Schedule, Monitor, Reload, and Troubleshoot ELT Processes
This section describes how to apply configuration settings to ensure Oracle Utilities Analytics Warehouse (OUAW) works smoothly over time.
Oracle Data Integrator with Oracle GoldenGate extracts, loads, and transforms data from the source database to the target database. Oracle GoldenGate captures the changes in the selected tables of the source schema and transfers the data to the replication schema. The tables in the replication schema are similar in structure to the source tables with a few additional columns added for history tracking and audit. Data retention in the replication schema is controlled by configuration stored in the metadata.
Based on the scheduler configuration, data from the replication schema is transferred by Oracle Data Integrator to the staging schema. The tables in the staging schema are similar to the tables in the target schema with a few additional columns for data transformations. There are no constraints on the staging tables. The foreign key mapping and other transformations are performed in the staging area. The data retention in the staging schema is controlled by configuration stored in the metadata.
From the staging schema, Oracle Data Integrator transfers data to the facts and dimensions in the target schema. Oracle Data Integrator also loads and refreshes the materialized views in the target schema.
Recommended Configuration
This section describes the recommended database configurations, as well as the script for estimating connection pool size.
Database
| Setting | Recommended |
|---|---|
| Open Cursors |
1000 Rationale: Oracle Data Integrator based ELT processes utilize database connections to perform transformations to load data into the data warehouse. Depending on the number of processes running in parallel, additional connections are created to the database. Oracle Analytics Server also uses the database connections to query and fetch data for the answers on various dashboards. Depending on the number of concurrent connected users, Oracle Analytics Server spawns additional database connections. Considering these standard database accesses and other ad-hoc database access, the open cursors parameter should be set to a minimum of 1000. The higher values may be set based on the implementation usage. |
Weblogic
| Setting | Recommended |
|---|---|
|
Connection Pool Size |
200 (Default is 12) Rationale: Each Oracle Data Integrator job utilizes a connection from the pool and the connection is released when not in use by the job. Oracle Utilities Analytics Warehouse ELT executes multiple jobs in parallel. The default configuration enables 6 parallel instances of each entity. This is particularly helpful during initial load when a large volume of historical data needs to be loaded into the data warehouse. Depending on the source system being configured, this can result in spawning up to 300 jobs. In case more than one source system is attached to Oracle Utilities Analytics Warehouse, this number can increase further. Ensure that the connection pool size is increased appropriately when increasing the max_parallel configuration for an entity or when attaching more than one source system. In case the connection pool is not sized appropriately, you will notice that many jobs go into the waiting state until a connection becomes available. |
Estimating Connection Pool Size
select round(
    greatest(
        sum(case when te.entity_type_flg in ('SCD1','SCD2') then max_parallel else 0 end),
        sum(case when te.entity_type_flg in ('FACT','RACC','SNAP')  then max_parallel  else 0  end)
        ) *.6,-2)  estimated_connection_pool_size
from
ndadm.b1_target_entity te , mdadm.b1_job_config jc
where jc.target_entity_id = te.target_entity_id;
Scheduling
-
There should be no errors that need reprocessing.
-
The maximum retries limit for the day should not be exceeded or reached.
-
Tasks wait for the configured retry interval before submitting a retry for the job.
-
Number of parallel jobs is always being limited to the maximum parallel configured.
-
Jobs are not executed beyond the time of the most recent Oracle GoldenGate sync or to a specified cut off time, whichever is less.
-
If a job is dependent on tables that are being synced by separate Oracle GoldenGate processes, then the common sync time of both processes is considered.
-
If a scenario does not exist, then the jobs are not executed.
-
An interface should be active.
-
All dependencies should be run.
-
The number of running/error instances of the job should be less than the maximum parallel executions allowed.
-
If the instance is configured as run once, then it should not execute once it is successfully executed.
-
If a job fails, it should be retried again until the maximum retries per day is reached. The interval between successive retries should be based on configuration.
-
Oracle GoldenGate models comprising of the source tables used in the entity should have been synced. In case the sync timestamps vary across multiple models, then the maximum sync timestamp is used.
-
The snapshot entities are executed on or after the snapshot end period.
-
The schedule time can be used to stagger loads and distribute processing. A job is not being executed until the current time crosses the scheduled time. See Administration > Target Entities Configuration for more information about scheduling jobs.
-
All job executions are internally managed by the scenario named B1_RUN_ALL. This is scheduled using Oracle Data Integrator to run every 1-10 minutes based on your requirements.
Monitoring the Jobs
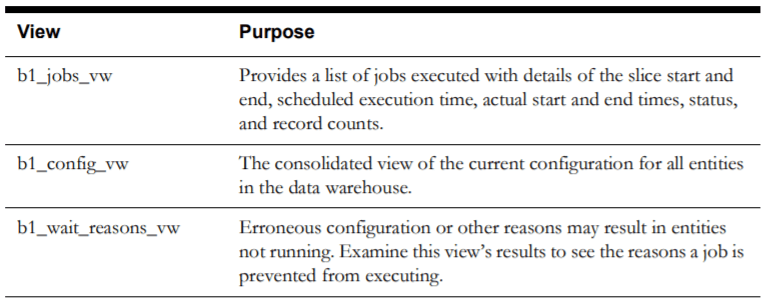
As jobs keep running on a regular basis, they are monitored or tracked to ensure that the required performance parameters are met. Jobs are created so that they are capable of automatic re-execution and retries. However, the reasons for the failures should be examined and appropriate actions taken to resolve the issues. The following views are provided for achieving this:
Debugging
Oracle Data Integrator jobs are designed to make it easy to examine the data that was processed to determine issues in the processing pipeline. To do this, staging tables are utilized that retain data for a configured duration. Each execution results in some data that has been processed from the replication layer into the staging area and then on to the target entity. Each such set is stored in the staging table with the session number to identify the executing session.
If a job fails or if you wish to examine how data was before it was loaded into the target, you can query the associated staging tables to view the data. The staging tables’ names are derived by prefixing the target entity name with "STG_".
Handling Errors
-
Oracle GoldenGate for replicating changes from the source to the target
-
Oracle Data Integrator to load data from the replication layer to the target
-
Oracle database to store and manage data in the different layers. Oracle data pump is utilized to perform the initial sync between the source and target database.
-
Failure of Initial Sync Processes: In case of an error, you can execute the initial sync process again and it resumes from where it left off. If the Oracle GoldenGate replication process is running while the initial sync is performed, it is possible that the process will fail due to the duplicate keys. Here are the steps to resolve the issue:
-
Stop the relevant replicat process.
-
Delete the data from the tables, which are listed in the error.
-
Execute the initial sync process again.
-
After the initial sync has been successfully loaded, start the replicat processes.
-
-
Failure of Oracle GoldenGate Processes: Oracle GoldenGate processes can fail if the source or the target database goes down or network connectivity fails between the source and the target. To identify whether Oracle GoldenGate processes are running properly, you should login to the server and run the command info all on the Oracle GoldenGate command prompt. If any jobs are listed as ABENDED or STOPPED, verify the reason for the error by looking at the Oracle GoldenGate logs and start the jobs. Oracle GoldenGate processes will restart from the point of failure and continue the replication processes.
-
Failure of Oracle Data Integrator Processes: The Oracle Data Integrator processes have been designed to automatically retry for a configurable number of attempts per day.
If the issue is related to a table space not being available or database connectivity issues, the jobs would automatically execute once the issue has been resolved. If the issue resolution is anticipated to take a few hours, it is advisable to disable the failing jobs for the duration of the fix.
Query the view B1_JOBS_VW in the metadata schema to identify if any jobs have failed. In case of a failure, the status_flg column will show 'E'. You can log into Oracle Data Integrator and filter by the session number (available in the jobs view) and look at the error encountered.
Any failures will roll back any changes to the target. A late arriving dimension will be tagged to a default key (-99) in the dimension, and these will be reprocessed in subsequent loads. If the dimensional data has arrived in the warehouse, then the foreign key references will be corrected automatically.
Reload the Data
Data warehouses are usually designed based on the assumption that data is added only once to the warehouse. Although rare, sometimes the data must be reloaded again to reset specific entities. Oracle Utilities Analytics Warehouse provides the functionality to reset and reload individual entities or all data associated with a specific instance of a source system.
Reload Replication Schema Tables
WARNING:
This should not be done in production environment, as the historical data would be lost.-
Log in to Oracle Data Integrator.
-
Navigate to the Load Plans and Scenarios section.
-
Select the scenario named B1_CLEANUP_REPLICATION, right-click it, and execute it.
-
In the dialog box, select the Context. For example, if you wanted to reset the replication schema for Oracle Utilities Work and Asset Management product instance 1, you would select the context WAM1.
After the B1_CLEANUP_REPLICATION is executed successfully, the initial load from source to replication can be done by executing the B1_SYNC_CONTEXT scenario.
Reset an Entity
-
Log in to Oracle Data Integrator.
-
Navigate to the Load Plans and Scenarios section.
-
Select the scenario named B1_RESET_ENTITY, right-click it, and execute it.
-
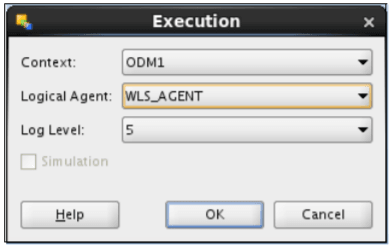
In the dialog box, select the Context. For example, if you wanted to reset the fact for Oracle Utilities Operational Device Management product instance 1, you would select ODM1.
-
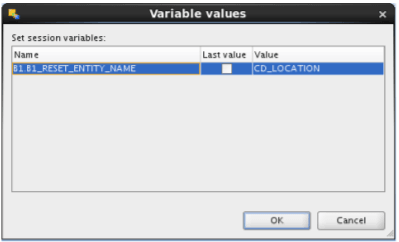
Clear the Last Value checkbox. Specify the variable value and click the Name field.
-
Click OK. This cleans up the metadata entries to execute the ELT job for this specific entity. The data loaded in the particular table for the entity will also be clear. Note that the ELT job for this entity will be in a “disabled” state.
Reset an Instance
-
Log in to Oracle Data Integrator.
-
Navigate to the Load Plans and Scenarios section.
-
Select the B1_RESET_INSTANCE scenario, right-click it, and run it.
-
In the dialog box, select the Context. For example, if you wanted to reset all entities for Oracle Utilities Operational Device Management product instance 1, you would select ODM1.

-
After verifying the configurations, enable all the entities to be loaded.
Note:
When a reset instance is done on the data warehouse, the materialized view refresh jobs that are subsequently triggered can result in an error. It may result in a materialized view refresh path error. This is a known behavior of the Oracle database. To work around this issue, manually perform a complete refresh of all the materialized views.
Reload the Extract Parameters
Note:
The ELT job that loads these parameters into the warehouse is configured to be initial load only. Any incremental changes to these parameters after the initial run are not going to be captured in Oracle Utilities Analytics Warehouse because they could cause inconsistencies in the loaded data. However, in case it is necessary to reconfigure the parameters, they can be changed in the source system and reloaded into the warehouse through the steps detailed in this section. The star schema tables also need to be truncated and reloaded.-
Modify the parameters in the source application. See Configure ETL Source for OUAW for details.
-
Regenerate the replication views of the source instance for which the parameters are being updated.
Note:
The "source instance" refers to the instance name given to the source in the Configure ETL Source for OUAW section. Example: ODM1.-
For Unix:
-
Navigate to the /bin directory.
-
Add Java 8 to the path variable:
export PATH=/bin:$PATH -
Run the following command:
runviewGenerator.sh -c <source instance>
-
-
For Windows:
-
Navigate to the /bin directory.
-
Add Java 8 to the path variable:
set PATH= \bin;%PATH% -
Run the following command:
runviewGenerator.cmd -c <source instance>
-
-
-
Reload all the facts for the source products. See Reset an Entity above for more details.
Reload the Bucket Configuration
Note:
All of the ELT jobs that load these bucket configurations into the warehouse are set to be initial load only. Any incremental changes to these buckets after the initial run are not captured in Oracle Utilities Analytics Warehouse because they could cause inconsistencies in the loaded fact data. However, in case it is necessary to reconfigure the buckets, certain additional steps need to be carried out to pull in the new configuration into the warehouse and ensure that it gets reflected in the star schema tables. The exact steps vary based on how the bucket configurations are used in the star schema ELT jobs. The following sections cover the possible scenarios. For details about which bucket configuration falls under which scenario, see Configure ETL Source for OUAW.Bucket Dimensions
This is the scenario where the configured buckets are loaded into dedicated bucket dimensions. The ELT jobs for the facts reference these bucket dimensions, and map a fact record to an appropriate bucket configuration record in the dimension. This is the typical scenario that most bucket configurations fall under.
-
Make the necessary changes to the bucket configurations in the source application.
-
Identify the bucket dimensions for the updated bucket configurations. See Configure ETL Parameters and Buckets for details.
-
The data that has been loaded into the bucket dimensions needs to be cleared and reloaded with the updated configuration. Both the dimensions and its related facts need to be reloaded. This list can be identified using the star schema mapping details provided in the Data Mapping Guides for the respective source product.
-
Follow the steps mentioned in Reset an Entity above to reload the bucket dimensions and related facts.
-
Reset the fact tables and the bucket dimensions.
-
When re-enabling the ELT jobs, enable the bucket dimensions and the facts.
Facts Referencing Bucket Configuration
This is the scenario where bucket configurations can be referenced by the fact ELT directly. This is a special use of the bucket configurations where a fact ELT would try to calculate a measure value based on the configured bucket ranges. Few bucket configurations fall under this scenario.
-
Make the necessary changes to the bucket configurations in the source application. For this type of bucket configuration where there is no dedicated bucket dimension, the data is loaded in the metadata table B1_RANGE_LOOKUP in the MDADM schema.
-
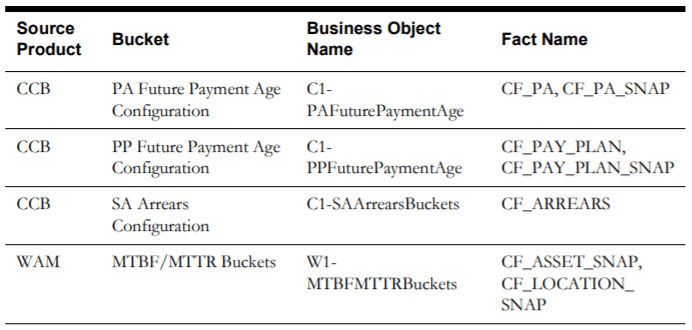
Delete the existing rows in the MDADM.B1_RANGE_LOOKUP table for the specific bucket whose configurations are being updated. The table below identifies the bucket business object name for each source product. The business object name is stored as the range code in the metadata table and can be used to identify the rows to be deleted.
-
Reload the updated bucket configuration once the identified rows are deleted from the metadata table.
-
For Unix:
-
Navigate to the /bin directory.
-
Add Java 8 to the path variable:
export PATH=/bin:$PATH -
Run the following command:
runviewGenerator.sh -c
-
-
For Windows:
-
Navigate to the /bin directory.
-
Add Java 8 to the path variable:
set PATH= \bin;%PATH% -
Run the following command:
runviewGenerator.cmd -c <source instance>
-
-
-
Identify the affected facts for which the bucket configurations are updated (mentioned in the table in step 2). See Configure ETL Parameters and Buckets for details.
-
Follow the steps mentioned in Reset an Entity above to reload the related facts. This needs to be done because the data that had been loaded into these facts would have been using the older bucket configuration, which gets invalidated when the configuration changes.
Dimensions Referencing Bucket Configurations
This is the scenario where bucket configurations can be referenced by the dimension ELT directly. These would be like any other dimension with attribute columns, but will also have the bucket range values. It is a special use of the bucket configurations where the dimension ELT would try to map a value in the dimension (for example, condition score of an asset) to a matching bucket range it falls into, and populate the bucket range details in the dimension. Few bucket configurations fall under this scenario.
-
Make the necessary changes to the bucket configurations in the source application. For this type, the data is loaded in the metadata table B1_RANGE_LOOKUP in the MDADM schema.
-
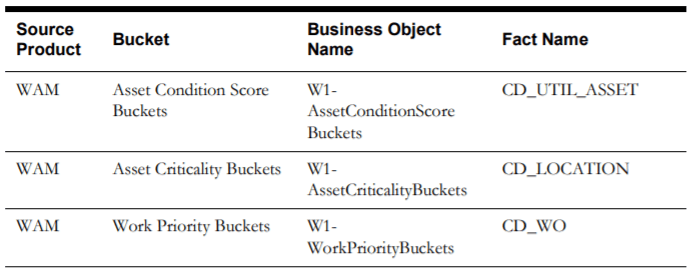
Delete the existing rows in the MDADM.B1_RANGE_LOOKUP table for the specific bucket whose configurations are being updated. The following table identifies the bucket business object name for each source product. The business object name is stored as the range code in the metadata table and can be used to identify the rows to be deleted.
-
Reload the updated bucket configuration after the identified rows are deleted from the metadata table.
-
For Unix:
-
Navigate to the /bin directory.
-
Add Java 8 to the path variable:
export PATH=<path to JDK directory>/bin:$PATH -
Run the following command:
runviewGenerator.sh -c <source instance>
-
-
For Windows:
-
Navigate to the /bin directory.
-
Add Java 8 to the path variable:
set PATH= \bin;%PATH% -
Run the following command:
runviewGenerator.cmd -c <source instance>
-
-
-
Identify the affected dimensions for which the bucket configurations are updated using the table above. See Configure ETL Parameters and Buckets for details.
-
Follow the steps mentioned in the Reset an Entity above to reload the related dimensions and facts. This needs to be done because the data loaded into these dimensions might use the older bucket configuration, which gets invalidated when the configuration changes. Since the dimensions are referenced by facts, the dependent facts on the affected dimensions have to be reloaded.