Setting Up the Integration Process
The following sections describe the steps to configure the integration pack to meet the requirements for this integration.
Configuring Oracle Integration Cloud
Oracle Integration Cloud is a complete, secure, but lightweight integration solution that enables to connect your applications in the cloud. It simplifies connectivity between the applications, and connects both the applications that live in the cloud and those that still are on-premises.
Oracle Integration Cloud provides secure, enterprise-grade connectivity regardless of the applications you are connecting or where they reside. The adapters simplify connectivity by handling the underlying complexities of connecting to applications using industry-wide best practices. Only a connection has to be created that provides minimal connectivity information for each system.
To use any Oracle Integration Cloud integration, do the following:
1. Download the integration package from the Oracle Market Place.
2. Import the package into the Oracle Integration Cloud server and configure the connections.
3. Update connections with the respective edge application's catalog URLs and activate the integration before doing the end-to-end testing.
Perform the following tasks to configure the Oracle Integration Cloud integration:
Working with Install Agent
Create an agent group in Oracle Integration Cloud and install agent on the on-premises server before creating/activating an integration in which messages are exchanged between the on-premises applications and Oracle Integration Cloud.
The agent related configurations are needed only if the server points to an on-premises application. The possible combinations are as follows:
Important: While modifying the configuration of any cloud and on-premises application combination, make sure that the package is downloaded from Oracle Market Place. Please do not download the package from the existing Oracle Integration Cloud environment.
Oracle Utilities Operational Device Management on Cloud and Oracle Utilities Meter Data Management on Cloud
When both the edge applications are on cloud, the connectivity agent is not required and an agent group need not be created in Oracle Integration Cloud.
Perform the following steps:
1. Import the integration package from Oracle Market Place.
For instructions to import an integration package, refer to the Importing Pre-built Integration Packages section.
2. Edit the Oracle Utilities Operational Device Management and Oracle Utilities Meter Data Management connections.
For instructions to edit the application connections, refer to the Configuring Connections section.
3. Activate the integrations.
For instructions to activate the integration, refer to the Activating Integration Flows section.
The following table shows the complete setup in edge applications/Oracle Integration Cloud required for this combination.
Integration Scenario | ODM | MDM |
|---|---|---|
Application is on cloud | Yes | Yes |
Application is on-premises | No | No |
Need Agent group in Oracle Integration cloud connection | No | No |
Install Agent on-premises | No | No |
Oracle Utilities Operational Device Management on Cloud and Oracle Utilities Meter Data Management On-Premises
When Oracle Utilities Operational Device Management is on cloud and Oracle Utilities Meter Data Management is on-premises:
1. Create an agent group ‘UAG’ in Oracle Integration Cloud.
For instructions to create an agent group, refer to the Create an Agent Group section.
2. Install the agent in Oracle Utilities Meter Data Management on-premises server.
For steps to download the agent installer and install on-premises, refer to the Downloading Agent Installer and Install On-Premises Agent sections.
3. Import the integration package.
For steps to import the integration package, refer to the Importing Pre-built Integration Packages section.
4. Edit the Oracle Utilities SOAP MDM for ODM-MDM connection.
a. Update the catalog URL and security details.
b. Check if the agent group is displayed in the Agent Group section.
c. Save and test the connection.
For steps to configure an Oracle Utilities Meter Data Management connection, refer to Configuring the Oracle Utilities Meter Data Management Connection section.
5. Edit the Oracle Utilities SOAP ODM for ODM-MDM connection.
a. Update the catalog URL and security details.
b. If UAG is displayed in the Agent Group section, remove it. It is not needed since Oracle Utilities Operational Device Management is on cloud.
c. Save and test the connection.
For steps to configure an Oracle Utilities Operational Device Management connection, refer to Configuring the Oracle Utilities Operational Device Management Connection section.
6. Activate the integrations.
For steps to activate the integration, refer to the Activating Integration Flows section.
The following table shows the complete setup in edge applications/Oracle Integration Cloud required for this combination.
Integration Entities | ODM | MDM |
|---|---|---|
Application is on cloud | Yes | No |
Application is on-premises | No | Yes |
Need Agent group in Oracle Integration cloud connection | No | Yes |
Install Agent on-premises | No | Yes |
Oracle Utilities Operational Device Management On-Premises and Oracle Utilities Meter Data Management on Cloud
When Oracle Utilities Operational Device Management is on-premises and Oracle Utilities Meter Data Management is on cloud, perform the following steps:
1. Create an agent group ‘UAG’ in Oracle Integration Cloud.
For instructions to create an agent group, refer to the Create an Agent Group section.
2. Install the agent in Oracle Utilities Operational Device Management on-premises server.
For steps to download the agent installer and install on-premises, refer to the Downloading Agent Installer and Install On-Premises Agent sections.
3. Import the integration package.
For steps to import the integration package, refer to the Importing Pre-built Integration Packages section.
4. Edit the Oracle Utilities SOAP ODM for ODM-MDM connection.
a. Update the catalog URL and security details.
b. Check if the agent group is displayed in the Agent Group section.
c. Save and test the connection.
For steps to configure an Oracle Utilities Operational Device Management connection, refer to Configuring the Oracle Utilities Operational Device Management Connection section.
5. Edit the Oracle Utilities SOAP MDM for ODM-MDM connection.
a. Update the catalog URL and security details.
b. If UAG is displayed in the Agent Group section, remove it. It is not needed since Oracle Utilities Operational Device Management is on cloud.
c. Save and test the connection.
For steps to configure an Oracle Utilities Operational Device Management connection, refer to Configuring the Oracle Utilities Meter Data Management Connection section.
6. Activate the integrations.
For steps to activate the integration, refer to the Activating Integration Flows section.
The following table shows the complete setup in edge applications/Oracle Integration Cloud required for this combination..
Integration Entities | ODM | MDM |
|---|---|---|
Application is on cloud | No | Yes |
Application is on-premises | Yes | No |
Need Agent group in Oracle Integration Cloud connection | Yes | No |
Install Agent on-premises | Yes | No |
Create an Agent Group
Create an agent group in Oracle Integration Cloud before running the agent installer. When the on-premises agent is installed in the environment, the on-premises agent is associated with the agent group identifier. Only one on-premises agent can be associated with an agent group. For a single Oracle Integration Cloud instance, you can create up to five agent groups. Creating the agent group also creates the necessary queues required for message exchange.
To create an agent group:
1. On the Oracle Integration Cloud Home page, click Agents.
2. Click Create Agent Group.
3. Enter the following information and click Create.
• Agent Group Name
• Identifier
• Agent Type: "Connectivity Agent"
• Description
Note: The agent group name and identifier must be same.
Downloading Agent Installer
Download the agent installer from Oracle Integration Cloud and run the installer to install the on-premises agent in your local environment.
During the installation, associate the agent with the Agent Group Identifier generated when creating an agent group in Oracle Integration Cloud.
For more information on agent installer, see https://docs.oracle.com/en/cloud/paas/integration-cloud/integrations-user/downloading-and-running-premises-agent-installer.html
Install On-Premises Agent
To install an on-premises agent:
1. On the Oracle Integration Cloud Home page, click Agents.
2. Click Download.
3. Select Connectivity Agent.
4. Select Save File when prompted to save the file to a directory location on your on-on-premises host.
5. Navigate to that directory and unzip oic_connectivity_agent.zip.
6. Change the file permissions to be executable.
7. Modify InstallerProfile.cfg to include the following information.
# Required Parameters
# oic_URL format should be https://hostname:sslPort
oic_URL=https://icshost:sslport
agent_GROUP_IDENTIFIER=
#Proxy Parameters
proxy_HOST=
proxy_PORT=
proxy_USER=
proxy_PASSWORD=
proxy_NON_PROXY_HOSTS=
8. Set the JAVA_HOME property to the directory/folder where JDK is installed.
9. Run the connectivity agent installer from the command prompt.
java -jar connectivityagent.jar
10. Provide the Oracle Integration Cloud credentials when prompted.
11. Wait for a successful installation message to appear.
After the installation is complete, an agent instance is created to interact with Oracle Integration Cloud.
To verify if the agent instance was created:
1. Navigate to the Agent Groups page.
2. Check if the agent count increased by one. Click the number to view the agent details.
Note: For more details, refer to Oracle Integration Cloud documentation at https://docs.oracle.com/en/cloud/paas/integration-cloud-service/index.html
Importing Pre-built Integration Packages
Every integration point is shipped as a package (.par) file.
To import a pre-built integration from Oracle Market Place:
1. Open the Oracle Market Place portal.
2. Click Applications.
3. Browse through the list of applications and select the pre-built integration package to import.
4. When prompted, select the server where the pre-built integration file should be uploaded.
The pre-built integration is imported as a package file that is visible on the Packages page in Oracle Integration Cloud. On the Integrations page, you can view the individual integrations of that imported package file that are designated with a BUILT BY ORACLE message.
Configuring Connections
After a successful import, the following connections are available in your Oracle Integration Cloud environment by default.
• Oracle Utilities SOAP ODM for ODM-MDM - Oracle Utilities Operational Device Management connection.
For steps to configure this connection, refer to the Configuring the Oracle Utilities Operational Device Management Connection section.
• Oracle Utilities SOAP MDM for ODM-MDM - Oracle Utilities Meter Data Management connection.
For steps to configure this connection, refer to the Configuring the Oracle Utilities Meter Data Management Connection section.
Configuring the Oracle Utilities Operational Device Management Connection
To configure an Oracle Utilities Operational Device Management connection:
1. On the Oracle Integration Cloud Home page, click Connections.
2. On the Connections page, search for the connection name: Oracle Utilities SOAP ODM for ODM-MDM.
3. From the Actions menu, select Edit. You can alternatively click the connection name. The Connection page is displayed.
4. Enter the URL for the Oracle Utilities Operational Device Management web service catalog in the Catalog URL field.
5. Click OK.
6. Click Configure Security and select a security policy.
7. Enter the respective details in the Username, Password, and Confirm Password fields.
8. Check if the UAG agent group is displayed in the Agent Group section.
If the integration uses the Oracle Utilities Operational Device Management Cloud environment, remove this agent group from the connection page.
9. Click OK.
10. Click Test in the upper-right corner of the page.
11. Click Save to save the connection.
Configuring the Oracle Utilities Meter Data Management Connection
To configure the Oracle Utilities Meter Data Management connection:
1. On the Oracle Integration Cloud Home page, click Connections.
2. On the Connections page, search for the connection name: Oracle Utilities SOAP MDM for ODM-MDM.
3. From the Actions menu, select Edit. You can alternatively click the connection name. The Connection page is displayed.
4. Enter the URL for the Oracle Utilities Meter Data Management web service catalog in the Catalog URL field.
5. Click OK.
6. Click Configure Security and select a security policy.
7. Enter the respective details in the Username, Password, and Confirm Password fields.
8. Check if the UAG agent group is displayed in the Agent Group section.
If the server point to the Oracle Utilities Meter Data Management cloud environment, remove this agent group.
9. Click OK.
10. Click Test in the upper-right corner of the page.
11. Click Save to save the connection.
Activating Integration Flows
After the package is imported, the integration process gets deployed in the Oracle Integration Cloud environment. The integration can now be activated to the run-time environment.
Note: An integration is eligible for activation only if the connections, mappings, tracking, etc. are specified.
To activate an integration flow:
1. On the Oracle Integration Cloud Home page, click Integrations.
2. Select an integration to be activated from the Integrations list.
3. Click the PENDING ACTIVATION slider.
4. To collect detailed logging information about messages processed by this integration flow at runtime, select Enable detailed tracing.
Detailed tracing may affect performance. To disable tracing, you must deactivate the integration, and then reactivate it without selecting the Enable detailed tracing check box.
To access the detailed trace logging information, refer to Monitoring Integration Flows using Oracle Integration Cloud Logs section.
5. If the activation is successful, the status of the integration changes to ACTIVE in the list. If it fails, an error message is displayed at the top of the Integrations page.
For information to troubleshoot the activation error, refer to the Troubleshooting section.
6. To view active integrations, click the integration name. Alternatively, you can select View from the menu to the right.
7. The active integrations are displayed as read-only. You will not be able to do any of the following:
• View Save or Actions buttons.
• Add adapters as there is no Connections Palette.
• Modify configuration details, such as the business identifiers under the Tracking tab, the source-to-target and target-to-source mappings in the mapper, and the configurations on the pages of the connection wizards.
Testing Integration Flows
An integration process can be tested only after it is activated.
To test an integration:
1. Check if the integration is activated.
2. In the Integrations list, click the How to run icon for an integration. It displays the WSDL URL of that integration to use for testing.
3. Test the integration.
• To test only the integration process, test the WSDL URL retrieved in step 2 in SOAP UI.
• To perform an end-to-end testing, configure the integration flow endpoint in the edge application.
For instructions to configure Oracle Utilities Operational Device Management, refer to the Message Sender section. For instructions to configure Oracle Utilities Operational Device Management, refer to the Message Sender section.
4. After the necessary configurations are in place, create data in the application.
5. Run the respective batch job to trigger the sync request that invokes the integration service.
Setting Up Security
As part of the Oracle Utilities Integration for Device Operations Using Oracle Integration Cloud, Certificate mechanism is used to communicate with the application.
A Certificate Authority (CA) is a trusted entity that issues electronic documents that verify a digital entity's identity on the Internet. The electronic documents, which are called digital certificates, are an essential part of secure communication and play an important part in the public key infrastructure (PKI).
CA-signed certificates are used to communicate with the source applications as part of the Utilities adapter.
To upload the CA-signed certificates to Oracle Integration Cloud:
1. Log into the Oracle Integration Cloud as an Administrator.
2. Navigate to Settings > Certificates.
3. Click Upload.
4. Select Certificate Type as Trust Certificate.
5. Provide the Certificate Alias Name and choose the certificate to be uploaded.
6. Click OK.
Configuring Lookups
A lookup associates values for a specific field used by an application to the values for the same field used by other applications. This provides the capability to map values across vocabularies or systems. The tables are reusable across multiple integrations.
The lookup maps can be imported and exported to CSV format, allowing for reuse across Cloud to on-on-premises implementations.
Editing Lookups
To add any new record in the lookup:
1. On the Oracle Integration Cloud Home page, click the Lookup icon.
2. From the list of lookup tables, click the Lookup to be edited.
3. Click + next to the column names (adapter or domain name).
4. Enter/modify the values in the field below the adapter or domain name.
5. To add more rows for additional values, click +.
6. Click Save when complete.
Lookup Name | Integration Point | Description |
|---|---|---|
OUTL-BRT-ODM_MDM_ErrorCode | All Integration points | Maps error codes in Oracle Utilities Meter Data Management to Oracle Utilities Operational Device Management and Oracle Utilities Operational Device Management to Oracle Utilities Meter Data Management. |
OUTL-BRT-ODM_MDM_AssetDeviceType | Asset Device Sync | Maps Oracle Utilities Operational Device Management asset type to corresponding Oracle Utilities Meter Data Management device type |
OUTL-BRT-ODM_MDM_AssetDeviceStatus | Asset Device Sync | Maps Oracle Utilities Operational Device Management asset status to corresponding Oracle Utilities Meter Data Management device status. |
OUTL-BRT-ODM_MDM_DisconnectLocation | SP Node Sync | Maps Oracle Utilities Meter Data Management disconnect location code to corresponding Oracle Utilities Operational Device Management disconnect location code. |
OUTL-BRT-ODM_MDM_NodeDisposition | SP Node Sync | Maps Oracle Utilities Meter Data Management Measurement node disposition to corresponding Oracle Utilities Operational Device Management node disposition. |
OUTL-BRT-ODM_MDM_SPNodeType | SP Node Sync | Maps Oracle Utilities Meter Data Management service point type to corresponding Oracle Utilities Operational Device Management node type. |
OUTL-BRT-ODM_MDM_Country | SP Node Sync | Maps Oracle Utilities Meter Data Management country code to corresponding Oracle Utilities Operational Device Management country code. |
OUTL-BRT ODM_MDM_OkToEnterCode | SP Node Sync | Maps Oracle Utilities Meter Data Management ok to enter code (values are yes or no) to corresponding Oracle Utilities Device Management Ok To Enter code. |
OUTL-BRT-ODM_MDM_TimeZone | SP Node Sync | Maps Oracle Utilities Meter Data Management time zone code to corresponding Oracle Utilities Operational Device Management time zone code. |
OUTL-BRT-ODM_MDM_LifeSupportSensitiveLoad | SP Node Sync | Maps Oracle Utilities Meter Data Management Life Support Sensitive Load flag to corresponding Oracle Utilities Operational Device Management life support sensitive load flag. |
OUTL-BRT-ODM_MDM_ContactType | Contact Sync | Maps Oracle Utilities Meter Data Management Contact Type value to corresponding Oracle Utilities Operational Device Management Contact Type value. |
OUTL-BRT-ODM_MDM_Email | All Integration points | Lookup to configure and map email ids in From & To fields in Notification activity. |
OUTL-BRT-ODM_MDM_ConfigProperties | All Integration points | Lookup to enable custom asset movement flag and email notifications. |
OUTL-BRT-ODM_MDM_MO | All Integration points | Maps Oracle Utilities Meter Data Management Maintenance Object value to the corresponding Oracle Utilities Operational Device Management Maintenance Object value. |
Error Handling
The integration includes two types of errors:
• Business Errors – Triggered when the target application throws any data related errors. Business errors are sent back to the source application and can be re-tried from there.
• Technical Errors – Triggered when there are connectivity issues between the integration layer and application or any assignment errors (sub language execution faults). Technical errors are sent to the source application.
In both cases an email notification will be sent to the people defined in the property “to” from OUTL-BRT-ODM_MDM_Email lookup. This notification will only be sent if the property “email.flag” is set to “true” within OUTL-BRT-ODM_MDM_ConfigProperties lookup.
The following diagram depicts the process for error handling: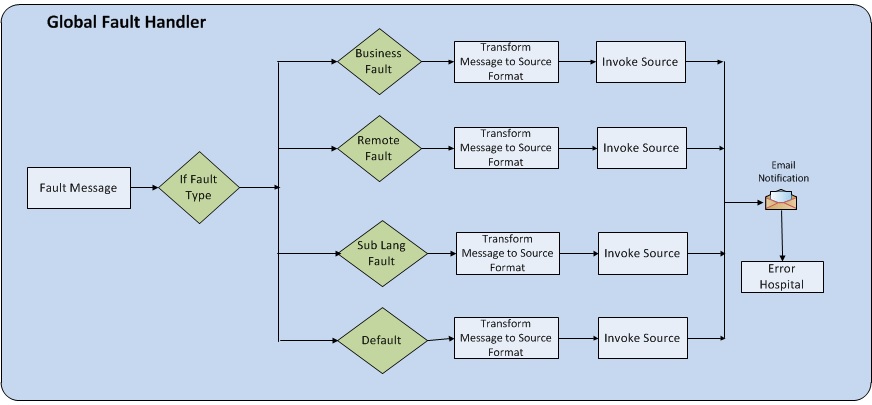
Error Handling Process Diagram
Email Notifications
Whenever there is a fault in the integration flow, an email notification is sent to the recipient.
To receive an email with error details, provide a valid email ID in the To field of the Notification activity.
To edit the To field:
1. On the Oracle Integration Cloud Home page, click the Lookup icon.
2. On the Lookup page, edit the OUTL-BRT-ODM_MDM_Email lookup table.
The lookup has the following columns:
Recipient email_id
from abc@domain.com
to xyz@domain.com
3. Provide the valid email address in the email_id column.
4. Click Save to save the changes.
Customizations
Define a custom template in the existing main XSL. Apply the template just before the root element's closing tag. For any extra mappings, edit the custom template.
To add custom mappings, do the following:
1. Export the integration process (.iar).
2. Edit the respective XSL file.
3. Add the custom code/mappings to the custom template.
4. Import the updated XSL in the integration.
5. Save the changes and activate the integration flow.
6. Test the flow to check if the customized changes are in place.