Configuring Manage Web Account Requirements
Manage Web Account configuration includes defining the identifiers used by customers to connect and verify their web account and utility accounts, creating person contacts to support web users, and defining invite guest user tasks and alerts.
Note: This documentation provides steps to complete these configuration tasks using Oracle Utilities Customer Care and Billing. However, many of these tasks can be completed with other applicable products such as Oracle Utilities Customer to Meter or Oracle Utilities Customer Cloud Service. Refer to your applicable product documentation for steps to complete the configuration using your Oracle Utilities product. Additionally, this documentation assumes that you know how to create the various objects listed below as well as modify or create master configurations. For additional details on these tasks, refer to the applicable Oracle Utilities Documentation.
Defining Account Verification and Account Connection Identifiers
Customers can link their web account for Digital Self Service - Transactions to utility accounts using approved identifiers. Groups of identifiers can be defined to provide customers options to verify and connect their accounts. For example, identifiers can be created to require a social security number, along with one of multiple phone numbers for the customer, to verify account connection.
To define account verification and account connection identifiers:
Complete the following steps to define the accepted identifiers that customers can use for account verification and connection:
- Log in to Customer Care and Billing as a user with edit access for the CC&B Self-Service Integration master configuration.
- From Menu, select Self-Service, select Self-Service Task Type, and select Add. The Select Business Object dialog box opens.
- From the Service Task Type Business Object drop-down list, select Account Verification Task Type (AND/OR), and then select OK. The Account Verification Task Type dialog box opens.
- Complete the following information for the self-service task type:
- Service Task Type: ACCOUNT-VERIFY-AND-OR
- Description: Account Verify (and/or)
- Related Transaction Object: Account Verification Task (AND/OR)
- Service Task Type Status: Active
- Service Task Class: Self-Service
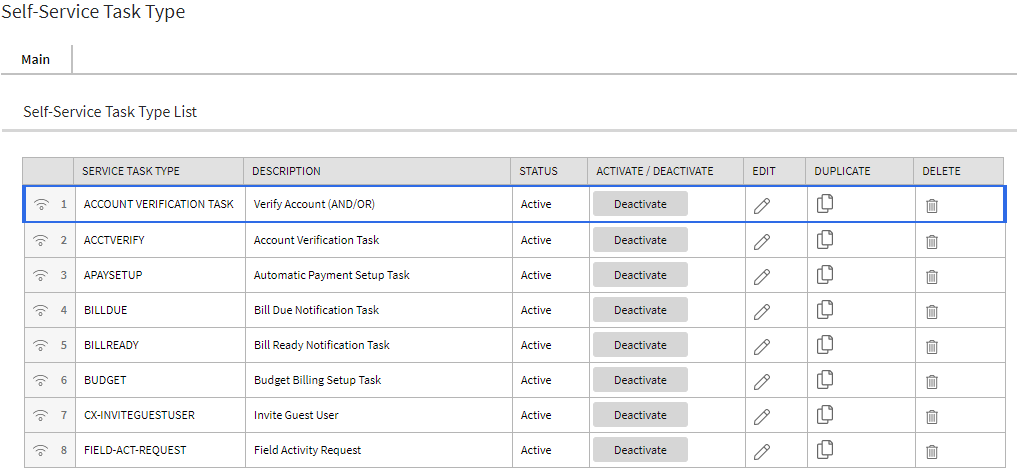
- To confirm the self-service task type has been created, from Menu, select Self-Service, select Self-Service Task Type, and select Search. Confirm the new self-service task is in the list, as shown below.
- From the Admin menu, select General, and select Master Configuration. From the Master Configuration zone, select the Edit option for the CC&B Self-Service Integration master configuration. The master configuration is displayed.
- From the Self-Service Tasks zone, select the plus icon to add a new self-service task and select the account verification task type created earlier:
- Service Task: Account Verification (AND/OR)
- Service Task Type: Account Verify (and/or)
- Customer Contact Class and Customer Contact Type: Customer contacts track the creation of self-service tasks to aid customer service representatives in reviewing tasks created for an account. In addition to selecting applicable customer contacts with these options, review Logging Self-Service Tasks for more information on configuring customer contacts.
- From the Line of Business Verification Fields zone, click the plus icon to add each applicable classification of accounts. This typically includes one for Commercial or Industrial customers, and one for Residential customers, as shown in the example below. The following steps must be completed for each line of business you define.
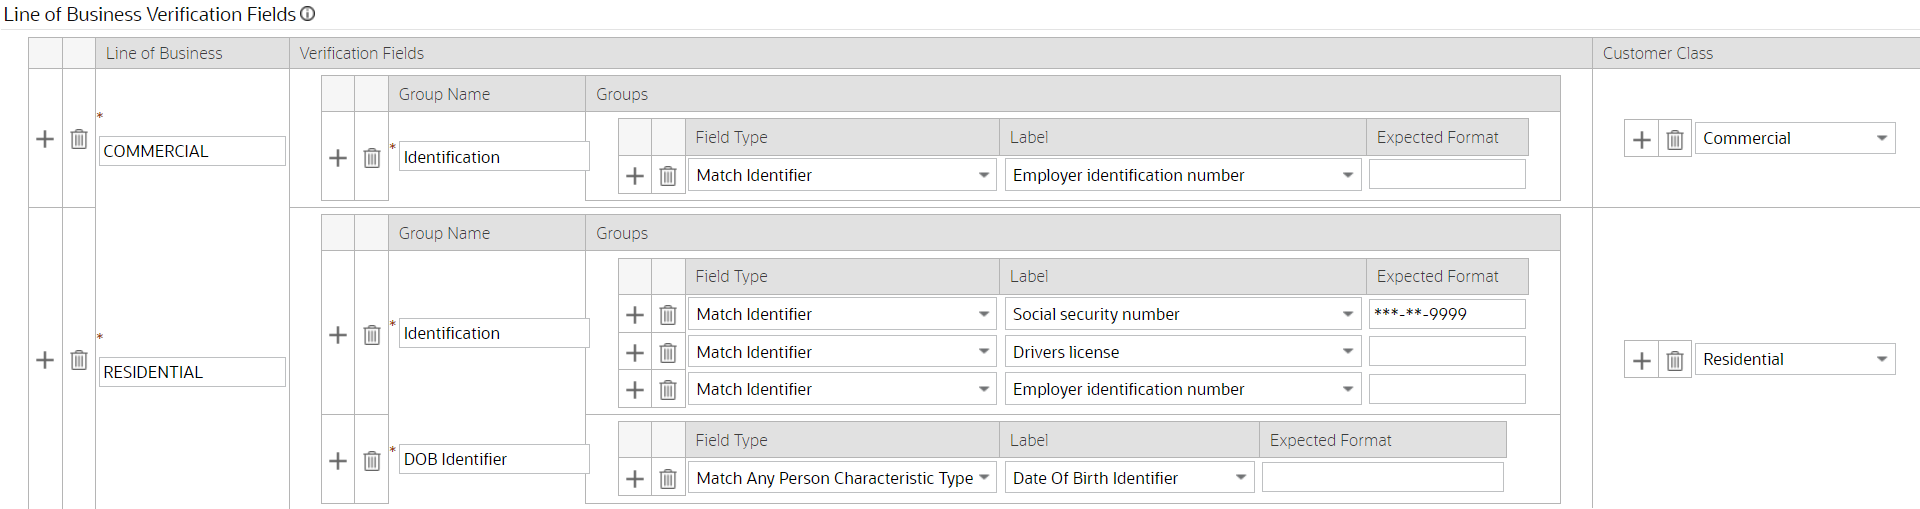
- Define the verification fields for each line of business. This includes creating one or more groups which contain one or more verification fields:
- Groups: Define a group to create an identity verification requirement. A customer must provide at least one verification field from each group to successfully connect an account. For example, one group can include a social security number requirement, and a second group can include multiple customer phone numbers that a customer can select from to provide. This configuration would make the social security number required, while allowing some flexibility on which phone number a customer can use.
- Verification Fields: Define the verification fields for each group. Within a group, all verification fields are valid options for customers to use to meet that group identity requirement. If there is a single verification field in a group, that verification field is required. By comparison, if a group has four verification fields, a customer must provide at least one of the four verification fields to meet that groups identify requirement.
- To define a verification field, use the appropriate Field Type and Label, which determines the values that a customer is prompted for when providing the identifying information. For example, a Field Type of Match Identifier and a Label of Driver's license prompts customers to provide a driver's license ID for verification.
- If you require only part of an ID to be entered for verification purposes, use the Expected Format field to specify the parts of the ID that need to be entered. Use
9as a placeholder for digits andAas placeholder for letters. For example, to specify that only the last four digits of a social security number need to be entered, specify a Expected Format value of***-**-9999. Be aware of the following when configuring an Expected Format:- The Field Type must be Match Identifier for the Expected Format to be applied.
- The application does not validate the Expected Format, therefore it is important to ensure the Expected Format value is compatible with the ID.
- Alphanumeric placeholders are not supported.
- Configure any applicable Customer Class for each line of business as required to support self-service transaction logging.
- Click Save to save the master configuration changes.
Creating a Person Contact Type for Web Users
Person contact types are required to support web users of Digital Self Service - Transactions.
Note: Various contact types are supported for users of Digital Self Service - Transactions. Defining phone contact types for users is described in Defining Phone Contact Types .
To create person contacts for web users
- Log in to Customer Care and Billing.
- From the Admin menu, select Customer, select Person Contact Type, and select Add. The Person Contact Type page is displayed.
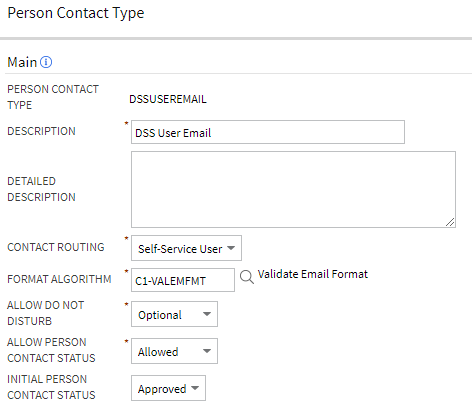
- Complete the following information to create the person contact type for Digital Self Service - Transactions:
- Person Contact Type: The internal identifier of the person contact type. This example uses DSSUserEmail.
- Description: The internal description of the person contact type. This example uses DSS User Email.
- Contact Routing: Self-Service User
- Format Algorithm:
C1-VALEMFMT - Allow Do Not Disturb: Define whether do not disturb information can be collected for users.
- Allow Person Contact Status: Allowed
- Select Save to create the person contact type.
- From the Admin menu, select General, and select Master Configuration. From the Master Configuration zone, select the Edit option for the CC&B Self-Service Integration master configuration. The master configuration is displayed.
- From the Link Self Service User zone, in Web User Person Contact Type enter the person contact type identifier you created earlier. For this example, enter DSSUserEmail.
- Select Save to save the master configuration changes.
Defining Invite Guest User Tasks, Roles, and Alerts
Customers can invite guest users to access their utility account. You must define the tasks, roles, and alerts that support guest user invitations.
Note: Guest user accounts use the same identifiers that are defined as part of Configuring New Service Information and Requirements.
To define an invite guest user self-service task type:
- Log in to Customer Care and Billing.
- From Menu, select Self-Service, select Self-Service Task Type, and select Add. The Select Business Object dialog box opens.
- From the Service Task Type Business Object drop-down list, select Web User Invitation Task Type and click OK. The Maintenance page opens.
- Complete the following information for the self-service task type:
- Service Task Type: CX-INVITEGUESTUSER
- Description: Invite Guest User
- Related Transaction Object:
CX-WebUserInvitationTask - Service Task Type Status: Active
- Service Task Class: Self-Service
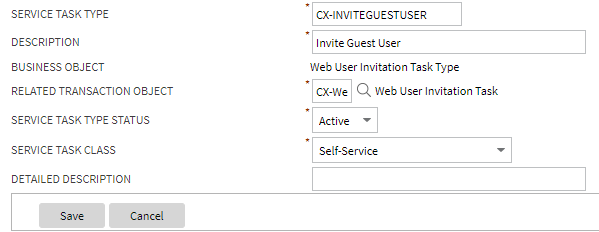
- Click Save to create the self-service task type.
- From the Admin menu, select General, and select Master Configuration. From the Master Configuration zone, select the Edit option for the CC&B Self-Service Integration master configuration. The master configuration is displayed.
- From the Self-Service Tasks zone, click the plus icon to add an entry. From the Service Task drop-down list select Invite Guest user, and from the Service Task Type drop-down list select the Invite Guest User self-service task type you created earlier in this procedure.
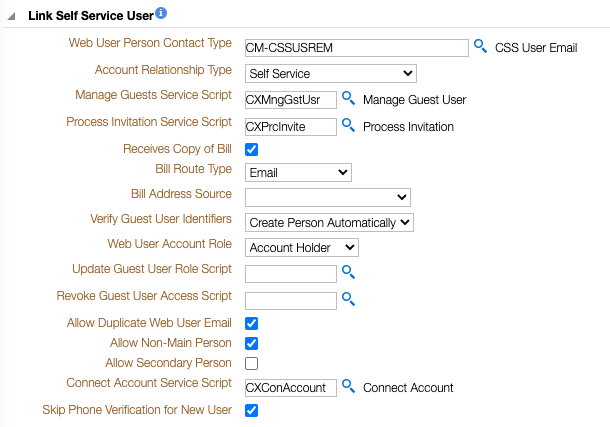
Customer contacts track the creation of self-service tasks to aid customer service representatives in reviewing tasks created for an account, and are configured using Customer Contact Class and Customer Contact Type. In addition to selecting applicable customer contacts with these options, review Logging Self-Service Tasks for more information on configuring customer contacts. - From the Link Self Service User zone, complete the following configurations to apply the required scripts and definitions to manage guest users and process guest user invitations:
- Account Relationship Type: Select the applicable account relationship type for your environment.
- Manage Guests Service Script:
CXMngGstUsr - Process Invitation Service Script:
CXPrcInvite - Receives Copy of Bill: Ensure that this checkbox is selected to support guest user accounts.
- Bill Route Type: Select whether guest users receive bills through email or a postal address. The most common configuration for guest users is to receive bills through email.
- Bill Address Source: Select the applicable address source for guest users that provides the address for the bill route type selected above.
- Verify Guest User Identifiers: Select one of the following options depending on whether guest users can complete their guest user access creation through self-service or must call the utility for support:
- Create Person Automatically: Guest users without applicable person contact types can accept invitations and have the person contact type automatically created.
- Verify Identifiers Manually: Guest users without applicable person contact types can accept invitations and then receive a message to contact the utility to complete the guest user creation process.
- Web User Account Role: Select a default role to be applied during guest invitation in the event that the role that was selected for the guest invitation would modify the guest user from a financially responsible role to a non-financially responsible role. In this scenario, this default role is applied to the guest account. If no default role is defined using this configuration, the role selected in the guest user invitation is used regardless of financial responsibility changes.
- Update Guest User Role Script: Select the script
CXGURolUpElgto confirm that the financial responsibility of a guest user account is not changed due to a user role update. Any user role updates that change a guest user's financial responsibility are prohibited. If you do not define a script, all user role updates are allowed regardless to changes in financially responsibility for the guest user account. - Revoke Guest User Access Script: Select the script
CXRvGuAccessto enable self-service removal of guest users. If a guest user account is defined as financially responsible for the account, the removal is prohibited and the guest user or main account holder must contact the utility. If you do not define a script, all guest user removals are allowed. - Allow Duplicate Web User Email: Select this checkbox to allow multiple accounts to use the same email address.
- Allow Non-Main Person: By default, this option is cleared and Digital Self Service - Transactions requires a single web user to be associated with a single person in the system. In this scenario, a customer can only connect to accounts where they are defined as the main person. Oracle Utilities recommends this approach along with a single person in the system being associated with a single customer.
The Allow Non-Main Person option, when selected, allows a web user to connect to accounts where they are not the main person through the use of the main person’s identifiers. Any persons connected in this manner are treated as guest users on the account. This can allow for scenarios such as multiple units of an apartment building having their accounts, each of which have different persons, connected to a single web user. While this method can support this behavior, Oracle Utilities instead recommends using the standard invite guest user features provided with Digital Self Service - Transactions to allow additional users to connect their accounts and perform required account management. - Allow Secondary Person: Select this checkbox to allow secondary persons already linked to the account in Customer to Meter to connect the account to their web user using their own person identifiers. These secondary persons can complete a connection without requiring the main account holder to send a guest invite. By default, this option is cleared, and only main account holders can connect their account without being invited.
- Connect Account Service Script: Customized connect account logic can be supported by including the script
CXConAccount. This script is provided as a basic example script and can be modified to meet business requirements for the account connection process. By default, this option is blank, and the base functionality for account connections is used. - Skip Phone Verification For New User: Select this checkbox to skip phone number validation as part of the guest users invite acceptance process. By default, this option is cleared, and guest users must validate their phone number to accept an invite.
- Click Save to save the master configuration changes.
To define guest user roles
The available guest user roles provided as part of Manage Web Account Configuration Options must be defined as described below.
- Log in to Customer Care and Billing.
- From the Admin menu, select General, and select Extendable Lookup. The Extendable Lookup Query is displayed.
- In the Business Object field, type C1-WebUserAccountRoleLookup and select Search. The Business Object is displayed in the search results.
- Select the Web User Account Role to open the extendable lookup.
- Complete the following configurations for each role:
- Select Add to add a new role. The Extendable Lookup dialog box opens.
- Complete all required information, including the following:
- Web User Account Role: The identifier code for the guest user role. This must match the code provided as an input with Manage Web Account Configuration Options
- Description: The name of the guest user role that is displayed in Digital Self Service - Transactions.
- Status: Active
- Account Relationship Type: Select the applicable account relationship type for the guest user role. If this configuration is left blank, the master configuration determines the default account relationship type.
- Financially Responsible: Select this checkbox if the guest user role is financially responsible for the account.
- Select Save to create the new entry.
To define alerts for guest user invitations
Alerts can be displayed in Digital Self Service - Transactions to notify customers that they have been sent an invitation to be a guest user on another utility account.
Note: These alerts are available if the user invited as a guest already has a web login with the utility. An email is also sent for all guest user invitations, which allows users without a web login to create the required web login as part of accepting the guest access.
- Log in to Customer Care and Billing.
- From the Admin menu, select General, and select Master Configuration. From the Master Configuration zone, select the Edit option for the CC&B Self-Service Integration master configuration. The master configuration is displayed.
- From the Digital Self Service Alerts zone, add the following new alert:
- Alert Category: Invite Alerts
- Alert Type: Pending invitation
- Priority: 20
- Alert Severity: Medium
- Script:
CXInvAlert
- Click Save to save the master configuration changes.
To define outbound notifications for guest user invitations
Email notifications are sent when guest users are invited to an account. This includes an email to the guest user notifying them of the invitation, and an email to the account owner when the guest user accepts the invitation and has been added to their account.
Digital Self Service - Transactions supports the following methods of delivering these guest notifications:
- Digital Self Service - Transactions sends the outbound notifications. To enable to send guest notifications for your customers, you must contact your Oracle Utilities Delivery Team, as described in Contacting Your Delivery Team and provide the minimum following inputs depending on your preferred template approach:
- If using the default templates, provide:
- desired logo in PNG format
- utility name
- primary color
- Digital Self Service - Transactions portal URL
- desired utility physical address
- desired customizations such as text or a preferred message illustration file, in PNG format, based on the configuration options described in Guest User Email Notifications.
- If using alternate templates, provide HTML files as described in the Alternate Template section from Reviewing Manage Web Account Configuration Options.
- If using the default templates, provide:
- An external system sends the outbound notifications. Refer to the Guest Notifications and Collection Process Template Configuration to send guest notifications through an external system.
To send guest user invitations from the account owner
Account owners can provide multiple users with the permissions to invite guests to the account. If one of these users then invites a new guest, by default, the user who invited the guest is mentioned in the invitation communications rather than the account owner. To ensure that the account owner is always listed in guest invitation communications, follow the steps below to define the character used as a separator for person accounts.
Note: If this optional step is completed, refer to Guest User Email Notifications for information on the guest invitation variables that return the name of the account owner.
- Log in to Customer Care and Billing.
- From the Admin menu, select Installation Options. The Installation Options are displayed.
- From the Person tab select Use Name Separator.
- In the Person Name Separator Character field, enter your supported character.
- Click Save to save the changes.