Configuring Start, Stop, and Transfer Service Requests
Complete the steps provided below to configure self-service tasks for start, stop, and transfer service requests. Digital Self Service - Transactions offers two options for Start, Stop, and Transfer Service features. The Classic version provides all functionality available with 23A and earlier releases, along with continued support in current releases. Starting with 23B, Start, Stop, and Transfer Service provides a separate set of features for these service requests. The Classic terminology in this documentation is used to distinguish the features originally released prior to 23B.
Note: This documentation provides steps to complete these configuration tasks using Oracle Utilities Customer Care and Billing. However, many of these tasks can be completed with other applicable products such as Oracle Utilities Customer to Meter or Oracle Utilities Customer Cloud Service. Refer to your applicable product documentation for steps to complete the configuration using your Oracle Utilities product. Additionally, this documentation assumes that you know how to create the various objects listed below as well as modify or create master configurations. For additional details on these tasks, refer to the applicable Oracle Utilities Documentation.
Start, Stop, and Transfer Service Classic Configurations
The following configurations are required for the Start, Stop, and Transfer Service Classic features.
Defining Service Date Restrictions
A calendar is displayed to customers to select when to complete a particular service request. You must define restrictions to these dates for reasons such as holidays by configuring the work calendar.
To define service date restrictions:
- Log in to Customer Care and Billing.
- From the Admin menu, select General, select Work Calendar, and then select Search. The Work Calendar Search dialog box opens.
- Click Search to return a list of all existing work calendars. Select an applicable calendar. For this example, select the BANK work calendar.
- Define the work days by selecting the checkbox for each applicable work day.
- Define all required holidays for the calendar by adding an item for each continuous holiday. You must provide a start date, start time, end date, end time, and a descriptive name for the holiday.
- Click Save to save all your changes for the work calendar.
- With a work calendar defined, you can also define the lead time required when customers select to start, stop, or transfer service. From the Admin menu, select General, and select Master Configuration. From the Master Configuration zone, select the Edit option for the CC&B Self-Service Integration master configuration. The master configuration is displayed.
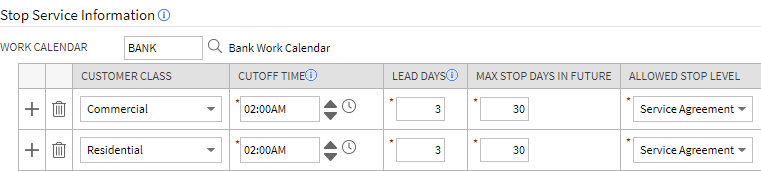
- From the Stop Service Information zone, define the following for each group of customers:
- Work Calendar: The calendar used to define holidays and work days, which you reviewed and modified as needed earlier in this procedure. The work calendar applies to all customer classes.
- Customer Class: The group of customers that the rules below apply to. For example, to create rules for your residential customers select Residential. If you also have other groups of customers such as commercial customers, you must define an entry for that customer class and select Commercial. An entry is required for each customer class you support even if the rules are identical for each group.
- Cut Off Time: Select a time of day in which a customer must make a start, stop, or transfer service request to consider only the lead days. If a customer creates a request after the cut off time, the request cannot be made for lead days plus one additional day.
- Lead Days: Select the applicable number of working, lead days for all requests.
- Max Stop Days In Future: Select how many days in the future a customer can select from when requesting their service request. This includes weekends and holidays.
- Allowed Stop Level: Select whether a customer can make a start, stop, or transfer request for an account, a premise for an account, or a service agreement for a premise.
- Service Agreement: The customer can select to stop service at all levels including an entire service agreement, an entire premise, or an account.
- Premise: The customer can select to stop service for an entire premise or an account.
- Account: The customer can select to stop service only for an account.
- Click Save to save your changes to the master configuration.
Configuring Self-Service Tasks
You must configure self-service tasks to support customer start and stop service requests.
To configure self-service tasks:
- Log in to Customer Care and Billing.
- From Menu, select Self-Service, select Self-Service Task Type, and select Add. The Select Business Object dialog box opens.
- From the Service Task Type Business Object drop-down list, select DSS Start/Stop Task Type and click OK. The Maintenance page opens.
- Complete the following information for the self-service task type:
- Service Task Type: C1-START-STOP
- Description: DSS Transactions Start Stop
- Related Transaction Object: Start/Stop Request Task (
C1-StartStopRequestTask) - Service Task Type Status: Active
- Service Task Class: Self-Service
- Click Save to create the self-service task type.
- From the Admin menu, select General, and select Master Configuration. From the Master Configuration zone, select the Edit option for the CC&B Self-Service Integration master configuration. The master configuration is displayed.
- From the Self-Service Task zone, click the plus icon to add an entry. From the Service Task drop-down list select Start/Stop Service Request, and from the Service Task Type drop-down list select the self-service task type you created earlier in this procedure DSS Transactions Start Stop (C1-START-STOP).
- From the Script zone, click the plus icon to add an entry. From the Processing Type drop-down list select Start Service Criteria, and in the Script field include the default
C1-StrSvcCriscript. Review this default script to ensure it meets your requirements for the start and stop service tasks. - Click Save to save your changes to the master configuration.
Creating Start Service Campaigns
Campaigns are used to present a series of questions to customers as one of the steps within the start service process. You can define whether these questions are required or optional, the type of response the customer must provide, and any applicable default values for selection. The steps below are high-level, refer to your Oracle Utilities Customer Care and Billing documentation for additional information on creating campaigns.
To create a start service campaign:
- Log in to Customer Care and Billing.
- From Menu, select Sales and Marketing, select Campaign, and then select Add. The options to create a campaign are displayed.
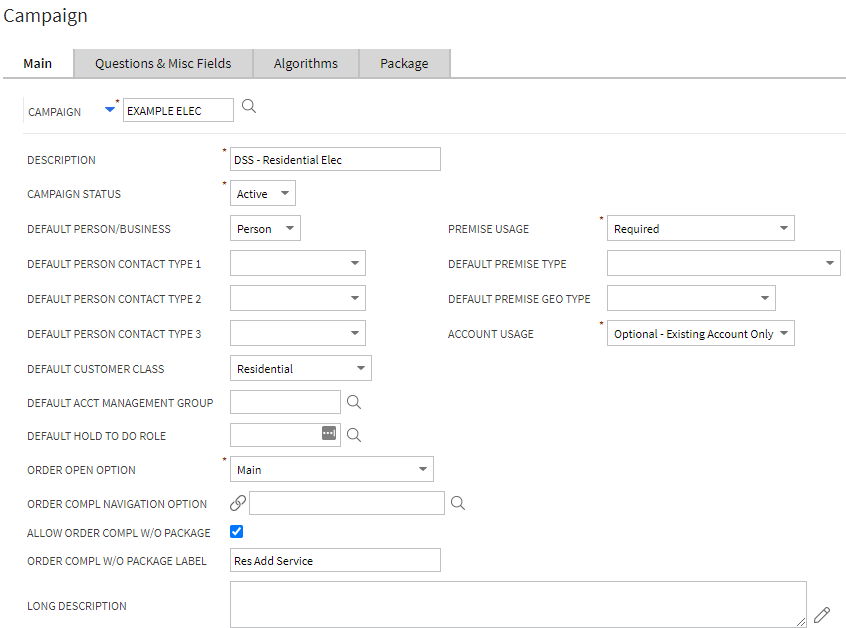
- From the Main tab, define general details for the campaign such as the default customer contact types, the default contact class, and how accounts can be used as part of the start service campaign. In the Campaign drop-down list, select OUCSS-RESSVC. In the Description field type Example Self-Service Residential.
If you are completing the configuration checklist available at Configuration Checklist, use the following configuration:- Campaign Status: Active
- Default Person/Business: Person
- Default Customer Class: Residential
- Order Open Option: Main
- Allow Order Compl W/O Package: Ensure the checkbox is selected.
- Premise Usage: Required
- Account Usage: Optional - Existing Account Only
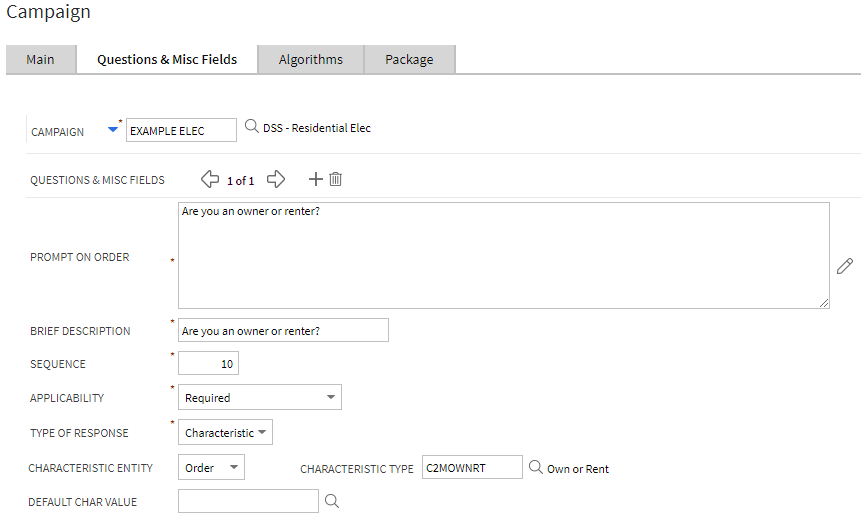
- From the Questions & Misc Fields tab, define the list of questions included in the campaign. Click the plus icon to add a new question or the trash can icon to remove a question. You can define whether these questions are required or optional, the type of response the customer must provide, and any applicable default values for selection.
If a question is defined to accept a characteristic type of response, the characteristic can be related to the Account, Order, Person, or Premise characteristics. For example, if a premise characteristic entity is chosen with a type of household size, customers are presented with various household size options to select from. Additionally, a premise characteristic is created on the customer’s premise to record their household size answer.
If your question cannot be created with the options in Customer Care and Billing, refer to Reviewing Start, Stop, and Transfer Service Configuration Options for submitting these questions to Oracle Utilities for creation.
If you are completing the configuration checklist available at Configuration Checklist, use the following configuration to create one simple question:- Prompt on Order: Are you an owner or renter?
- Brief Description: Are you an owner or renter?
- Sequence: 10
- Applicability: Required
- Type of Response: Characteristic
- Characteristic Entity: Order
- Characteristic Type:
C2MOWNRT
- From the Algorithms tab,
- From the Packages tab, click the Go To Package icon for any configured package to review the various service agreement options that a customer can be assigned to through the start service process. The Package options are displayed:
- From the Main tab, review and configure general details about the package. If you are completing the configuration checklist available at Configuration Checklist, use the following configuration:
- Campaign: Select the campaign you are creating as part of this process.
- Description: Initial configuration package.
- Status: Active
- From the SAs to Create tab, review, add, and remove service agreements as applicable. If you are completing the configuration checklist available at Configuration Checklist, do not create a service agreement.
- From the Eligibility tab, review and configure the logic used to determine whether the package is implemented for a customer who chooses to start service. Customer inputs through the campaign questions can be used as fields for this logic. For example, a package can be eligible for the customer of they select that they are a senior citizen and would like to be started on a standard rate plan. Campaigns must have packages configured so that all combinations of possible customer answers support the selection of an eligible package for starting service.
If you are completing the configuration checklist available at Configuration Checklist, use the following configuration:- Sequence: 10
- Description: Initial config eligibility
- If Group Is True: Eligible
- If Group Is False: Ineligible
- Criteria Field: Select Algorithm in the drop-down list, and select the
C1-ORD-GETCCAlgorithm - Criteria Comparison: Select = in the drop-down list, and type
Rin the text field - If True: Group is True
- If False: Group is False
- If Insufficient Data: Group is False
- Click Save to save any package changes.
- From the Main tab, review and configure general details about the package. If you are completing the configuration checklist available at Configuration Checklist, use the following configuration:
- From the Algorithms tab, apply any required algorithms, such as algorithms that determine customer eligibility for a campaign. If you are completing the configuration checklist available at Configuration Checklist, define a Campaign Eligibility event that uses the
C1-ELIGIBLEalgorithm. - Click Save to create your start service campaign.
To display the available service types for a premise
Complete the following configurations to display the available service point types at a premise and determine the service agreements to start.
- Log in to Customer Care and Billing.
- From the Admin menu, select System, select Algorithm, and then select Add. The Algorithm page is displayed.
- Define an algorithm as follows:
- Algorithm Code: Provide a descriptive name for the algorithm code which is referenced later when defining eligibility criteria
- Description: Provide a description for the algorithm
- Algorithm Type: C1-ELIGSPTY
- SP Types to Check: Include the service point types the algorithm validates
- SP Types to Ignore: Include the service point types the algorithm can ignore
- Click Save to create the new algorithm.
- From Menu, select Sales and Marketing, select Campaign, and then select Search. Select the campaign created in the previous steps.
- Navigate to the Package information, and from the Eligibility tab navigate to the applicable eligibility criteria group, select the plus icon to create a new eligibility criteria row:
- Sequence: Modify the sequence as necessary to process the new eligibility criteria in the correct order
- Criteria Field: Select Algorithm in the drop-down list, and then type the Algorithm Code name you created previously in this procedure
- Criteria Comparison: Select = in the drop-down list, and then type
TRUEin the text field - If True: Check Next Condition
- If False: Group is False
- If Insufficient Data: Group is False
- Click Save to update your package.
Displaying Campaign Questions Based on Customer Service Point Type
As part of creating start service campaigns, you can define which questions are shown to customers based on their applicable service point types. This optional configuration allows you to display only those questions that are applicable to a customer. For example, you can prompt customers with electricity service to select their preferred electricity service rate plan, while hiding this prompt for customers who only have water or wastewater service. To support this configuration, you must provide
To retrieve customer service point types
- Log in to Customer Care and Billing.
- From the Admin menu, select Geographic, select Service Point Type, and then select Search. A Service Point Type List is displayed.
- Collect the values in the SP Type column for applicable service point types.
- Review the campaign questions that you created in the steps above to create a start service campaign. Include a mapping of each service point type value that applies for each campaign question.
- Provide the campaign question to service point type mapping information to Oracle Utilities. For information on providing this information, see Contacting Your Delivery Team.
Configuring New Service Information and Requirements
You must configure your self-service master configuration to define the information retrieved for a new residential service request along with which pieces of information are required and which are used to identify a customer.
To configure New Service Information and Requirements:
- Log in to Customer Care and Billing as a user with edit access for the CC&B Self-Service Integration master configuration.
- From the Admin menu, select General, and select Master Configuration. From the Master Configuration zone, select the Edit option for the CC&B Self-Service Integration master configuration. The master configuration is displayed.
- From the New Service Information zone, in the Start Service Campaigns area click the plus icon to include a start service campaign.
- From the Customer Class drop-down list select Residential, and from the Campaign drop-down list select the Example Self-Service Residential campaign you created to support the start service workflows. If you are completing the configuration checklist available at Configuration Checklist, select the campaign you created for those steps.
- From the New Customer Identifiers area, click the plus icon to add a new customer identifier. These identifiers are presented to customers when they select to start service.
- Select the Allow As A Primary Identifier checkbox to configure an identifier as a primary identifier of a customer, which must be capable of uniquely identifying a customer. If multiple identifiers are defined as the primary identifier, the identifier with the lowest Sequence value is used as the primary identifier.
- Select whether each identifier is required to be completed by the customer or is an optional identifier that the customer can leave blank when starting service. An example of customer identifiers is shown below.

- Click Save to save your master configuration changes.
Defining Phone Contact Types
Customers can maintain phone numbers for their Digital Self Service - Transactions account. To ensure that phone types can be located and displayed within Digital Self Service - Transactions, ensure that the word phone is included within either the phone contact type or phone contact type description.
Note: Various contact types are supported for users of Digital Self Service - Transactions. Creating person contact types for web users is described in Creating a Person Contact Type for Web Users.
To define phone contact types
- Log in to Customer Care and Billing.
- From the Admin menu, select Customer, select Person Contact Type, and select Search. The Person Contact Type List is displayed.
- Locate a person contact type for phone numbers that is used for Digital Self Service - Transactions, and select the Edit button. The Person Contact Type page is displayed.
- If the Person Contact Type code does not include phone, update the Description to include phone as part of the description.
- Select Save to save your changes.
Supporting Back-to-Back Stop and Start Service Requests
By default, a start service request cannot be initiated if there is still an active service on the premise, such as an active service for a previous resident. You can enable support for these types of start service requests, often referred to as back-to-back requests, which initiates a stop service request for the active service for the premise.
To support back-to-back stop and start service requests
- Log in to Customer Care and Billing.
- From the Admin menu, select System, select Algorithm, and then select Search. The Algorithm Search dialog box opens.
- In the Algorithm Code field, type
C1-VASTSTPRQand select Search. TheC1-VASTSTPRQalgorithm is displayed. - From the Allow Back-to-Back row of the table, modify the Value column to be defined as Y.
- Select Save to save your changes.
Supporting ACH Automatic Payment Enrollment During Start Service Requests
Customers can be provided with the option to enroll in ACH automatic payments during their start service request. If the customer has opts into the program, an automatic payment self-service task is generated after their utility billing account is established. Automatic payment enrollment performed during a start service request follows the same NACHA business rules configured for general automatic payments, which are described at Automatic Payments.
Start, Stop, and Transfer Service Configurations
The following configurations are required for the Start, Stop, and Transfer Service features.
Configuring Self-Service Tasks
You must configure self-service tasks to support customer start and stop service requests. Self-service tasks are used to support starting new service, adding services, stopping services, and transferring service, and the same self-service task can be used for each of these tasks. You can also create separate self-service tasks for any of these tasks to configure unique processing for those tasks.
To configure self-service tasks
- Log in to Customer Care and Billing.
- From Menu, select Self-Service, select Self-Service Task Type, and select Add. The Select Business Object dialog box opens.
- From the Service Task Type Business Object drop-down list, select Self-Service Start/Stop/Transfer Task Type and click OK. The Maintenance page opens.
- Complete the following information for the self-service task type:
- Service Task Type: Provide a name to identify the self-service task type object such as START-STOP-TRANSFER-TASK.
- Description: Provide a description for the self-service task type, which can include the types of tasks the object supports.
- Related Transaction Object: Self-Service Start/Stop/Transfer Task (
C1-SSStartStopXferServiceTask) - Service Task Type Status: Active
- Service Task Class: Self-Service
- Click Save to create the self-service task type. Repeat these steps for any additional self-service task types for the supported tasks.
Configuring the Action Methods
You must configure action methods to support customer start and stop service requests. Action methods are used to support starting new service, adding services, stopping services, and transferring service, and a separate action method is required for each of these tasks.
To configure action methods
- Log in to Customer Care and Billing.
- From Admin menu, select System, select Action Method, and select Add. The Select Business Object dialog box opens.
- From the Action Method Business Object drop-down list, select Self-Service SST Action Method and click OK. The Action Method page is displayed
- Complete the following information for the action method:
- Action Method: Provide a descriptive name such as Start-Service-Action-Method.
- Action Method Role: Select the applicable role for the type of task you are creating an action method for. For example, when creating an action method for starting new service, select Self-Service New Service.
- Description: Provide a brief description, such as Start New Service Action Method.
- Detailed Description: Provide a more detailed description about the action method as applicable.
- Self-Service Task Type: Select the applicable self-service task type for the type of task you are creating an action method for, which is created by completing Configuring Self-Service Tasks above.
- Customer Service Request Type: Select the applicable customer service request type for the type of task you are creating an action method for, which is created by completing Configuring Customer Service Request Types.
- Override Details: Define and overrides that are required for the action method.
- Click Save to create the action method. Repeat these steps until separate action methods are available for start new service, add service, stop service, and transfer service.
Configuring Customer Service Request Types
You must configure customer service request types to support customer start and stop service requests. Customer service request types are used to support starting new service, adding services, stopping services, and transferring service, and a separate customer service request type is required for each of these tasks. The steps to create a customer service request type for each task is provided below. Additional customer service request types may be required if overrides are needed based on CIS division or customer class.
To configure a customer service request type for starting new service
- Log in to Customer Care and Billing.
- From the Admin menu, select Customer, select Customer Service Request Type, and then select Add. The Select Business Object dialog box opens.
- Select From the Customer Service Request Type Business Object drop-down list, select Self-Service New Service Request Type, then select OK. The Customer Service Request Type page is displayed.
- Provide the following information:
- Customer Service Request Task Type: Provide a name to identify the customer service request task type object such as NEW-SERVICE-CUSTOMER-SERVICE-REQUEST.
- Description: Provide a brief description, such as Start New Service Customer Service Request Task Type.
- Detailed Description: Provide a more detailed explanation of the object as required.
- Customer Service Request Business Object: Start Service Request
- CS Request Person Business Object:
C1-CustSvcRequestPerson - CS Request Account Business Object:
C1-CustSvcRequestAccount - CS Request Premise Business Object:
C1-CustSvcRequestPremise - CS Request Start SA Business Object:
C1-StartServiceRequestSA
- The configuration of the following controls varies depending on the business rules of the utility. For additional information on how these controls are used, refer to the New Service Operations topic Oracle Utilities Customer Care and Billing User Guide. Refer to the Customer Care and Billing product library.
- Check for Existing Person Algorithm: Implement utility-specific rules to check if the main customer already exists. If the record exists, then the customer cannot proceed with the transaction. This prevents the creation of duplicate records.
- Person Controls: Define the controls for an individual main customer. These configurations are required to support residential customers:
- Identifier Types: Configure the identifiers that are defined for the main customer. Multiple identifiers can be defined. The configuration of these identifiers must match the Line of Business Verification Fields for Match Identifier if used for Account linking.
- Sequence: Determines the order in which a person control is used within the system.
- ID Type: Select the type of identification that corresponds to a Person Identifier Type, such as Driver's license.
- Allow as Primary Identifier: Select this checkbox to define this ID Type as eligible to be the primary ID. This must match the Allow as Primary setting on the Person Identifier Type.
- Required/Optional: Select whether the ID Type is required or optional.
- Format: Set the formatting guide for this ID Type. This only applies to the number of digits and delimiters.
- Should Prompt For ID: Defines the rule for capturing identifiers for the main customer. If the Algorithm option is selected, you must implement utility-specific rules to determine if identifiers are captured using an algorithm and then select the applicable algorithm.
- Perform ID/Credit Check: Select this checkbox to perform an ID or credit check for the main customer and the co-applicant. If selected, you must implement utility-specific rules to perform these checks using algorithms and then select the applicable algorithms.
- Prompt For Date Of Birth: Select this checkbox to request the main customer and the co-applicant's date of birth when starting new service. If selected, you can also select Store Date Of Birth On Person to save the date of birth information provided. Storing this information can be done if date of birth is used as identifying information. If the date of birth is stored, you must also define the characteristic type used to store the information with the Date of Birth Characteristic Type field. This must match the Line of Business Verification Fields Date of Birth Characteristic Type if used for account linking.
- Start Service Eligibility Algorithm: Implement utility-specific rules within an algorithm to determine if a customer is eligible to start new service. Select the applicable algorithm that defines these rules.
- Display Paperless Billing Enrollment: Select this checkbox to display paperless billing enrollment as part of a start service request. If selected, you must also configure the following:
- Paperless Bill Route Type: Select the bill route type used for paperless billing.
- Postal Bill Route Type: Select the bill route type for postal billing.
- Autopay Usage: Select this checkbox to display autopay enrollment as part of a start service request. If selected, Autopay Service Task Type: Applicable if Autopay Usage is enabled. This must match the Auto Pay Setup Self-Service Task in the Customer Care and Billing Self-Service Master Configuration. Autopay enrollment during a start service request follows the same business rules configured for general automatic payments as described in Automatic Payments.
- Display Other Persons: Defines the rule for capturing co-applicant information. If selected, the following options are available:
- Search For Person Algorithm: Implement utility-specific rules to check if the co-applicant already exists in Customer Care and Billing If an exact match is found, then the existing record is used. If no match is found, then a new record is created. If an ambiguous or partial match is found, then the co-applicant cannot be used in the transaction.
- Collect ID: Select this checkbox to store identification information for the co-applicant. If selected, use Identifier Types to configure the identifiers that are defined for the main customer. Multiple identifiers can be configured:
- Sequence: Determines the order in which a person control is used within the system.
- ID Type: Select the type of identification that corresponds to a Person Identifier Type, such as Driver's license.
- Allow as Primary Identifier: Select this checkbox to define this ID Type as eligible to be the primary ID. This must match the Allow as Primary setting on the Person Identifier Type.
- Required/Optional: Select whether the ID Type is required or optional.
- Format: Set the formatting guide for this ID Type. This only applies to the number of digits and delimiters.
- Account Relationship Types: Define the options for the relationship types that the co-applicant can select. These can include options such as Family Member or Employee.
- Other Person Eligibility: Defines the rule for determining if a matching co-applicant is eligible or not.
- If set to ID Check, then an ID or credit check is part of the eligibility check.
- If set to Algorithm, you must implement utility-specific rules to determine if a matching co-applicant is eligible or not, and select the algorithm in Other Person Eligibility Algorithm.
- Ineligible Other Person Processing: Defines the rule for determining if an ineligible matching co-applicant is rejected or submitted for further review.
- If set to Reject, then the co-applicant cannot be used in the transaction.
- If set to Review, then the co-applicant can be used in the transaction but is not automatically added to the account. Further review and processing is required. You must implement utility-specific processing if ineligible matching co-applicant is accepted for further review, and select the algorithm in Ineligible Other Person Processing Algorithm.
- Default Financially Responsible: Select this checkbox to define co-applicants as financially responsible by default.
- Default Third Party Guarantor: Select this checkbox to define co-applicants as a third party guarantor by default.
- Default Receives Copy of Bill: Select this checkbox to define co-applicants as receiving a copy of the utility bill by default.
- Default Receives Collection And Overdue Notices: Select this checkbox to define co-applicants as receiving collection and overdue notices by default.
- Default Allow Communication Preference: Select this checkbox to define co-applicants as modifying communication preferences by default.
- Identifier Types: Configure the identifiers that are defined for the main customer. Multiple identifiers can be defined. The configuration of these identifiers must match the Line of Business Verification Fields for Match Identifier if used for Account linking.
- Business Controls: Define the controls for accounts that manage business entities. These configurations are required to support non-residential customers:
- Identifier Types: Configure the identifiers that are defined for the main customer for a business. Multiple identifiers can be defined. The configuration of these identifiers must match the Line of Business Verification Fields for Match Identifier if used for Account linking.
- Sequence: Determines the order in which a person control is used within the system.
- ID Type: Select the type of identification that corresponds to a Person Identifier Type, such as Driver's license.
- Allow as Primary Identifier: Select this checkbox to define this ID Type as eligible to be the primary ID. This must match the Allow as Primary setting on the Person Identifier Type.
- Required/Optional: Select whether the ID Type is required or optional.
- Format: Set the formatting guide for this ID Type. This only applies to the number of digits and delimiters.
- Should Prompt For ID: Defines the rule for capturing identifiers for the main customer of the business. If the Algorithm option is selected, you must implement utility-specific rules to determine if identifiers are captured using an algorithm and then select the applicable algorithm.
- Perform ID/Credit Check: Select this checkbox to perform an ID or credit check for the main customer and the co-applicant of the business. If selected, you must implement utility-specific rules to perform these checks using algorithms and then select the applicable algorithms.
- Start Service Eligibility Algorithm: Implement utility-specific rules within an algorithm to determine if a customer is eligible to start new service. Select the applicable algorithm that defines these rules.
- Display Paperless Billing Enrollment: Select this checkbox to display paperless billing enrollment as part of a start service request. If selected, you must also configure the following:
- Paperless Bill Route Type: Select the bill route type used for paperless billing.
- Postal Bill Route Type: Select the bill route type for postal billing.
- Autopay Usage: Select this checkbox to display autopay enrollment as part of a start service request. If selected, Autopay Service Task Type: Applicable if Autopay Usage is enabled. This must match the Auto Pay Setup Self-Service Task in the Customer Care and Business Self-Service Master Configuration. Autopay enrollment during a start service request follows the same business rules configured for general automatic payments as described in Automatic Payments.
- Display Other Persons: Defines the rule for capturing co-applicant information. If selected, the following options are available:
- Search For Person Algorithm: Implement utility-specific rules to check if the co-applicant already exists in Customer Care and Billing If an exact match is found, then the existing record is used. If no match is found, then a new record is created. If an ambiguous or partial match is found, then the co-applicant cannot be used in the transaction.
- Collect ID: Select this checkbox to store identification information for the co-applicant. If selected, use Identifier Types to configure the identifiers that are defined for the main customer. Multiple identifiers can be configured:
- Sequence: Determines the order in which a person control is used within the system.
- ID Type: Select the type of identification that corresponds to a Person Identifier Type, such as Driver's license.
- Allow as Primary Identifier: Select this checkbox to define this ID Type as eligible to be the primary ID. This must match the Allow as Primary setting on the Person Identifier Type.
- Required/Optional: Select whether the ID Type is required or optional.
- Format: Set the formatting guide for this ID Type. This only applies to the number of digits and delimiters.
- Account Relationship Types: Define the options for the relationship types that the co-applicant can select. These can include options such as Family Member or Employee.
- Other Person Eligibility: Defines the rule for determining if a matching co-applicant is eligible or not.
- If set to ID Check, then an ID or credit check is part of the eligibility check.
- If set to Algorithm, you must implement utility-specific rules to determine if a matching co-applicant is eligible or not, and select the algorithm in Other Person Eligibility Algorithm.
- Ineligible Other Person Processing: Defines the rule for determining if an ineligible matching co-applicant is rejected or submitted for further review.
- If set to Reject, then the co-applicant cannot be used in the transaction.
- If set to Review, then the co-applicant can be used in the transaction but is not automatically added to the account. Further review and processing is required. You must implement utility-specific processing if ineligible matching co-applicant is accepted for further review, and select the algorithm in Ineligible Other Person Processing Algorithm.
- Default Financially Responsible: Select this checkbox to define co-applicants as financially responsible by default.
- Default Third Party Guarantor: Select this checkbox to define co-applicants as a third party guarantor by default.
- Default Receives Copy of Bill: Select this checkbox to define co-applicants as receiving a copy of the utility bill by default.
- Default Receives Collection And Overdue Notices: Select this checkbox to define co-applicants as receiving collection and overdue notices by default.
- Default Allow Communication Preference: Select this checkbox to define co-applicants as modifying communication preferences by default.
- Identifier Types: Configure the identifiers that are defined for the main customer for a business. Multiple identifiers can be defined. The configuration of these identifiers must match the Line of Business Verification Fields for Match Identifier if used for Account linking.
- Common Service Controls: Define the controls for validating the service start date:
- Work Calendar: Select the applicable calender that is used for validating the service start date.
- Lead Days: Enter the applicable number of working, lead days for the start service requests.
- Cutoff Time: Select a time of day in which a customer must make a start service request to consider only the lead days. If a customer creates a request after the cut off time, the request cannot be made for lead days plus one additional day.
- Time Zone: Select the applicable time zone used for validating the service start date.
- Maximum Start Days In Future: Select how many days in the future a customer can select from when requesting their service request. This includes weekends and holidays.
- Deposit Required: Defines the rule for assessing a deposit. If Algorithm is selected, you must define the following configurations which are used for calculating the deposit and creating the deposit service agreement:
- Deposit Required Algorithm: Implement utility-specific rules to determine if deposit is required and select the applicable algorithm.
- CIS Division: Select the applicable CIS division.
- SA Type: Select the applicable service agreement type.
- Start Option: Select the applicable start option.
- Allow Bill in Full: Select this checkbox to allow customers to pay their bill in one lump sum. If this option is selected, installment amount settings are ignored.
- Minimum Installment Amount: Enter a minimum installment amount to enable customers to pay their bill in installments.
- Number of Installments: If a minimum installment amount is provided and Allow Bill in Full is cleared, enter the number of installments each bill is broken down into for payment.
- Start Level: Defines whether service is started for an entire premise or is done for individual services. If you select Individual Services, you must select algorithms to validate the service points with the Validate Service Points to Start Algorithm options. This validation is completed prior to performing question and response processing.
- Validate Services to Start Algorithm: Implement utility-specific rules to validate the services that are started. This validation is completed after performing question and response processing.
- Determine Services To Start Algorithm: Implement utility-specific rules to retrieve the services that are started for the service points at the premise. This processing is completed prior to performing question and response processing.
- Process Services To Start Algorithm: Implement utility-specific rules to process the services that are started for the service points at the premise. This processing is completed when finalizing the start service request.
- Create Customer Contact: Define the controls for creating a customer contact on finalization of the start service request. If you select Yes to create a customer contact, you must define the following:
- Customer Contact Class: Select the class for the customer contacts that are created when starting new service.
- Customer Contact Type: Select the customer contact type for the customer contacts that are created when starting new service. The customer contact type selected must require Person, Account, and Premise as these are used on creation of the customer contact. The entity relationship should be set to Person and Account Only.
- Click Save.
- For the configuration of Questions, Service Eligibility, and Response-related updates, refer to the embedded help in Customer Care and Billing or the Questions and Response Processing topic in the Oracle Utilities Customer Care and Billing User Guide. Refer to the Customer Care and Billing product library.
To configure a customer service request type for adding services
- Log in to Customer Care and Billing.
- From the Admin menu, select Customer, select Customer Service Request Type, and then select Add. The Select Business Object dialog box opens.
- Select From the Customer Service Request Type Business Object drop-down list, select Self-Service Add Service Request Type, then select OK. The Customer Service Request Type page is displayed.
- Provide the following information:
- Customer Service Request Task Type: Provide a name to identify the customer service request task type object such as ADD-SERVICE-CUSTOMER-SERVICE-REQUEST.
- Description: Provide a brief description, such as Add Service Customer Service Request Task Type.
- Detailed Description: Provide a more detailed explanation of the object as required.
- Customer Service Request Business Object: Start Service Request
- CS Request Person Business Object:
C1-CustSvcRequestPerson - CS Request Account Business Object:
C1-CustSvcRequestAccount - CS Request Premise Business Object:
C1-CustSvcRequestPremise - CS Request Start SA Business Object:
C1-StartServiceRequestSA
- The configuration of the following controls varies depending on the business rules of the utility. For additional information on how these controls are used, refer to the Add Service Operations topic within the Oracle Utilities Customer Care and Billing User Guide. Refer to the Customer Care and Billing product library.
- Person Controls: Define the controls for an individual main customer. These configurations are required to support residential customers:
- Identifier Types: Configure the identifiers that are defined for the main customer. Multiple identifiers can be defined. The configuration of these identifiers must match the Line of Business Verification Fields for Match Identifier if used for Account linking.
- Sequence: Determines the order in which a person control is used within the system.
- ID Type: Select the type of identification that corresponds to a Person Identifier Type, such as Driver's license.
- Allow as Primary Identifier: Select this checkbox to define this ID Type as eligible to be the primary ID. This must match the Allow as Primary setting on the Person Identifier Type.
- Required/Optional: Select whether the ID Type is required or optional.
- Format: Set the formatting guide for this ID Type. This only applies to the number of digits and delimiters.
- Should Prompt For ID: Defines the rule for capturing identifiers for the main customer. If the Algorithm option is selected, you must implement utility-specific rules to determine if identifiers are captured using an algorithm and then select the applicable algorithm.
- Perform ID/Credit Check: Select this checkbox to perform an ID or credit check for the main customer and the co-applicant. If selected, you must implement utility-specific rules to perform these checks using algorithms and then select the applicable algorithms.
- Prompt For Date Of Birth: Select this checkbox to request the main customer and the co-applicant's date of birth when starting new service. If selected, you can also select Store Date Of Birth On Person to save the date of birth information provided. Storing this information can be done if date of birth is used as identifying information. If the date of birth is stored, you must also define the characteristic type used to store the information with the Date of Birth Characteristic Type field. This must match the Line of Business Verification Fields Date of Birth Characteristic Type if used for account linking.
- Start Service Eligibility Algorithm: Implement utility-specific rules within an algorithm to determine if a customer is eligible to start new service. Select the applicable algorithm that defines these rules.
- Identifier Types: Configure the identifiers that are defined for the main customer. Multiple identifiers can be defined. The configuration of these identifiers must match the Line of Business Verification Fields for Match Identifier if used for Account linking.
- Business Controls: Define the controls for accounts that manage business entities. These configurations are required to support non-residential customers:
- Identifier Types: Configure the identifiers that are defined for the main customer for a business. Multiple identifiers can be defined. The configuration of these identifiers must match the Line of Business Verification Fields for Match Identifier if used for Account linking.
- Sequence: Determines the order in which a person control is used within the system.
- ID Type: Select the type of identification that corresponds to a Person Identifier Type, such as Driver's license.
- Allow as Primary Identifier: Select this checkbox to define this ID Type as eligible to be the primary ID. This must match the Allow as Primary setting on the Person Identifier Type.
- Required/Optional: Select whether the ID Type is required or optional.
- Format: Set the formatting guide for this ID Type. This only applies to the number of digits and delimiters.
- Should Prompt For ID: Defines the rule for capturing identifiers for the main customer of the business. If the Algorithm option is selected, you must implement utility-specific rules to determine if identifiers are captured using an algorithm and then select the applicable algorithm.
- Perform ID/Credit Check: Select this checkbox to perform an ID or credit check for the main customer and the co-applicant of the business. If selected, you must implement utility-specific rules to perform these checks using algorithms and then select the applicable algorithms.
- Start Service Eligibility Algorithm: Implement utility-specific rules within an algorithm to determine if a customer is eligible to start new service. Select the applicable algorithm that defines these rules.
- Identifier Types: Configure the identifiers that are defined for the main customer for a business. Multiple identifiers can be defined. The configuration of these identifiers must match the Line of Business Verification Fields for Match Identifier if used for Account linking.
- Common Service Controls: Define the controls for validating the service start date:
- Work Calendar: Select the applicable calender that is used for validating the service start date.
- Lead Days: Enter the applicable number of working, lead days for the start service requests.
- Cutoff Time: Select a time of day in which a customer must make a start service request to consider only the lead days. If a customer creates a request after the cut off time, the request cannot be made for lead days plus one additional day.
- Time Zone: Select the applicable time zone used for validating the service start date.
- Maximum Start Days In Future: Select how many days in the future a customer can select from when requesting their service request. This includes weekends and holidays.
- Deposit Required: Defines the rule for assessing a deposit. If Algorithm is selected, you must define the following configurations which are used for calculating the deposit and creating the deposit service agreement:
- Deposit Required Algorithm: Implement utility-specific rules to determine if deposit is required and select the applicable algorithm.
- CIS Division: Select the applicable CIS division.
- SA Type: Select the applicable service agreement type.
- Start Option: Select the applicable start option.
- Allow Bill in Full: Select this checkbox to allow customers to pay their bill in one lump sum. If this option is selected, installment amount settings are ignored.
- Minimum Installment Amount: Enter a minimum installment amount to enable customers to pay their bill in installments.
- Number of Installments: If a minimum installment amount is provided and Allow Bill in Full is cleared, enter the number of installments each bill is broken down into for payment.
- Start Level: Defines whether service is started for an entire premise or is done for individual services. If you select Individual Services, you must select algorithms to validate the service points with the Validate Service Points to Start Algorithm options. This validation is completed prior to performing question and response processing.
- Validate Services to Start Algorithm: Implement utility-specific rules to validate the services that are started. This validation is completed after performing question and response processing.
- Determine Services To Start Algorithm: Implement utility-specific rules to retrieve the services that are started for the service points at the premise. This processing is completed prior to performing question and response processing.
- Process Services To Start Algorithm: Implement utility-specific rules to process the services that are started for the service points at the premise. This processing is completed when finalizing the add service request.
- Create Customer Contact: Define the controls for creating a customer contact on finalization of the add service request. If you select Yes to create a customer contact, you must define the following:
- Customer Contact Class: Select the class for the customer contacts that are created when adding new service.
- Customer Contact Type: Select the customer contact type for the customer contacts that are created when adding new service. The customer contact type selected must require Person, Account, and Premise as these are used on creation of the customer contact. The entity relationship should be set to Person and Account Only.
- Person Controls: Define the controls for an individual main customer. These configurations are required to support residential customers:
- Click Save.
- For the configuration of Questions, Service Eligibility, and Response-related updates, refer to the embedded help in Customer Care and Billing or the Questions and Response Processing topic in the Oracle Utilities Customer Care and Billing User Guide. Refer to the Customer Care and Billing product library.
To configure a customer service request type for stopping services
- Log in to Customer Care and Billing.
- From the Admin menu, select Customer, select Customer Service Request Type, and then select Add. The Select Business Object dialog box opens.
- Select From the Customer Service Request Type Business Object drop-down list, select Self-Service Stop Service Request Type, then select OK. The Customer Service Request Type page is displayed.
- Provide the following information:
- Customer Service Request Task Type: Provide a name to identify the customer service request task type object such as STOP-SERVICE-CUSTOMER-SERVICE-REQUEST.
- Description: Provide a brief description, such as Stop Service Customer Service Request Task Type.
- Detailed Description: Provide a more detailed explanation of the object as required.
- Customer Service Request Business Object: Stop Service Request
- CS Request Person Business Object:
C1-CustSvcRequestPerson - CS Request Account Business Object:
C1-CustSvcRequestAccount - CS Request Premise Business Object:
C1-CustSvcRequestPremise - CS Request Stop SA Business Object:
C1-StopServiceRequestSA
- The configuration of the following controls varies depending on the business rules of the utility. For additional information on how these controls are used, refer to the Stop Service Operations topic in the Oracle Utilities Customer Care and Billing User Guide. Refer to the Customer Care and Billing product library.
- Common Service Controls: Define the controls for validating the stop start date:
- Work Calendar: Select the applicable calender that is used for validating the service stop date.
- Lead Days: Enter the applicable number of working, lead days for the stop service requests.
- Cutoff Time: Select a time of day in which a customer must make a stop service request to consider only the lead days. If a customer creates a request after the cut off time, the request cannot be made for lead days plus one additional day.
- Time Zone: Select the applicable time zone used for validating the service stop date.
- Maximum Stop Days In Future: Select how many days in the future a customer can select from when requesting their service request. This includes weekends and holidays.
- Determine Services To Stop Algorithm: Implement utility-specific rules to retrieve the services that are stopped for the service points at the premise. This processing is completed prior to performing question and response processing.
- Process Services To Stop Algorithm: Implement utility-specific rules to process the services that are stopped for the service points at the premise. This processing is completed when finalizing the stop service request.
- Stop Level: Defines whether service is stopped for an entire premise, an account, or for service agreements. If you select SA, you can select Require SAs At Same SP To Behave Together to validate that all service agreements at the same service point are selected to stop together.
- Validate Services to Stop Algorithm: Implement utility-specific rules to validate the services that are stopped. This validation is completed after performing question and response processing.
- Create Customer Contact: Define the controls for creating a customer contact on finalization of the stop service request. If you select Yes to create a customer contact, you must define the following:
- Customer Contact Class: Select the class for the customer contacts that are created when stopping service.
- Customer Contact Type: Select the customer contact type for the customer contacts that are created when stopping service. The customer contact type selected must require Person, Account, and Premise as these are used on creation of the customer contact. The entity relationship should be set to Person and Account Only.
- Common Service Controls: Define the controls for validating the stop start date:
- Click Save.
- For the configuration of Questions, Service Eligibility, and Response-related updates, refer to the embedded help in Customer Care and Billing or the Questions and Response Processing topic in the Oracle Utilities Customer Care and Billing User Guide. Refer to the Customer Care and Billing product library.
To configure a customer service request type for transferring services
- Log in to Customer Care and Billing.
- From the Admin menu, select Customer, select Customer Service Request Type, and then select Add. The Select Business Object dialog box opens.
- Select From the Customer Service Request Type Business Object drop-down list, select Self-Service Transfer Service Request Type, then select OK. The Customer Service Request Type page is displayed.
- Provide the following information:
- Customer Service Request Task Type: Provide a name to identify the customer service request task type object such as TRANSFER-SERVICE-CUSTOMER-SERVICE-REQUEST.
- Description: Provide a brief description, such as Transfer Service Customer Service Request Task Type.
- Detailed Description: Provide a more detailed explanation of the object as required.
- Customer Service Request Business Object: Transfer Service Request
- CS Request Person Business Object:
C1-CustSvcRequestPerson - CS Request Account Business Object:
C1-CustSvcRequestAccount - CS Request Premise Business Object:
C1-CustSvcRequestPremise - CS Request Start SA Business Object:
C1-StartServiceRequestSA - CS Request Stop SA Business Object:
C1-StopServiceRequestSA
- The configuration of the following controls varies depending on the business rules of the utility. For additional information on how these controls are used, refer to the Transfer Service Operations topic in the Oracle Utilities Customer Care and Billing User Guide. Refer to the Customer Care and Billing product library.
- Person Controls: Define the controls for an individual main customer. These configurations are required to support residential customers:
- Start Service Eligibility Algorithm: Implement utility-specific rules within an algorithm to determine if a customer is eligible to start new service. Select the applicable algorithm that defines these rules.
- Business Controls: Define the controls for accounts that manage business entities. These configurations are required to support non-residential customers:
- Start Service Eligibility Algorithm: Implement utility-specific rules within an algorithm to determine if a customer is eligible to start new service. Select the applicable algorithm that defines these rules.
- Common Service Controls: Define the controls for validating the service start date:
- Work Calendar: Select the applicable calender that is used for validating the service start date.
- Lead Days: Enter the applicable number of working, lead days for the start service requests.
- Cutoff Time: Select a time of day in which a customer must make a start service request to consider only the lead days. If a customer creates a request after the cut off time, the request cannot be made for lead days plus one additional day.
- Time Zone: Select the applicable time zone used for validating the service start date.
- Maximum Start Days In Future: Select how many days in the future a customer can select from when requesting their service request. This includes weekends and holidays.
- Deposit Required: Defines the rule for assessing a deposit. If Algorithm is selected, you must define the following configurations which are used for calculating the deposit and creating the deposit service agreement:
- Deposit Required Algorithm: Implement utility-specific rules to determine if deposit is required and select the applicable algorithm.
- CIS Division: Select the applicable CIS division.
- SA Type: Select the applicable service agreement type.
- Start Option: Select the applicable start option.
- Allow Bill in Full: Select this checkbox to allow customers to pay their bill in one lump sum. If this option is selected, installment amount settings are ignored.
- Minimum Installment Amount: Enter a minimum installment amount to enable customers to pay their bill in installments.
- Number of Installments: If a minimum installment amount is provided and Allow Bill in Full is cleared, enter the number of installments each bill is broken down into for payment.
- Start Level: Defines whether service is started for an entire premise or is done for individual services. If you select Individual Services, you must select algorithms to validate the service points with the Validate Service Points to Start Algorithm options. This validation is completed prior to performing question and response processing.
- Validate Services to Start Algorithm: Implement utility-specific rules to validate the services that are started. This validation is completed after performing question and response processing.
- Determine Services To Start Algorithm: Implement utility-specific rules to retrieve the services that are started for the service points at the premise. This processing is completed prior to performing question and response processing.
- Process Services To Start Algorithm: Implement utility-specific rules to process the services that are started for the service points at the premise. This processing is completed when finalizing the add service request.
- Create Customer Contact: Define the controls for creating a customer contact on finalization of the start service request. If you select Yes to create a customer contact, you must define the following:
- Customer Contact Class: Select the class for the customer contacts that are created when adding new service.
- Customer Contact Type: Select the customer contact type for the customer contacts that are created when adding new service. The customer contact type selected must require Person, Account, and Premise as these are used on creation of the customer contact. The entity relationship should be set to Person and Account Only.
- Stop Service Controls: Define the controls for validating the stop start date:
- Work Calendar: Select the applicable calender that is used for validating the service stop date.
- Lead Days: Enter the applicable number of working, lead days for the stop service requests.
- Cutoff Time: Select a time of day in which a customer must make a stop service request to consider only the lead days. If a customer creates a request after the cut off time, the request cannot be made for lead days plus one additional day.
- Time Zone: Select the applicable time zone used for validating the service stop date.
- Maximum Stop Days In Future: Select how many days in the future a customer can select from when requesting their service request. This includes weekends and holidays.
- Determine Services To Stop Algorithm: Implement utility-specific rules to retrieve the services that are stopped for the service points at the premise. This processing is completed prior to performing question and response processing.
- Process Services To Stop Algorithm: Implement utility-specific rules to process the services that are stopped for the service points at the premise. This processing is completed when finalizing the stop service request.
- Stop Level: Defines whether service is stopped for an entire premise, an account, or for service agreements. If you select SA, you can select Require SAs At Same SP To Behave Together to validate that all service agreements at the same service point are selected to stop together.
- Validate Services to Stop Algorithm: Implement utility-specific rules to validate the services that are stopped. This validation is completed after performing question and response processing.
- Create Customer Contact: Define the controls for creating a customer contact on finalization of the stop service request. If you select Yes to create a customer contact, you must define the following:
- Customer Contact Class: Select the class for the customer contacts that are created when stopping service.
- Customer Contact Type: Select the customer contact type for the customer contacts that are created when stopping service. The customer contact type selected must require Person, Account, and Premise as these are used on creation of the customer contact. The entity relationship should be set to Person and Account Only.
- Person Controls: Define the controls for an individual main customer. These configurations are required to support residential customers:
- Click Save.
- For the configuration of Questions, Service Eligibility, and Response-related updates, refer to the embedded help in Customer Care and Billing or the Questions and Response Processing topic in the Oracle Utilities Customer Care and Billing User Guide. Refer to the Customer Care and Billing product library.
Disabling Back-to-Back Stop and Start Service Requests
By default, a start service request can be initiated if there is still an active service on the premise, such as an active service for a previous resident. Often referred to as back-to-back requests, when supported, starting service initiates a stop service request for the active service for the premise. You can disable the support for these types of start service requests if this type of scenario is handled through other processing.
To disable support for back-to-back stop and start service requests
- Log in to Customer Care and Billing.
- From the Admin menu, select System, select Business Object, and then select Search. The Business Object Query dialog box opens.
- Enter
C1-SSStartStopXferServiceTaskin the Business Object field and select Search. The applicable business object is displayed in the search results. - Select the link in the description column to open the object.
- From the Algorithm tab make the following updates:.
- Business Object System Event: Validation
- Sequence: Provide an applicable value.
- Algorithm:
C1SSVBTBSVC
- Click Save.
Configuring Mailing Address Validation
Customers can edit the mailing address in account preferences. Mailing address validation can be enabled to highlight to customers when the address provided is not valid. This configuration is applicable to all versions of the Start, Stop, and Transfer service features.
To configure mailing address validation
- Log in to Customer Care and Billing.
- From the Admin menu, select Feature Configuration, and then select Search. The Feature Configuration Search dialog box opens.
- In the Feature Type field, select General System Configuration, and then select Search.
- Open the General System Configuration.
- Select the plus icon, from the Option Type select Address Validation Self-Service Script and define the followiong:
- Sequence:
1 - Value:
C1-ValAddr
- Sequence:
- Select the plus icon, from the Option Type select Allow Address Validation and define the following:
- Sequence:
1 - Value:
Y
- Sequence:
- From the Admin menu, select System, select Algorithm, and then select Search. The Algorithm Search dialog box opens.
- In the Algorithm Code field, type
F1-ORAGEOCDand select Search. The F1-ORAGEOCD algorithm is displayed. Review and modify algorithm as needed. - From the Geocoding JNDI Data Source row of the table, modify the Value column to be defined as
GEOSAMPL. - Mailing address validation must also be enabled by Oracle Utilities. Request this support by providing the input as part of Reviewing Start, Stop, and Transfer Service Configuration Options.
Configuring Messaging and Behavior
Note: This documentation provides steps to complete configuration tasks using the Opower Configuration Tool. For more information on using the Opower Configuration Tool, refer to the Oracle Utilities Opower Configuration Tool User Guide.
To configure Start, Stop, and Transfer Service messaging and behavior:
- From the Opower Configuration Tool, select Widgets, and then select the applicable widget:
- Sst (widget-sst): The configurations to support existing customers using Start, Stop, and Transfer Service Classic features.
- Sst (widget-sst-on-loginforkpage): The configurations to support new customers using Start, Stop, and Transfer Service Classic features.
- Sst Enhanced (widget-sst-enhanced): The configurations to support existing customers using Start, Stop, and Transfer Service features.
- Sst Enhanced (widget-sst-enhanced-on-loginforkpage): The configurations to support new customers using Start, Stop, and Transfer Service features.
- To configure text and messages of the feature:
- Select Text (locale), where locale is the language locale you are configuring.
- Text and messages are included for the text used throughout the various experiences of the Start, Stop, and Transfer features. For example, from the General tab, the Address Line Placeholder configuration allows for the definition of the input field for customers to enter their address.
- Select Save Changes to save any changes to the default text and messages. Text and messages that are directly available are updated in the preview, while text and messages in secondary locations may not be directly highlighted in the preview.
- To configure the behavior of the feature:
- Select Functionality.
- Make any required configuration changes. For example, from the Basic tab, the Service States options allow you to define which states are supported for utilities that configure multiple CIS divisions (see Supporting Multiple Divisions). The help text provided with configurations can provide additional explanation of each available option.
- Select Save Changes to save any changes to the default configurations. Certain configurations that are directly available are updated in the preview, while some configurations may not be directly highlighted in the preview.
- Refer to the Oracle Utilities Opower Configuration Tool User Guide for steps to publish configuration changes.
- Repeat these steps for each Start, Stop, and Transfer Service widget that you require to configure. This can include configuring a single widget if only the authenticated experience is used, or configuring two widgets if both authenticated and unauthenticated experiences are used. It would be unexpected to configure both versions of the features, since only one version of the features can be enabled at a time for customers.