Initial Configurations
The following general configurations are required as part of your Digital Self Service - Transactions configuration. To help you get started, a configuration checklist is provided for initial Digital Self Service - Transactions configuration.
Note: This documentation provides steps to complete these configuration tasks using Oracle Utilities Customer Care and Billing. However, many of these tasks can be completed with other applicable products such as Oracle Utilities Customer to Meter or Oracle Utilities Customer Cloud Service. Refer to your applicable product documentation for steps to complete the configuration using your Oracle Utilities product. Additionally, this documentation assumes that you know how to create the various objects listed below as well as modify or create master configurations. For additional details on these tasks, refer to the applicable Oracle Utilities Documentation.
Configuration Checklist
This documentation provides comprehensive configuration steps to fully configure Digital Self Service - Transactions. The following checklist summarizes the configurations that are required for initial configuration. Completing these configurations can be helpful when first configuring the product, such as for setting up feature and user acceptance testing.
This initial configuration checklist can also be reviewed in PDF form.
| Configuration | Complete |
|---|---|
|
Install required Oracle Utilities product patches The full list of supported product versions and patch dependencies is documented on My Oracle Support Document ID 2569793.1, which requires My Oracle Support access. |
|
|
Link Services to a Cloud Account The Digital Self Service - Transactions Cloud Service must be linked to a cloud account, as described in Link Services to a Cloud Account. |
|
|
Complete Environment Connection Digital Self Service - Transactions requires environments for development, user testing, and production purposes. These requirements are described in Environment Connection Information. As part environment configuration, a user must be available in your Oracle Utilities system which can invoke the Inbound Web Services that support Digital Self Service - Transactions, including the ability to perform both read and update actions. This user account must be granted proper permissions through methods such as enrolling the user as a member of the |
|
|
Complete Network Configuration Digital Self Service - Transactions requires a real-time secure connection to an Oracle Customer Information System including Oracle Utilities Customer Care and Billing, Oracle Utilities Customer to Meter, or Oracle Customer Cloud Service system. The network configuration requirements are described in Networking Configuration. |
|
|
Complete Feature Configuration Configure the Oracle Utilities products to enable Digital Self Service - Transactions as part of the general feature configuration, as described in Feature Configuration. |
|
|
Support Multiple Divisions Multi-jurisdictional Utilities can configure multiple divisions in Digital Self Service - Transactions to provide unique experiences to customers that belong to different divisions and states, as described in Supporting Multiple Divisions. |
|
|
Complete Key Oracle Utilities Product Configurations Digital Self Service - Transactions relies on various configurations within your Oracle Utilities products, as described in Key Configurations. |
|
|
Complete Manage Web Account Requirements Manage Web Account configuration includes defining the identifiers used by customers to connect and verify their web account and utility accounts, creating person contacts to support web users, and defining invite guest user tasks and alerts. These processes are described in Configuring Manage Web Account Requirements |
|
|
Configure Automatic Payments A unique automatic payment source must exist for every entity such as a bank, credit card company, or bill payment service that is available to customers as the source of the funds when they sign up for automatic payments. A self-service task must also be configured to support automatic payments. For initial configuration, ensure that at a minimum a properly configured Auto Pay Source Type exists that uses ACH-NACHA as the Auto Pay Route Type. To configure automatic payments, refer to Automatic Payments. Note: Automatic payment configuration also includes steps to support same day enrollment. This option is not required for initial configuration. |
|
|
Configure the Budget Billing Script Ensure that the script used for budget billing is configured, which is described as part configuration in Budget Billing. |
|
|
Review Alert and Notification Configuration Locate and review the default alert and notification configuration, as described in Alerts and Notifications. |
|
|
Define Service Date Restrictions A calendar is displayed to customers to select when to complete a particular service request. You must define restrictions to these dates for reasons such as holidays by configuring the work calendar, as described in Defining Service Date Restrictions. |
|
|
Create a Simple Residential Campaign Campaigns are used to present a series of questions to customers as one of the steps within the start service process. To create a simple residential campaign, refer to Creating Start Service Campaigns and use the provided example configurations. |
|
|
Select Your Simple Residential Campaign Configure the self-service master configuration to define the information retrieved for a new residential service request along with which pieces of information are required and which are used to identify a customer. To complete these steps, refer to Configuring New Service Information and Requirements. |
|
|
Configure Authentication Authentication ensures that an individual is recognized and granted an appropriate level of access to Digital Self Service - Transactions. This procedure is described in the Oracle Utilities Opower Digital Self Service - Transactions Authentication Configuration Guide. As you complete this process, ensure that at least one user has been added. This user account is used later in the initial configuration process to log in to Digital Self Service - Transactions. |
|
|
Connect an Account to Digital Self Service - Transactions Determine an account in your Oracle Utilities product, including the applicable account ID, that can be used to connect to a user account that was configured when completing authentication configuration. Note: It is recommended to select an account with at least 6 months of recent bills. You can then complete the steps below to connect the account in Digital Self Service - Transactions:
|
|
|
Confirm Successful Configuration At this point in the process, initial configuration of Digital Self Service - Transactions is complete. Browsing and testing of features can begin, including features such as: Note: For more information on the features listed below, see the Oracle Utilities Opower Digital Self Service - Transactions Cloud Service Product Overview.
The next steps to continue and complete your Digital Self Service - Transactions configuration can be taken by reviewing the features and configuration options described at Design and Configuration. |
Link Services to a Cloud Account
When the Digital Self Service - Transactions Cloud Service is ordered, the point of contact defined on the ordering document is sent an automated email message directing them to add their subscriptions to a cloud account.
By default, when adding your Digital Self Service - Transactions subscription to a cloud account, the default identity domain of that account is selected as the employee identity management for the Cloud Service for your initial pre-production environments.
From the automated email message, select one of the applicable options to either create a new cloud account or activate the services into an existing cloud account. Complete all steps to link your Digital Self Service - Transactions services to a cloud account.
Consider how you intend to configure authentication for Digital Self Service - Transactions by reviewing the options below prior to linking the service to a cloud account, as the activation is permanent once completed.
OAuth Mode with Oracle Cloud Infrastructure Identity and Access Management
The following service linking options are available when utilizing Oauth mode.
Default Identity Domain in a Dedicated Cloud Account
By choosing a new cloud account, or if Digital Self Service - Transactions is the only service for an existing cloud account you choose, you can continue to utilize the default identity domain as the identity management for Digital Self Service - Transactions Implementation and Stage environments as part of your Digital Self Service - Transactions subscription.
This domain grants your employees and implementation partners access to Digital Self Service - Transactions to perform implementation and user testing activities in the same authentication mode your customers have access to in the production environment.
Dedicated Identity Domain in a Shared Cloud Account
If the desired cloud account hosts additional Oracle services or you plan to host additional services in the future, you must follow the steps to create a new identity domain that can be dedicated to Digital Self Service - Transactions Implementation and Stage environments in this cloud account. As part of this process you must provide your identity domain URL to the Oracle Utilities Delivery Team. See Contacting Your Delivery Team for methods to securely share this information.
This domain grants your employees and implementation partners access to Digital Self Service - Transactions to perform implementation and user testing activities in the same authentication mode your customers have access to in the production environment. Oracle Utilities converts this domain to an Oracle Apps identity domain when Digital Self Service - Transactions is provisioned.
Single Sign-On Mode in a Dedicated or Shared Cloud Account
If you intend to support authentication to Digital Self Service - Transactions in Single Sign-On mode, you can continue to utilize the default identity domain as the identity management for your Digital Self Service - Transactions Implementation and Stage environments as part of your Digital Self Service - Transactions subscription regardless of it being shared with other Cloud Services.
This domain grants your employees and implementation partners access to Digital Self Service - Transactions to perform implementation and user testing activities in the same authentication mode your customers have access to in the production environment.
Feature Configuration
You must configure your Oracle Utilities products to enable Digital Self Service - Transactions as part of the general feature configuration. If you previously used Oracle Utilities Customer Self Service, configurations for that product related to line of business verification fields and links for self-service users to person or account records are removed. These configurations are replaced with applicable Digital Self Service - Transactions configurations, along with additional configurations that support Digital Self Service - Transactions.
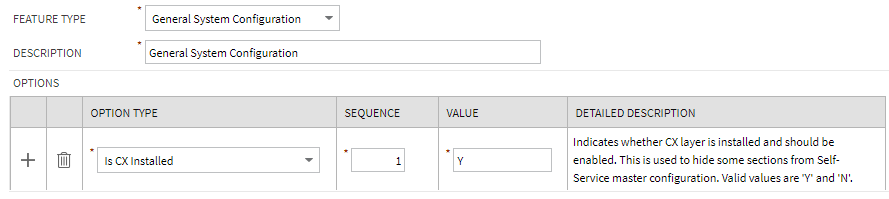
To configure Feature Configuration
- Log in to Customer Care and Billing.
- From the Admin menu, select General, select Feature Configuration, and select Search. The Feature Configuration search is displayed.
- In the Description field, type General System Configuration and select Search. The General System Configuration is displayed.
- Within the Options table, locate the Option Type of Is CX Installed, ensure the Value column has the value of Y. This ensures that Digital Self Service - Transactions configurations are enabled.
Supporting Multiple Divisions
Multi-jurisdictional Utilities can configure multiple divisions in Digital Self Service - Transactions to provide unique experiences to customers that belong to different divisions and states. Supporting multiple divisions ensures that service agreements and premises match the account's CIS division, which supports segmenting data by CIS division. For more information on applying segmentation to Digital Self Service - Transactions, see the Oracle Utilities Opower Configuration Tool User Guide.
Note: In addition to the configuration steps listed below, you must also request Oracle Utilities to enable multiple division support. When submitting your request, indicate whether divisions must be enabled for start, stop, and transfer service. The request must also provide a list of operating companies with their associated divisions for each one of your applications as needed. For information on creating a service request for this update, see Contacting Your Delivery Team.
To support multiple divisions
- Log in to Customer Care and Billing.
- From the Admin menu, select General, select Feature Configuration, and select Search. The Feature Configuration search is displayed.
- In the Description field, type General System Configuration and select Search. The General System Configuration is displayed.
- Within the Options table, locate the Option Type of Multi Division Master Config Script, ensure the Value column has the value of C1MultDvConf. Select Save if any changes were made.
- From the Admin menu, select General, select Characteristic Type, and select Search. The Characteristic Type page is displayed.
- Modify the
C1-OPCOcharacteristic type to define your divisions as described below:- Characteristic Type: Enter
C1-OPCOto modify this characteristic type. - Description: Provide a descriptive value to identify the characteristic, such as Operating Divisions.
- Type of Char Value: Pre-defined Value.
- Allow Search by Value: Allowed.
- Custom: Select this option.
- Add characteristic value rows for each division. For each row created, the Characteristic Value acts as the programmatic name, and the Description acts as a more descriptive name for the division. For example, valid values could be E-Div and Eastern Division.
- From the Characteristic Entities tab, create rows for the following Characteristic Entities:
- CIS Division
- Extendable Lookup
- Characteristic Type: Enter
- Select Save to save the changes to the
C1-OPCOcharacteristic type. - A CIS Division must be created in the CIS Division List for each division characteristic type created previously in these steps. Repeat this process for each division.
- From the Admin menu, select General, select CIS Division, and select Add. The Main page is displayed to define the CIS Division.
- Take note of the ID field for any applicable divisions, these values are required later in these steps.
- In addition to the required fields, ensure that the Effective Dated Characteristics area includes a row for the applicable characteristic type. From the example provided above, the Characteristic Type is defined as Operating Divisions (the description of the characteristic type) and the Value is defined as E-DIV (the characteristic value of one of the divisions).
- Select Save to create the CIS Division.
- From the Admin menu, select General, and then select Extendable Lookup. The Extendable Lookup Query page is displayed.
- In the Business Object field, enter C1-SelfServiceIntegration and select Search. The C1-SelfServiceIntegration Business Object is displayed.
- Select the Self-Service Integration link. The Extendable Lookup Value List is displayed.
- Create a row in the list for each supported division. Select Add to create a new row and complete the following configurations:
- Value: The first value must match the ID value defined in the CIS Division List which was created previously in these steps.
- Description: An identifying description for the division, such as Easter Division.
Key Configurations
Digital Self Service - Transactions relies on various configurations within your Oracle Utilities products. The table below provides some configurations that are important to support the initial configuration of Digital Self Service - Transactions and provides some examples of common values for these configurations. Work with your Oracle Utilities Delivery Team, as described at Contacting Your Delivery Team, to provide the values in your system for each configuration listed below:
| Configuration | Example Values |
|---|---|
| Service Type |
|
| Bill Route Type |
|
| Customer Class |
|
| Country | USA |
| Time zone | US/Pacific |
Environment Connection Information
All required environment connection information must be provided to Oracle Utilities. The following environments are required:
- IMP: The implementation or development environment.
- UAT: The user acceptance testing or systems integration testing environment.
- PROD: The production environment.
Each environment listed above must be able to connect to the following components:
- Customer Care and Billing or Customer to Meter: Digital Self Service - Transactions uses Customer Care and Billing or Customer to Meter APIs, also referred to as Inbound Web Services (IWS), to retrieve applicable data from the on-premise application. To support this connection, you must provide the load balancer IP address and port number for the host of the IWS.
An IWS running on a load balancer must be capable of returning an XML document without any authentication when retrieved using the cURL commandcurl -v -k https://[IP]:[Port]/ouaf/webservices/WXGetSelfServiceDropdowns?wsdl. This capability must be tested and confirmed before sending applicable details. - File Manager: File manager stores client files on the utility's WebDav server. To support a connection to file manager, you must provide the IP address as well as applicable credentials for the WebDav server.
- Bill Download: Bill download retrieves client bills from a utility specific URL. To support bill download, you must provide the IP address of this service, and any authentication if applicable. For more information on this integration, refer to the Oracle Utilities Opower Digital Self Service - Transactions Bill Download Integration Guide.
In summary, the following information for all environments and components must be provided:
| Customer Care and Billing or Customer to Meter IWS Host | File Manager WebDav Host | Bill Download Service | |
|---|---|---|---|
| IMP |
IP address and port:
Credentials: |
IP address and port:
Credentials: |
IP address and port:
Credentials (if applicable):
|
| UAT |
IP address and port:
Credentials:
|
IP address and port:
Credentials: |
IP address and port:
Credentials (if applicable): |
| PROD |
IP address and port:
Credentials:
|
IP address and port:
Credentials: |
IP address and port:
Credentials (if applicable): |