15.2.3.2 Retail & Business Approval Rules – Create

Bank Administrator can create approval rules for the Retail & Business users. Administrator is allowed to create an approval rule only if the party preference is maintained and party is in active status.

Approval rules can be setup based on the following parameters.

  • Type of Transaction
    • Financial Transactions

      This option is used to setup approval rules for the transactions, this involves exchange of money.

      E.g. Money Transfer, Draft Issuance, Redeem Term Deposit etc.

    • Non Financial Transactions

      This option is used to setup approval rules for the transaction which are for an account, but does not involve exchange of money.

      E.g. Cheque Book Request, Statement Request, Stop Cheque etc.

    • Maintenance

      This option is used to setup approval rules for the transaction which are at the party level and not for a specific account

      E.g. Payee Maintenance, Biller Maintenance etc.

    • Administration

      Option is used to setup approval rules for the maintenances which corporate administrator can initiate. These are mainly configurations related transactions for that corporate

      E.g. Account-Transaction mapping, Approval related maintenances etc.

    • Non Account Financial Transactions:

      This option is used to setup approval rules for the transaction with amount range and no debit account

      E.g. Initiate LC, Supply Chain Finance related transactions like create Invoice.

    • Initiator
      • Specific User
      • User Group
      • All Users
    • Accounts
    • Transactions
    • Currency
    • Amount Range

Administrator can create multiple approval rules for party users. In a scenario when a transaction is initiated and multiple rules are applicable as per set conditions, then the complex rule amongst all the applicable rules is applied for approval.

User can further define if for a condition, the transaction should be auto approved (which means there is no approval workflow and the transaction gets approved as soon as initiator submits the transaction) or should follow a set approval workflow and should get approved by the defined set of approvers. The same is achieved by attaching a workflow maintained for the Retail & Business party.

To create an approval rule for Retail & Business user:

  1. Navigate to one of the above paths.
    The Approval Rules screen appears.
  2. Enter the search parameters and click Search.
    The Approval Rules screen with both Party ID and Party Name appears.
  3. Click the Party ID link to view details.
    The Approval Rule - Summary screen appears.
  4. Click Create.
    The Approval Rules - Create screen appears.

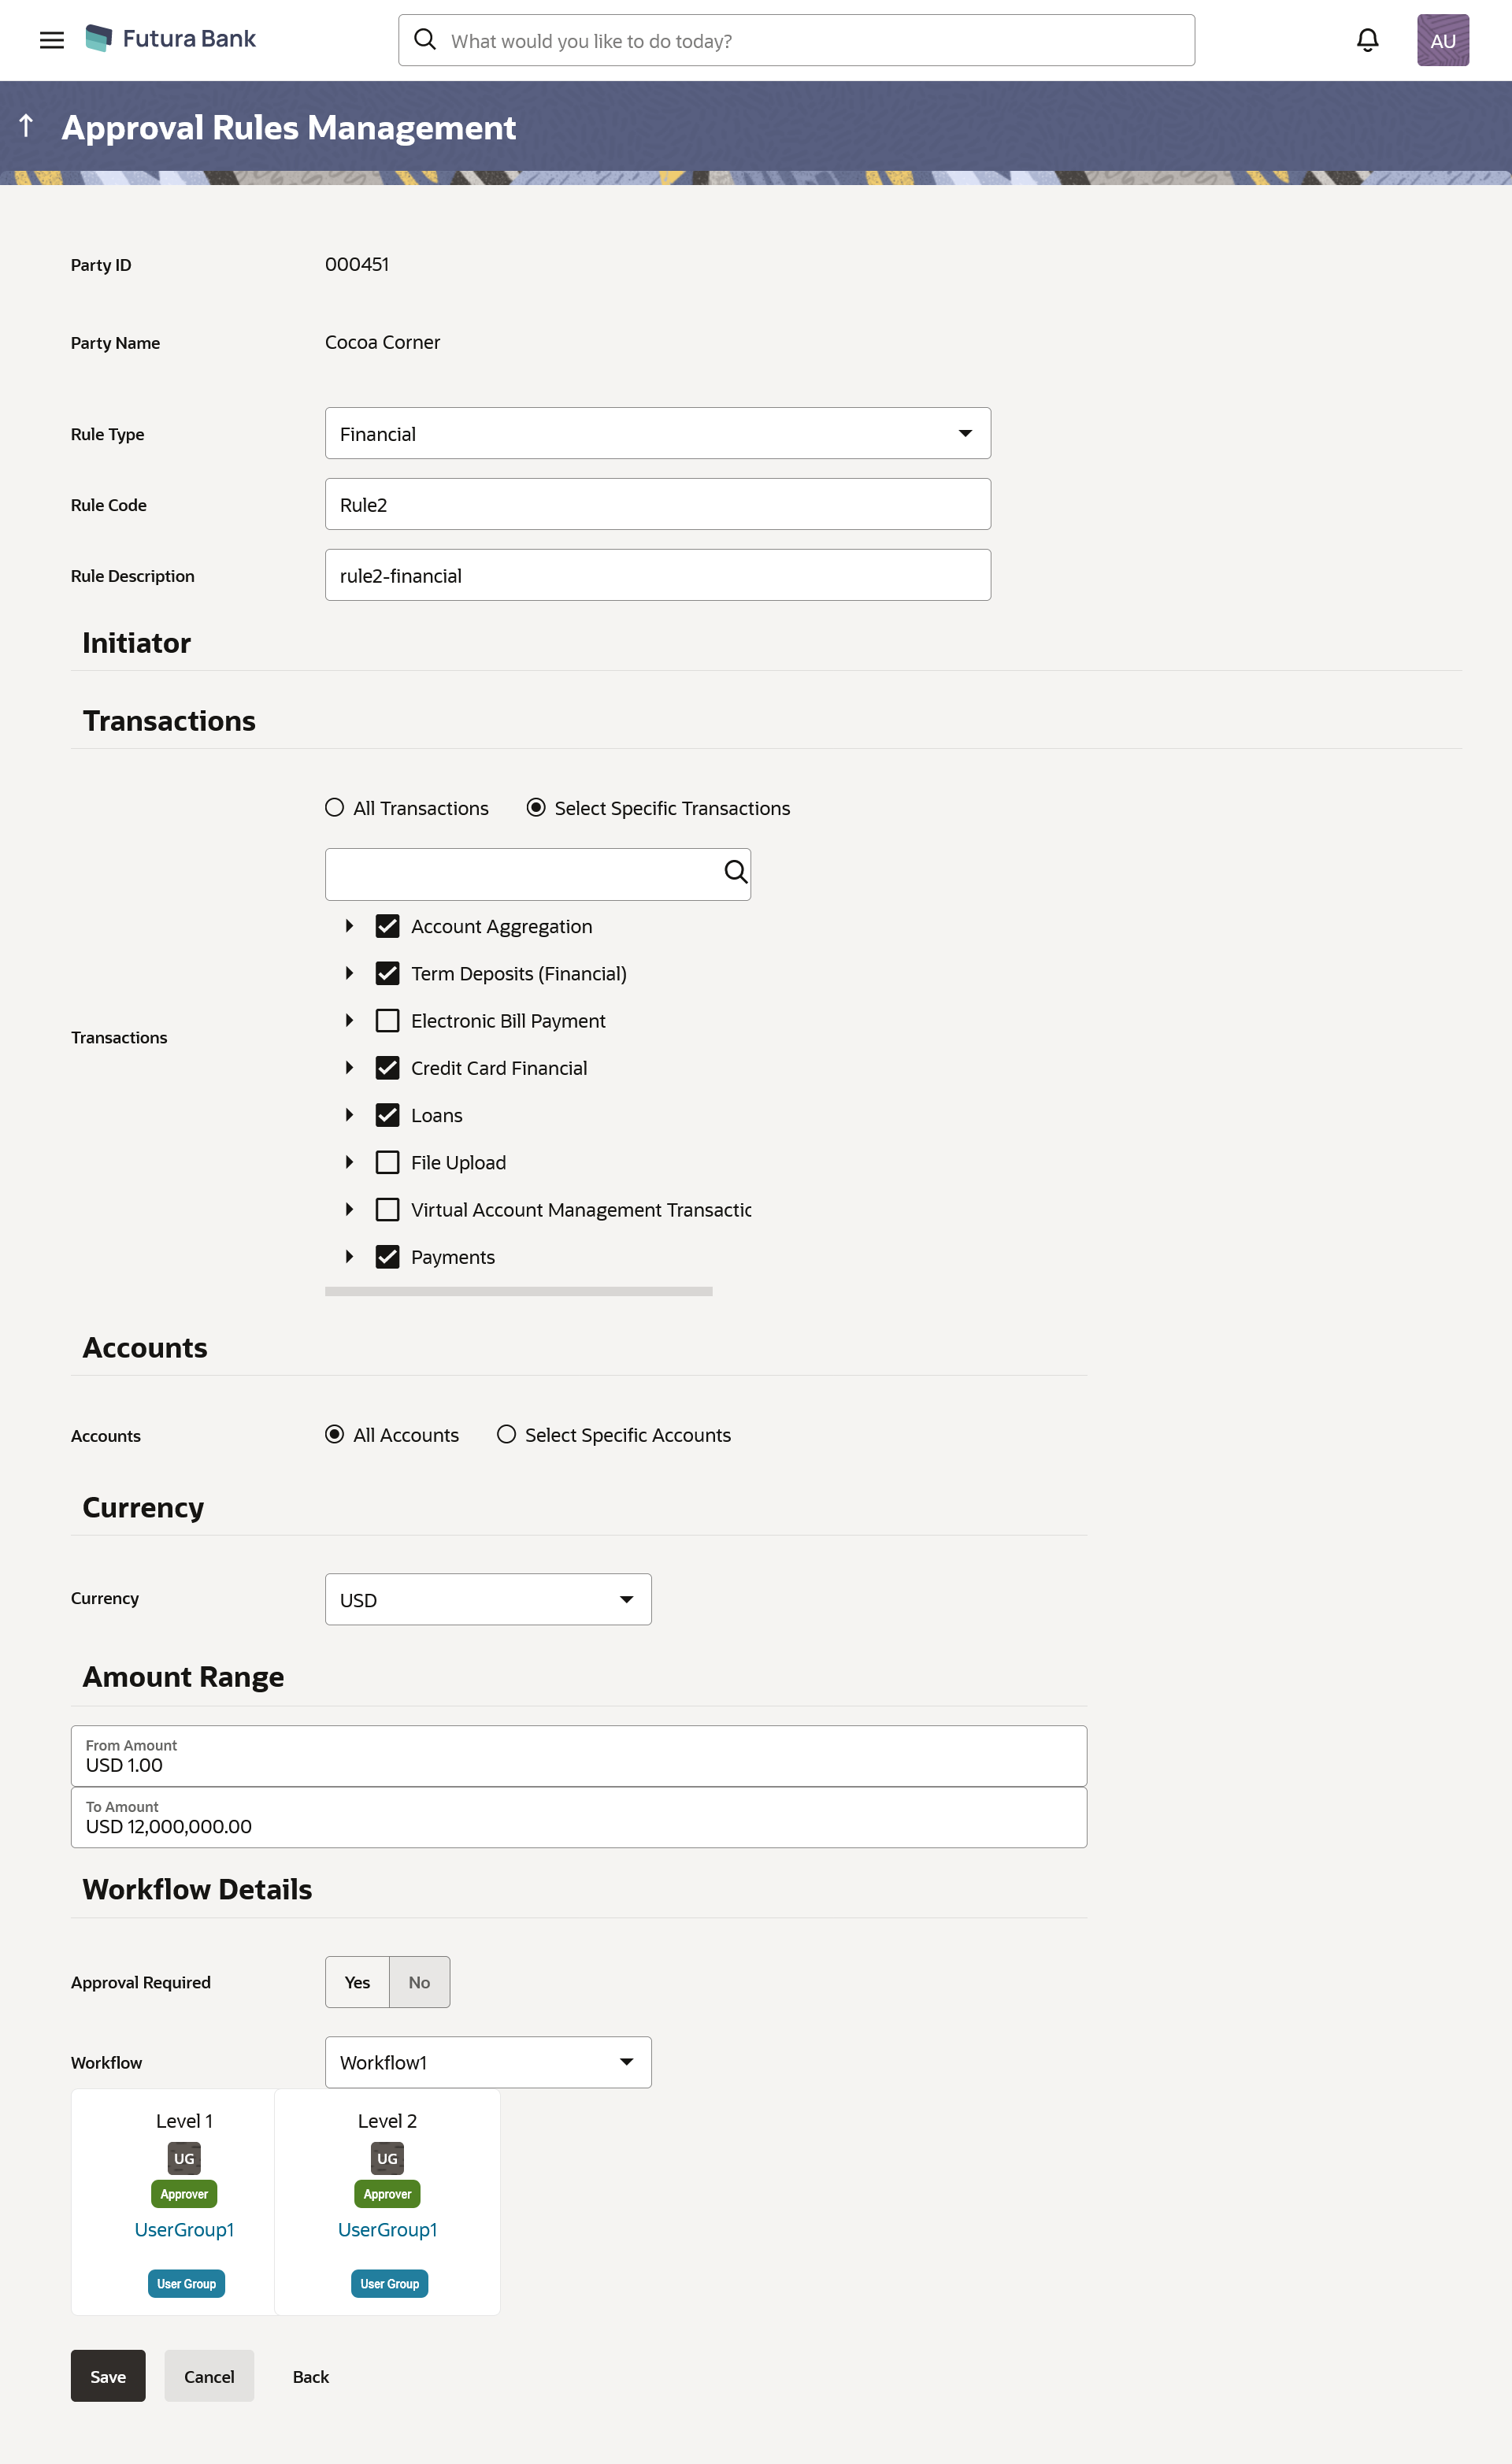
    Figure 15-26 Approval Rules – Retail & Business User - Create


    Table 15-19 Field Description

    Field Name Description
    Party ID Party ID for which an approval rule is to be maintained.
    Party Name Party name of Party ID for which an approval rule is to be maintained.
    Rule Type Transaction rule type for which the approval rule needs to be set up.

    The transaction rule for Retail & Business user are:

    • Financial
    • Non Financial
    • Maintenance
    • Administration
    • Non Account Financial

    The transaction rule types for a non-customer Retail & Business user are:

    • Maintenance
    • Non Account Financial
    • Administration
    Rule Code To specify approval rule code.
    Rule Description To specify approval rule description.
    Initiator
    Initiator Type Initiator type who initiates the transaction.

    This has options as ‘User’ , ‘User Group’ and ‘All Users

    User / User Group Name of the user or user group as initiator.

    If initiator is selected as User, then all the users belongs to the party will be listed for selection.

    If initiator is selected as User Group, then all the user groups belongs to the party will be listed for selection.

    If Initiator is selected as All Users, then the rule which is being created is applicable for all users of Corporate Party.

    Transactions Type of transactions to set the approval rules.

    Type of transactions depends on the selection of rule type.

    Accounts Type of accounts.

    This field appears if you select Financial and Non Financial in the Rule Type field.

    Currency Currency type in which the financial approval rule for a corporate is defined.

    This field appears if you select Financial and Non Account Financial in the Rule Type field.

    Note:

    1. Entity’s base currency (maintained in system configuration) will be defaulted in the currency field.
    2. User will be able to select the currency other than the default currency from the currency list.
    Amount Range
    From Amount/ To Amount Transactions allowed for the user between the amount range.

    This field appears if you select Financial and Non Account Financial in the Rule Type field.

    Workflow Details
    Approval Required Option to decide whether approval is required or not for the set condition.
    Workflow Field has description of the approval workflow. All workflows maintained for the party are listed here along with the defined approval level for each of them.

    This field appears if you select Yes in the Approval Required field.

  5. In the Rule Type field, select the appropriate transaction rule type.
  6. In the Rule Code field, enter the code.
  7. In the Rule Description field, enter the rule name.
  8. From the Initiator Type field, click appropriate user / user group and select the user/ user group.
  9. From the Transaction list, select the transactions to be mapped to the rule.
  10. From the Accounts list, select the appropriate account, if you have selected Financial option in the Rule Type field.
  11. From the Currency list, select the appropriate account currency, if you have selected Financial option in the Rule Type field.
  12. In the Amount Range section, enter the appropriate amount if you have selected Financial and Non Account Financial option in the Rule Type field.
  13. In the Workflow Details section, select whether approval is required for the mapped transactions.
    1. If you select Yes option, select the appropriate Workflow.
  14. Click Save to save approval rule.
    OR

    Click Cancel to cancel the transaction.

    OR

    Click Back to navigate to the previous screen.

  15. The Approval Rule - Create Review screen appears.
    Verify the details, and click Confirm.

    OR

    Click Cancel to cancel the transaction.

    OR

    Click Back to navigate to the previous screen.

  16. The success message of saving the created approval rule appears along with the transaction reference number and status.
    Click OK to complete the transaction and navigate back to the ‘Dashboard’.