47.4 Dashboard Overview – Design – Create Administrator Template

The system administrator can select a default dashboard available for administrator or can create a custom dashboard by dragging and dropping new widgets available from the list of components.

The administrator can create the administrator dashboard template either by selecting the administrative maintenance or group of administrative functions.

As part of administrative maintenances UI component, there are individual transaction quick links put in a single widget to component mapping available, the administrator user on actual login will be shown only those quick links that user has access to.

As part of system functions UI component, there is a logical group of transactions that can placed as a widget on the dashboard by selecting the administrative function from the group.

To create a new administrative dashboard template:

  1. Navigate to one of the above paths.
    The Dashboard Builder screen appears.
  2. the Dashboard Overview screen, click Create.
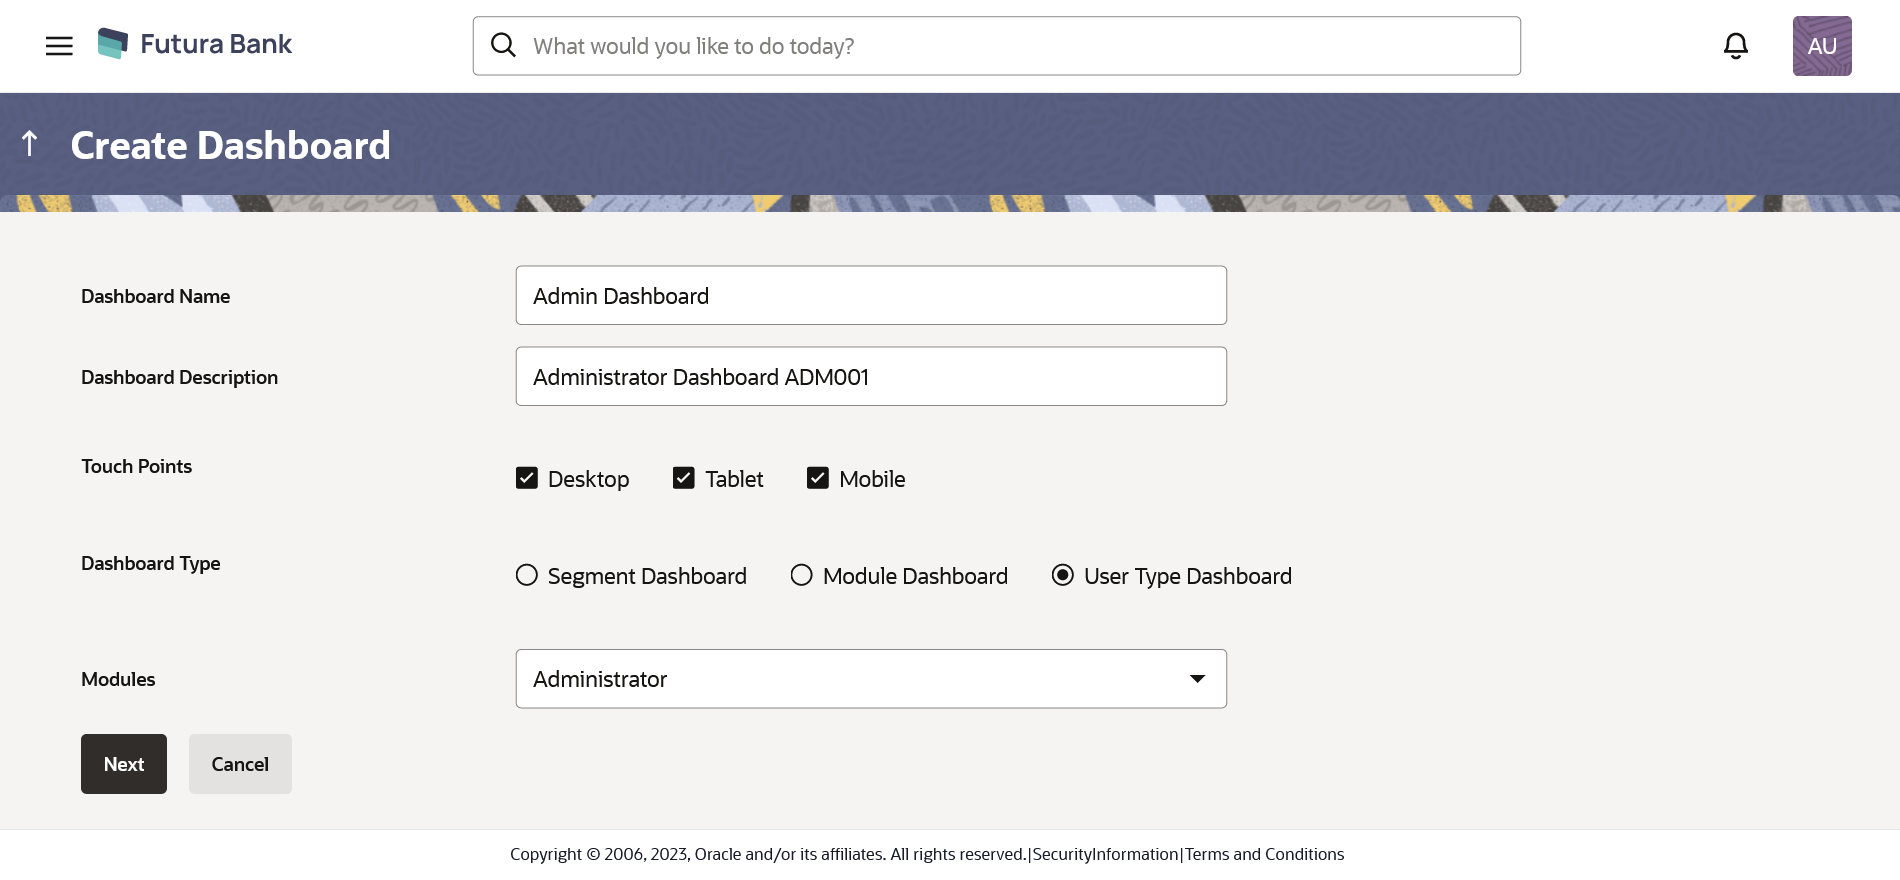
    The Create Dashboard screen appears.

    Figure 47-7 Create Dashboard Template – For Administrator User Type


    Table 47-4 Field Description

    Field Name Description
    Template Name Name of the template that the System Administrator user wants to create.
    Template Description Description for the template.
    Design The type of device on which the template will be enabled.
    Select Module System lists the dashboard for the segments / application roles / user type / module depending on the option selected.
    User Type Select administrator from the user type list.
    List of Dashboards System displays the list of dashboards available for selection based on the selected module type.
  3. In the Template Name field, enter the name of the new template that is to be created.
  4. In the Template Description field, enter the description of the new template.
  5. To enable the template for Desktop/ Tablet / Mobile, select the required options from the Design check box.
  6. From the Segment Dashboard/ Application Role Dashboard/ Module Dashboard/ User Type Dashboard tabs, select the appropriate module.
    The Dashboard Overview - Design screen of the selected module appears.

    To create a dashboard for a newly created administrator application role or to customize the dashboard for an existing administrator application role, user will need to select Application Role Dashboard/ User Type Dashboard tab.

  7. In the User Type field, select the administrator user.
  8. Select the appropriate dashboard from the list of dashboards displayed based on the selected module.
  9. Click Next.
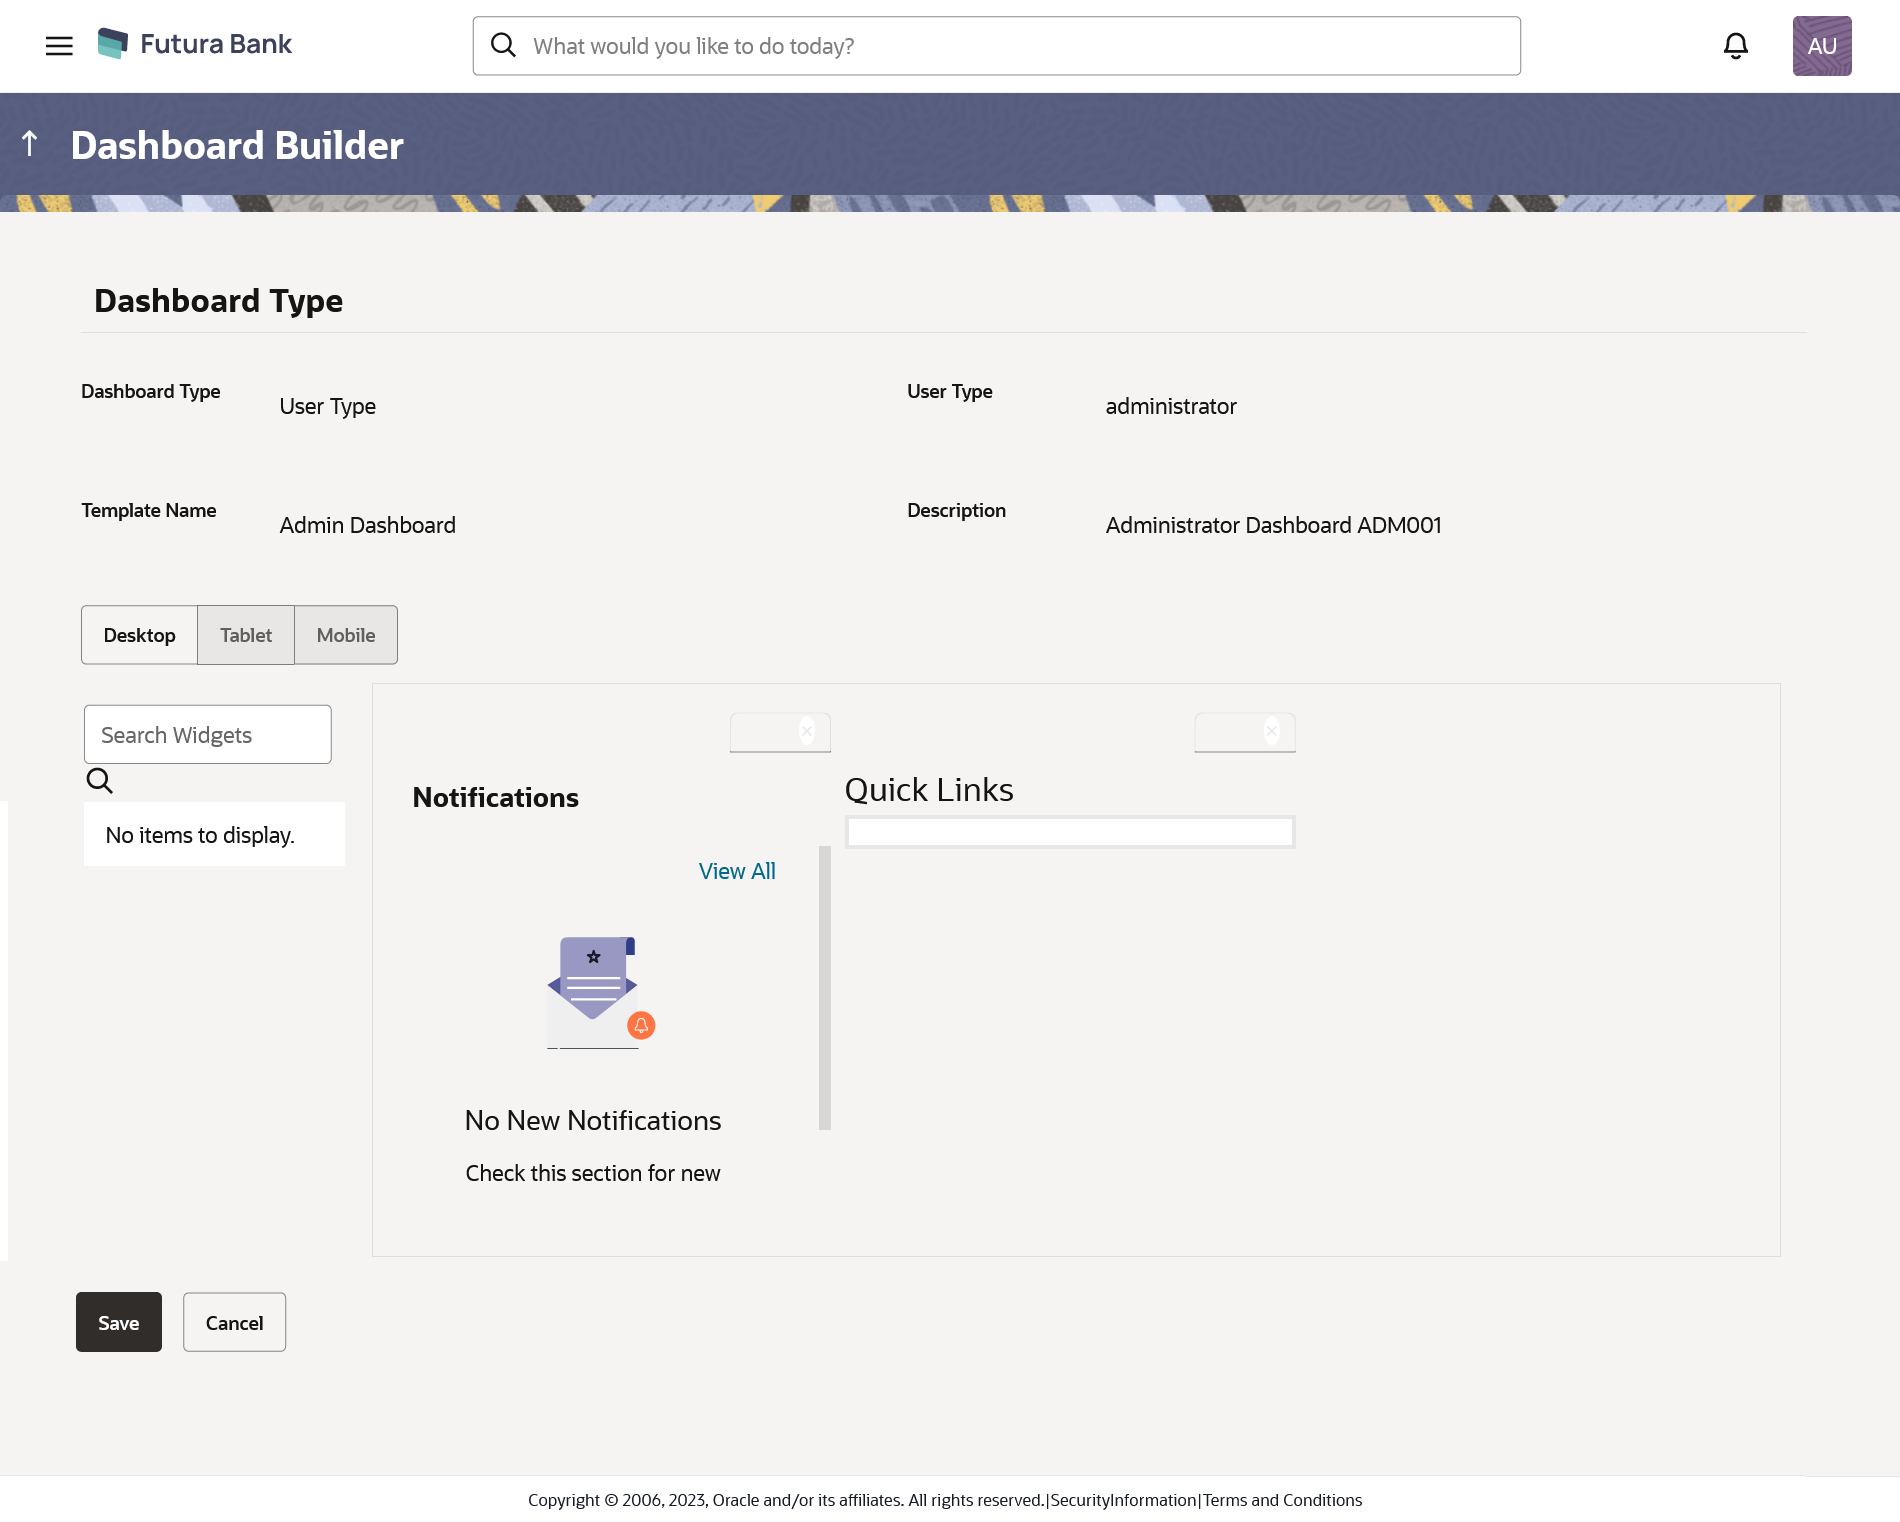
    The Dashboard Overview - Design template for Administrator appears.

    OR

    Click Cancel to cancel the transaction.

    Figure 47-8 Dashboard Overview - Design – Create Administrator Template


  10. Click on the desired widgets from the widget list to appear on the dashboard.
    OR

    In the Search Widget field, enter the name of the widget that you want to appear on the dashboard and click search icon.

    OR

    Click on the desired widgets of the dashboard to the desired location. System highlights the
      area where the widget can be placed.

  11. Click Expand icon on the upper right corner of the widget, if you want to expand the widget.
    OR

    Click compress icon on the upper right corner of the widget, if you want to compress the widget.

    OR

    Click remove icon on the upper right corner of the widget, if you want to remove the widget from the dashboard.

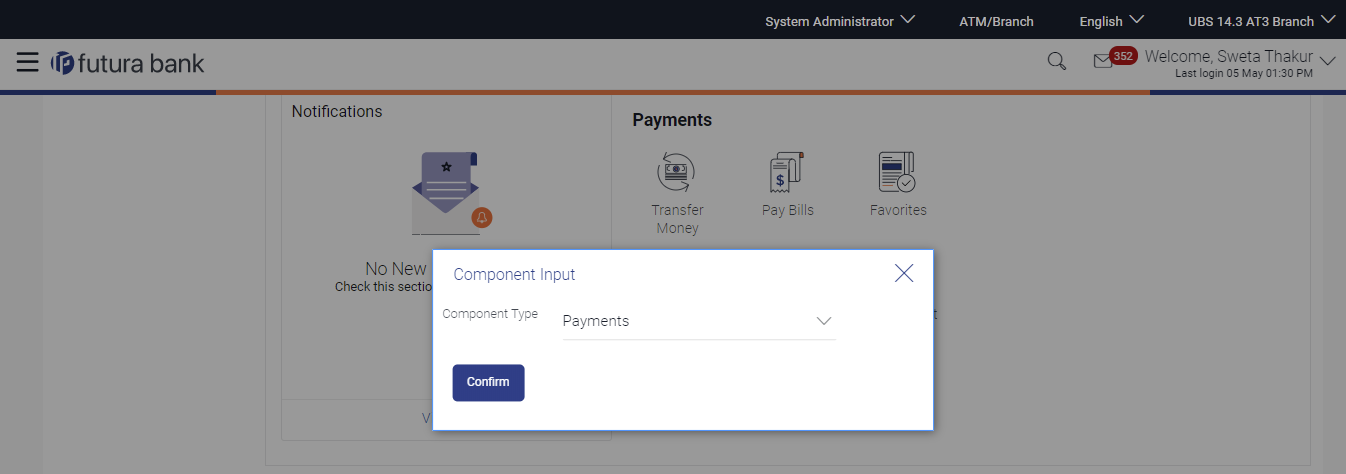
  12. If the selected widget has multiple widgets on the same component like 'System Administrator Action Card', select the required widget that you want to appear on the dashboard.

    Figure 47-9 Dashboard Overview - Component Input box


    Table 47-5 Field Description

    Field Name Description
    Component Type Select the component type, which you want to appear on your dashboard.

    This field is applicable only if the selected widget has multiple components.

    1. From the Component Type list, select the widget component that you want to appear on the dashboard.
    2. Click Confirm.

      The selected component appears as a widget on the selected location of your dashboard.

  13. Click Save to save the template information.
    OR

    Click Cancel to cancel the transaction.

    OR

    Click Back to navigate to the previous screen.

  14. The Review screen appears.
    Verify the details, and click Confirm.

    OR

    Click Cancel to cancel the transaction.

    OR

    Click Back to navigate to the previous screen.

    OR

    Click the Desktop/ Tab/ Mobile icon to review the template in desktop, tab or mobile mode.

  15. The success message appears.
    Click Go to Dashboard to view your customized dashboard.