7.2 Limits Definition - Create
Using this option, System Administrator can create a limit as required.
To create a transaction limit:
- Navigate to one of the above paths.
The Limits Definition screen appears.
- Click Create.
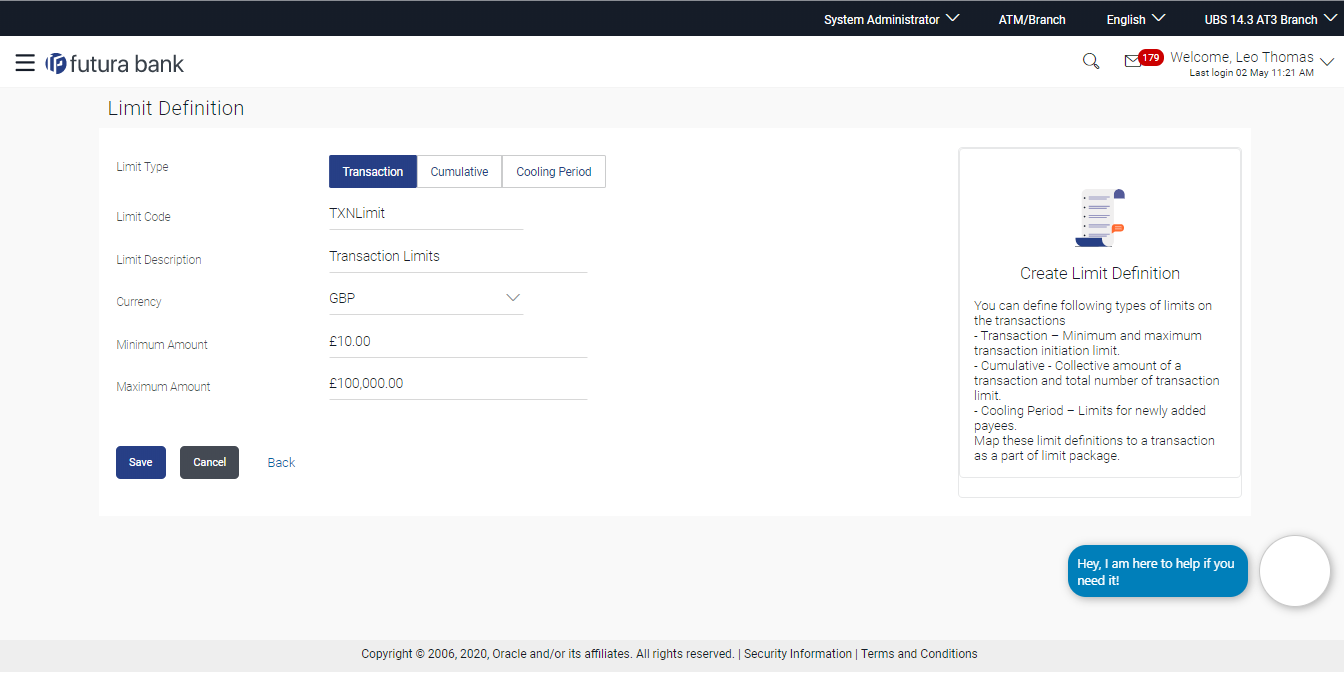
The Limits Definition - Create screen with Transaction tab appears.
Figure 7-4 Limits Definition - Transaction - Create
Table 7-2 Field Description
Field Name Description Limit Type The type of limit. The limit type for selection are:- Transaction – It is the initiation limit with minimum and maximum amount
- Cumulative – It is a duration based limit with maximum amount and number of transactions for a day/month
- Cooling Period – Payee cooling period limit is a time and the amount limit set by the bank during which fund transfer is not allowed or allowed till the specified limit, to a newly added payee.
Limit Code The name of the limit with unique identifier. Limit Description Description of the limit. Currency The currency to be set for the limit. Minimum Amount The minimum amount for a transaction in selected currency. Maximum Amount The maximum amount for a transaction in selected currency. - In the Transaction tab screen, enter the code in the Limit Code field.
- In the Limit Description field, enter the description of the limit.
- From the Currency field, select the appropriate currency for the limits.
- In the Minimum Amount and Maximum Amount field, enter the minimum and maximum amount for a transaction in local currency.
- Click Save to Save the created
limit.
OR
Click Back to navigate to the previous screen.
OR
Click Cancel to cancel the transaction.
- The Review screen appears.
Verify the details, and click Confirm.
OR
Click Cancel to cancel the transaction.
OR
Click Back to navigate to the previous screen.
- The success message of party preference creation appears.
Click OK to complete the transaction.
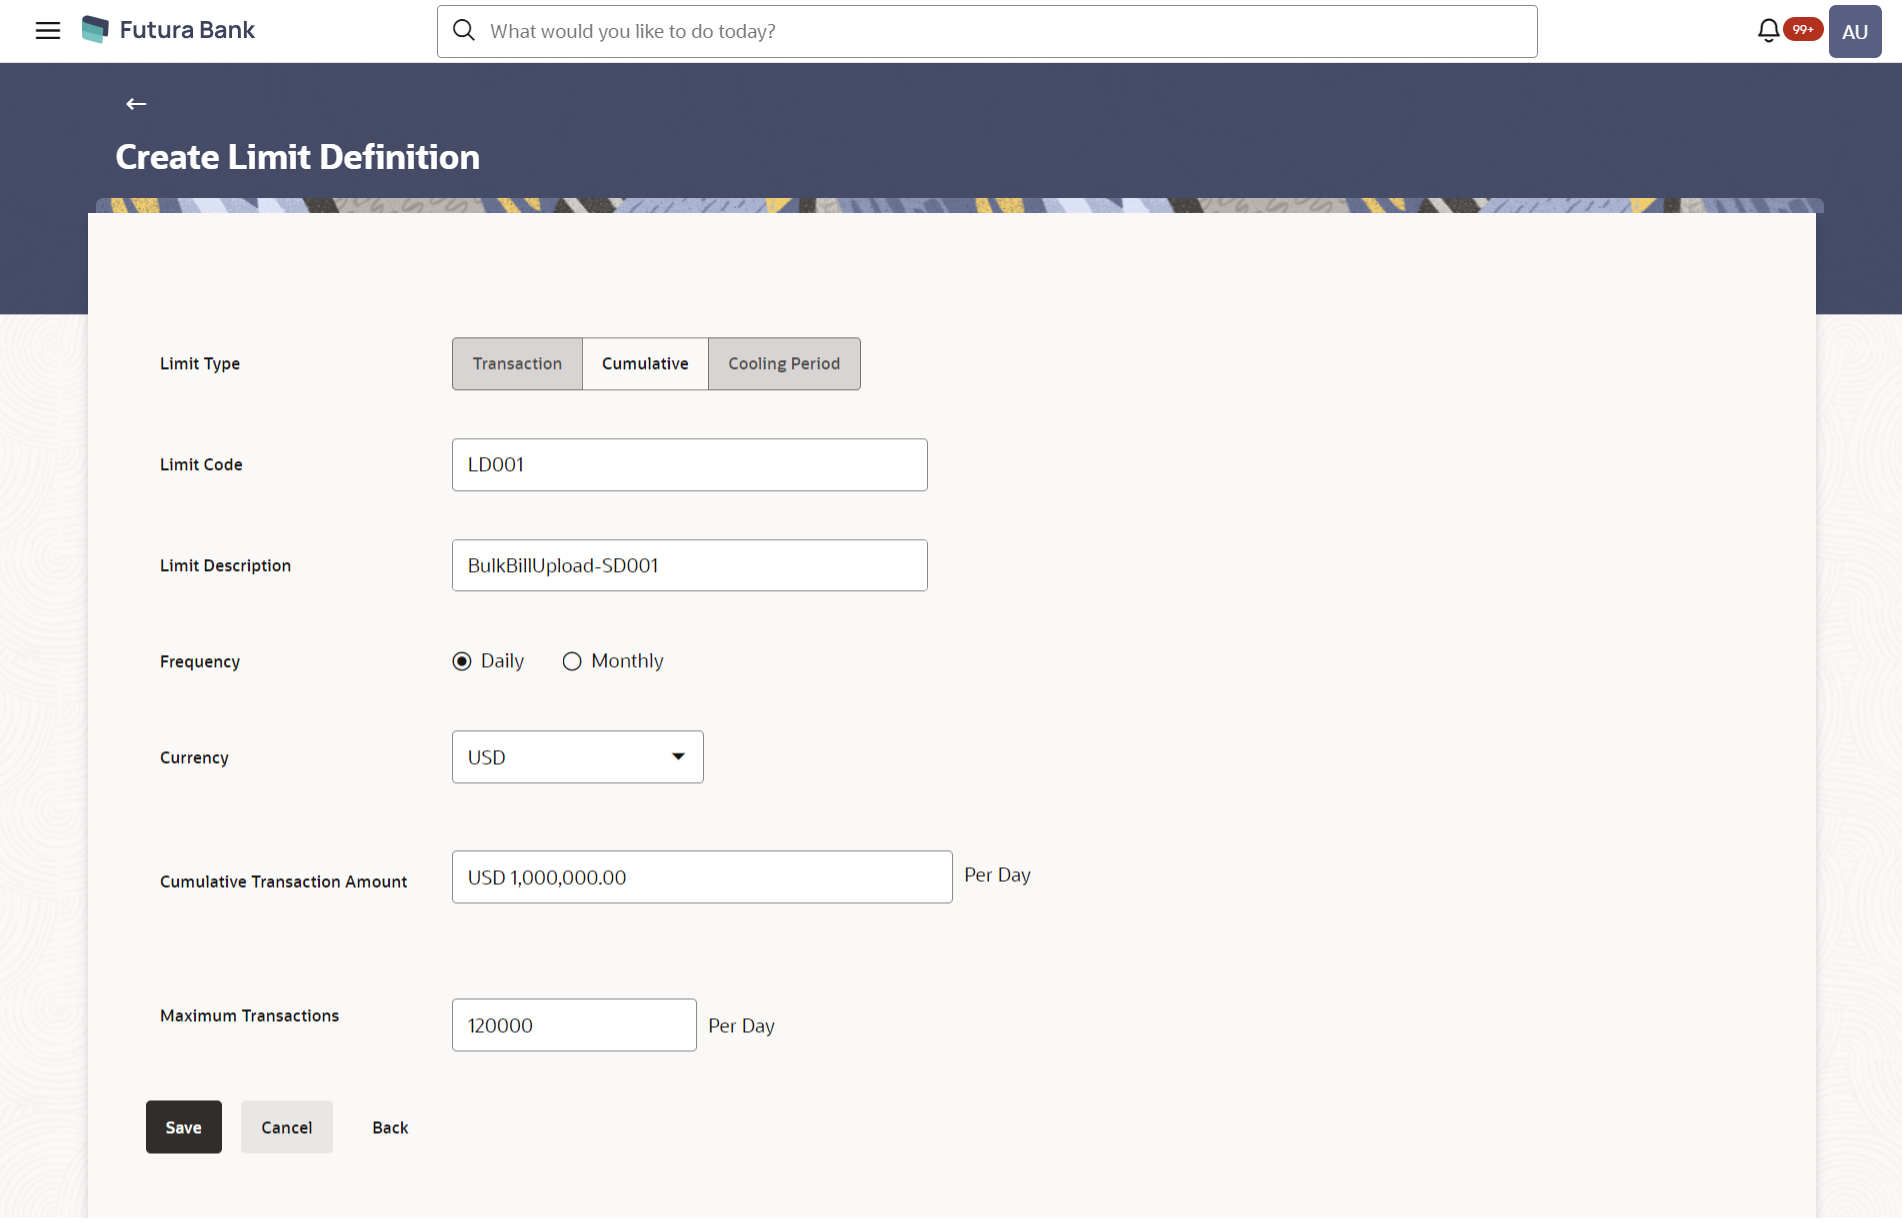
Figure 7-5 Limits Definition - Cumulative - Create
Table 7-3 Field Description
Field Name Description Limit Type The type of limit. The limit type for selection are:- Transaction – It is the initiation limit with minimum and maximum amount
- Cumulative – It is a duration based limit with maximum amount and number of transactions for a day/month
- Cooling Period – Payee cooling period limit is a time and the amount limit set by the bank during which fund transfer is not allowed or allowed till the specified limit, to a newly added payee.
Limit Code The name of the limit with unique identifier. Limit Description Description of the limit. Frequency The specific duration for which the limits can be utilized and available. The options are:- Daily
- Monthly
Currency The currency to be set for the limit. Cumulative Transaction Amount The collective amount in selected currency for transactions that can be performed in a day. Maximum Transactions The maximum number of transactions that can be performed per day.
- Click the Cumulative tab.
The Limits Definition - Create screen with Cumulative tab appears.
Enter the relevant information in Limit Code and Limit Description field.
- Enter the relevant information in Limit Code and Limit Description field.
- From the Frequency field, select the appropriate duration for the limits.
- From the Currency field, select the appropriate currency for the limits.
- In the Cumulative Transaction Amount field, enter the collective amount of transaction in local currency.
- In the Maximum Transactions field, enter the value for maximum number of transactions.
- Click Save to Save the created
limit.
OR
Click Back to navigate to the previous screen.
OR
Click Cancel to cancel the transaction.
- The Review screen appears.
Verify the details, and click Confirm.
OR
Click Cancel to cancel the transaction.
OR
Click Back to navigate to the previous screen.
- The success message of party preference creation appears.
Click OK to complete the transaction.
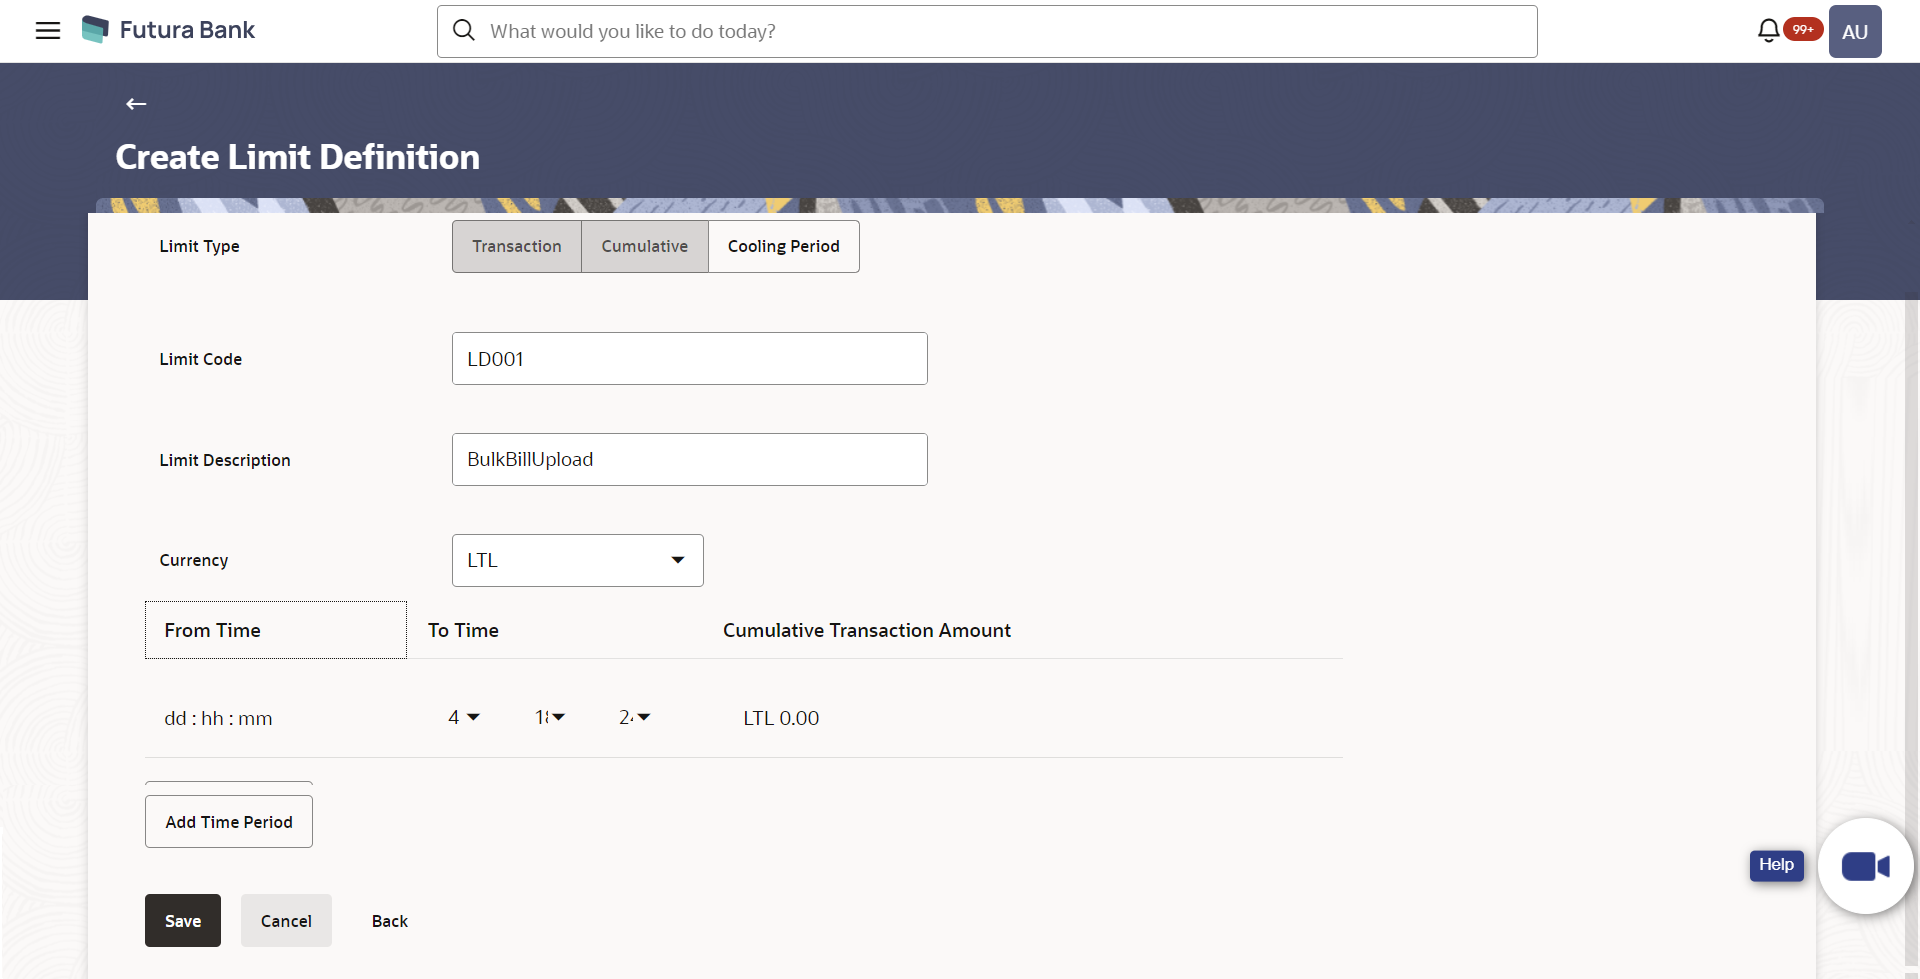
Figure 7-6 Limits Definition - Cooling Period – Create
Table 7-4 Field Description
Field Name Description Limit Type The type of limit. The limit type for selection are:- Transaction – It is the initiation limit with minimum and maximum amount
- Cumulative – It is a duration based limit with maximum amount and number of transactions for a day/month
- Cooling Period – Payee cooling period limit is a time and the amount limit set by the bank during which fund transfer is not allowed or allowed till the specified limit, to a newly added payee.
Limit Code The name of the limit with unique identifier. Limit Description Description of the limit. Currency The currency to be set for the limit. From Time The cooling period start time. It can be in days and/or hours and/or minutes For example a new payee will be 'active' after a cooling period of 0 days & 0 hours & 30 minutes
To Time The cooling period end time. It can be in days and/or hours and/or minutes. For example a new payee will be 'active' after a cooling period of 0 days & 0 hours & 30 minutes.
Cumulative Transaction Amount The collective transaction amount in selected currency for a defined cooling period.
- Click the Cooling Period tab. The Limits Definition - Create screen with Cooling Period tab appears.
- Enter the relevant information in Limit Code and Limit Description field.
- From the Currency field, select the appropriate currency for the limits.
- From the From Time and To Time field, select the appropriate day, hours and minutes.
- In the Cumulative Transaction Amount field, enter the collective amount that is applicable for the defined cooling period.
- Click Add Time Period if you want to create more than one amount and time limit slabs.
- Click Save to Save the created
limit
OR
Click Back to navigate to the previous screen.
OR
Click Cancel to cancel the transaction.
- The Review screen appears.
Verify the details, and click Confirm.
OR
Click Cancel to cancel the transaction.
OR
Click Back to navigate to the previous screen.
- The success message of party preference creation appears.
Click OK to complete the transaction.
Note:
You can icon click to delete a record. refer
Parent topic: Limits Definition


