21 System Rules

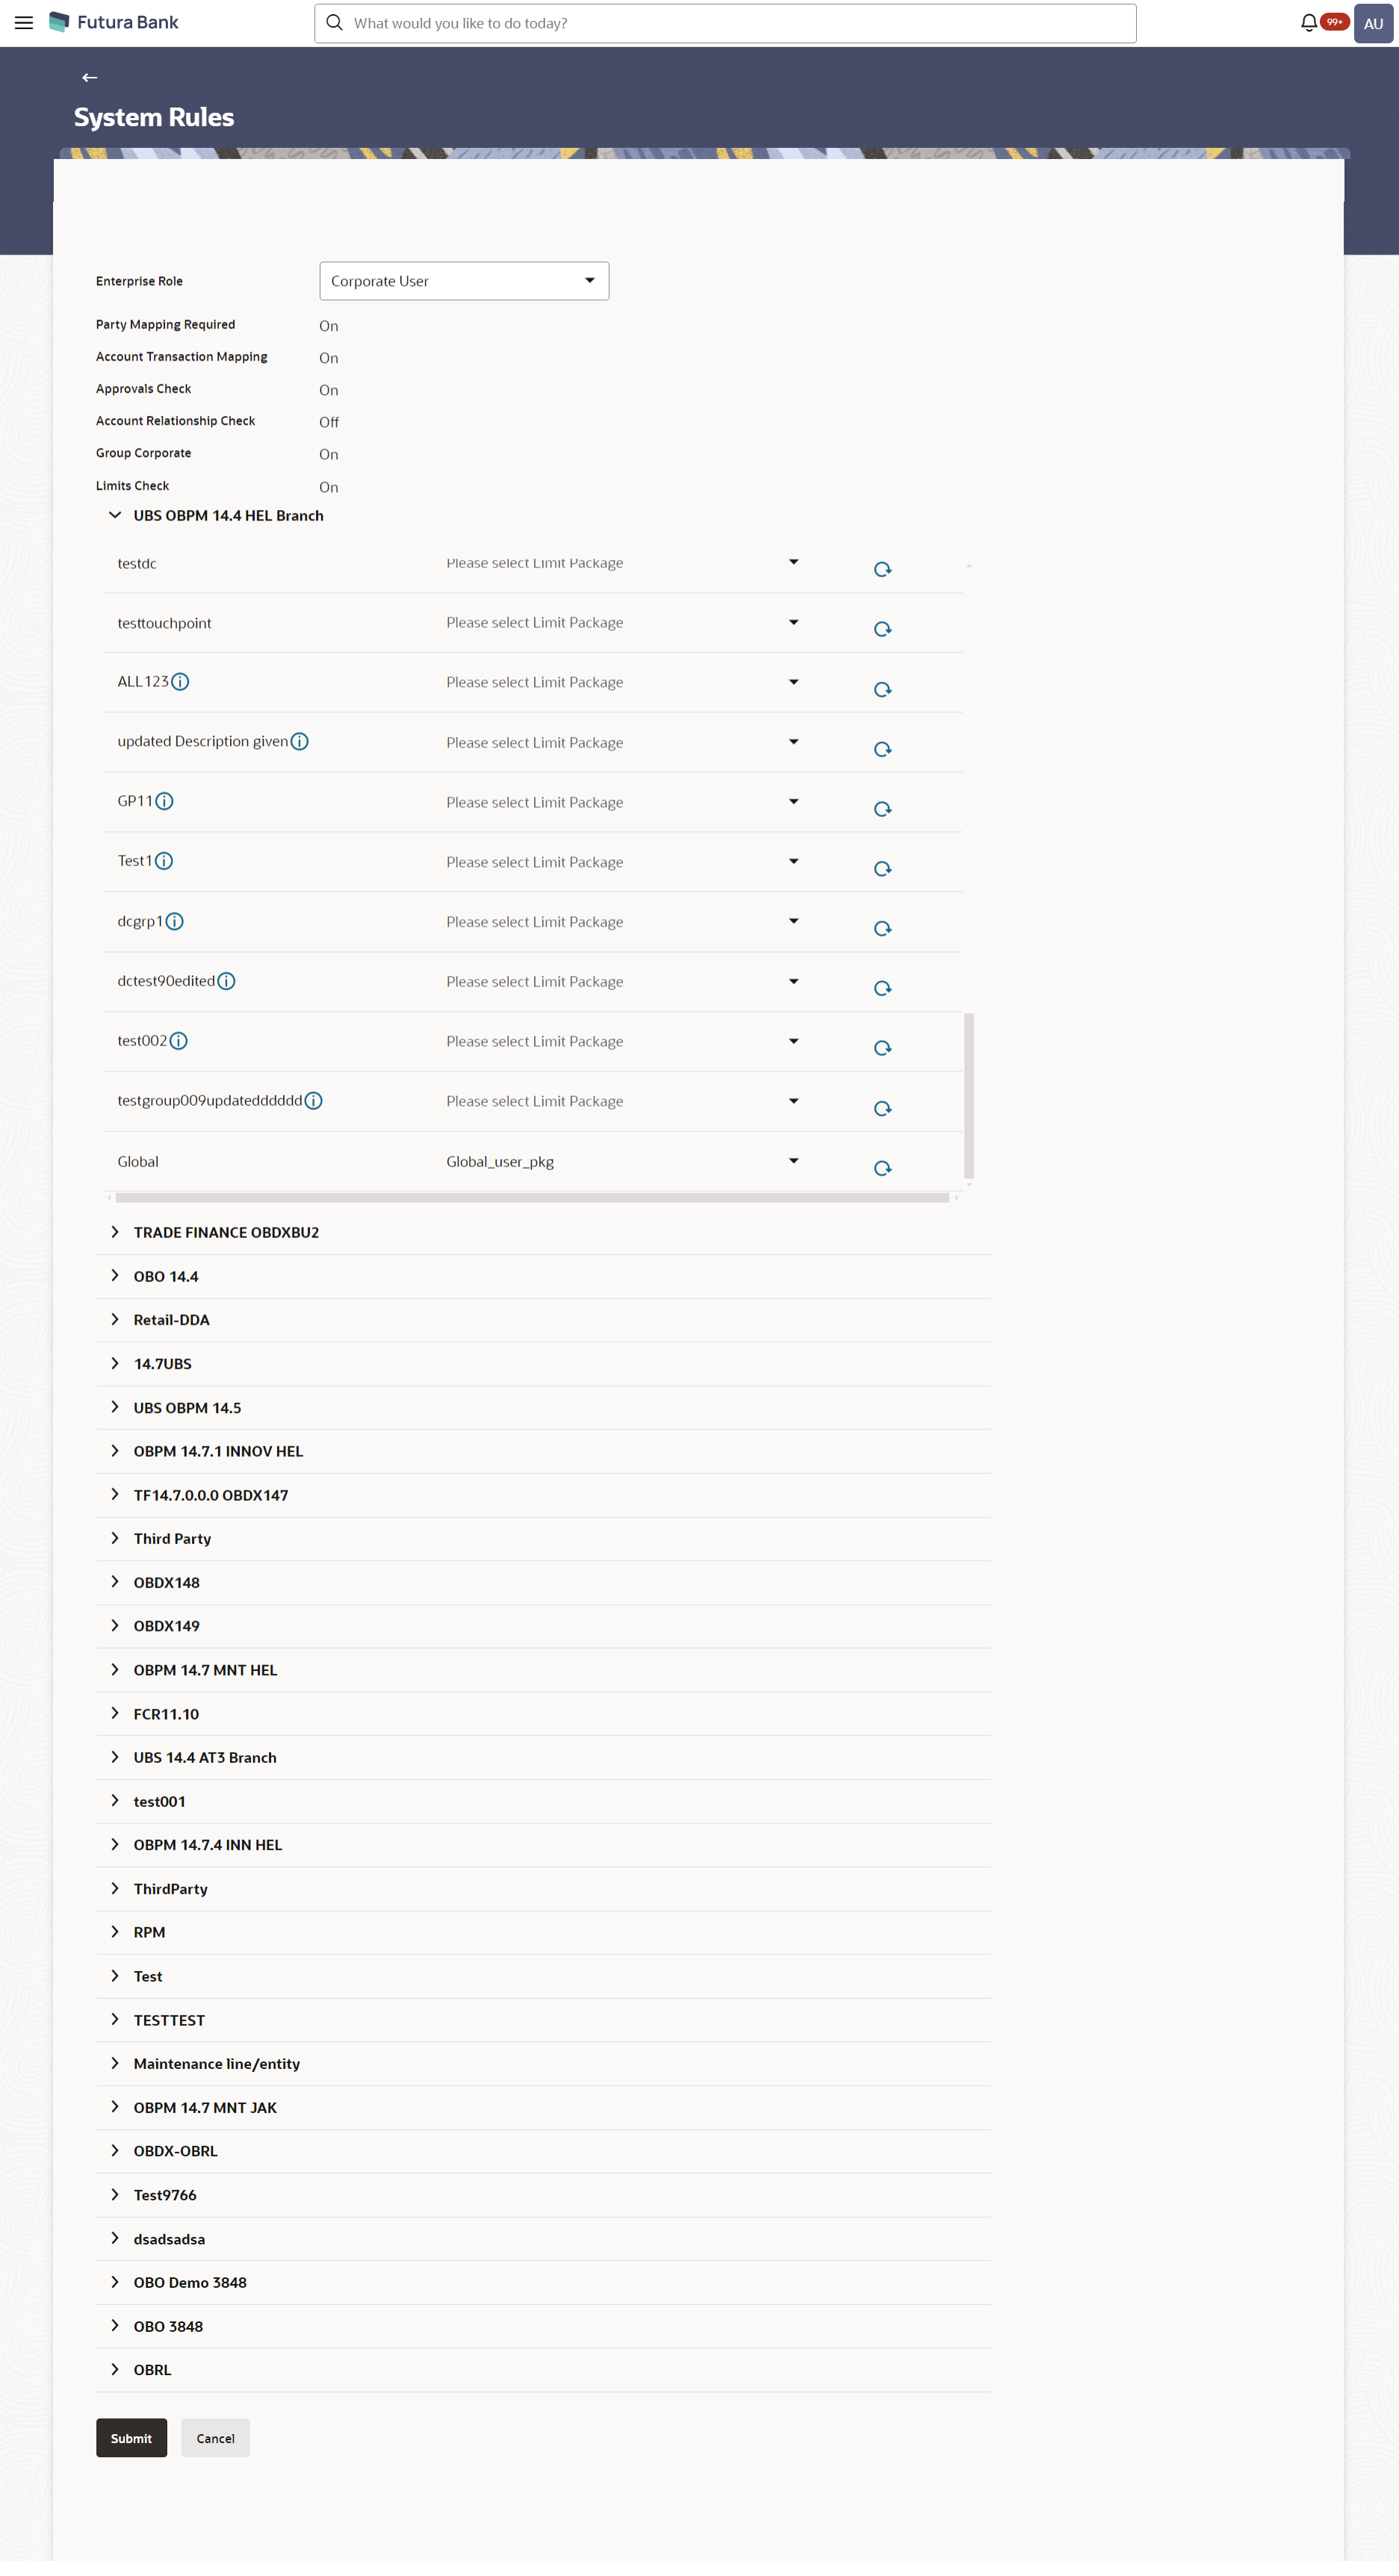
System rules are defined to set different parameters for each enterprise role (User Type- Retail, Corporate and Administrator). Various parameters that can be set for each enterprise role are Party Mapping required Limits check, Party Preferences check, Account Transaction Mapping and Approvals check, Group Corporate Check. Enabling these parameters at enterprise role, enforces the system to check if respective maintenances are available for users associated with those enterprise roles.

E.g. if Approval check flag is enabled for ‘Corporate User’ type of enterprise role; then transactions initiated by corporate type of users will follow the approval maintenance for a party mapped to user and vice versa.

The flag ‘Group Corporate’ is applicable only for ‘Corporate User’ type of enterprise role. This flag in System Rules screen defines the mode of corporate onboarding.

If Group Corporate flag is set ‘ON’ then Bank administration will be able to onboard Group Corporate. The Group Corporate flag is enabled by default and always “ON”.

When in the Enterprise Role field user type is selected as Corporate User, then the Group Corporate flag will get displayed in non-editable mode.

This screen allows the System Administrator to search and view existing system rules, and create new system rule.

Pre-Requisites
  • Transaction access is provided to System Administrator.
  • Approval rule set up for System Administrator to perform the actions.
  • Enterprise roles are maintained in application.
  • Touch point groups are maintained, if required.
  • Limit packages are maintained.

Features Supported In Application

This option allows the System Administrator to:
  • Maintain system rules
  • View system rules
  • Edit system rules

Navigation Path:

From System Administrator Dashboard, Under Configuration widget, click System Rules.

OR

From System/ Bank Administrator Dashboard, click Toggle menu, then click Menu and then click Configuration, Under Configuration , click System Rules.

Table 21-1 Field Description

Field Name Description
Enterprise Role Name of enterprise roles set in application.
The options can be:
  • Corporate User
  • Administrator
  • Retail User

On selecting an application role, system rules maintained if any, are shown in editable form.

Party Mapping Required Party mapping check is required for a particular enterprise role or not.
Party Preferences Check Party preferences check is required or not.
Account Transaction Mapping Account transaction mapping check is required or not.
Approvals Check Approvals check is required or not.
Account Relationship Check Account Relationship check is required or not.

Note:

The Account relationship check has to be disabled for the corporate user.
Group Corporate Check

Group Corporate onboarding is required for corporate or not

Note:

  1. The Group Corporate flag is enabled by default and always “ON”. When in the Enterprise Role field user type is selected as Corporate User, then the Group Corporate flag will get displayed in non-editable mode.
  2. Group Corporate flag = ‘On’, then Bank administration will be able to onboard Group Corporate.
Limits Check Limits check is required or not.
Limits - Entity Level Configuration

If limit check is required, assign a limit package.

In case of multi entity set up, limit packages needs to be mapped at each entity level.

Name of the entity Name of entity under which limit packages are to be mapped is shown in the header.
Touch Points/ Group Name of touch points/ groups under a specific entity to whom the limit packages are to be mapped. Also an option is provided to map the limit package at Global level (a group created with all internal and external touch points)
Package List of the packages which are to be mapped to a touch points/ groups. Only limit packages maintained for the selected touch point will get listed here.

To set the system rules:

  1. Navigate to one of the above paths.
    The System Rules screen appears.
  2. From the Enterprise Role list, select the appropriate option.
  3. In the Party Mapping Required field, select the appropriate option.
  4. In the Party Preferences Check field, select the appropriate option.
  5. In the Account Transaction Mapping Check field, select the appropriate option.
  6. In the Approvals Check field, select the appropriate option.
  7. In the Account Relationship Check field, select the appropriate option.
  8. In the Group Corporate Check field, select the appropriate option.
  9. In the Limits Check field, select the appropriate option.
    1. Click downarrow icon of desired entity to whom limit package to be mapped.

      Displays the list of touch points/ groups to map limit package.

    2. From the Package list, select the appropriate option.

      Note:

      Click refresh icon to refresh the option.
    3. Repeat steps a to b of step 8 for all touch points/ groups.
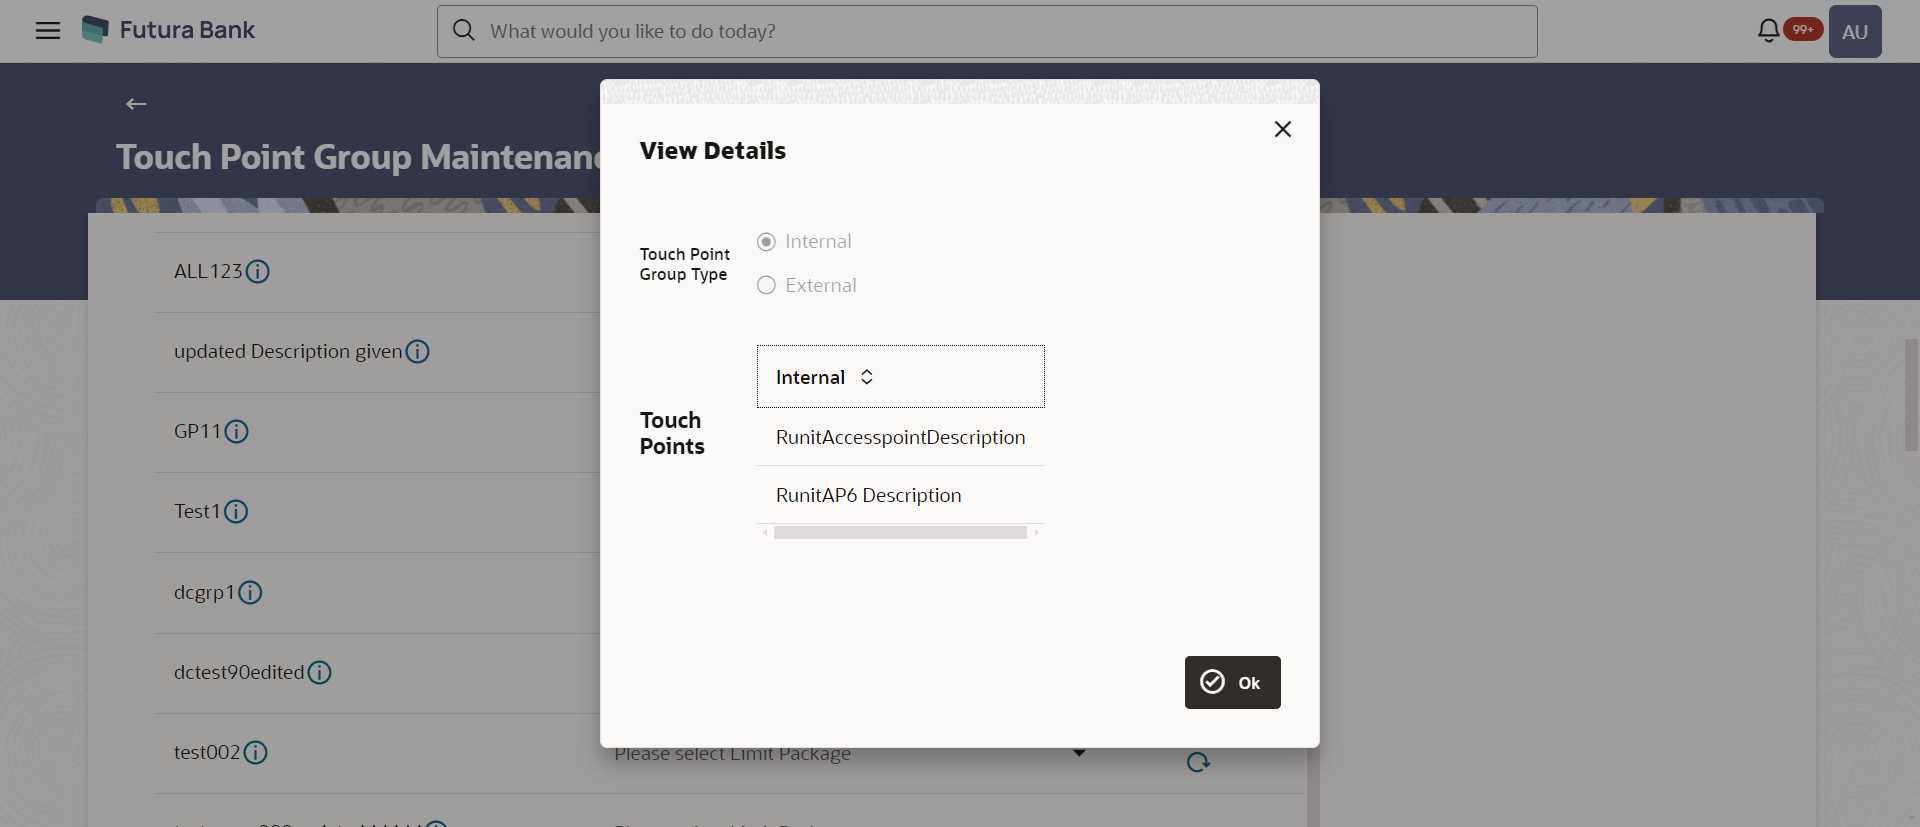
      1. Click loading icon to view the details of touch points group.

        The View Details -Touch Point Group popup window appears.

    Figure 21-3 View Details -Touch Point Group


    Table 21-2 Field Description

    Field Name Description
    Group Code Group code defined for a touch point group.
    Group Description Group description defined for a touch point groups.
    Touch Point Group Type Type of touch point i.e. whether touch point is of type internal or external.
    Touch Points List of the internal or external touch points.
  10. Click Submit to save system rules.
    OR

    Click Cancel to cancel the transaction.

    The success message appears.

  11. The System Rules - Review screen appears.
    Verify the details, and click Confirm.

    OR

    Click Back to navigate to the previous screen.

    OR

    Click Cancel to cancel the transaction.

  12. The success message of System Rules maintenance appears along with the transaction reference number.
    Click OK to complete the transaction.