6.2 Manage Post Dated Cheques
This topic describes the information to manage the post dated cheques received and take various actions on them.
Specify User ID and Password, and login to Home screen.
- On Home screen, click Cash Management. Under Cash Management, click Collections.
- Under Collections, click Instrument Management.
- From the Branch list, select the branch for which the cheque is to be managed. By default, the branch of the logged-in user is selected.
- In the Cheque Date toggle, select the Post Dated option.
- From the Action list, select the action to be taken on post-dated cheques.
- Click Proceed to view the search parameters.
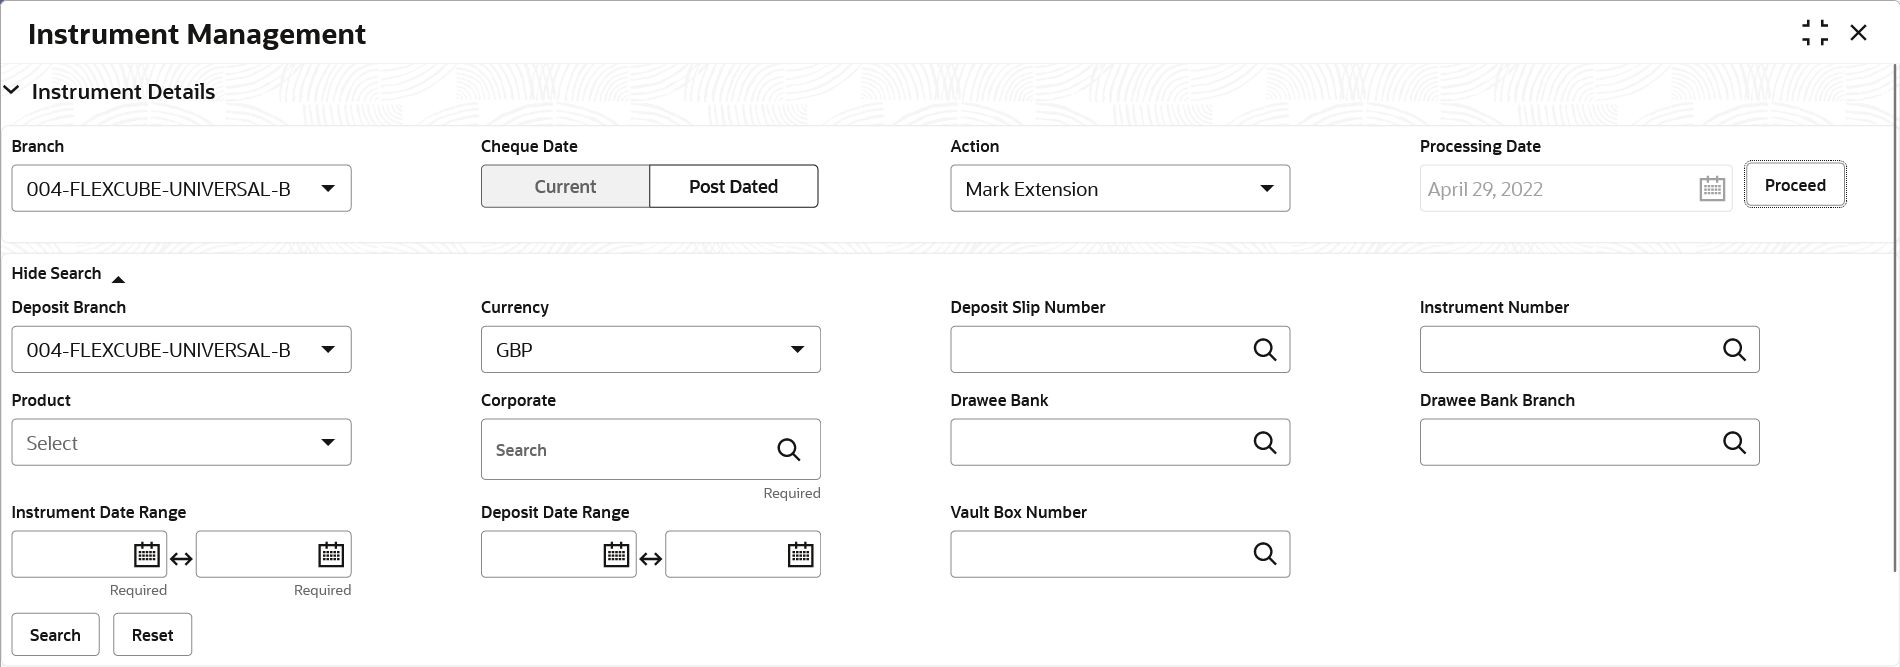
The Instrument Management - Post Dated Cheques screen displays.
Figure 6-14 Instrument Management - Post Dated Cheques
- Specify the fields on Instrument Management - Post Dated Cheques screen.
For more information on fields, refer to the field description table.
Note:
The fields marked as Required are mandatory.Table 6-7 Post Dated Cheques - Field Description
Field Name Description Deposit Branch Select the branch where the instrument is deposited. By default, the branch of the logged-in user is selected. Currency Select the currency of the instrument. Deposit Slip Number Click the search icon and select the deposit slip number containing the instrument to be searched. Instrument Number Click the search icon and select the instrument number to search for. Product Select the product for which the instrument is deposited. Corporate Click the search icon and select the corporate for/by whom the instrument is deposited. Drawee Bank Click the search icon and select the drawee bank of the instrument. Drawee Bank Branch Click the search icon and select the branch of the drawee bank. Instrument Date Range Click the calendar icons and select the start and end dates of the range for the date mentioned on the instrument. Deposit Date Range Click the calendar icons and select the start and end dates of the date range within which the instrument was deposited. Vault Box Number Click the search icon and select the vault box number in which the instrument is stored. This field is not displayed for the Mark Extension action. - Click Search to view the search results.
Further procedure differs based on the selected action to be taken on the instrument. Click on the action name to get redirected to the relevant procedure:
- Mark Extension
This topic describes the systematic instruction to mark the extension for the instruments. - Mark Hold
This topic describes the systematic instruction to mark hold for the post-dated cheques in the bank’s custody, without presenting for clearance, until further notice is provided. - Mark Unhold
This topic describes the systematic instruction to manually unhold the instruments that are currently on hold. - Mark Misplaced
This topic describes the systematic instruction to mark the misplaced post-dated cheque by the bank or pick vendor. - Mark Recovered
This topic describes the systematic instruction to mark the recovered post-dated cheques which are misplaced by the bank/vendor, before their instrument date. - Mark Replacement and Withdrawal
This topic describes the systematic instruction to replace or withdraw the instrument when the issuer of the cheque requests.
Parent topic: Instrument Management
