4.4.2 Edit Structure Simulation – Pool

The Edit Pool Structure Simulation screen enables the user to edit the pool structure simulation to perform the notional movement of funds, the account balances are notionally consolidated and interest computations carried out on such notional balances.

  1. On the View Pool Structure Simulation screen, click Edit.
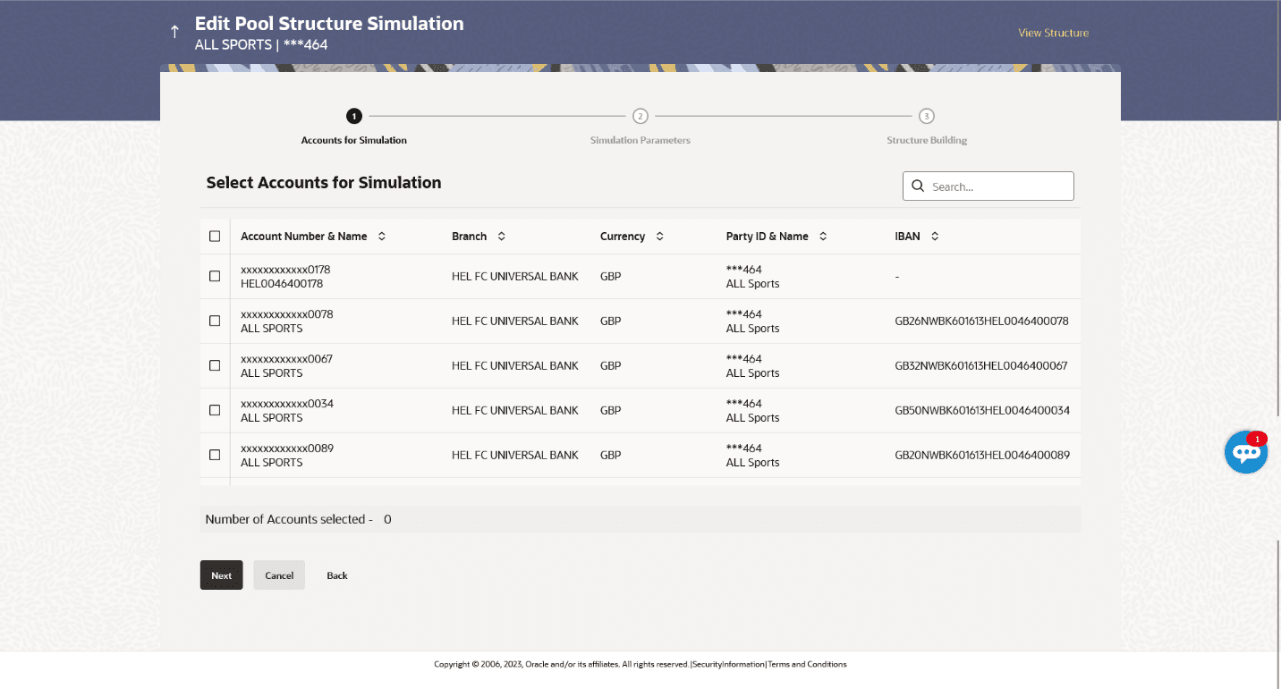
    The Edit Pool Structure Simulation – Accounts for Selection screen displays.

    Figure 4-62 Edit Pool Structure Simulation – Accounts for Selection


    The first step of edit pool structure simulation involves searching and selecting multiple accounts from the list to edit the simulation structure.

  2. Click Search to search and select the accounts to be added for the structure simulation.
  3. Click Next to navigate to the simulation parameters screen.
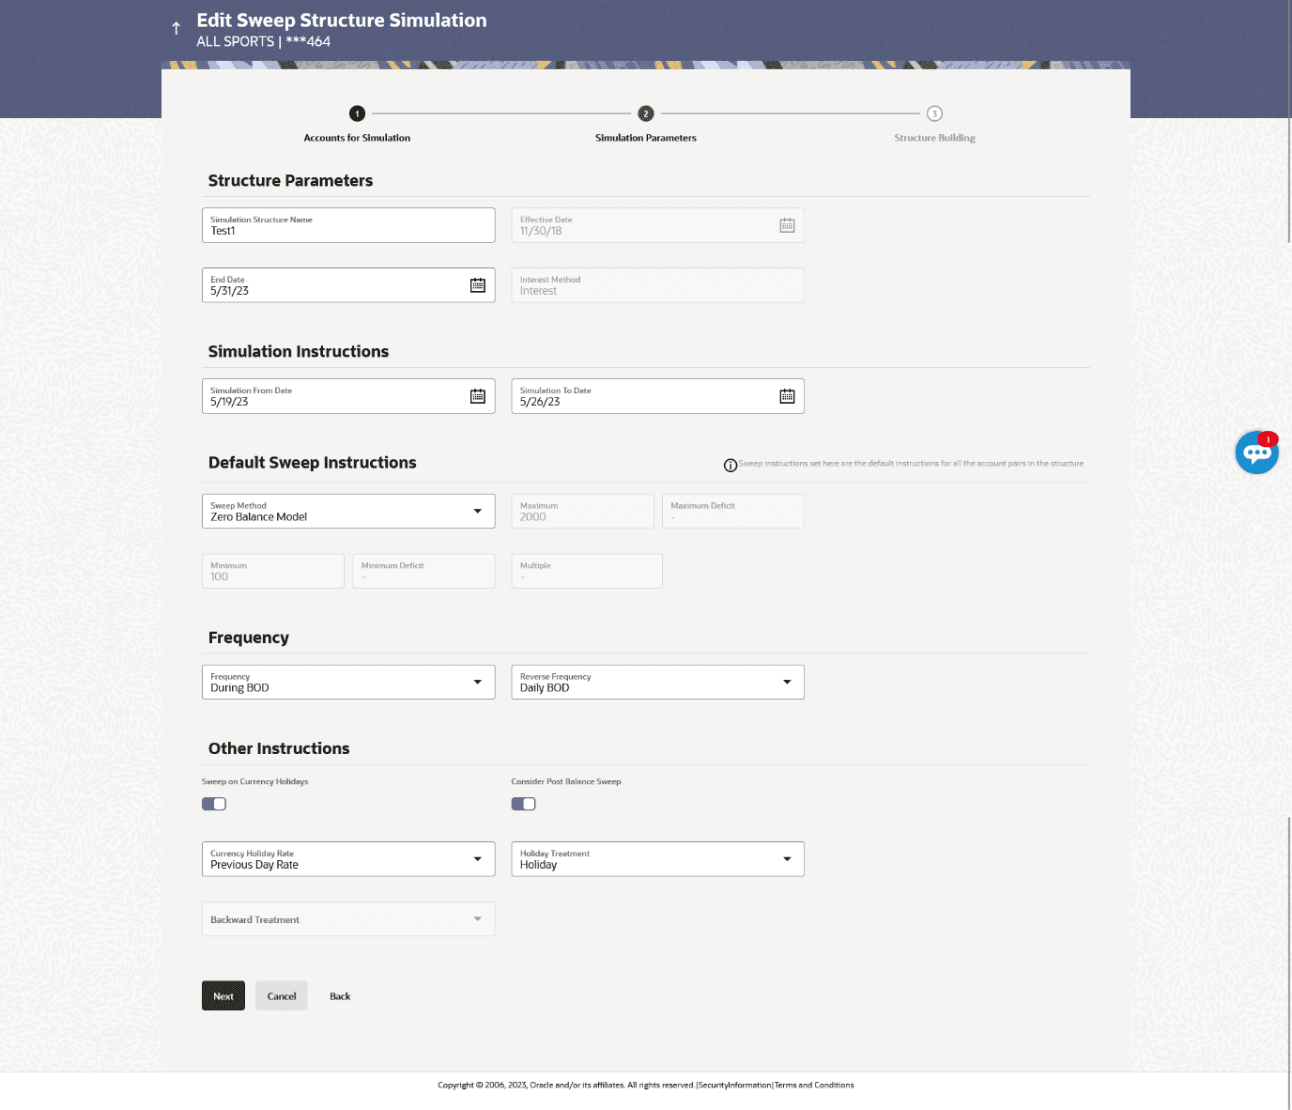
    The Edit Pool Structure Simulation – Simulation Parameters screen displays.

    Figure 4-63 Edit Pool Structure Simulation - Simulation Parameters


    For more information on fields, refer to the field description table.

    Table 4-48 Edit Pool Structure Simulation - Simulation Parameters - Field Description

    Field Description
    Structure Parameters Information specified in below fields are related to structure simulation parameters.
    Simulation Structure Name Specify the name of the pool structure that is to be edited.
    Effective Date Displays the date from which the account structure execution should take place.
    End Date Select the date till which the account structure execution should take place.
    Interest Method Select the method by which the interest is calculated.
    The available options are:
    • Advantage
    • Interest
    • Ratio
    Simulation Instructions Information specified in below fields are related to simulation instructions.
    Simulation From Date Select the date from which the sweep structure simulation execution should take place.

    Note: Simulation From Date should be within the structure Effective Date and End Date.

    Simulation To Date Select the date till which the sweep structure simulation execution should take place.

    Note: Simulation To Date should be within the structure Effective Date and End Date.

    Pool Details Information specified in below fields are related to pool details.
    Reallocation Method Select the method in which the interest is shared with the participating accounts within the account structure.
    The available options are:
    • Absolute Pro-Data Distribution
    • Central Distribution
    • Even Direct Distribution
    • Even Distribution
    • Fair Share Distribution
    • No Reallocation
    • Reverse Fair Share Distribution
    Note:
    • This field is disabled if the Interest Method is selected as Ratio.
    • The Percentage Reallocation method is also available, but it can be defined only at the pair parent level in Select Reallocation Method & Link Accounts.
    Central Account Number Specify the account in which the interest arrived is credited to one central account, which can be any one of the participating accounts or a separate account.

    This field appears if the user selects Central Distribution from the Reallocation Method list.

    Note:
    • User can search the Central Account Number by Account Name, Account Number, Branch or Currency based on the parameters set in the system configuration and also displays these details in the search results and the respective fields once the required account is selected.
    • Central Account Number is disabled when the account is inaccessible. But once user changes the Reallocation method and switches back to Central Distribution, the central account dropdown will be enabled and it will get cleared. However, the dropdown will contain only accessible accounts.
    Central Account Currency & Branch Displays the currency and branch of the central account.

    This field appears if the user selects Central Distribution from the Reallocation Method list and select central account number from drop-down.

  4. In the Structure Name field, enter the name of the acount structure.
  5. From the End Date list, select the appropriate date to set up the instruction.
  6. From the Interest Method list, select the appropriate method for interest calculation.
  7. From the Reallocation Method list, select the appropriate reallocation method.
    1. If the user has selected Central Distribution option:

      From the Central Account Number list, select the appropriate account.

  8. Perform any one of the following actions:
    • Click Next to navigate to Edit Pool Structure Simulation – Added Accounts screen appears.
    • Click Cancel to cancel the operation and navigate back to Dashboard.
    • Click Back to navigate back to the previous screen.

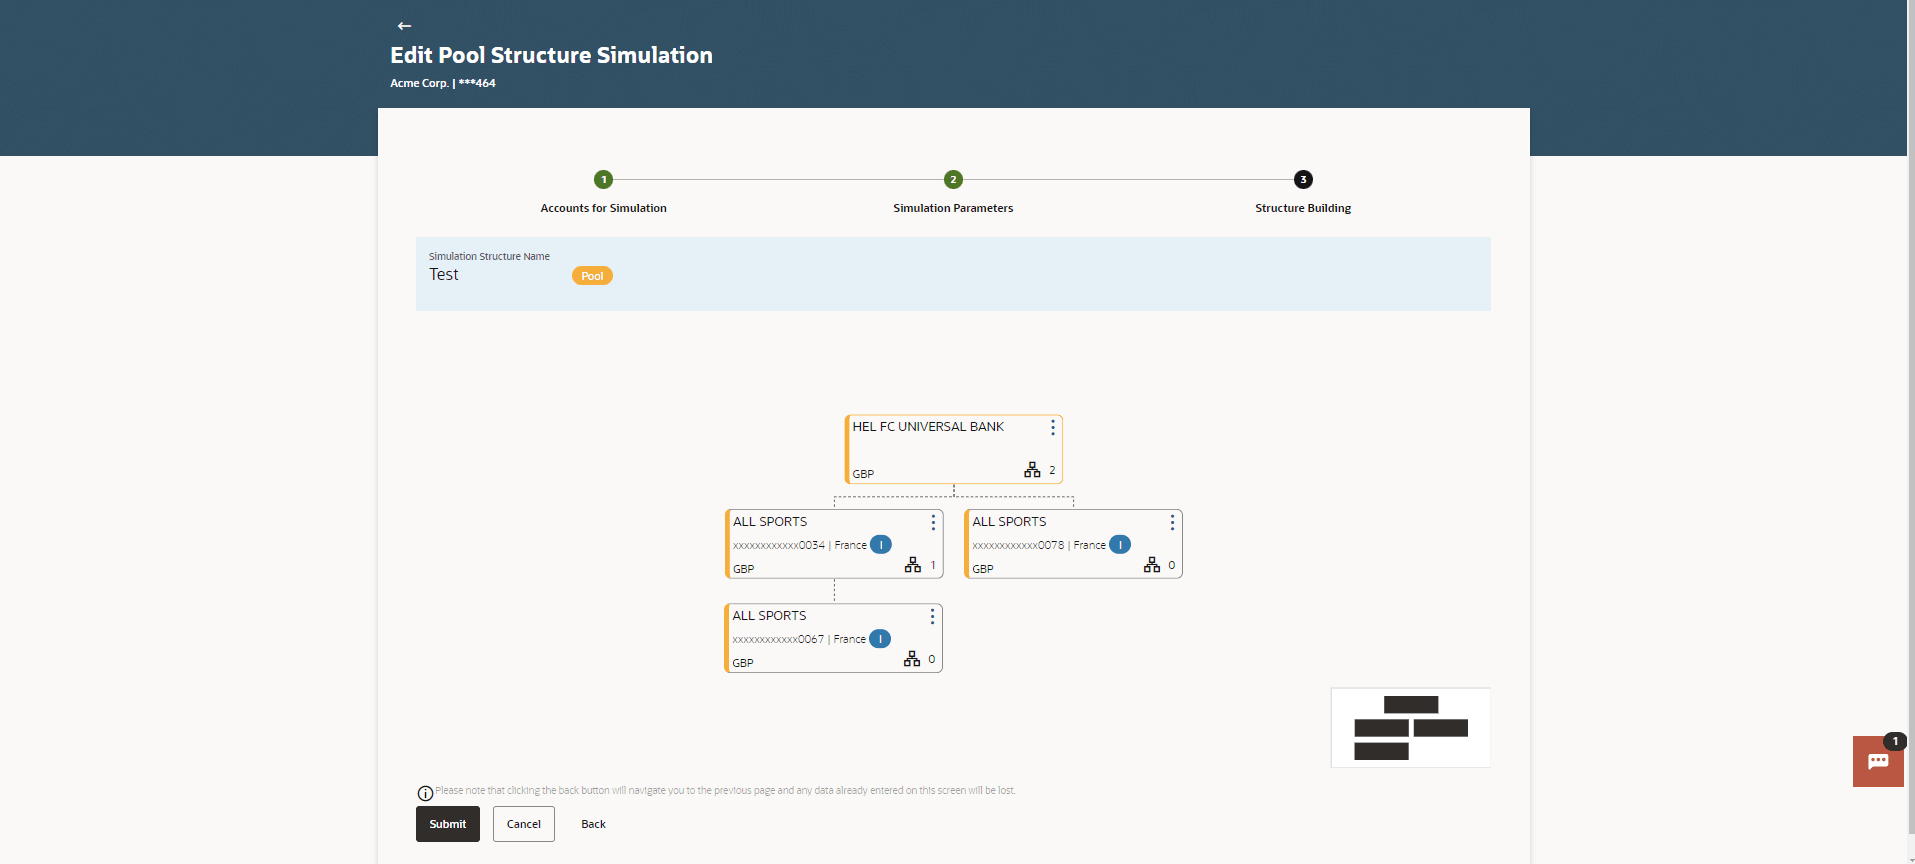
The user can link the new accounts, view the account details of child nodes, delink the existing accounts, and update the reallocation method for the accounts in the existing structure.

Figure 4-64 Edit Pool Structure Simulation – Tree View


For more information on fields, refer to the field description table.

Table 4-49 Edit Pool Structure Simulation – Tree View - Field Description

Field Description
Simulation Structure Name Displays the name of the simulation structure.
Simulation Structure Type Displays the type of the simulation structure.
Notional Account Information specified in below fields are related to notional account.
Branch Displays the branch name for the header account.
Currency Displays the currency for the header account.
Real Account Information specified in below fields are related to real account.
Account Name Displays the name of the account.
Account Number Displays the account number of the user in masked format.
Location Displays the location of the account.
Account Type Displays the type of account.
The available option is:
  • I: An account which is internal to the bank.
Account Currency Displays the currency of the account.
Link Displays the number of the child account(s) linked to the parent account.

  1. Click Kebab and then click Link to add the child accounts for the selected parent account.
    • The Edit Pool Structure Simulation - Select Reallocation Method & Link Accounts pop-up screen displays.
    • Click Reallocation. This option appears only for the parent accounts with the child accounts. The Edit Pool Structure Simulation - Reallocation pop-up screen displays.
    • Click Account Details to view the account details. The Account Details overlay screen displays. (Refer to section View Structure Simulation – Pool for the detailed explanation).
    • Click Delink. A delink Account popup appears confirming the removal of accounts. This option will not appear for the notional header account. (Refer to section Create Sweep Structure Simulation for the detailed explanation)
      1. Click OK, if the user want to remove the added header account.
      2. Click Cancel to cancel the removing process.

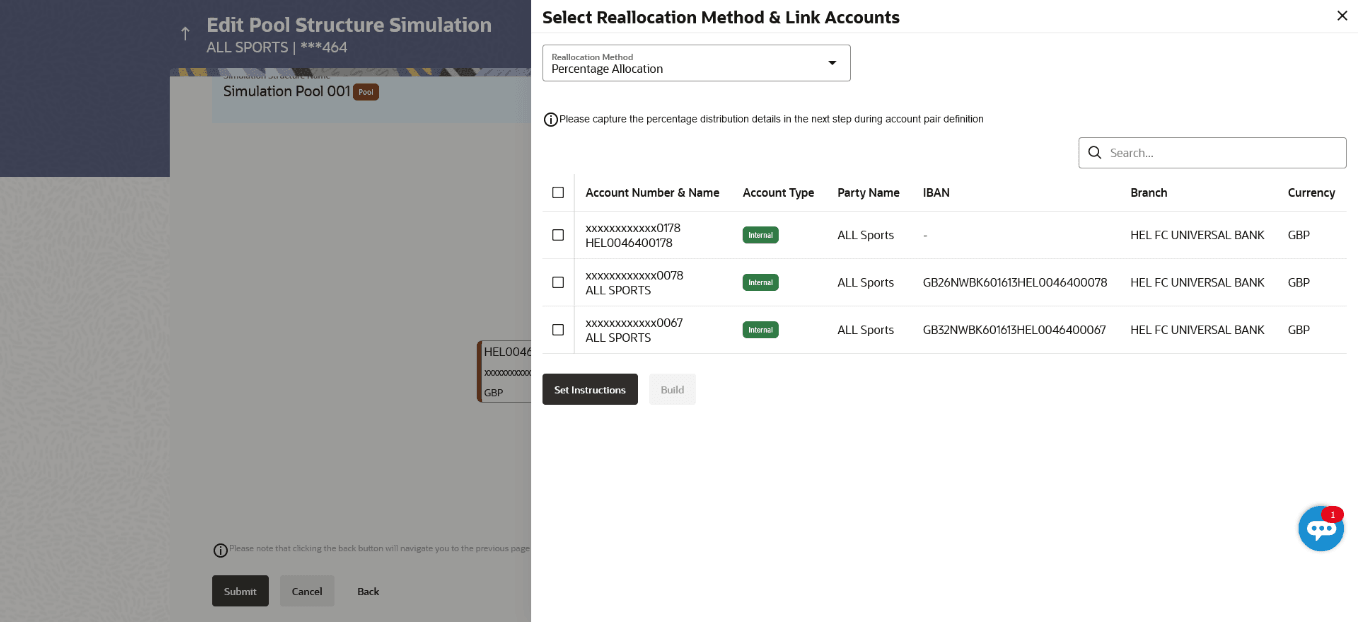
The user can search and select the accounts to be linked to the selected header/parent account. The filtered account list for which the user has access to will appear for linking the accounts

Note:

The user can either select the accounts directly in the overlay or can use the UI search to filter and select additional records. In this case, the accounts that were filtered using UI search will appear at the top, while those selected before applying UI search will appear at the bottom.

Figure 4-65 Edit Pool Structure Simulation – Select Reallocation Method & Link Accounts


For more information on fields, refer to the field description table.

Table 4-50 Edit Pool Structure Simulation – Select Reallocation Method & Link Accounts – Field Description

Field Description
Reallocation Method Select the method in which the interest is shared with the participating accounts within the account structure.
The available options are:
  • Absolute Pro-Data Distribution
  • Central Distribution
  • Even Direct Distribution
  • Even Distribution
  • Fair Share Distribution
  • No Reallocation
  • Percentage Allocation
  • Reverse Fair Share Distribution
This field will be in read-only mode for the notional header account.
Search Specify and search the complete or partial account details and display the list of accounts that matches across the fields in the table.
Select All Select the checkbox to select all the accounts.
Account Number & Name Displays the account numbers and name of the user in masked format.
Account Type Displays the type of account.
The available options are:
  • Internal : An account which is internal to the bank.
  • External: An account which is external to the bank and linked for liquidity management.
Party Name Displays the name of the party linked to the user's account.
IBAN Displays the IBAN number of the account.
Branch Displays the branch name of the user's account.
Currency Displays the currency of the account.

  1. From the Reallocation Method list, select the reallocation method.
  2. Select the accounts that the user wants to link to the header account.
    In the Search By Party Name, Account Number field, specify and search the complete or partial account details and displays the list of accounts that matches across the fields in the table and select the accounts that the user want to link to the header account.
  3. Perform any one of the following actions:
    • Click Set Instructions. This button is enabled only if the Reallocation Method is selected as Percentage Allocation.

      The Edit Pool Structure Simulation -Reallocation pop-up screen displays.

    • Click Build to add the child accounts to the Header account.

      The Edit Pool Structure Simulation – Submit screen displays.

    • Click Closeto close the overlay screen.

Once the child accounts are selected, the user can further set the allocation percentage for each child accounts. This screen is only applicable if the Reallocation Method is selected as Percentage Allocation, in which the percentage selection fields such as account number and name, and allocation percentage will be displayed. When a Reallocation Method other than percentage allocation is used, only the reallocation method field is displayed.

Figure 4-66 Edit Pool Structure Simulation - Reallocation


For more information on fields, refer to the field description table.

Table 4-51 Edit Pool Structure Simulation - Reallocation – Field Description

Field Description
Reallocation Method Displays the method in which the interest is shared with the participating accounts within the account structure.

Note: If the Reallocation Method is selected as Percentage Allocation, in which the percentage selection fields such as account number and name, and allocation percentage will be displayed. When a Reallocation Method other than percentage allocation is used, only the reallocation method field is displayed.

Account Number & Name Displays the account numbers and name of the account in masked format
Allocation Percentage Specify the allocation percentage for the child accounts.
Note:
  • The sum of the allocation percentage for all child accounts must be 100. This condition is applicable only for first level (accounts directly linked with notional header).
  • If the user wants to delink one of the child nodes from the first level of structure, then the user needs to first zero the percentage of that node and distribute the percentage allocation among the remaining nodes such that the total percentage allocation of the remaining nodes is 100.

  1. Perform any one of the following actions:
    • Click Build to add the child accounts to the header account.. The Edit Pool Structure Simulation – Submit screen displays.
    • Click Close to close the overlay screen.

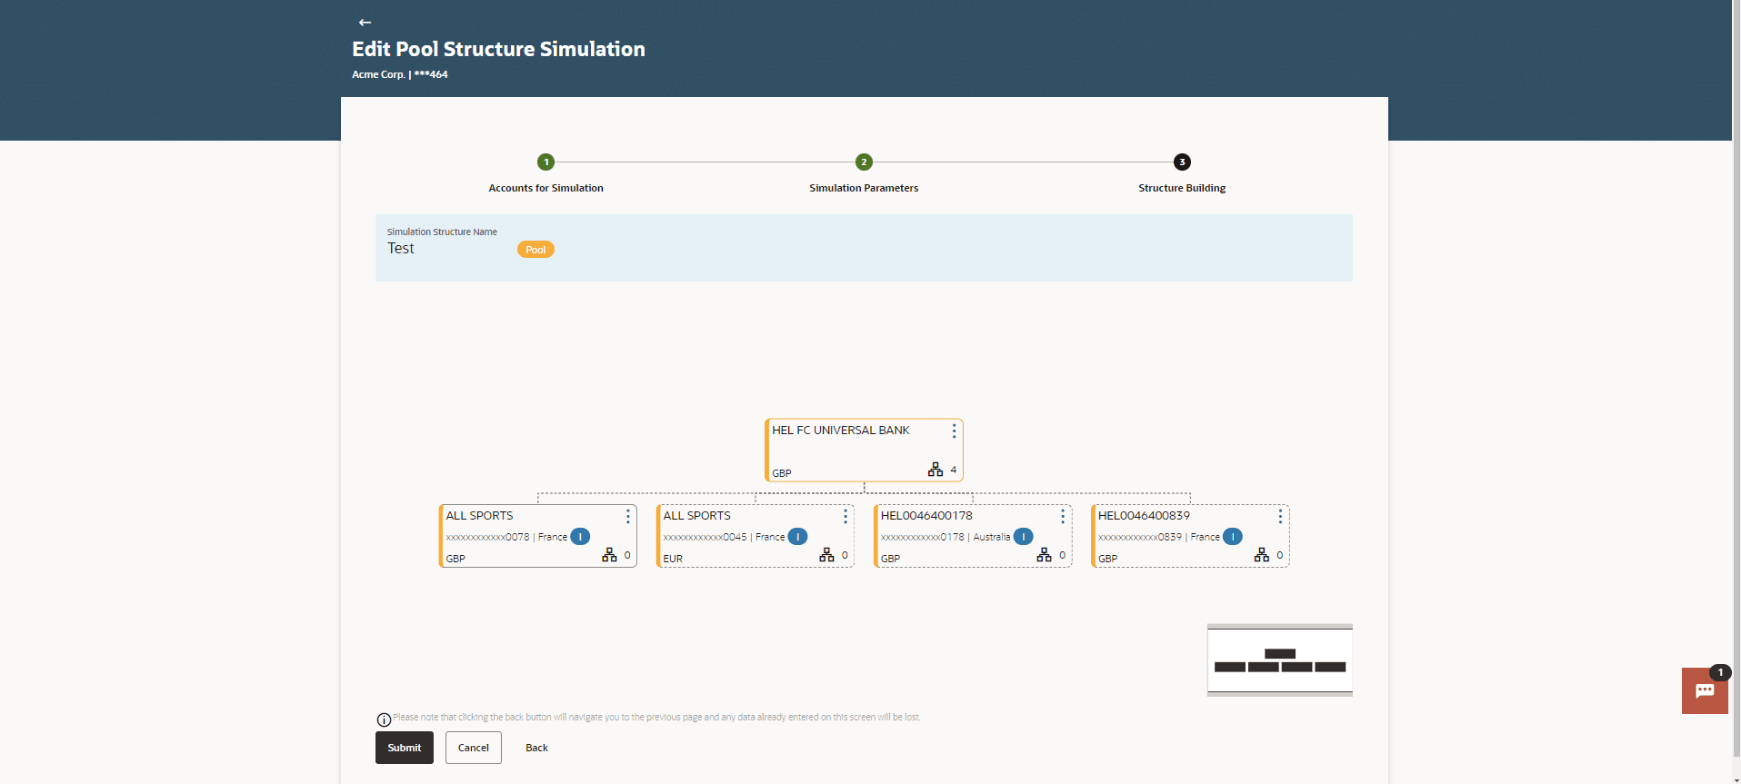
This screen enables the user to view the modified account structure in both tree and table view.The Edit Pool Structure Simulation – Submit - Tree View screen displays

Figure 4-67 Edit Pool Structure Simulation – Submit – Tree View


For more information on fields, refer to the field description table.

Table 4-52 Edit Pool Structure Simulation – Submit - Tree View – Field Description

Field Description
Simulation Structure Name Displays the name of the simulation structure.
Structure Simulation Type Displays the type of the simulation structure.
Notional Account Information specified in below fields are related to notional account card.
Branch Displays the branch name for the header account
Currency Displays the currency for the header account.
Real Account Information specified in below fields are related to real account card.
Account Name Displays the name of the account.
Account Number Displays the account number of the user in masked format.
Location Displays the location of the account.
Account Type Displays the type of account.
The available option is:
  • I: An account which is internal to the bank.
Account Currency Displays the currency of the account.
Link Displays the number of the child account(s) linked to the parent account.

  1. Click Kebab and then click Link to add the accounts for the selected parent account.
    • The Edit Pool Structure Simulation - Select Reallocation Method & Link Accounts pop-up screen displays.
    • Click Reallocation to view the reallocation details for the account pairs. This option appears only for the parent accounts with the child accounts.

      The Edit Pool Structure Simulation – Reallocation screen displays.

    • Click Account Details to view the account details.

      The Account Details overlay screen displays. (Refer to section View Structure Simulation – Pool for the detailed explanation)

    • Click Delink. A delink account pop-up appears confirming the removal of accounts. This option will not appear for the notional header accounts. (Refer to section Create Sweep Structure Simulation for the detailed explanation)
      • Click OK. if the user wants to remove the added header account.
      • Click Cancel to cancel the removing process.
  2. Perform any one of the following actions:
    • Click Submit.

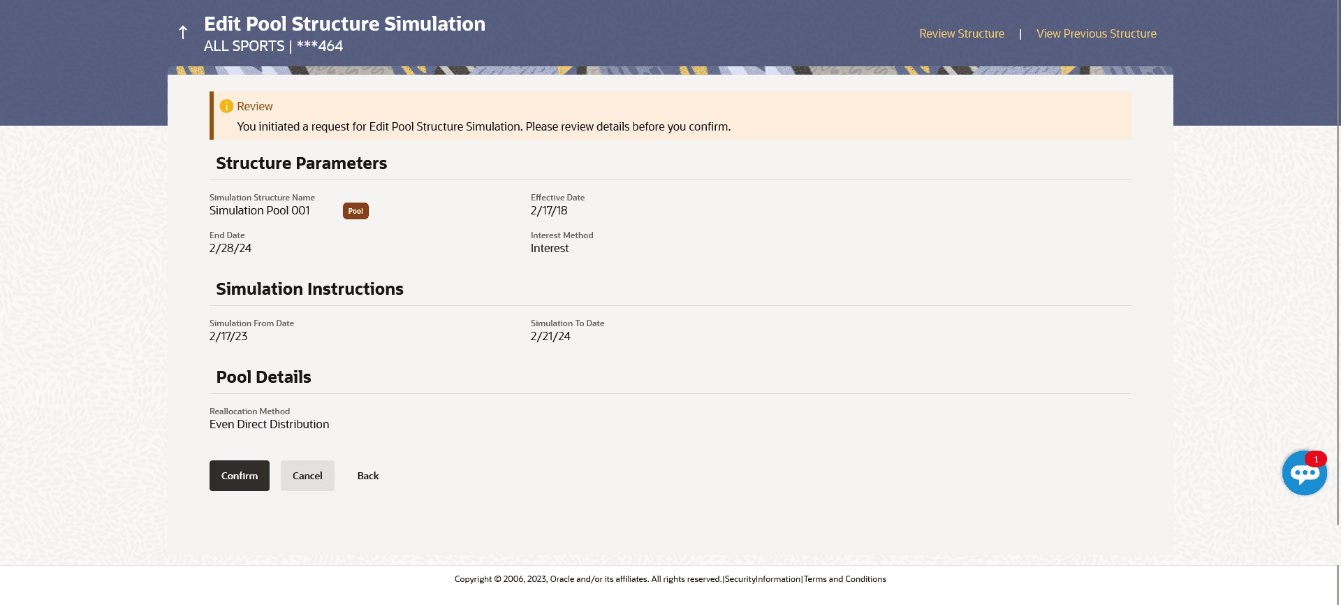
      The Edit Pool Structure Simulation – Review screen displays.

    • Click Cancel to cancel the operation and navigate back to Dashboard.
    • Click Back to navigate back to the previous screen.

Figure 4-68 Edit Pool Structure Simulation - Review


  1. Perform any one of the following actions:
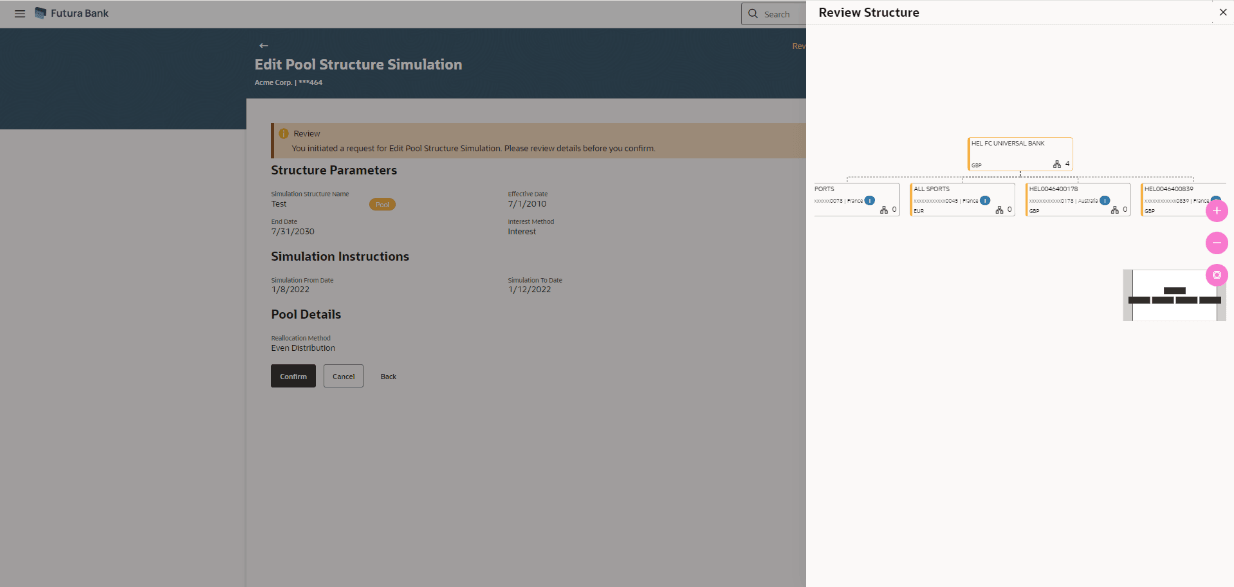
    • Click Review Structure to review the structure.

      The Edit Pool Structure Simulation – Review Structure overlay screen displays.

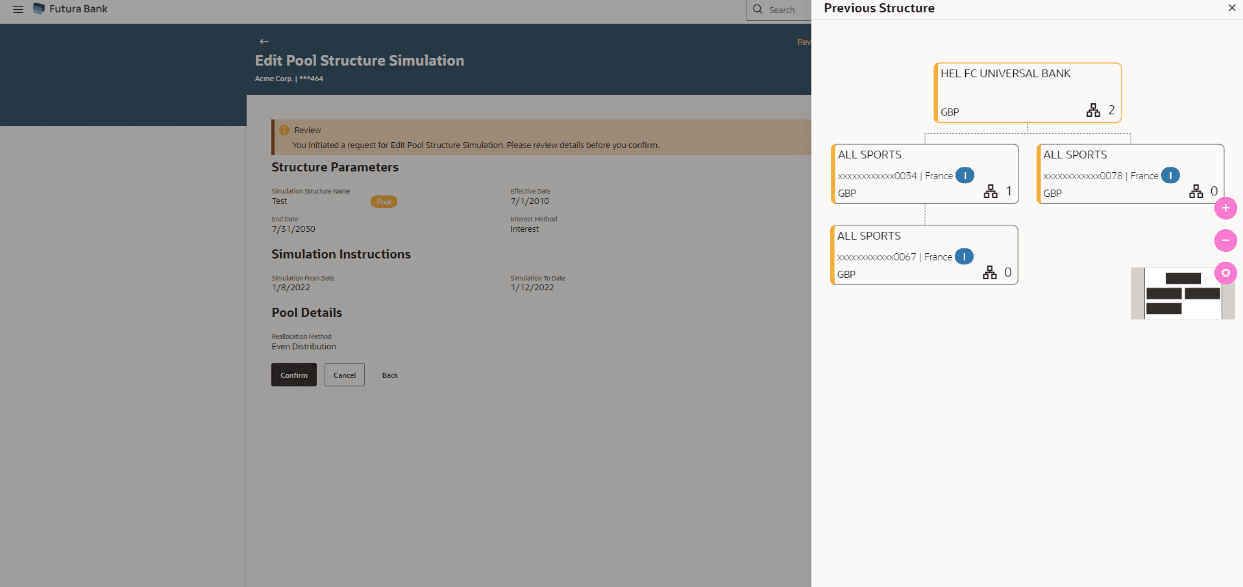
    • Click View Previous Structure to review the structure.

      The Edit Pool Structure Simulation – Previous Structure overlay screen displays.

    • Click Confirm to create the pool structure.
    • Click Cancel to cancel the operation and navigate back to Dashboard.
    • Click Back to navigate back to the previous screen.
    The Edit Pool Structure Simulation – Review Structure overlay screen displays.

    Figure 4-69 Edit Pool Structure Simulation – Review Structure


    Figure 4-70 Edit Pool Structure Simulation – Previous Structure


    1. Click + to zoom in the structure.
    2. Click to zoom out the structure.
    3. Click Fit to fit the structure to screen.
    4. Click Close to close the review structure overlay screen.
  2. Perform any one of the following actions:

    The success message appears along with the status and simulation structure details.

    • Click Home to go to dashboard screen.
    • Click Go To Overview to go to the liquidity management Dashboard.
    • Click Create Simulation to create the simulation structures.