2.3 Add Demand Draft Payee

This topic describes the payee setup process, wherein users are given the option to categorize the demand draft payee as either Domestic Bank, or Cross Border.

A Demand Draft is a pre-paid negotiable instrument. The issuing bank undertakes to make payment in full when the instrument is presented by the payee. The demand draft is made payable at a specified centre and can be issued in local currency as well as in (allowed) foreign currencies. A foreign currency demand draft can be requested using Cross Border Demand Draft while a pay order or local currency demand draft can be requested using the Domestic Demand Draft transaction. A Demand Draft, as compared to a cheque is issued by the Bank against the Bank’s own funds and hence there is a reduced risk of the cheque not clearing. Users can save the payee details of the draft through payee maintenance. Payees for demand drafts are of two types:

  • Domestic Demand Draft
  • Cross Border Demand Draft

The feature allows you to create a Domestic Draft payee to initiate a request to issue a draft which is payable at a location within the country. The user provides the payee details, the details of draft to be issued in favour of and the payable location.

Note:

The Long Press Gesture feature is implemented. Users can now press and hold down on a screen for an extended duration, which triggers additional options or actions like Issue Demand Draft, Edit Payee, Delete Payee. This functionality is only supported on mobile devices and tablets.
Perform anyone of the following navigation to access the Add Account Payee screen.
  • From the Dashboard, click Toggle menu, click Menu, then click Payments .

    Under Payments , click More Actions , and then click Payees, then click Add Demand Draft Payee.

  • From the Dashboard, click Toggle menu, click Menu, then click Payments .

    Under Payments , click More Actions , and then click Payees, then click Add Demand Draft Payee.

  • From the Search bar, type Payees – Add Demand Draft Payeeand press Enter.

To add a new demand draft payee:

  1. The Add Demand Draft Payee screen appears.

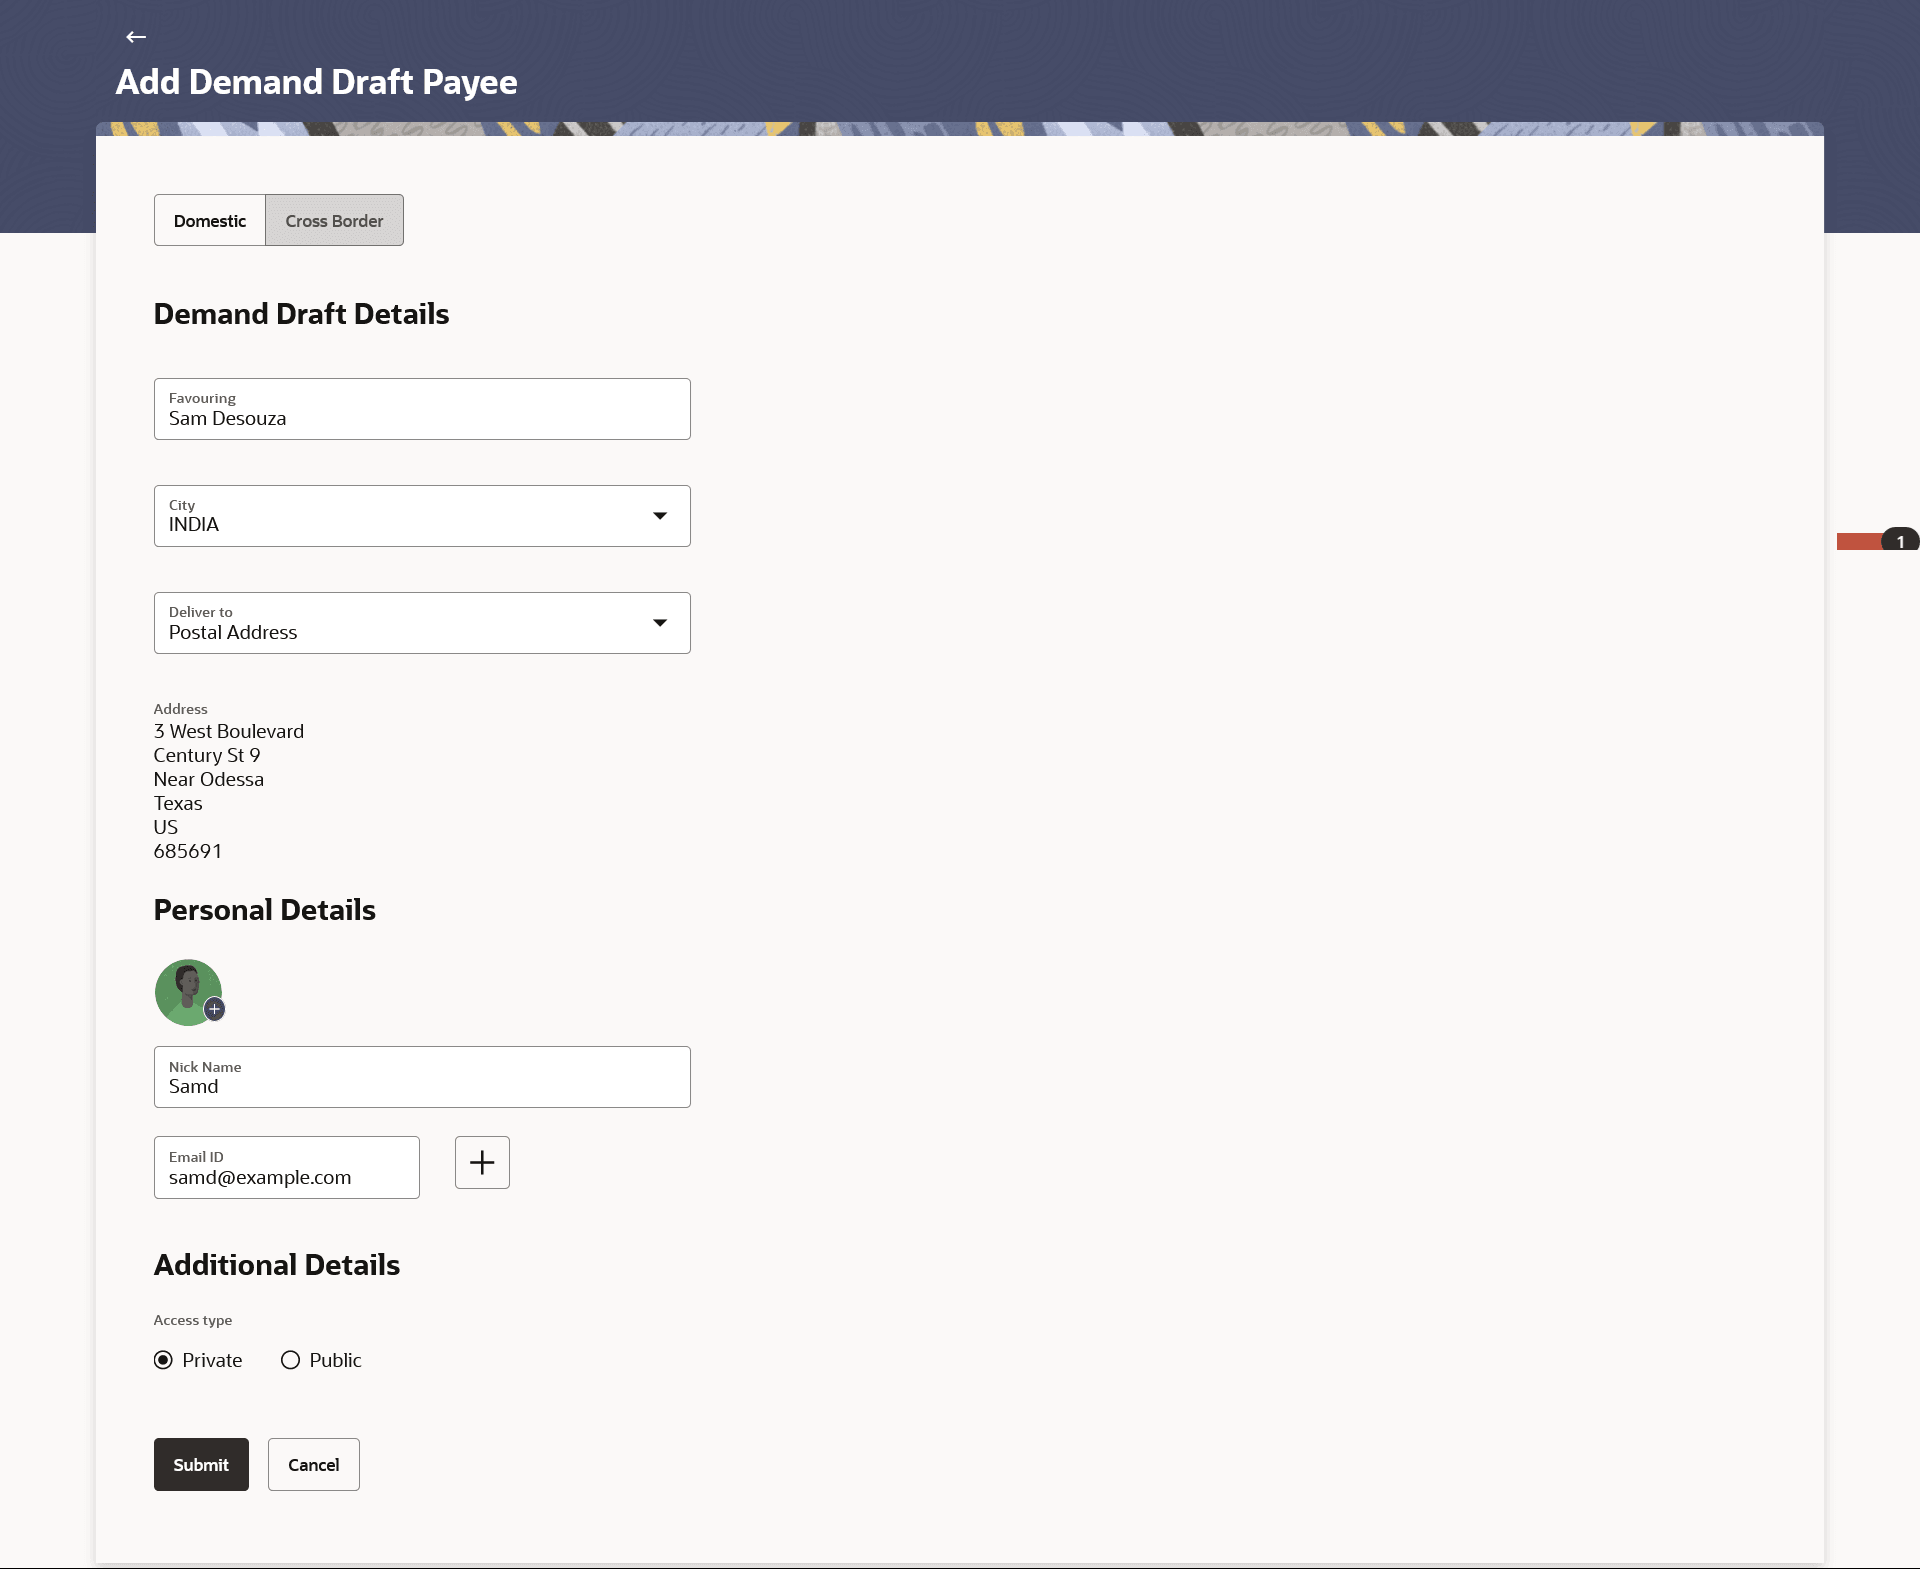
    Figure 2-11 Add Demand Draft Payee- Domestic


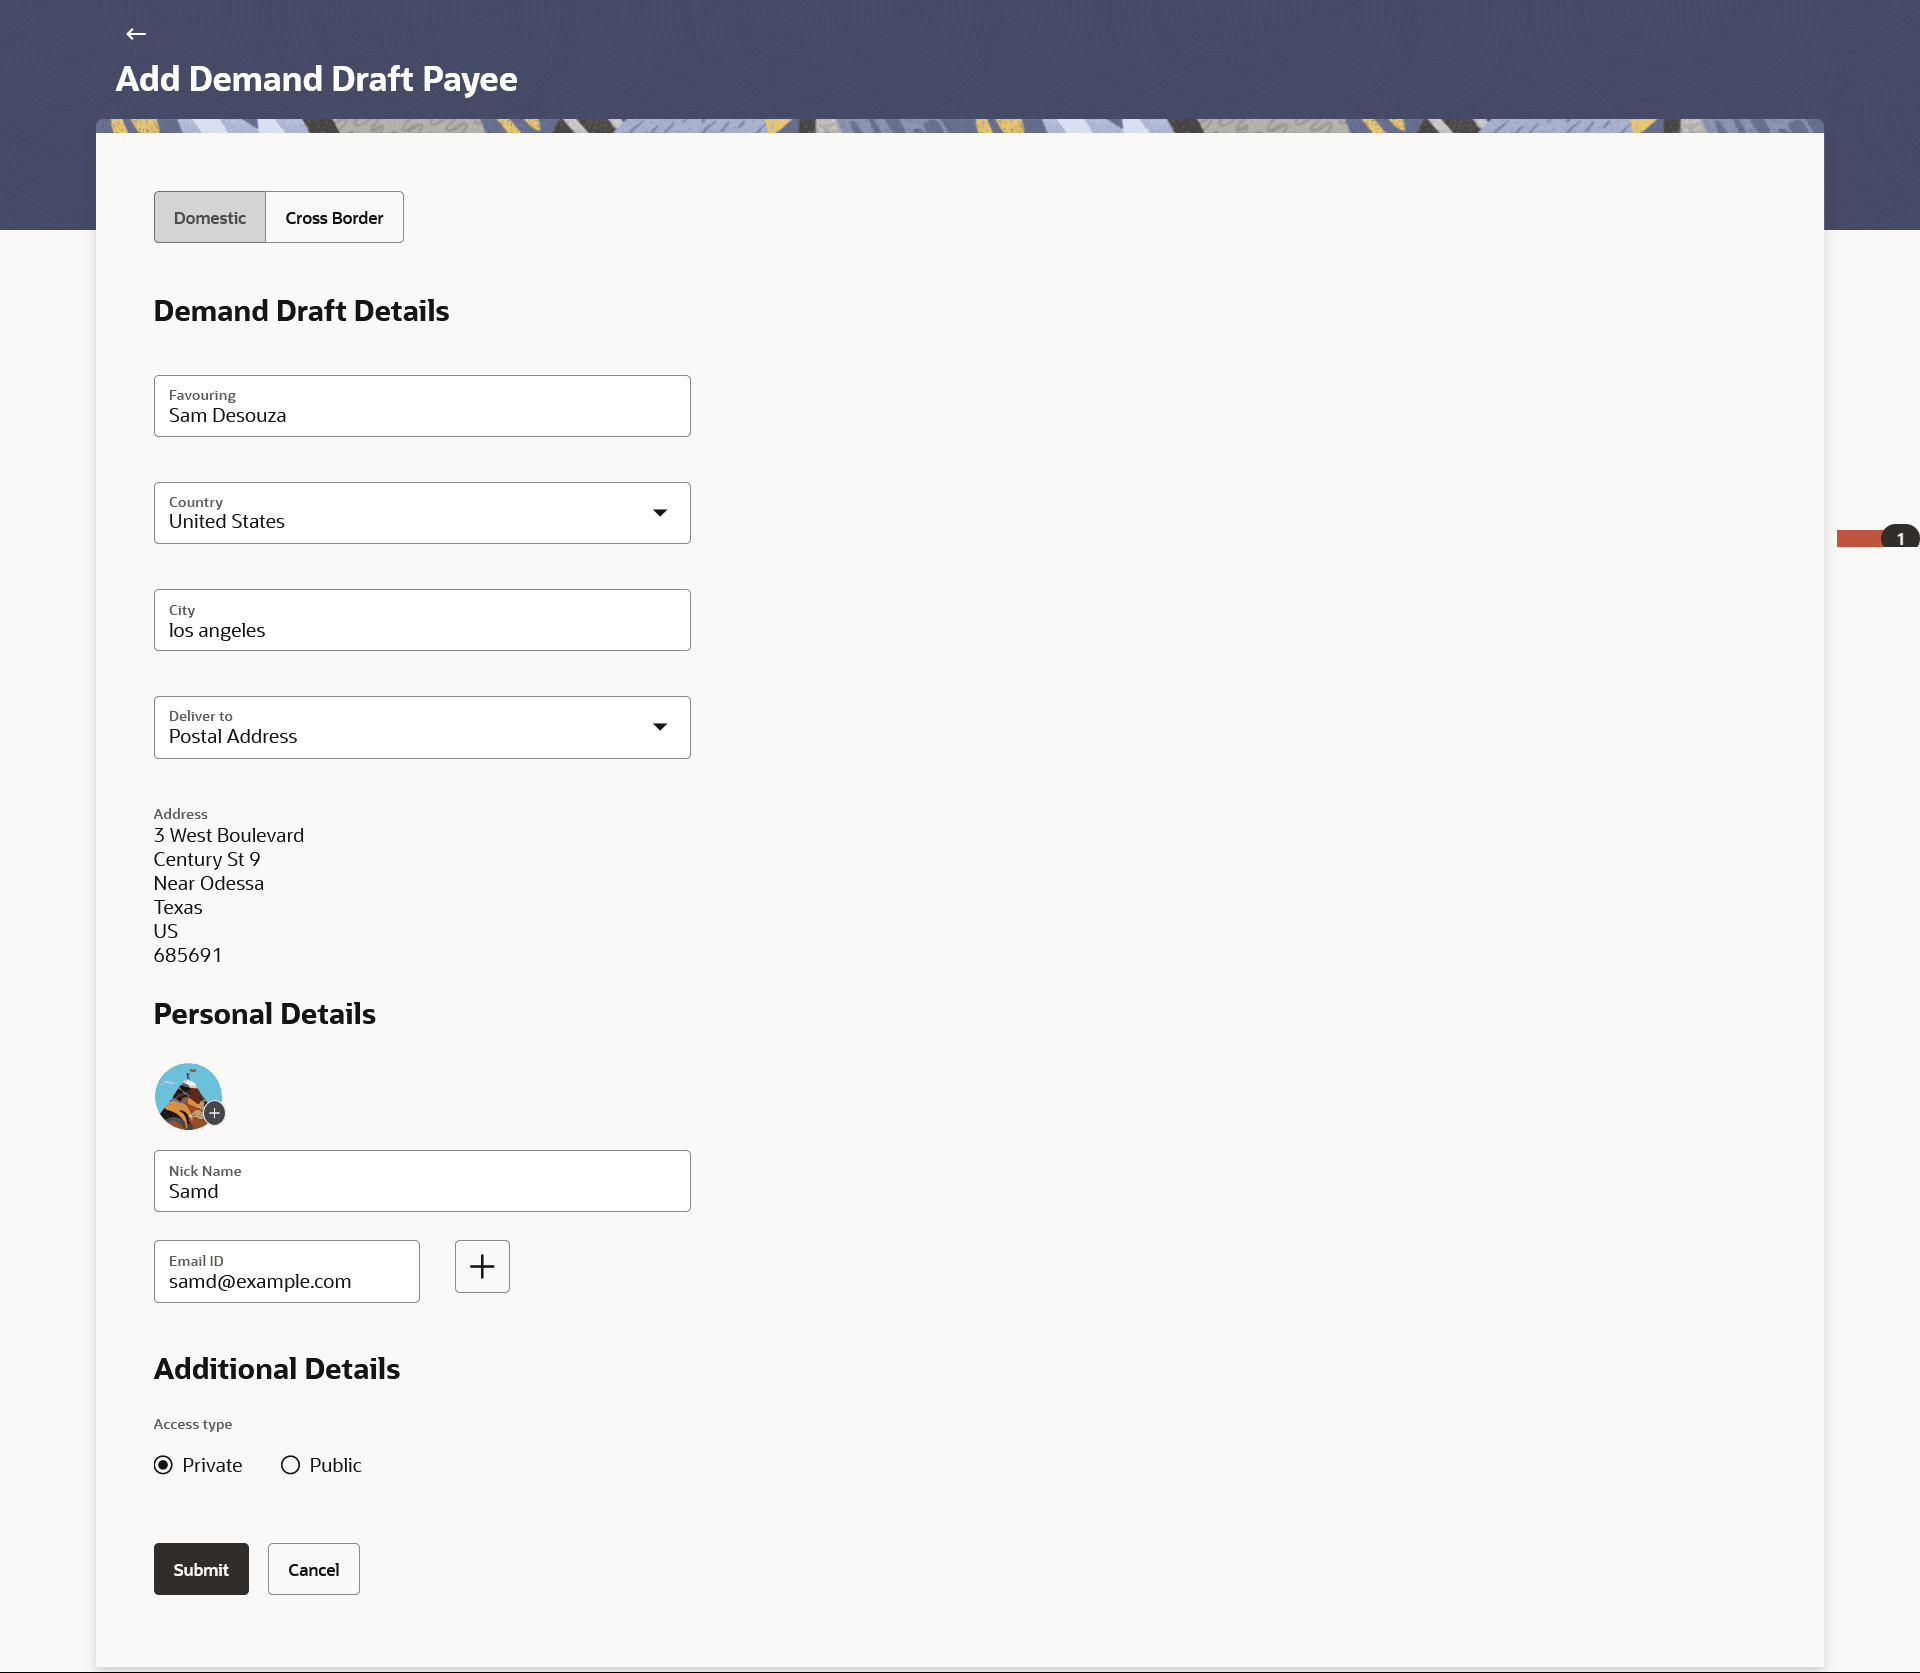
    Figure 2-12 Add Demand Draft Payee- Cross Border


    Table 2-7 Field Description

    Field Name Description
    Draft Type Specify the type of draft to be associated with the payee.

    It Could be:

    • Domestic
    • Cross Border
    Demand Draft Details  
    Favouring Specify the name of the payee as it is to be printed on the demand draft.
    Country Specify the country in which the draft is to be payable.

    This field is enabled only for the Cross Border Demand Draft type.

    City Specify the name of the city in which the draft is payable.
    Personal Details  
    Upload Photo Select this option to upload a profile photo against the payee.

    Following actions are available on the + icon:

    • Upload – Browse and upload the profile picture.
    • Choose Avatar - Select initials pattern profile picture or picture from suggestions.
    • Remove - Removes the profile picture uploaded.

    This option will only appear if no photo has been uploaded against the payee.

    Note:

    1. The maximum allowable image size is 1MB, and the accepted formats are limited to JPG and PNG.
    2. Once a photo is uploaded against the payee, click on the + icon and select Upload/Choose Avatar to update the profile picture.
    Nickname Specify a nickname to be assigned to the specific account of the payee for the purpose of easy identification.
    Email ID Email address of the payee.

    Note:

    This field is provided simply as a base product feature and will be available to send across to the backend Payments Processor during posting a payment. There will be no notifications sent to the payee on this email address by OBDX. Doing any processing of this field would be an implementation time activity.
    Additional Details  
    Access Type Specify the access type to be assigned to the payee.

    The options are:

    • Public
    • Private
    Primary Party The primary party associated to the user.

    The primary party users will always have access to the payee if it’s Public.

    Accessible to Parties Accessible parties associated to the user.

    During payee creation a corporate user can define the parties within his GCIF to whom this payee will be accessible if the payee is public.

    The primary party users will always have access to the payee if it’s Public.

  2. Fill the details in the respective field.
  3. In the Nickname field, enter the nickname to be assigned to the payee.
  4. Click Submit.
    The Add Payee - Review screen appears.
  5. The Review screen appears.
    Perform one of the following actions:
    • Verify the details and click Confirm.
    • Click Cancel to cancel the transaction.
    • Click Back to navigate back to Add Payee screen.
  6. The success message appears along with the transaction reference number and payee details.
  7. Below are the available actions on the confirmation page:
    • View Payees - To view the list of payees. It will navigate to manage payee’s screen
    • Go to Payments Overview - To go to the My Payment Overview page.
    • Go to Dashboard - To go to the main dashboard screen.
    • Issue Demand Draft - To issue demand draft to the added payee.
    • Add New Payee - To add a new payee.