1.21 Maintain Users
This topic explains systematic instructions to create user profiles.
Note:
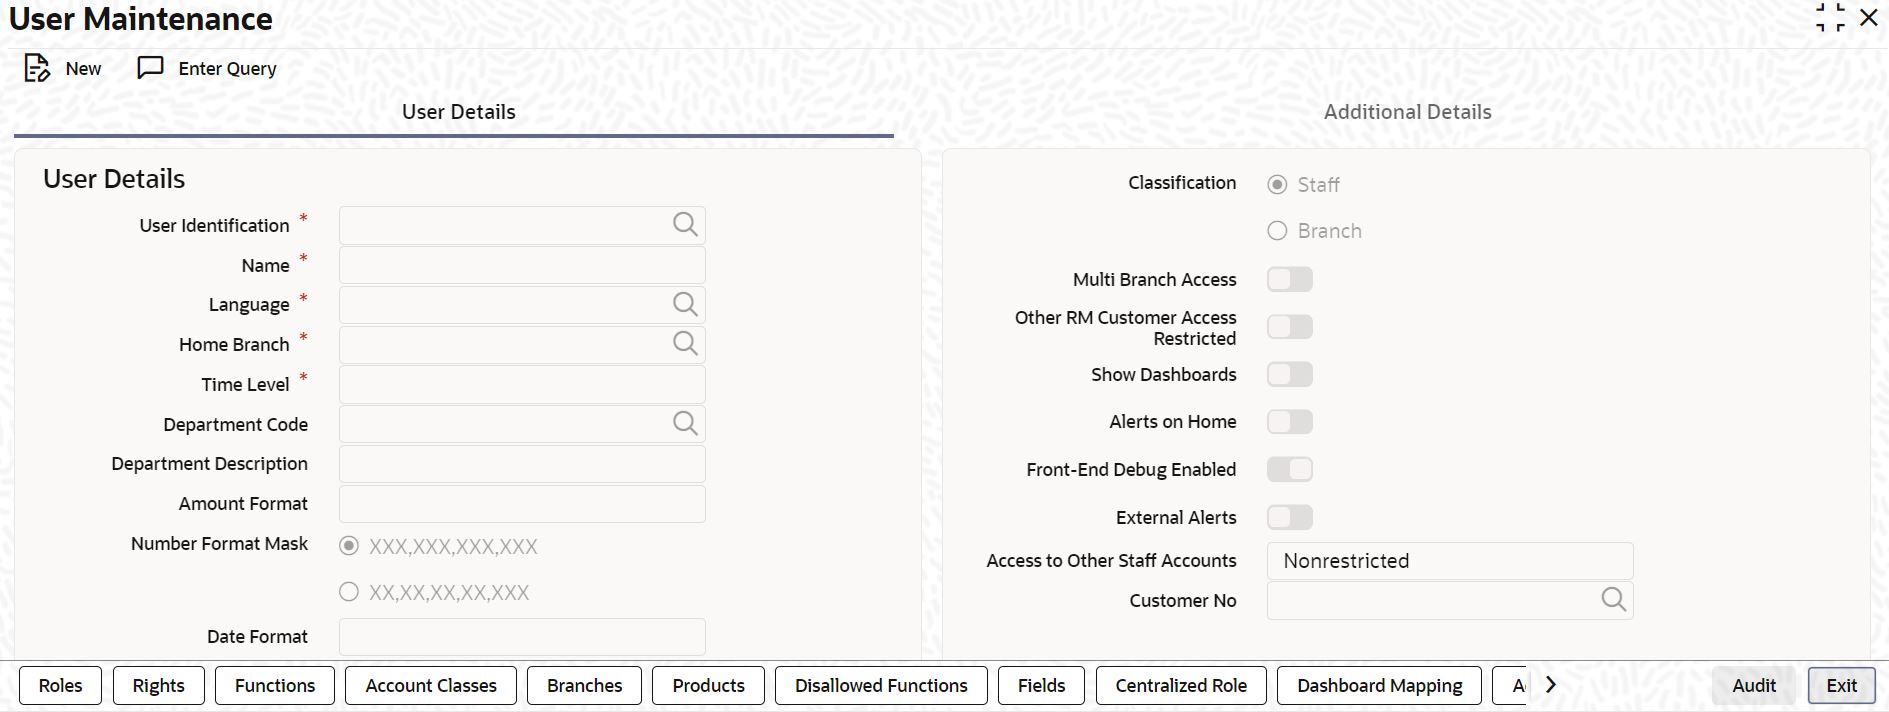
The fields which are marked in asterisk are mandatory.- On Homescreen, type SMDUSRDF in the text box, and click Next.The User Maintenance screen displays.
Note:
The User Details tab displays default. - On the User Details tab, specify the fields.
For more information on fields, refer to the field description table.
Table 1-32 User Maintenance - Field Description
Field Description User Identification Specify the user identification. This ID identifies the user whose profile is being defined. In a user ID, Use alphabets in upper or lower case, numbers 0 to 9, and _ (underscore). The number of characters in a User ID should be greater than or equal to six and less than 12. Name Specify the name of the user. Language Click Search and specify the language in which the user's screen have to be defined from the list of values. The language codes maintained through the Language Code Maintenance screen are available for selection. Home Branch By default, the Current Branch displays here. All users have to be attached to a branch. Time Level The time level defaults to Nine. Specify the time level that is to be maintained at the User level if needed. Specify values between Zero to Nine. The Time Level can be specified at the Branch level and the User level. To log in, then the time level maintained at User Profile should be greater than or equal to that maintained at the Branch level.
Time levels are maintained to prevent logging into the application when the system is processing the EOC batch. Before EOC Operations, the time level of the system is increased, so that it is higher than that maintained at the User level. However, if the user is not logged out when the Time Level is raised to the one higher than defined, then the user can continue to use the application. If required, modify the time level at the user profile level when the branch is at the Transaction Input stage.
Note:
After modifying the time level value to the value wanted to maintain, move the cursor to any other field and then click Save.Department Code Click Search and specify the department code. The adjoining list of values displays a list of all the valid department codes maintain in the system. Department Description The system displays the department description. Amount Format Select the amount format from the drop-down list. - .,
- ,.
- ,
Number Format Mask Select the format of the mask number either in Million or Lakh from the following options: - XXX,XXX,XXX,XXX
- XX,XX,XX,XX,XXX
Date Format Select the date format from the drop-down list. - MM/DD/YYYY
- DD/MM/YYYY
- YYYY-MM-DD
- DD-MMM-YYYY
- DD-MM-YYYY
- DD.MM.YYYY
Auto Authorization To indicate that a user is allowed to perform automatic authorization, check the Auto Authorization box.
If automatic authorization has been enabled for a function, branch, and user profile, and a user has rights for both input and authorize operations, any record maintained by such user in the corresponding function (maintenance or online) screens will be automatically authorized when the Save operation is performed.
For example of the automatic authorization enabled branches, refer to the unresolvable-reference.html#GUID-2564DB05-5FC5-4B96-9DBF-A24EDA7EE92E__TABLE_PW1_1XP_SSB table.
For example of the automatic authorization enabled functions, refer to the unresolvable-reference.html#GUID-2564DB05-5FC5-4B96-9DBF-A24EDA7EE92E__TABLE_PYC_HXP_SSB table.
For example of the Transaction access rights for the users, refer to the unresolvable-reference.html#GUID-2564DB05-5FC5-4B96-9DBF-A24EDA7EE92E__TABLE_AVD_RXP_SSB.
For example of the automatic authorization examples according to maintenance, refer to the unresolvable-reference.html#GUID-2564DB05-5FC5-4B96-9DBF-A24EDA7EE92E__TABLE_IBZ_GYP_SSB
Supervisor Identification Specify the ID of the supervisor of the user. The list of values displays all valid supervisor identifications maintained in the system. In the case of relationship managers, also use this field to define the Relationship Manager hierarchy. For defining the Relationship Manager hierarchy in this method, select the RM user who is one level up in the hierarchical order as the supervisor.
If the user is superior in the RM hierarchical order, specify their user ID as the supervisor ID. The supervisor ID list of values also shows the user ID of the user is maintained. This means it is possible to define an RM user as their own supervisor.
Note:
The RM hierarchy defined in this method is enabled only if the check box RM Hierarchy Setup Required is not checked in the SMS Banks Parameters screen.Supervisor Name The system displays the name of the supervisor based on the selected Supervisor Identification. PII Allowed Check this box to allow the users to view Personally Identifiable Information. Classification - Staff - All internal users of the bank can be classified as Staff. Include any of the functions available in the system in the user profile.
- Branch - This indicates a branch user. This is used to identify a branch user and branch-specific user maintenance for the branch user.
Multi Branch Access Check this box to configure a dual access framework for the specified User ID. Other RM Customer Access Restricted The user’s access to the transactions of the customers who are assigned to a different relationship manager can be restricted. Check this box to restrict the user from viewing, creating, authorizing or amending the transactions of the customers who are not assigned.
The customers who are not assigned to the relationship manager include the customers assigned to other relationship managers as well as those who are not assigned to any relationship manager. If this box is not checked, the user can view, create, authorize and amend the transactions of the customers assigned to other relationship managers. This is applicable to the users created with their role as relationship manager.
Show Dashboards Check this box if want the system to display all the dashboards assigned to User Role on the landing page. Alerts on Home Check this box if want the system to display the Alerts on the landing page. Front-End Debug Enabled Check this box to enable the debug window for a user. External Alerts Check this box to enable the external alerts. Access to Other Staff Accounts Select Access to Other Staff Accounts from the drop-down list: - Restricted
- Nonrestricted
A user with restricted access will not be able to view/print details of contracts involving the product in all Contract Functions and Contract Summary screens for the following modules:- Corporate Teller
- Clearing
- The Contract Online and Cycle Due screen of SI
- Foreign Exchange (online and payment)
- The Contract Online, Value Dated Amendments, and Payments Input screens of MM
- The Contract Online put, Value Dated Amendments, Payments Input, and Loans
Note:
The view restriction does not apply to the transaction or contract screens in which the other staff accounts are involved.The other functions to which the user will have restrictive rights are as follows:- Ad-hoc loan statement generation
- Queries - Accounting Entries
- Customer Based Information Retrieval
- Limits Override showing account balances
- Message Browser
Note:
The restricted users will be able to:- View/print financial information of contracts they have initiated or view/ print balances of their accounts.
- Post transactions to the staff accounts or create contracts for staff members, even if the user is restricted to view/print the balances/contract information of other colleagues.
- In case of a balance exception during transaction posting, the balance will not be displayed. The Exception Message will only state that the account will be Overdrawn on account of the transaction.
- Post transactions and view transaction information until the contract is authorized. After authorization, such users cannot access the contract.
Customer Number Click Search and specify the Customer Number from the list of values. It is feasible to link the customer number (CIF ID) of the employee with the User ID. For example, if the automatic authorization is enabled for the following branches in the Branch Parameters:Table 1-33 Automatic Authorization enabled Branches
Branch Automatic Authorization Enabled 000 Yes 001 No 002 Yes In the Function Description Maintenance screen, automatic authorization has been enabled for the following functions:Table 1-34 Automatic Authorization enabled Functions
Function Automatic Authorization Enabled Customer Information Maintenance Yes LD Contract Online Yes Customer Account Maintenance Yes Automatic authorization rights are maintained for specific users in the User Maintenance as shown below:Table 1-35 Automatic Authorization enabled Users
User Automatic Authorization Enabled Ronald Yes George Yes Smith No Transaction access rights for the users are maintained as shown below:Table 1-36 Transaction access rights
User Branch Function Input Access Authorize Access Ronald 000 Customer Information Maintenance Yes Yes Ronald 001 Customer Information Maintenance Yes Yes Ronald 000 Customer Account Maintenance Yes No George 001 LD Contract Online Yes Yes George 000 Customer Account Maintenance Yes Yes Smith 000 LD Contract Online Yes Yes Smith 000 Customer Account Maintenance Yes Yes According to maintenance, automatic authorization would be performed as shown below:For more details about automatic authorization, refer to the Procedures User Guide.Table 1-37 Automatic Authorization - Maintenance
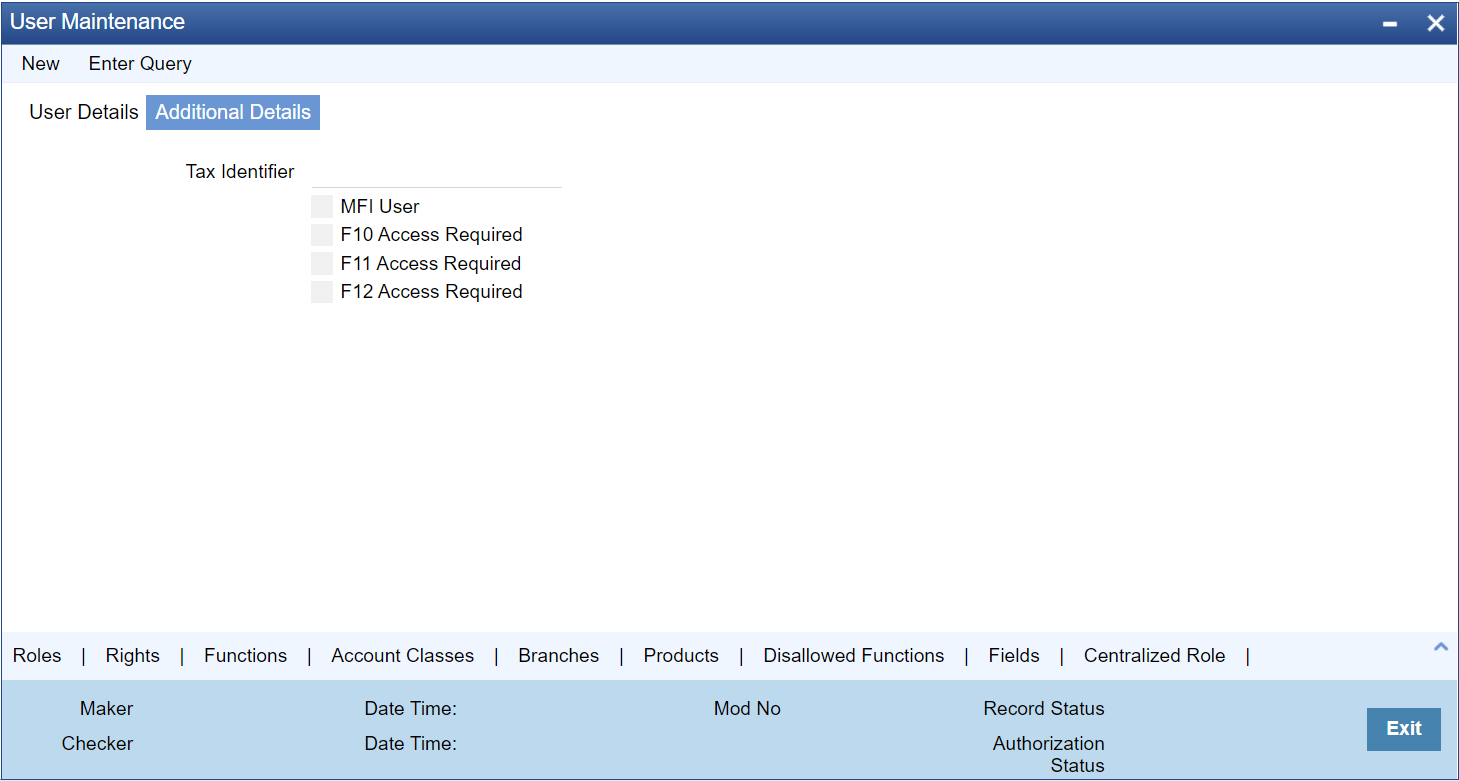
User Branch Function Automatic Authorization on Save? Reason Ronald 000 Customer Information Maintenance Yes Input and Authorize rights are enabled for the user, as well as automatic authorization rights enabled for the user, branch, and function. Ronald 001 Customer Information Maintenance No Automatic authorization is not enabled for branch 001. Ronald 000 Customer Information Maintenance No Authorization access is not enabled for the user. George 001 LD Contract Online No Automatic authorization is not enabled for branch 001. George 000 Customer Information Maintenance Yes Input and Authorize rights are enabled for the user, as well as automatic authorization rights enabled for the user, branch, and function. The user can also authorize any maintenance done by the user Ronald in this function. Smith 000 LD Contract Online No Authorization access is not enabled for the user. - On the User Maintenance screen, click Additional Details.The Additional Details tab displays.
- On the Additional Details tab screen, specify the fields.
For more information on fields, refer to the field description table.
Table 1-38 Additional Details - Field Description
Field Description Tax Identifier Specify the tax identifier code of the customer to monitor Anti Money Laundering activities. MFI User Select the MFI User check box to indicate that the user is a Microfinance (Account Officer) user. By default, the system leaves this check box deselected to indicate that all users would be normal users. An account officer can book loan accounts for customers who are linked to him/her.
Note:
For more details, refer to topic (Account Officer Maintenance screen) Linking Customers to Account Officers in the Micro finance User Manual.F10 Access Required Select this check box to access SVDIMGVW (Customer Signature and Image View) screen. F11 Access Required Select this check box to access STDCUSBL (Customer Account Balance View) screen. F12 Access Required Select this check box to access SVDIMGVW (Customer Signature and Image View) screen. - Click Exit to end the transaction.
Parent topic: Security Management

