- Corporate Onboarding User Guide
- Corporate Customer Onboarding
- Onboarding Enrichment
- Customer Profile
- Address
1.5.1.2 Address
This topic describes the systematic instruction to add the address details for the Corporate customer.
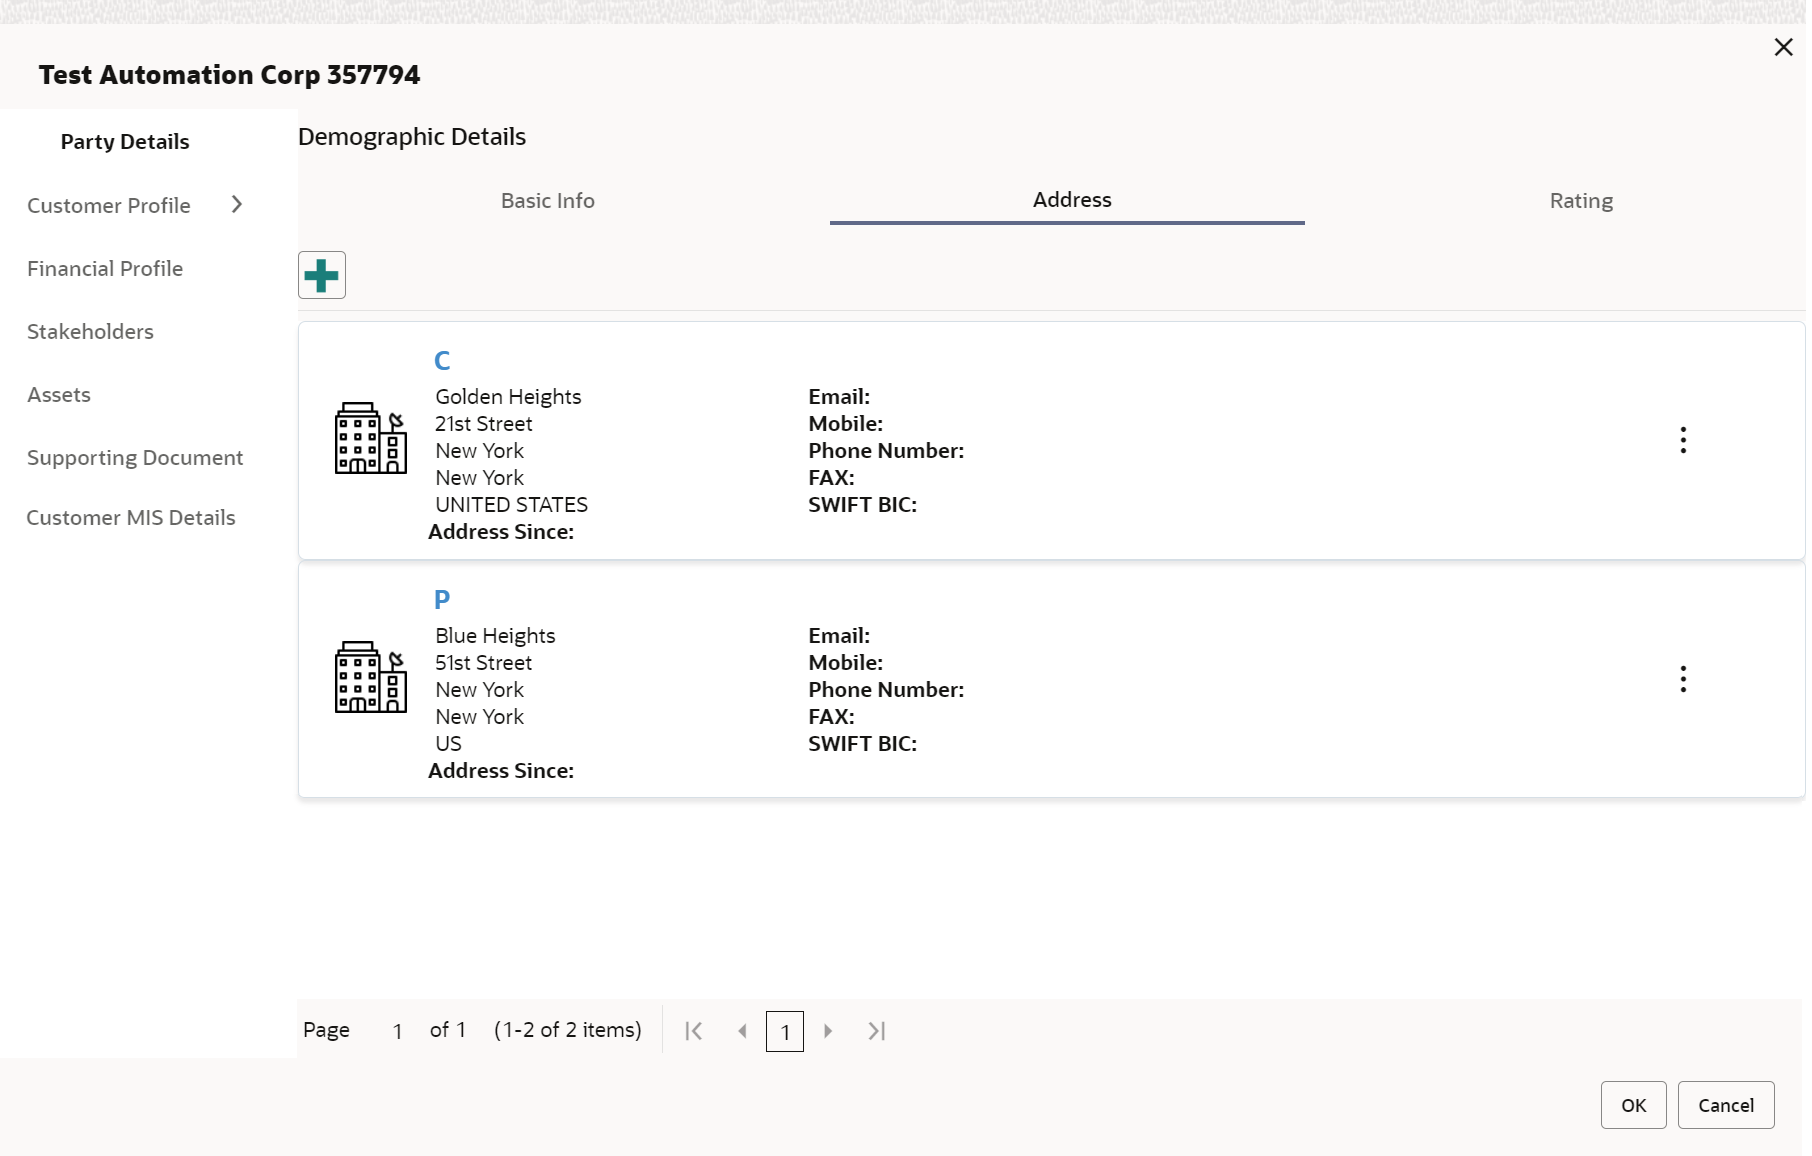
- On the Customer Profile screen, click on the Address tab after you add the basic information.The Demographic Details - Address screen displays.
Figure 1-17 Demographic Details - Address
- Click and expand the Address section.
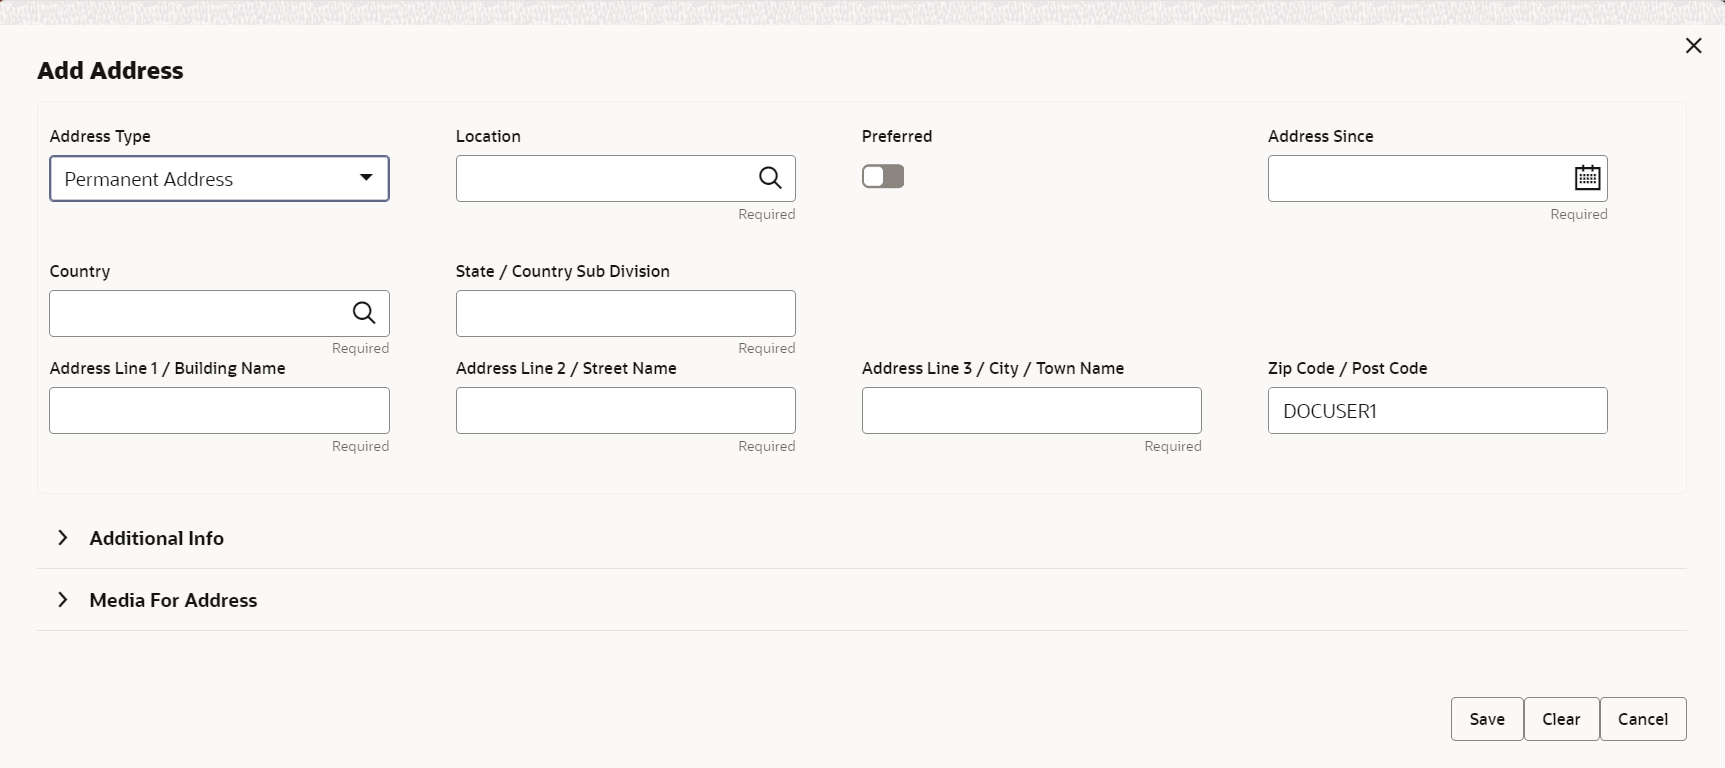
- Click on the + button to add the address details.The Add Address screen displays.
- On the Add Address segment, specify the fields. For more information on fields, refer to the field description table.
Table 1-6 Add Address – Field Description
Field Description Address Type Select the address type from the drop-down list. The available options are: - Permanent Address
- Residential Address
- Communication Address
- Office Address
Note:
The address type can be configured as mandatory using Address Management. Refer to the Oracle Banking Party Configurations User Guide for more details.Location Click Search and select the preferred location from the list of values. Note:
The list of values can be configured through Common Core Maintenance for Location Code.Preferred Click the toggle to specify the preferred to be used for communication. Note:
If more than one address is captured for the same address type, at-least one address should be marked as preferred.Address Since Specify address start date. Country Click Search icon and select the country from the list of values. Note:
The list of values can be configured through Common Core Maintenance for Country CodeState / Country Sub-division Specify State or Country Sub-division. Address Line 1 / Building Name Specify Address Line 1 or Building Name. Address Line 2 / Street Name Specify Address Line 2 or Street Name. Address Line 3 / City / Town Name Specify Address Line 3 or City Name or Town Name. Zip Code / Post Code Specify Zip Code or Post Code. - Expand the Additional Info section on the Add Address segment.The Additional Info data segment is displayed.
- Specify the details in the Additional Info segment. For more information on fields, refer to the field description table.
Table 1-7 Additional Info – Field Description
Field Description Department Specify the name of the department for the customer. Sub Department Specify the sub-department for the customer. Building Number Specify the building number. Floor Specify the floor for the given address. Post Box Specify the post box. Room Specify the room for the given address. Town Location Name / Locality Specify Town Location or Locality Name. District Name Specify the district name. Landmark Specify the near Landmark to address. Contact Name / Narrative Specify Contact Name or Narrative for the address Note:
Refer to the Oracle Banking Party Configurations User Guide for entity maintenance. - On the Add Address screen, in the Media For Address segment, specify the details under the Mobile tab.
- On the Mobile tab, click + icon.The Add Mobile Number pop-up screen is displayed.
- Specify the details in the Add Mobile Number pop-up screen. For more information on the fields, refer to the field description table.
Table 1-8 Media (Mobile) – Field Description
Field Description ISD Code Specify the ISD code for the mobile number of the customer. Mobile Number Specify the mobile number of the customer. Preferred Specify the preferred mobile number, in case more than one mobile number is captured. - On the Add Address screen, in the Media For Address segment, specify the details under the Phone tab.
- On the Phone tab, click + icon.The Add Phone Number pop-up screen is displayed.
- Specify the details in the Add Phone Number pop-up screen. For more information on the fields, refer to the field description table.
Table 1-9 Media (Phone Number) – Field Description
Field Description ISD Code Specify the ISD code for the phone number of the customer. Area Code Specify the area code for the phone number of the customer. Phone Number Specify the phone number of the customer. Preferred Specify the preferred phone number, in case more than one phone number is captured. - On the Add Address screen, in the Media segment, specify the details under the Email tab.
- On the Email tab, click + icon.The Add Email pop-up screen is displayed.
- Specify the details in the Add Email pop-up screen. For more information on the fields, refer to the field description table.
Table 1-10 Media (Email) – Field Description
Field Description Email Id Specify the email id of the customer. Preferred Specify the preferred email id, in case more than one email id is captured. - On the Add Address screen, in the Media segment, specify the details under the FAX tab.
- On the Fax tab, click + icon.The Add Fax Number pop-up screen is displayed.
- Specify the fields under Add Fax Number pop-up screen. For more information on fields, refer to the field description table.
Table 1-11 Media (Fax) – Field Description
Field Description ISD Code Specify the ISD code for the FAX number of the customer. Area Code Specify the area code for the FAX number of the customer. Fax Number Specify the FAX number of the customer. Preferred Specify the preferred FAX number, in case more than one FAX number is captured. - On the Add Address screen, in the Media for Address segment, specify the details under the SWIFT tab.
Parent topic: Customer Profile


