- Analytical Application Infrastructure User Guide
- System Configuration and Identity Management
- Identity Management
- User Administrator
- User Maintenance
- Adding User
Adding User
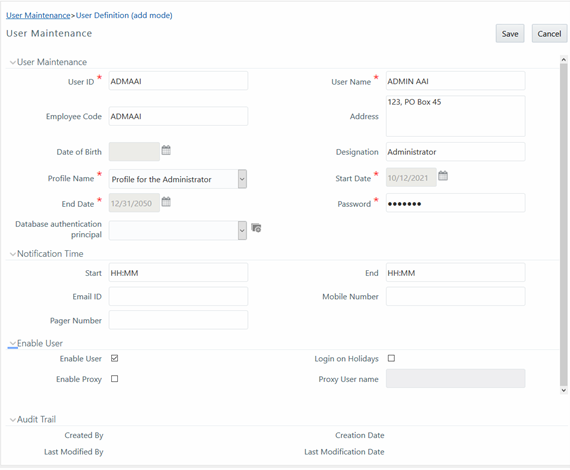
- Select Add from the User Maintenance tool bar.
Add button is disabled if you have selected any User
ID in the grid. The New User window is displayed.
Figure 15-31 User Definition (add mode)

- Enter the user details as tabulated. The following table describes the fields
in the User Definition window.
Table 15-18 Fields in the User Definition window and their Descriptions
Field Description Fields marked in red asterisk (*) are mandatory. User ID Enter a unique user id. Ensure that the User ID does not contain any special characters or spaces except “.”, “@”, “-”, and “_”. User Name Enter the user name. The user name specified here will be displayed on the Infrastructure splash window. Ensure that the User Name does not contain any special characters except “–”, “’” and “.”. Employee Code Enter the employee code. Ensure that the Employee Code does not contain any special characters or spaces except “.”, “@”, “-”, and “_”.
If employee code is not provided, user ID will be taken as employee code.
Address Enter the contact address of the user. It can be the physical location from where the user is accessing the system. Ensure that Contact Address does not contain any special characters except ".", "#", "-", ",". Date Of Birth Specify the date of birth. You can use the popup calendar to enter the date. Designation Enter the user designation. Ensure that Designation does not contain any special characters except “_, “:” and "-". Profile Name Select the profile name by clicking on the drop-down list. Start Date By default, the Start Date is today’s date and you cannot edit this field. End Date By default, the End Date value is 12/31/2050 and you cannot edit this field. Password Enter the default password for the user for the initial login. User needs to change the default password during the first login.
A user is denied access in case the user has forgotten the password or enters the wrong password for the specified number of attempts (as defined in the Configuration window). To enable access, enter a new password here.
Database Authentication Principal Select the Database Principal name from the drop-down list. The list displays the Principal names for HDFS Kerberos connection.
Click Create Database to create a new Database Principal by entering the Principal name and password in the DbAuth Principal and DbAuth String fields respectively.
Notification Time (Optional) Specify the notification start and end time within which the user can be notified with alerts. Email ID Enter the e-mail address of the user. Mobile Number (Optional) Enter the mobile number of the user. Pager Number (Optional) Enter the pager number of the user. Enable User Select the checkbox to allow user to access the system.
NOTE: By default, this check box is selected.
A deselected checkbox denies access to the user.
Login on Holidays Select the checkbox to allow users to access the system on holidays.
A deselected checkbox denies access to the user on holidays.
SMS Auth Only This field is displayed only if the LDAP Authentication & SMS Authorization or SSO Authentication & SMS Authorization is selected from the Configuration window.
Select the checkbox to authenticate the user through SMS even though the LDAP Authentication orSSO Authentication is enabled.
This feature can be used to bypass LDAP or SSO authentication for selected users.
Enable Proxy Select the checkbox if you want to enable proxy user for database connection. Proxy User name Enter the Proxy user name for the OFSAAI user, which will be used for database connection. - Click Save to upload the user details. The new User details are populated in the User Authorization window which has to be authorized by System Authorizers. Once authorized, the User details are displayed in User Maintenance window and can then be mapped to the required user group in the User Group Map window.