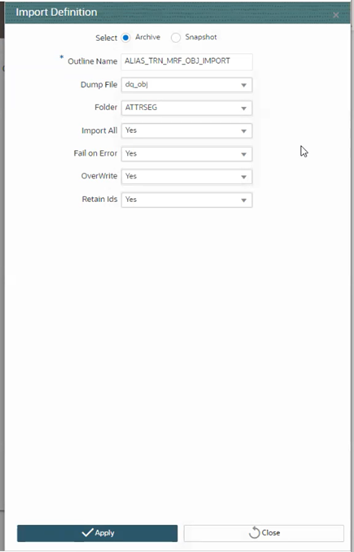
Creating Import Definition from an Archive
To import objects, perform the following steps:
- Click the Add button in the Object Migration
Import Summary window. The Import Definition
window is displayed.

- Select the dump file from the drop-down list. It displays the dump files in the
/ftpshare/ObjectMigration/metadata/restorefolder. The objects in the dump file will be displayed in the Available Objects pane. - Select the required Folder from the drop-down list. This is the default target folder if object specific Folder is not provided. However, if both Folders are not specified, then source folder available in the exported dump file will be considered as target folder.
- Select the Retain Ids as Yes or
No from drop down to retain the source AMHM objects
after migration. If it is turned ON, different scenarios and the behaviors are
as follows:
-
Object and ID does not exist in Target- the object is created in target environment with same ID as that in source.
-
Object exists in Target with different ID- object is migrated and the ID in the target is retained.
-
ID already exists in Target with different object- then the object is migrated to target environment and a new ID is generated.
-
- Same object and ID exists in Target- In this case, the behavior depends on the OVERWRITE flag.
-
- Turn ON the Fail On Error toggle button to stop the import process if there is any error. If it is set OFF, the import process will continue with the next object even if there is an error.
- Turn ON the Import All toggle button to import all objects in the dump file to the target environment.
- Turn ON the Overwrite toggle button to overwrite any existing metadata. If it is turned OFF, it will not overwrite the object and continue migrating the next object.
- Click Save.The Import definition will be available in the Object Migration Import Summary window.
- Select the definition and click Import to execute.
- A confirmation message is displayed. Click Ok to trigger the import process.You can view the logs from /ftpshare/ObjectMigration/logs folder.