- Analytical Application Infrastructure User Guide
- Data Management Framework
- Data Mapping
- Creating Data Mapping Definition
- Defining Data Mapping to Table (T2T, F2T, H2T, T2H, H2H, F2H, L2H)
Defining Data Mapping to Table (T2T, F2T, H2T, T2H, H2H, F2H, L2H)
In case of F2T or F2H, the source data file should be located at
/ftpshare/<INFODOM>/dmt/source/<SOURCE_NAME>/data/<MIS_DATE>.
In case of multi-tier setup, if the
dmt/source/<SOURCE_NAME>/data/<MIS_DATE>/ folder
structure is not present in /ftpshare/<INFODOM> location,
then
manually create the folder structure.
For local L2H executions, create the execution file path explicitly in
the app layer. Since the source folders get created in web local path, the execution
searches for data file in the
ftpshare/<infodom>/dmt/<sourcename>/data/<datefolder>/
folder in the app layer.
Note:
Data source based on a file present in the HDFS system cannot be loaded into an RDBMS target Infodom.- Select the Load to Table option as Load Type.
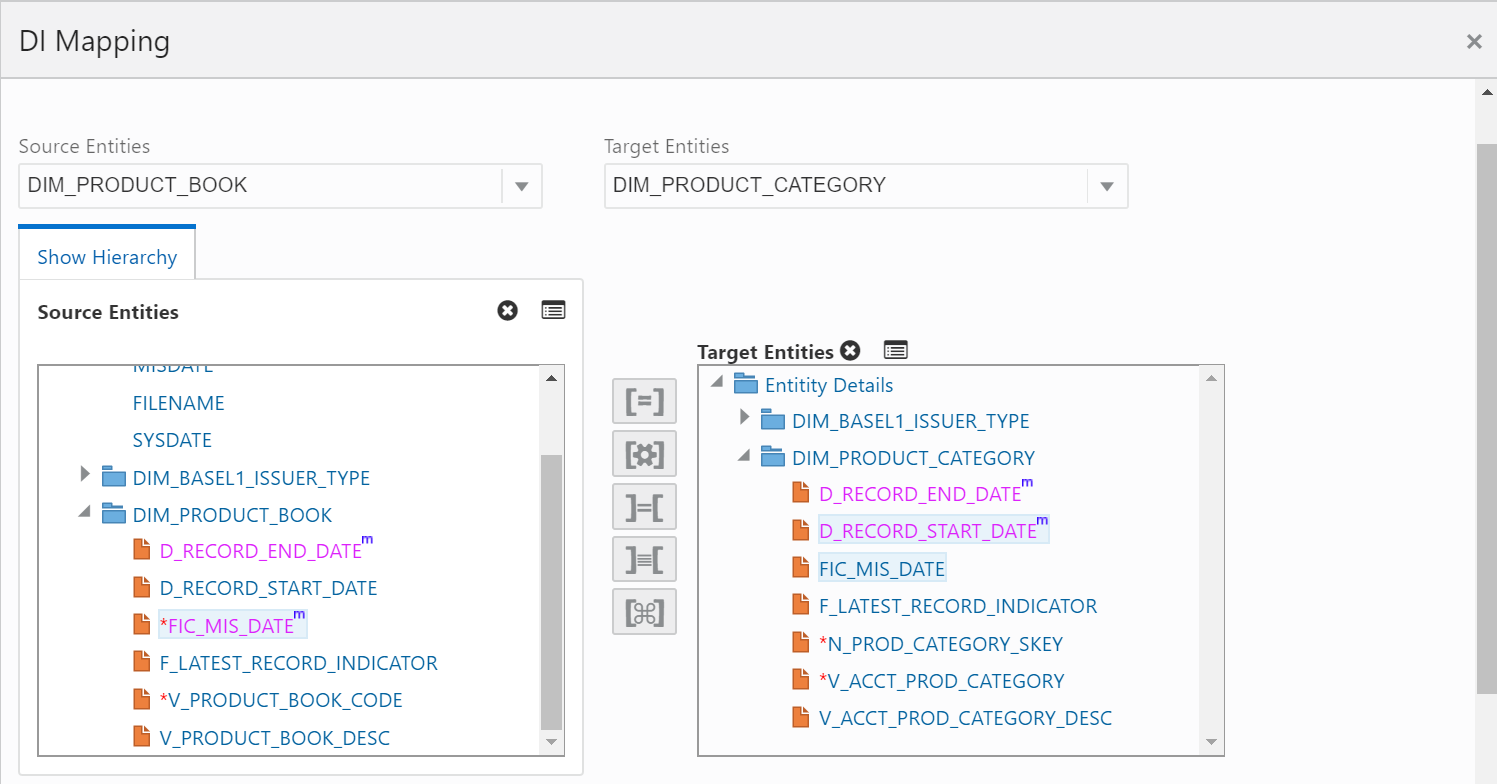
- From the Mapping Details pane, click Map.The DI Mapping window is displayed.
Figure 8-7 DI Mapping window

- Select the required table from the Source Entities
drop-down list.The list displays all the tables that are part of the source model.The selected source entity attributes are displayed in the Source Entities pane.
- Select the target table from the Target Entities
drop-down list. The selected entities are displayed in the Target
Entities pane of the Target Table Map panel.If the Target column is a partitioned column, it is indicated using a superscript P and if it has a static value, mouse over the column to display the partition value.To view the Entity details, select an entity and click the Entity details icon. To remove an Entity from the Definition pane or Target Entities pane, select the entity and click the Cross icon. You cannot remove an entity if any of its attributes are mapped. The mapped attribute is indicated using a superscript m.
Note:
You can create a new table by clicking the Plus icon if the target information domain is based on the HDFS database. The newly created table will be part of the OFSAAI Data Model and it is visible and available to all other modules. For more information, see Dynamic Creation of Table. - To map a source to target, do one of the following:
- Select the required attribute from the Source Entities pane and select an attribute from the Target Entities pane and click the Is Equal to icon.
- Click to automatically map between source attribute and target attribute. Auto mapping happens if both source and target attributes have the same name.
- To remove a mapping, select the target column and click the Target icon. To remove all mappings in the Target Entities pane, click the icon.
- To remove all mappings from a Target Entity, select the target table from the Target Entities pane and click.
- To define an expression to transform a source column and map it to a target column:
- Select EXPRESSION from the Source Entities pane, select an attribute from the Target Entities pane and click Transform Map. From the Expression Builder window, define an expression to transform the column.
- To modify an expression, expand EXPRESSION from the Source Entities pane, select the expression you want to modify and click the Transform Map icon. Modify the expression from the Expression Builder window. This will modify the value for all target columns mapped to this expression irrespective of the target column selected while defining the expression. A confirmation pop-up message is displayed.
- To map an existing expression to a new target column, expand EXPRESSION from the Source Entities pane, select the expression you want to map and click the Is Equal to icon.
Note:
For a single DI Mapping, you can use different target tables. That is, after mapping a source column to a column in a Target Entity, you can select another Target Entity and start mapping source columns to that target table columns. Also, the same source column can be mapped to different target columns of different target entities. - For F2T definition, you can map Row Level Transformation (RLT) functions, that
is, SysDate() and Constant values to a target column:
- Select SysDate() under Entity Details in the Source Entities pane and the required target column in the Target Entities pane and click the Is Equal to icon. The target column should be a Date column.
- Select Constant Value under Entity Details in the Source Entities pane and the required target column in the Target Entities pane and click the icon. Select the required constant value type from the drop-down list. The supported constant values are #DEFINITIONNAME, #SOURCENAME, #MISDATE, and #FILENAME. Ensure the Data Type of the target column matches with the constant value Data Type.
The options for Constants are:- DEFINITIONNAME- The name of the Data Mapping (F2T) definition will be transformed at Row level and loaded into a mapped target column.
- SOURCENAME- The name of the Source on which the Data Mapping (F2T) definition is defined will be transformed at Row level and loaded into a mapped target column.
- MISDATE- Execution date of the Data Mapping (F2T) definition will be transformed at Row Level and loaded into the mapped target column.
Note:
Columns mapped to #MISDATE will use the NLS format of DB for loading. For loading successfully, specify the DB_DATE_FORMAT given in the AAI_DB_PROPERTY table as the NLS date format of the corresponding atomic schema. To know the NLS date format of the DB , you can fire the following query: select * from V$nls_Parameters.- #FILENAME- The name of the file used for loading will be transformed at Row Level and loaded into the mapped target column.
- Others- Enter user-defined constant value in the textbox provided. To map a constant date to a target column, the date has to be given in NLS format of the database. That is, if the NLS format is DD-MON-RR, in the text box value should be 25-OCT-19.
Note:
- Row Level Transformation is supported only for F2T.
- In case of date based columns in F2T, when you map a source date column to multiple target columns, an expression value is added to all the mapped target columns, except to the first mapped column. The expression is in this format: TO_DATE(<<first record>>,'mm-dd-yyyy').
Figure 8-8 Join/Filter pane
 If you are mapping from multiple Source Tables, define an expression to join the column data corresponding to each table. You can pass Runtime Parameters through Expressions, Joins, and Filter conditions. For more information, see Passing Runtime Parameters in Data Mapping.
 - Specify the ANSI Join or Join to
join the source tables and enter the Filter criteria and
Group By to include during extraction. For example,
“$MISDATE” can be a filter for Run-time substitution of the MIS Date.
Note:
If the defined expression uses a function that has a placeholder or calls a stored procedure that has a placeholder for String data type, enclose the placeholder in single quotes. Using double-quotes would generate an error during extract definition or batch execution. Additionally, expressions with Date/Timestamp data type placeholders are not supported.Figure 8-9 Prescript/Hint

- Specify any Source Prescript or Target
Prescript if you want to use it. Prescripts are supported for
all HIVE based target Infodoms, that is, for H2H and T2H definitions. In case of
H2T, the prescripts are fired on the source.For more information, see Prescripts.
- Specify Source Hint and Target Hint (if any) for faster loading. Oracle hints
follow the format as
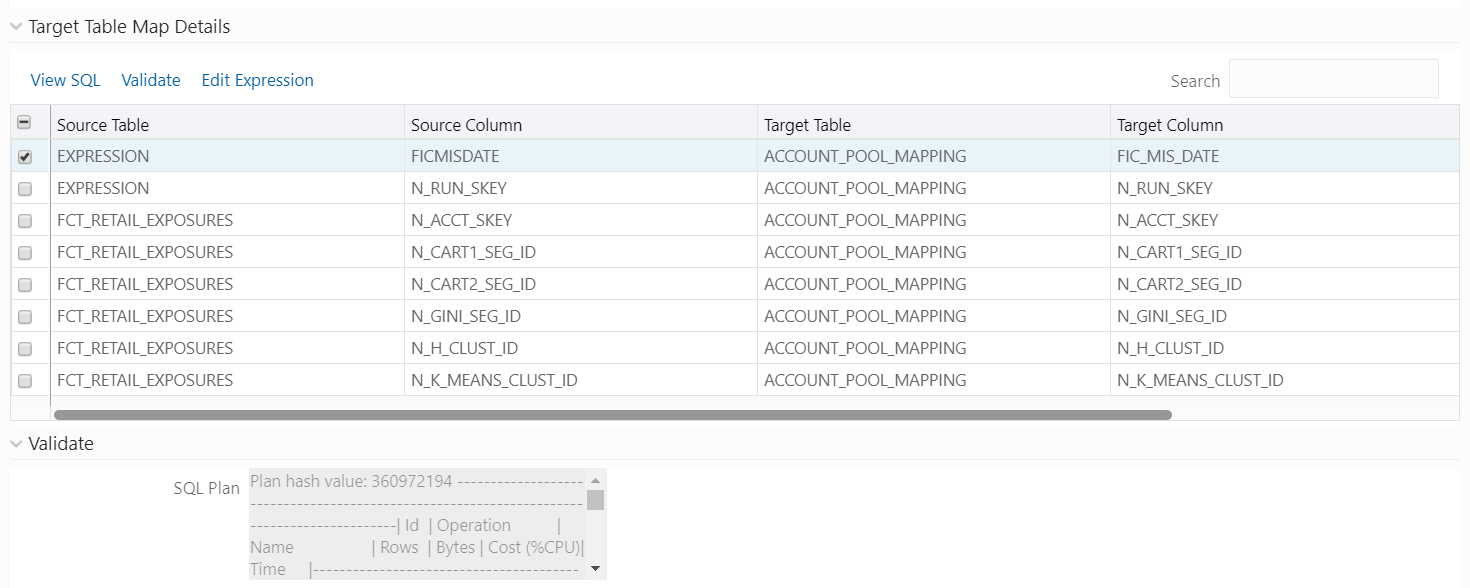
/*+ HINT */. The mapping level hint is applicable for T2T, H2T, and H2H definitions only. For example,/*+ PARALLEL */.Figure 8-10 Target Table Map Details

Note:
The View SQL and Validate buttons will be enabled only if your user group is mapped to the User Role DMADV. - Click View SQL to view the complete query in the SQL/Plan pane.
- Click Validate to validate the query by converting to the selected data source. If Validation is successful, the Explain Plan for the SQL query is displayed in the SQL/Plan pane. Otherwise, the SQL exception is displayed.
- To modify an expression, select the expression name and click Edit Expression.
Modify the expression in the Expression Builder window.For T2T definitions, it is recommended to use source-level expressions because the source and target expressions are similar in T2T. Target expression for T2T is mainly provided to edit the target level expression of the migrated Data Mapping definitions.
- Click OK in the DI Mapping window.
- Click Properties to specify the properties.
- Click Save to save the mapping details. The Data Mapping
definition will be saved as version 1.
- If a partitioned column is not mapped and the static value is not set for the partitioned column, an alert is displayed. The saving of the mapping definition does not fail. You can set a static value at any time before execution.
- For H2H definition, if the source and target are pointing to two different Hive Schemas, it is mandatory to prefix the schema name to the source tables. Otherwise, the execution will fail.
- When you click Save, if there are Primary Key
Columns in the Target Entities which are not mapped, then the following
alert appears: [8368] Mandatory Columns are not Mapped [9024] Do you
want to continue?
You can click OK if no change is required and proceed, or click Cancel to stay on the current window.