5.1.3.1 Conversion Steps
To convert BD AML scenario, follow these steps:
- Import Workspace Metadata for SCU
- Accessing SCU Notebook
- Accessing Calendar Notebook
- Generating Threshold and Scenario Notebook
- Running the Scenario
Note:
This section is applicable for both fresh installation and upgrade.- Create a public database link to Compliance Studio schema from
ASC BD database server as SYS DBA using the following
command.
set define off
/
DROP DATABASE LINK dl_studio
/
CREATE PUBLIC DATABASE LINK dl_studio
CONNECT TO <Compliance_Studio_atomic_user> IDENTIFIED BY
<Compliance_Studio_atomic_pwd>
USING ' (DESCRIPTION= (ADDRESS= (PROTOCOL = TCP) (HOST =
<replace_with_cs_db_ip> ) (PORT=1521) ) (CONNECT_DATA= (SERVICE_NAME =
<replace_with_cs_db_service_name> ) ) ) '
/
Note:
- Create DB link in the BD schema for connecting Compliance Studio.
- Replace <compliance_studio_atomic_user>, <compliance_studio_atomic_pwd> with proper value for creating the required DB Link.
- DB Link should not contain Domain Name of the DB and it should be just DL_STUDIO without additional character appended by DB.
- Navigate to
<COMPLIANCE_STUDIO_INSTALLATION_PATH>/deployed/ficdb/Scenario-
                            Conversion-Utility/bin
directory. - Identify the utilities and execute commands as mentioned in the
following table.
Table 5-2 Utilities for Workspace and Notebook
Utility BD Workspace Command importWorkspaceSQLSCU.shYes./importWorkspaceSQLSCU.sh -w <workspace_wallet_alias>importNotebooksSCU.shYes./importNotebooksSCU.sh -w <workspace_code>Note:
After executing theimportWorkspaceSQLSCU.sh, the following scripts are executed internally:synonym.sqlsequence.sqltypes.sqlfunction.sqltable.sqlviews.sqlpackage_body_common.sqlpackage_body.sql
If any BD scenario xml files are modified, then ensure that the materialized views are refreshed using the following commands.
BEGIN DBMS_SNAPSHOT.REFRESH(
'"<BDSCHEMANAME>"."VW_SCNRO_BIND_MD"','C'); end;
/
BEGIN DBMS_SNAPSHOT.REFRESH(
'"<BDSCHEMANAME>"."VW_SCNRO_CHKPT_BIND_MD"','C'); end;
/
BEGIN DBMS_SNAPSHOT.REFRESH(
'"<BDSCHEMANAME>"."VW_SCNRO_CHKPT_MD"','C'); end;
/
BEGIN DBMS_SNAPSHOT.REFRESH(
'"<BDSCHEMANAME>"."VW_SCNRO_CONSTRAINT_MD"','C'); end;
/
BEGIN DBMS_SNAPSHOT.REFRESH(
'"<BDSCHEMANAME>"."VW_SCNRO_DATASET_JOB_MD"','C'); end;
/
BEGIN DBMS_SNAPSHOT.REFRESH(
'"<BDSCHEMANAME>"."VW_SCNRO_HIGHLIGHT_MD"','C'); end;
Replace the <BDSCHEMANAME> placeholder with the username/schema name of the target data source of the underlying workspace/sandbox. i.e., BD Atomic schema in case of a production workspace, target data source of ASC workspace.
- If both ASC BD schema and Compliance Studio schema are part of
same database server and you should not use the database link; in that case
you should create synonyms with studio schema as a user name as
follows:
CREATE OR REPLACE SYNONYM ds_notebook FOR
<STUDIO_SCHEMA_NAME>.ds_notebook
/
CREATE OR REPLACE SYNONYM ds_paragraph FOR
<STUDIO_SCHEMA_NAME>.ds_paragraph
/
CREATE OR REPLACE SYNONYM seq_paragraph FOR
<STUDIO_SCHEMA_NAME>.seq_paragraph
Note:
- This section is applicable for both fresh installation and upgrade.
- Select Show Empty Objectives checkbox if SCU Objective is not visible in the Model Pipelines page.
- Navigate to the Workspace Summary page.
- Select the Workspace.
- On the Modeling menu, select Pipelines. The Model Pipelines window is displayed.
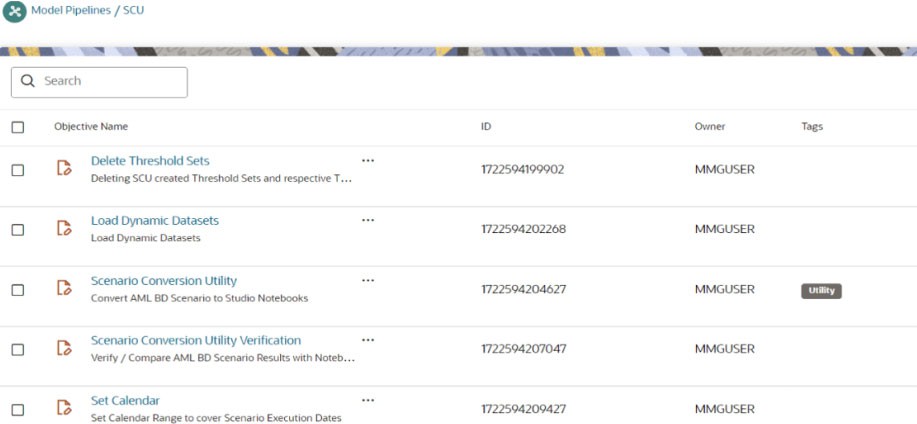
- Click the SCU folder and you can see the following
notebooks:
- Delete Threshold Sets
- Load Dynamic Datasets
- Scenario Conversion Utility
- Scenario Conversion Utility Verification
- Set Calendar
- Click Scenario Conversion Utility to access the SCU notebook.
- Click Launch on the Scenario Conversion Utility workspace to launch workspace to display the Dashboard window with application configuration and model creation menu.
- On the Modeling menu, click Pipelines.
- Click SCU Objective Name.
Generally, the notebooks are available where you imported.
- Click Set Calendar notebook. The Pipeline canvas page is displayed.
- From the Python Runtime drop-down list, select the ml4aml_8.1.2.8.0. The selected Python runtime parameter will be used during all the notebook executions.
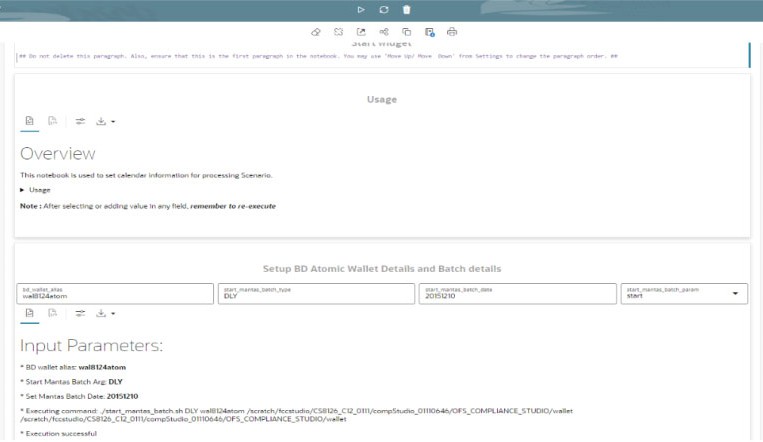
- Click the Notebook tab. The following page is
displayed.
In the Setup BD Atomic Wallet Details and Batch details paragraph,
- Enter the Behavior Detection Atomic Schema's oracle wallet
alias in the bd_wallet_alias.
The wallet alias is available in the
<COMPLIANCE_STUDIO_INSTALLATION_PATH>/wallet/
                                tnsnames.ora
directory. - Enter the start_mantas_batch_type. By default, it is
DLY.
For example, DLY indicates the Daily Batch.
- Enter the start_mantas_batch_date in the specified
format YYYYMMDD. By default, enter the current date.
For example, 20241010 for 10th Oct 2024.
- Execute Run Paragraph to processing batch date for execution of
the scenario notebook.
After execution, you can verify the data are populating for the batch processing by executing the following queries:
select * from kdd_cal;
select * from kdd_prcsng_batch_control;
Note:
- This section is applicable for both fresh installation and upgrade.
- In case of upgrade scenario (CS 8.1.2.6.0/8.1.2.7.0 to CS 8.1.2.8.0), the user has to delete all the generated scenario notebooks which were generated on CS 8.1.2.6.0/8.1.2.7.0. in the 'AMLScenarios- Converted" objective. The scenario notebooks should be generated again in CS 8.1.2.8.0 by performing the below steps.
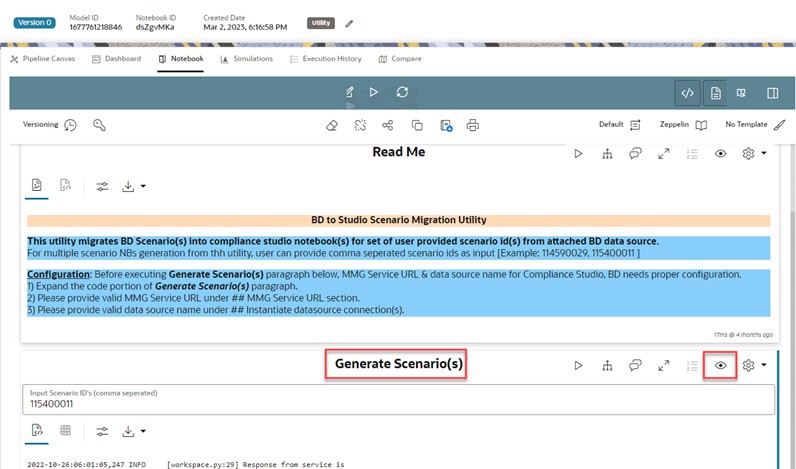
- Navigate to the Notebook tab. The following page is displayed.
- In the Generate Scenario(s) paragraph, click the Visibility icon and select the Code option.
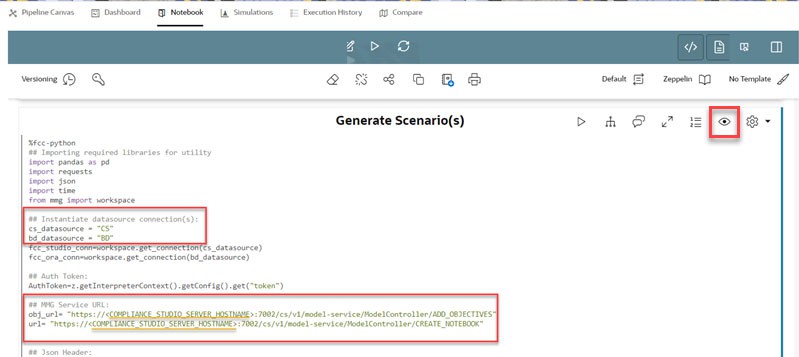
- Expand the Code in Generate Scenario(s) paragraph.
Replace the Hostname for obj_url and url variables with the
hostname of the Compliance Studio server.
Note:
If you are using custom ports, then replace 7002 with the port number available in the BASE_URL record in the NEXTGEMEMF_CONFIG table in the Studio schema. - Provide valid data source name for
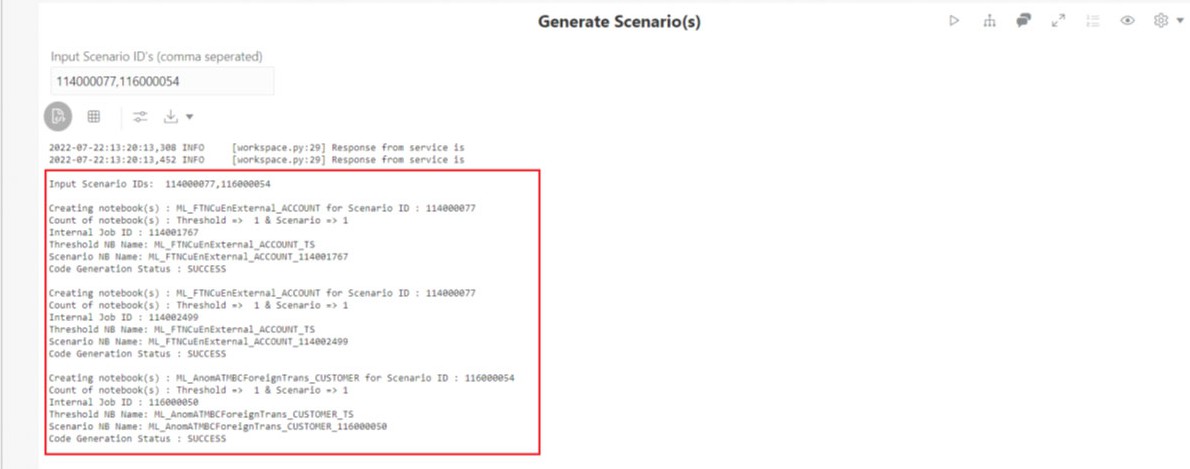
cs_datasourceandbd_datasourcevariables under## Instantiate datasource connection(s)section in the Generate Scenario(s) paragraph.Figure 5-9 Editing MMG Server URL and Data Source Name
- Enter the required Scenario ID(s) in the Input Scenario ID’s
(comma-separated) text box.
You can enter multiple IDs with commas separated.
- Click Run Paragraph to generate threshold and Scenario
Notebook. Once it is executed successfully, you can view the success message
and scenario notebook details in Generate Scenario(s) paragraph.
Note:
The folder structure for the generated scenario and threshold set notebooks is as follows.
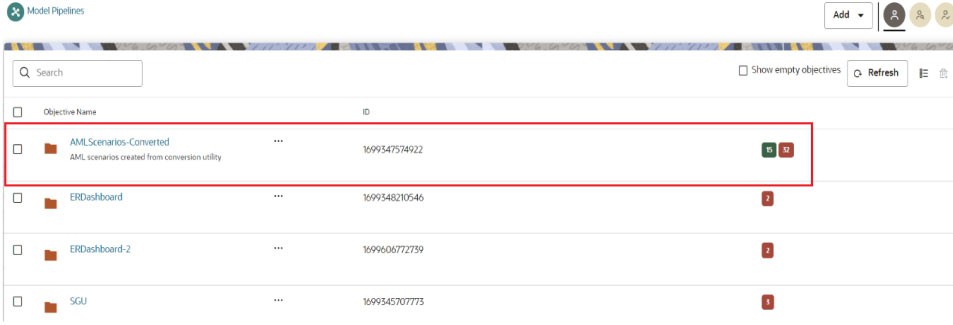
The objective will be created by the name AMLScenarios-Converted.- Inside the AMLScenarios-Converted objective, one or more objectives will be created by the name <Scenario ID>. This depends upon scenario ids provided in the Scenario Conversion Utility notebook.
- Inside the <Scenario ID> objective, the threshold set notebook will be generated as "Threshold."
- Inside the <Scenario ID> objective, one or more than one scenario notebooks will be generated based on the number of jobs for each scenario.
- After successful execution, navigate to Pipelines and click AMLScenarios-Converted objective to display the list of scenarios created from the conversion utility.
- Select the <Scenario ID> objective from the AML
Scenarios-Converted folder.
Use the threshold and Scenario Notebook ID generated during the execution to identify the Scenario Notebook folder.
Note:
For n number of jobs n number of Notebook IDs are created for scenario. - Click <Scenario ID> objective. The Pipeline canvas page is displayed.
- On the right pane, select default_8.1.2.8.0, from the
Python Runtime drop-down list. The selected Python runtime
parameter will be used during all the notebook executions.
Note:
If generated scenario notebook is used with ASC feature, then ml4aml_8.1.2.8.0 should be selected from the Python Runtime drop-down list. - Navigate to Notebook tab to run paragraph and generate the events
Note:
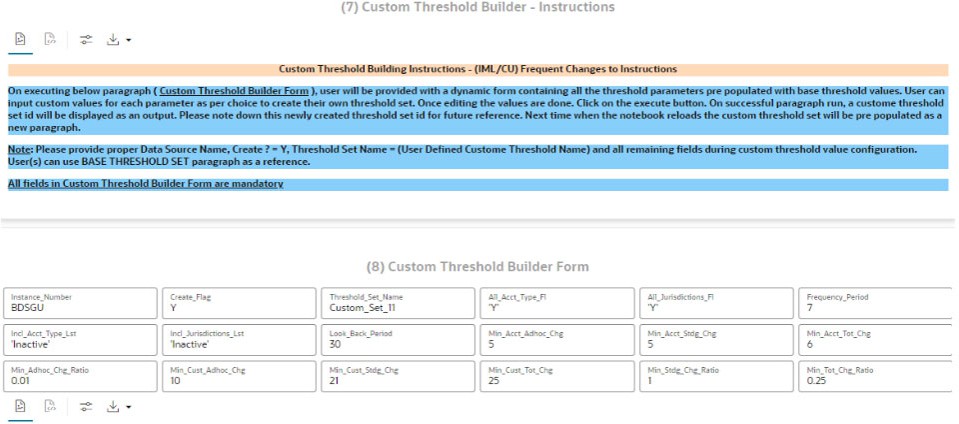
This section is applicable for both fresh installation and upgrade.- In Threshold Notebook, configure the following paragraphs:
- Metadata
- Base threshold set
- Custom threshold set
Follow the markdown provided under (1) About and (5) Custom Threshold Builder – Instructions paragraphs for instructions.
Figure 5-15 (5) Custom Threshold Builder – Instructions Paragraph
Note:
- Instance number is Data source of the BD atomic schema.
- Threshold Notebook naming is created in the
following format:
ML_<Scenario Catalogue Name>_<Focus>_TS
- Once the threshold configuration is completed, navigate to the
respective scenario Notebook and click Run Paragraphs to generate
events.
Enter the custom value in the Custom Threshold Set ID field to run the scenario with a custom threshold set id.
Note:
Scenario Notebook naming is created in the following format:
ML_<Scenario Catalogue Name>_<Focus>_<Job ID>
You can use the Run ID from the Create Event paragraph to verify the data for whom the events are generated with the event details created in the BD schema.
Using Custom Data Source
- To create a data source, see the How to Create Data Store section.
- Navigate to Workspace summary > Managed Data Sources.
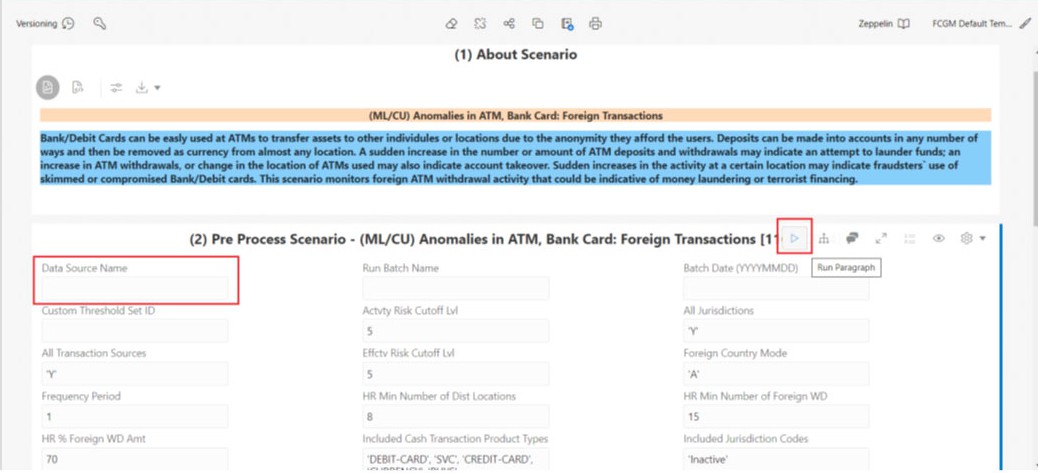
- Select the custom data source name and enter the same name in the Data Source Name text box of the(2) - Pre Process Scenario -<Scenario notebook> paragraph in the respective scenario notebooks.
- Click Run Paragraph to execute the scenario using a custom data source.
- Once it is executed, click Run Paragraphs at the top of
the Notebook to run the scenario notebook entirely rather than executing
each paragraph in sequence.
Note:
By default, scenario notebooks use data sources as BD.
Supported Scenario
- AC – Account
- CU – Customer
- ML – Money Laundering
- ML/AC – Money Laundering Account focus Scenario
- ML/CU – Money Laundering Customer focus Scenario
- (ML/AC) Transactions in Round Amounts
- (ML/CU) Early Payoff or Paydown of a Credit Product
- (ML/AC) CIB: High Risk Geography Activity
- (ML/AC) Anticipatory Profile - Expected Activity
- (ML/AC) CIB: Significant Change from Previous Peak Activity
- (ML/AC) CIB: Significant Change from Previous Average Activity
- (ML/AC) CIB: Product Utilization Shift
- (ML/CU) Anomalies in ATM, Bank Card: Foreign Transactions
- (ML/CU) Anomalies in ATM, Bank Card: Excessive Withdrawals
- (ML/CU) Rapid Movement of Funds - All Activity
- (ML/AC) Rapid Movement of Funds - All Activity
- (ML/CU) Single or Multiple Cash Transactions: Large Significant Transactions
- (ML/AC) Deposits / Withdrawals in Same or Similar Amounts
- (ML/AC) Patterns of Funds Transfers Between Customers and External Entities
- (IML/CU) Frequent Changes to Instructions
- (IML/CU) High Risk Electronic Transfers
- (IML/EN) High Risk Electronic Transfers
- (ML/CU) High Risk Transactions: Focal High Risk Entity
- (ML/AC) High Risk Transactions: Focal High Risk Entity
- (ML/AC) High Risk Transactions: High Risk Counter Party
- (ML/HH) High Risk Transactions - High Risk Counter Party
- (ML/AC) High Risk Transactions: High Risk Geography
- (ML/CU) Single or Multiple Cash Transactions: Possible CTR
- (ML/HH) Single or Multiple Cash Transactions: Possible CTR
- (ML/AC) Anomalies in ATM, Bank Card: Excessive Withdrawals
- (ML/AC) Deposits/Withdrawals in Same or Similar Amounts
- (ML/EN) Hub and Spoke
- (ML/AC) Terrorist Financing
- (ML/EN) Terrorist Financing
- (ML/EN) Transactions in Round Amounts (MI)
- (ML/CU) Large Reportable Transactions
- (ML/EN) Patterns of Recurring Originators/Beneficiaries in Funds Transfers
- (ML/CU) Patterns of Funds Transfers Between Customers and External Entities
- (ML/AC) Patterns of Funds Transfers Between Internal Accounts and Customers
- (ML/CU) Hub and Spoke
- (ML/AC) CIB: Foreign Activity
- (ML/CB) CIB: Significant Change from Previous Peak Activity
- (ML/CB) CIB: Significant Change from Previous Average Activity
- (ML/CU) Routing of Funds Through Multiple Location
- (ML/CU) High Risk Transactions: High Risk Geography
- (ML/CU) Terrorist Financing
- (ML/AC) Escalation in Inactive Account
- (ML/CU) Structuring: Deposits/Withdrawals of Mixed Monetary Instruments
- (ML/AC) Anomalies in ATM, Bank Card: Foreign Transactions
- ML/CU) Structuring: Avoidance of Reporting Threshold
Note:
Other BD scenarios apart from the above mentioned list are under the verification process.
