7.7.2.3 Configure Multi-data Sources

A JDBC multi-data source is an abstraction around a group of data sources that provides load balancing and failover between data sources. As with data sources, multi-data sources are also bound to the JNDI tree. Applications can look up a multi-data source on the JNDI tree and then reserve a database connection from a data source. The multi-data source determines from which data source to provide the connection.

When the database used is Oracle RAC (Real Application Clusters), which allows Oracle Database to run across a set of clustered servers, then a group of data sources can be created for instances running on a set of clustered servers and a JDBC multi-data source can be created so that applications can look up a multi-data source on the JNDI tree to reserve database connection. If a clustered server fails, Oracle continues running on the remaining servers.
  1. Open the WebLogic Admin Console in the browser window: http://<ipaddress>:<administrative console port>/console. (https if SSL is enabled). The Login window is displayed.
  2. Login with the User ID that has admin rights.
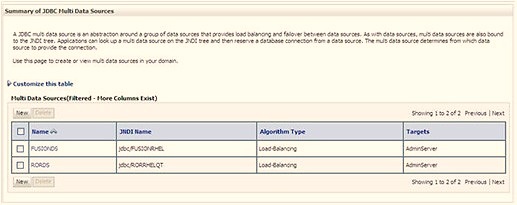
  3. In the LHS menu (Domain Structure), select Services > JDBC > Multi Data Sources to display the Summary of JDBC Multi Data Sources window.

    Figure 7-42 Multi Data Sources


    Login with the User ID that has admin rights. In the LHS menu (Domain Structure), select Services > JDBC > Multi Data Sources to display the Summary of JDBC Multi Data Sources window.

  4. Click New to display the New JDBC Multi Data Source window.

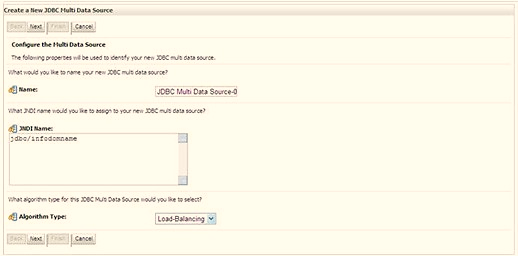
    Figure 7-43 Configure Multi Data Source


    Enter the JDBC Source Name, JNDI name, and select the Algorithm Type from the drop-down list. Click Next.

    Ensure that the Data Sources which must be added to the new JDBC Multi Data Source are created.
  5. Enter the JDBC Source Name, JNDI name, and select the Algorithm Type from the drop-down list. Click Next.

    Note:

    • The JNDI Name must be specified in the format jdbc/ infodomname.
    • The JNDI Name of the Data Sources that is added to the new JDBC Multi data source must be different from the JNDI name specified during Multi Data Source.
    • The same steps must be followed to create a mandatory data source pointing to the "configuration schema" of infrastructure with jdbc/FICMASTER as JNDI name for Data Source.
    • The JNDI Name provided in the multi-data source must be the same name that is mentioned in the web.xml file of OFSAAI Application.
    • You can select the Algorithm Type as Load-Balancing.

    Figure 7-44 Select Targets


    Select the AdminServer check box and click Next.

  6. Select the AdminServer check box and click Next.

    Figure 7-45 Select Data Source Type


    Select the type of data source to add to the new JDBC Multi Data Source. Click Next.

  7. Select the type of data source to add to the new JDBC Multi Data Source. Click Next.

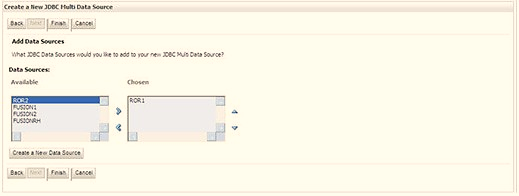
    Figure 7-46 Add Data Sources


    Map the required Data Source from the Available Data Sources. Click Finish. The New JDBC Multi Data Source is created with added data sources.

  8. Map the required Data Source from the Available Data Sources. Click Finish. The New JDBC Multi Data Source is created with added data sources.