1 OFS Funds Transfer Pricing Pack (OFS FTP Pack) Release v8.1.2.11.0
OFS FTP Pack Installation Guide Maintenance Level (ML) release v8.1.2.11.0 includes all the bug fixes and minor enhancements since the previous Minor release v8.1.2.0.0.
This ML release of OFS FTP Pack can be installed on a setup with OFS FTP Pack Release v8.1.2.0.0.
Pre-installation Requirements
Ensure that the following prerequisites are installed and available:
- The minimum patch level installed must be OFS FTP Release 8.1.2.0.0.
See the OFS Analytical Applications Technology Matrix for hardware and software requirements.
Note:
If you are installing release 8.1.2.11.0 with Java 17, update JAVA_HOME, JAVA_BIN, and LD_LIBRARY_PATH to point to the corresponding Java 17 paths.
Note:
Take a backup of the SETUP_MASTER table in the Atomic schema if there are customizations. This table will be overwritten with default values after installation.
Note:
For details on Java 11, see the Update the OFSAA 8.1.1.x Java 8 Instance to Java 11 section in the OFS Analytical Applications Infrastructure Administration and Configuration Guide, available at the OHC Documentation Library.
- The unlimited cryptographic policy for Java is enabled during the installation of OFS FTP 8.1.2.0.0. For more information, see Enabling Unlimited Cryptographic Policy in the OFS Analytical Applications Infrastructure Administration and Configuration Guide, available at the OHC Documentation Library.
- Install Python 3.14.7 and the third-party packages described in Chapter 3, Python Configuration.
Oracle Linux 9 Server Support
OFS AAI 8.1.2.5.x and later MLs support Oracle Linux 9 Server in addition to the continued support on Oracle Linux 8 and Oracle Linux 7. See the OFS Analytical Applications Technology Matrix for the supported platform and infrastructure requirements for this release.
Note:
The Oracle Linux 9 Server Configuration section of the infrastructure guide applies to upgrade installations of OFS AAI. The New Installation of OFS AAI 8.1.2.0.0 with Oracle Linux 9 Server section applies to new installations.
New Installation of OFS AAI 8.1.2.0.0 with Oracle Linux 9 Server: Follow My Oracle Support Doc ID 3067623.1 to install the OFS AAI 8.1.2.0.0 base installer. Then apply the OFS FTP 8.1.2.11.0 ML release patch.
Installing this Release
Note:
You must install all the Enterprise Performance Management application packs in a single Infodom.
To install this release patch, follow these steps:
1. Log in to My Oracle Support and locate the OFS FTP 8.1.2.11.0 ML installer patch under Patches & Updates. Installer patch ID: 39658084.
2. Download the OFS Funds Transfer Pricing 8.1.2.11.0 ML release archive and copy it to your OFSAA server in Binary mode.
Note:
Different archive files are provided for different operating systems, such as Solaris and RHEL or OEL. Use the archive supported for your deployment.
3. If you are customizing the data model, download the OFS FTP 8.1.2.11.0 erwin data model patch from My Oracle Support. Erwin patch ID: pending release assignment.
Update the Silent.Props file with the customized data model file name and its location on the server. If you are not customizing the data model, you do not need to download the erwin patch.
4. Stop all the OFS AAI services. See Stop the OFSAA Infrastructure services in the OFS AAI Installation and Configuration Guide, available at the OHC Documentation Library.
5. Log in to the OFSAA server as a non-root user and navigate to the $FIC_HOME directory.
6. Assign WRITE permission to files or directories such as commonscripts, EXEWebService, ficapp, ficweb, and ficdb:
chmod -R 775 *7. If the Unzip utility is available, continue to step 8. Otherwise, download the OS-specific utility and copy it in Binary mode to a directory in your PATH, typically $HOME or the directory containing the 8.1.2.11.0 ML archive.
Uncompress the installer and assign EXECUTE permission:
uncompress unzip_<os>.Z
chmod 751 unzip_<os>
For example: chmod 751 unzip_linux.
Note:
If the message uncompress: not found [No such file or directory] is displayed, contact your UNIX administrator.
8. Extract the contents of the 8.1.2.11.0 ML archive using one of the following commands:
unzip_<os> -a <release_archive.zip>
unzip -a <release_archive.zip>
Use the actual downloaded archive file name. The -a option is mandatory.
9. Navigate to /OFS_FTP_PACK/appsLibConfig/conf and set UPLOAD_MODEL to 1 in params.conf.
Note:
Model Upload Process
Input values are 1 to trigger model upload or 0 to skip model upload.
If model upload is enabled, select 0 for the released data model or 1 for a customized data model. For a customized data model, provide the data model name and its path.
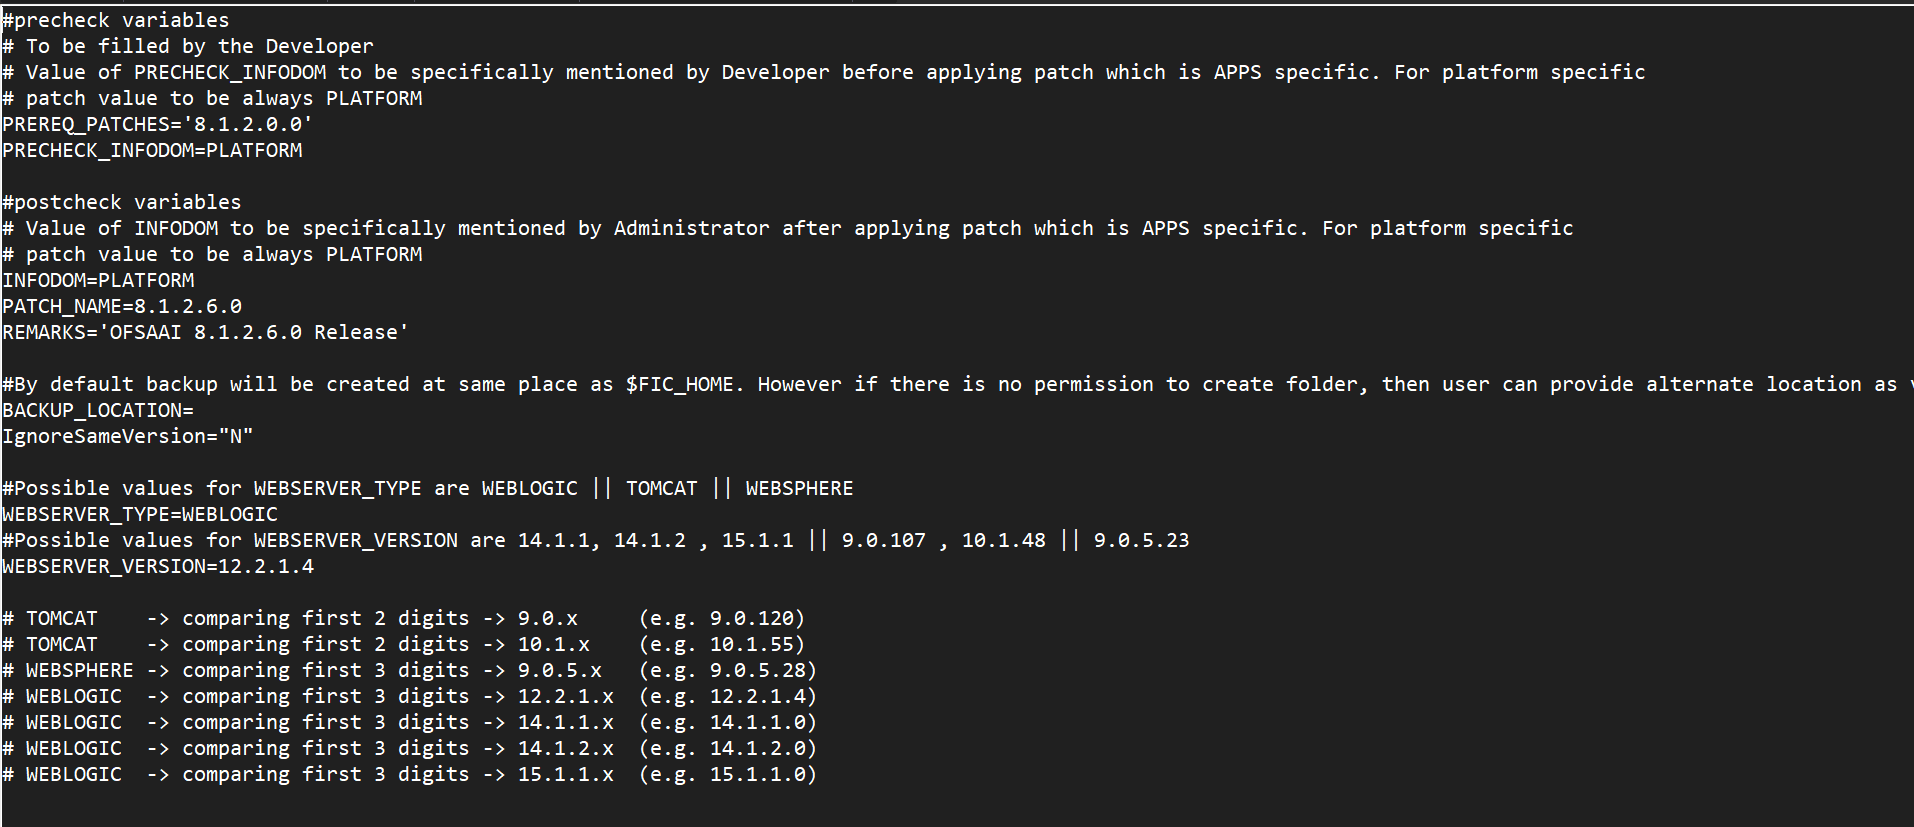
10. Update the parameters in the params.conf file in the OFS_FTP_PACK root directory.
Set WEBSERVER_TYPE and WEBSERVER_VERSION for your deployed web application server. Follow the comments in the FTP installer file and use the supported web server_type and web server_version for your environment.
Figure 1-1 FTP Pack Directory - params.conf
Note:
When upgrading to OFS FTP 8.1.2.11.0, install Python 3.14.7 and the third-party packages specified in Chapter 3, Python Configuration. OFS FTP 8.1.2.11.0 does not support Python 3.9.4; the required Python version is 3.14.7.
11. Navigate to the OFS_FTP_PACK directory and assign EXECUTE permission to the ML patch installer script:
chmod 755 OFSAAIUpdate.sh12. Complete the patch upgrade:
./OFSAAIUpdate.sh13. Verify that the ML patch was applied successfully by checking OFSAAIUpdate.log in OFS_FTP_PACK/logs and the installation logs in OFS_FTP_PACK/OFS_FTP/logs. You can ignore error codes ORA-00001, ORA-02292, ORA-00955, and ORA-02260. For any other errors, contact My Oracle Support.
Note:
For an upgrade on Hive Infodom, you may encounter the exception PL/SQL: ORA-00942: table or view does not exist. You can ignore this error.
14. After successful installation of the ML, execute the .profile file:
. $HOME/.profileClear the application cache using the path for your configured web application server:
Tomcat
<Tomcat installation folder>/work/Catalina/localhost/
<Application name>/org/apache/jsp
WebLogic
<WebLogic installation location>/domains/<Domain name>/
servers/<Server name>/tmp/_WL_user/<Application name>
WebSphere
<WebSphere installation directory>/AppServer/profiles/
<Profile name>/temp/<Node name>/server1/<Application name>/
<.war file name>
15. Delete the existing EAR or WAR file in the $FIC_HOME/ficweb directory.
16. Install the updated OFSAAI Runner package if Oracle R Enterprise (ORE) is installed for OFS Enterprise Modeling (EMF) and the application is licensed and enabled. This configuration does not apply to Tomcat. See Chapter 5, Additional Configurations.
17. Generate the application EAR or WAR file and redeploy the application onto your configured web application server. See Create and deploy EAR/WAR files in the OFS AAI Installation and Configuration Guide, available at the OHC Documentation Library.
18. At the command prompt, navigate to the $FIC_HOME/FTPWebService directory on the WEB tier and run:
./ant.shThis creates the EAR (<contextname>.ear) or WAR (<contextname>.war) file in the same $FIC_HOME/FTPWebService directory.
Note:
This step is required even if FTPWebService is not used. The generated EAR or WAR file differs from the file in $FIC_WEB_HOME used for standard OFSAA deployments. After ant.sh runs from $FIC_HOME/FTPWebService with the updated build.xml, the log4j.jar files are removed.
19. Confirm that a message indicating a successful build is displayed after the EAR or WAR file is created.
20. Stop the web server.
21. Back up the EAR (<contextname>.ear) or WAR (<contextname>.war) file.
22. Deploy the EAR (<contextname>.ear) or WAR (<contextname>.war) file in the web server.
23. Clear the web server cache.
24. Restart all OFSAAI services. See Start the OFSAA Infrastructure services in the OFS AAI Installation and Configuration Guide, available at the OHC Documentation Library.
25. Configure the document upload settings. See Configure Document Upload Settings in the OFS FTP Installation and Configuration Guide, available at the OHC Documentation Library.
Complete the post-installation schema checks in Chapter 4, Post Installation.