- Configuration Guide
- Personnel
- People Management
- Grant Access to Point of Sale Operations
Grant Access to Point of Sale Operations
- In Reporting and Analytics, click the application navigation
icon
 , and
then click People.
 - Click the name of the person you want to edit.
- Click the Point of Sale tab.
Figure 5-14 Point of Sale Settings

- Click the Settings page and then
complete the following fields:
- Select the POS language.
- Select the Employee level.
The employee level is a layer of security that gives an employee access to some employee records but not others. This field allows a one-digit entry, where 0 gives the most access and 9 gives the least access. For example, an employee with level 2 access can see all employees with levels 3 through 9 but can’t see employees with levels 0 through 2 (including themselves). Level 0 should be reserved for System Administrators while a level like 8 or 9 to be used for cashiers or servers.
- Enter the Employee group.
The employee group is another level of security that controls employee access to other employee records. This field is more restrictive than the Employee level field, which is more commonly used. The Employee group field allows a three-digit entry. If you set the employee group number to 0, the employee can view all other employee records. Any other number restricts the employee to view only employees with that same number as their employee group. For example, an employee with a group number of 17 can only view other employees from group number 17.
- Enter the POS Client PIN.
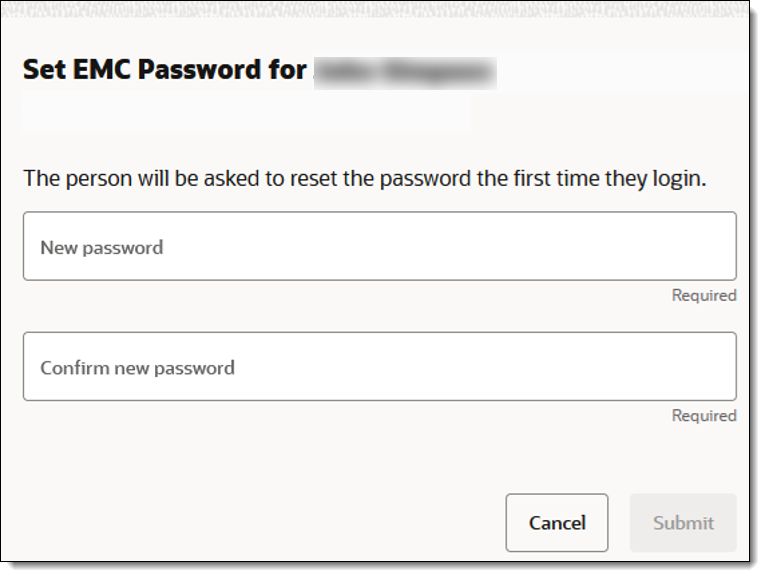
- For EMC users, click Set EMC Password, enter and confirm the new password, and then click Submit.
Figure 5-15 Set EMC Password

- Click the Roles page and then complete
the following fields:
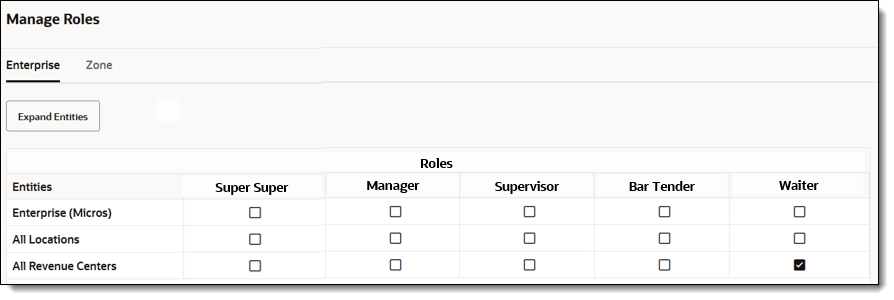
- Click Assign Roles.
- Select the EMC role or roles for the user, and then
click Assign.
Click Expand Entities to view all locations and revenue centers or click Zone to view roles by regional zone.
See Create Employee Roles and Grant Privileges for more information about EMC roles.
Figure 5-16 Manage Roles

- Click the Visibility page, and then
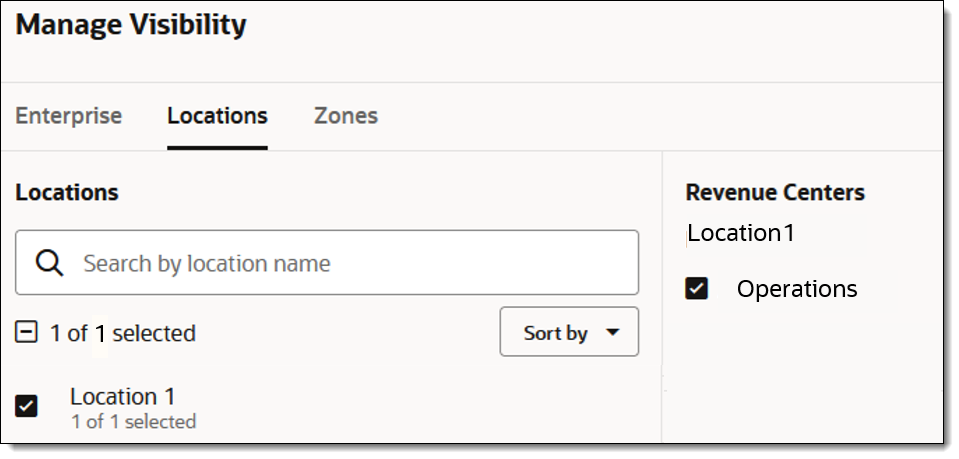
click Assign Visibility.
If the person you are setting up has EMC access, you can configure what they can see at specific enterprise levels.
- Select the locations and revenue centers that the user
can access, and then click Assign.
You can view options by Enterprise, Location, or Zones.
Figure 5-17 Manage Visibility

- Select the locations and revenue centers that the user
can access, and then click Assign.
- Click Update.
Parent topic: People Management