Installing the Android Service Host

The Simphony Android Service Host Android Package Kit (APK) is a package file used to distribute and install the service host application software on a device running the Android operating system.
  • Starting with Simphony version 19.3.1, you do not need to use CAL to install, upgrade, or downgrade the Android Service Host. This section describes the steps required to install the Android Service Host using Simphony version 19.3.1 and later.

    Important:

    • Starting with Simphony version 19.3.1, access the EMC, select the property, click Setup, Workstations, Options tab, and then select the Hardware/Cash Drawer tab. Under the Hardware/Cash Drawer section, ensure option 68 - Third Party Managed Device is disabled (which is the default setting) for each Android workstation.

    • All of your Android workstations and tablets must be configured in the Workstations module using the 6 - Tablet Client setting as the Type.

  • If you are using Simphony version 19.3 or earlier, you need to use CAL to install or upgrade the Android Service Host. See the, Installing CAL on the Android Device topic for instructions to install the Android Service Host.

Install the Simphony Android Service Host APK for the first time on a new Android device. Login credentials are required for the Simphony EMC and the device in order to install the Android Service Host for the first time.

To install the Android Service Host on Simphony 19.3.1 and later:

  1. Ensure the CAPS client is running the latest Simphony version available for your enterprise. This must be verified and/or upgraded before installing the Simphony Android Service Host APK on your device.
  2. In the EMC, select the property, click Setup, and then click Workstations.
  3. Click the insert icon This image shows the Insert icon, which is a green circle with a white plus sign. on the toolbar.
  4. Enter the Android device name, and then click OK.
  5. Double-click the new Android device record.
  6. On the General tab, select 6 - Tablet Client in the Type drop-down list:

    See Adding a Workstation for more information.

  7. Enter the IP address for the device in the Address / Host Name field.
  8. Click the Options tab, click the Offline/Misc subtab, and then enable the following options:
    • 17 - Allow Offline Operations

    • 45 - Exclude this Workstation from EMC Module Version Validations

  9. Click Save.
  10. Using the device on which you want to install Android Service Host, access the Simphony Web Portal (SWP) by opening a web browser and entering the following address: https://[ServerName]/SimphonyApp.
  11. Enter the User Name, Company, and Password, and then click the Login button.

    Depending on your organization, there may not be a Company field.

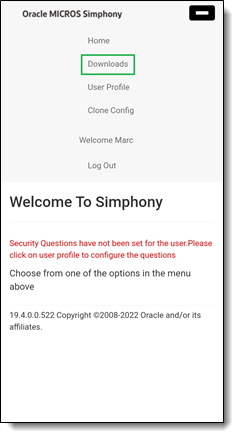
  12. Click Downloads.

    If you are using a small device in portrait mode, you may have to scroll to the right to see the Downloads option.

    Figure 11-1 Welcome to Simphony Page with Downloads Option


    This figure shows the Welcome to Simphony page with the Downloads link indicated at the top of the page.

    On some devices, you need to expand a menu to see the Downloads option.

    Figure 11-2 Welcome to Simphony Page with Expand Icon


    This figure shows the Welcome to Simphony page with the expand icon indicated at the top of the page.

    Figure 11-3 Welcome to Simphony Page with Expand Icon and Downloads


    This figure shows the Welcome to Simphony page with the Downloads link indicated after the page is expanded.
  13. In the Download Type drop-down list, select Simphony Point of Sale Client Install (Android).
  14. In the Version Download Type drop-down list, select the Simphony version.
  15. Click the Download button to download the .apk file.
  16. Navigate to the Downloads folder, locate the AndroidServiceHost.apk file that you downloaded, and click it to install the application.
  17. Click Continue or Install. When the .apk installation is complete, the message App installed appears beneath a check mark.
  18. Click Open in the lower right area, and then click Allow. The Oracle MICROS Simphony launch page appears briefly.

    Figure 11-4 Oracle MICROS Simphony Launch Page


    This figure shows the Oracle MICROS Simphony launch page.
  19. Enter one of the following:
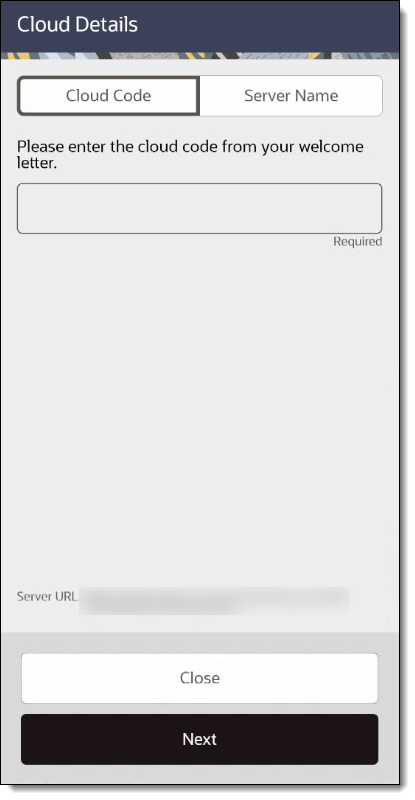
    • Cloud Code: Enter the cloud code from your welcome letter to connect to Simphony.

      If you enter more than five characters, the following message appears: Incorrect Cloud Code, please try again.

      Figure 11-5 Cloud Details


      This figure shows the Cloud Details dialog.
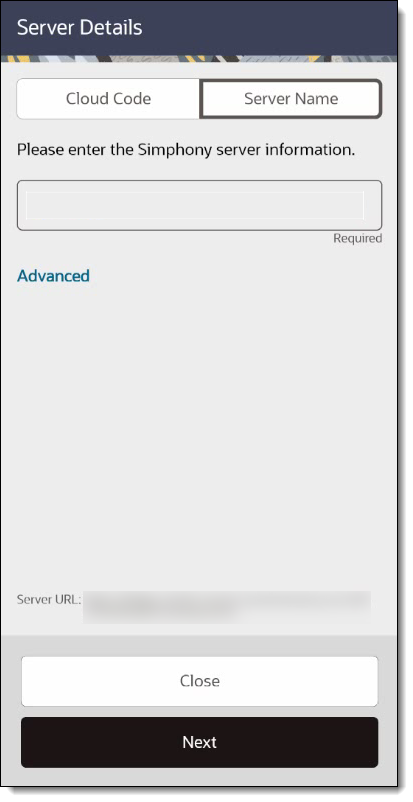
    • Server Name: Enter the URL to connect to the server.

      This entry field is free format. If you enter a decimal point, a list of common domain suggestions appears. You can select one of these domains rather than manually entering it.

    Figure 11-6 Server Details


    This figure shows the Server Details dialog.
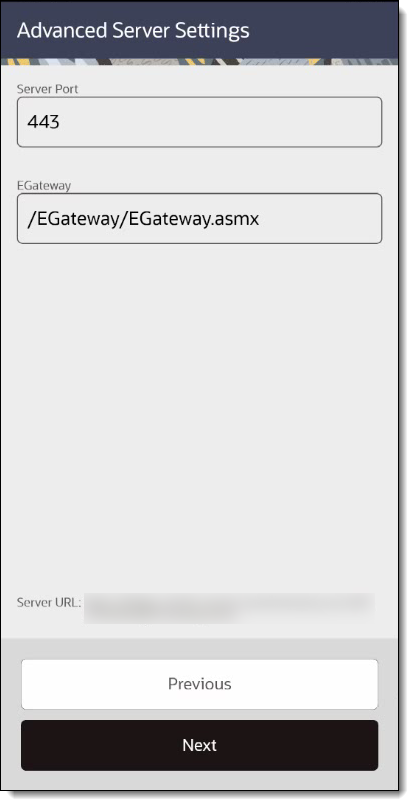
  20. (Optional) To view the Server Port and EGateway information, click Advanced. This information may be required for support purposes and should not be changed.

    Figure 11-7 Advanced Server Settings


    This figure shows the Advanced Server Settings dialog, which allows you to change the Server Port number.
  21. When the Cloud Code or Server Name (entered in Step 19) is valid, the Next button becomes active. Click Next.
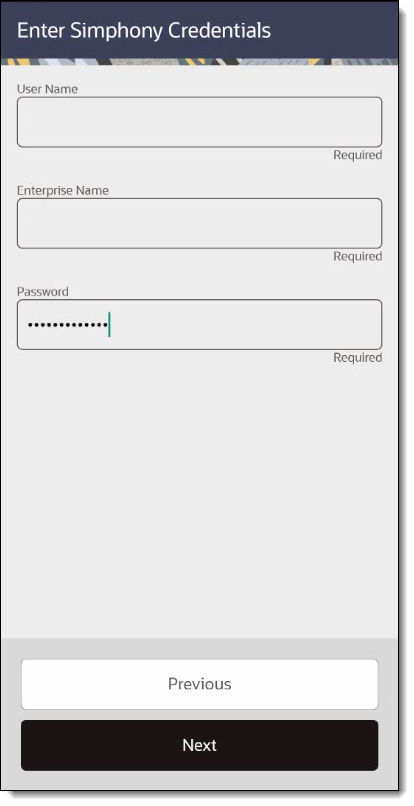
  22. In the Enter Simphony Credentials dialog, enter your User Name, Enterprise Name, and Password, and then click Next. The Service Host APK is authenticated with the Simphony server.

    Depending on your Simphony system, the Enterprise Name may not appear.

    Figure 11-8 Enter Simphony Credentials


    This figure shows the Enter Simphony Credentials dialog, which shows the User Name, Enterprise Name, and Password fields.
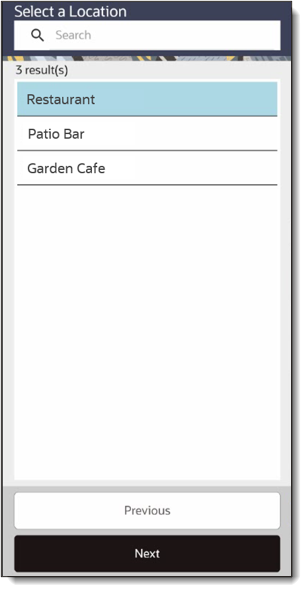
  23. If prompted, select the location, and then click Next. Otherwise, continue to the next step.

    Figure 11-9 Select Location


    This figure shows the list of locations.
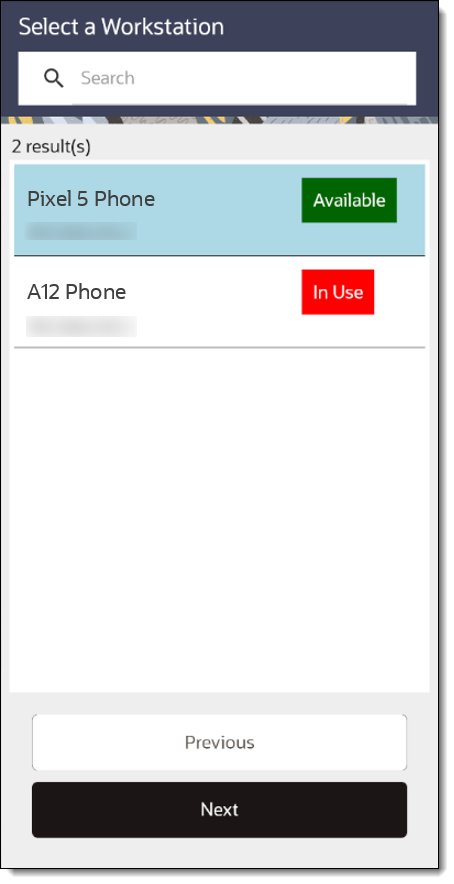
  24. Select a workstation device that shows either In Use or Available, and then click Next. When you select a workstation, it is highlighted in blue.

    In Use means the device has already been through the CAL process.

    Figure 11-10 Select Workstation


    This figure shows the list of workstations.
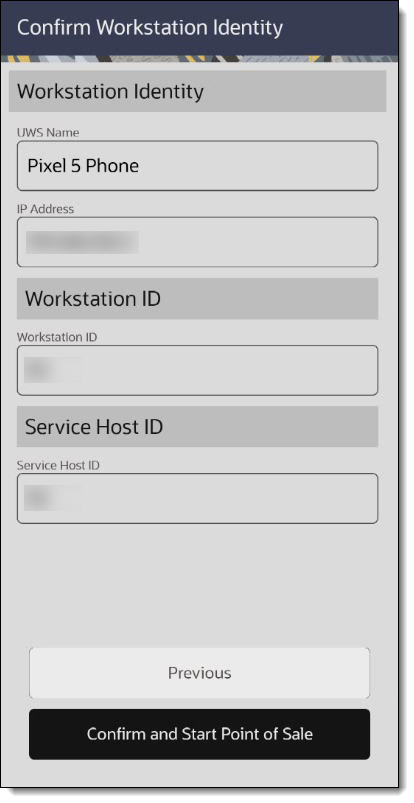
  25. On the Confirm Workstation Identity page, check the information shown, and then click Confirm and Start Point of Sale to start Simphony.

    Figure 11-11 Confirm Workstation Identity


    This figure shows the workstation identity information.

    Figure 11-12 Starting Simphony


    This figure shows the starting Simphony page.