Configuring Case Workflow

Configuring case workflow involves configuration of:

  • Workflow States
  • Workflow Rules

Configuring Workflow States

This screen enables you to configure the workflow states.

Field Descriptions

The following table lists and describes the fields available under Total Number of Rows:

Field or Control Name Description

State Name

Displays the name of a workflow state.

State Description

Displays a brief description about the workflow state.

Site

Displays the site associated with a workflow state.

Tip:

Click Add New to add a new workflow state to the list of existing workflow states.

Use the following to modify workflow states

  1. Enter the name of the workflow state under State Name.

    Tip:

    This name is displayed as Case Status in the General Information section of the Case Form.
  2. Enter the description of the workflow state under Description.
  3. Select the site to be associated with the workflow state from the Site drop-down list.
  4. The drop-down list is populated with the configured user sites.
  5. Click Save to save the changes made.

Configuring Workflow Rules

This screen enables you to configure workflow rules. The following illustration shows the fields associated with this section.
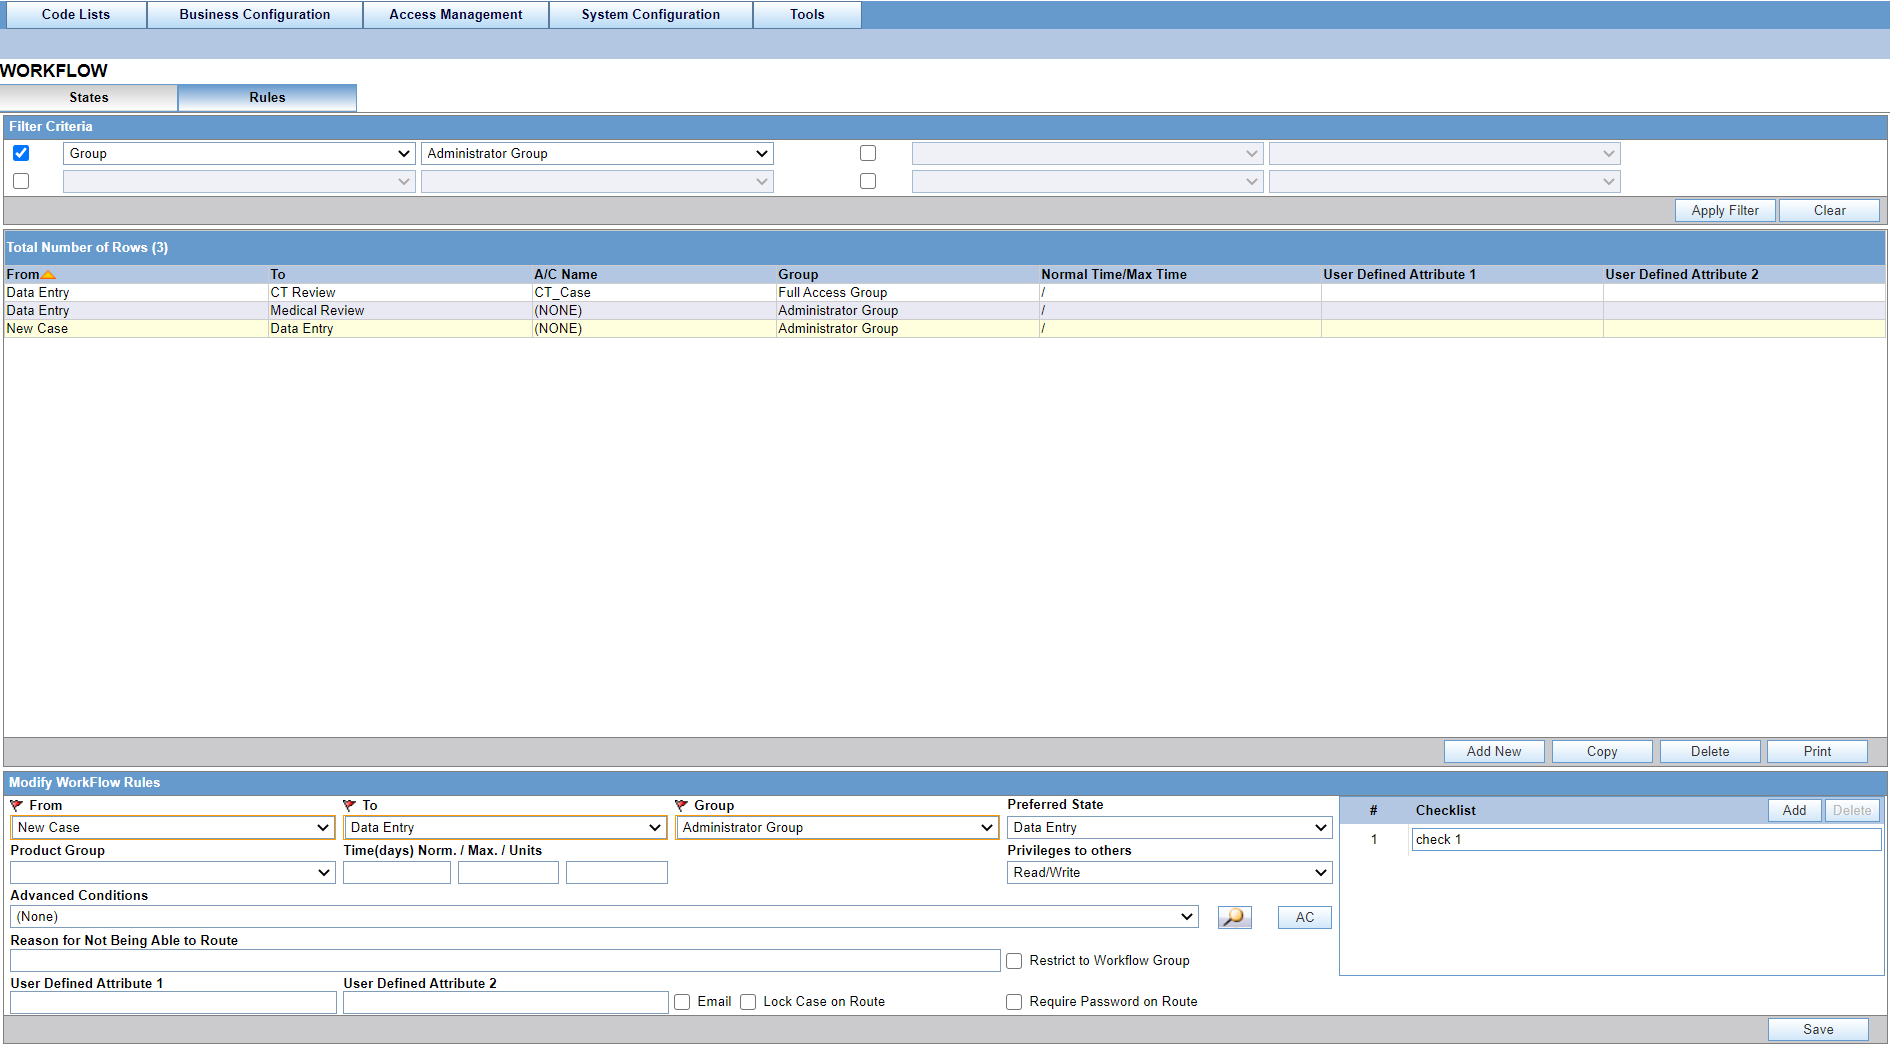

Workflow rules

Field Descriptions

The following table lists the Field Descriptions for this section.

Field or Control Name Description

From

Defines the original state for the transition.

To

Defines the destination state for the transition.

Group

Specifies the group which will own the case once it moves from the From state to the To state (via this transition).

The drop-down list displays all the configured user groups of Oracle Argus Safety.

Normal Time (days)

Max Time (days)

The workflow system monitors the time frames of each case in a state with respect to the Normal and Maximum parameters through AG Service.

  • The AG Service evaluates the status of each open case.
  • If a case has existed in its current state longer than the Normal time specified for the transition, the system raises the priority of the case by one level.

This escalation occurs only once for a case within a given state.

  • The case priority is not reset to its assigned priority upon transition.
  • If a case has existed in its current state longer than the Maximum time specified for the transition, the system raises its priority to level one (the highest priority).
  • In addition, an email notification is sent to the group's supervisor, indicating that the case has exceeded its maximum time.
  • The email message identifies the Case ID, Current State, Current Owner, and the time it has spent in its current state.

User Defined Attribute 1

/

User Defined Attribute 2

Lets a user define a custom attribute for a work flow rule such as logically grouping workflow rules. Used only for filtering purposes on the same screen.

Units

Enables you to specify the number of units.

Product Group

Enables you to associate a specific Product group as additional criteria for the workflow transition.

Restrict to Workflow Group

Enables you belonging to the identified workflow rule group to have case access rights, based on the definitions of only the identified group.

Email

When checked, the system sends an email notification to the user group address specified in group information whenever a case makes this particular transition.

By default, the checkbox is unchecked.

Require Password on Route

  • If the switch PASSWORD_ON_ROUTING" is disabled (0), the password option on the Workflow Dialog is not displayed and the Routing dialog does not ask the user for a password.
  • If the switch PASSWORD_ON_ROUTING" is enabled (1), the password option on the Workflow Dialog is displayed to users. If the Workflow Rule has the password option checked and the case being routed passes that workflow rule criteria, the password option is displayed on the routing dialog.
  • If the Workflow Rule that the case has passed does not have the Password option checked, no password option is displayed on the routing dial.

Lock Case on Route

Enables you to lock the case on routing. Users might need to enter a password when routing to the case.

Reason for not being able to route

Enables you to enter the description needed by the system to display while routing the case, when the case is ineligible to be routed to any of the configured To State.

Privileges to others

Specifies the access rights for groups other than To Group' of the transition have to the case when it follows that transition. The choices are:

  • No Access
  • Read-Only
  • Read/Write (default)

Preferred State

Enables you to specify the preferred state for the rule.

Use the following procedure to modify workflow rules.

  1. Select the appropriate Filter Criteria.
    • Execute the following steps to apply a filtering criteria to search for specific workflow rules.
    • Select the check boxes to enable the drop-down lists containing a filtering criteria.
    • Select the appropriate filtering criteria from the drop-down lists.
    • Click Search to remove the selected criteria or click Apply Filter to apply the selected criteria. This displays the search results under Total Number of Rows.
  2. The entities in Total Number of Rows display the From and To states, the Advanced Condition, Group, Normal Time/Max Time and Number of User Defined Attributes in the Workflow.
  3. Select the rule displayed under Total Number of Rows that needs to be modified.
  4. The Modify Workflow Rules section is populated with information about the selected rule.
  5. Select the original state of the workflow rule from the From drop-down list.
  6. Select the destination state of the workflow rule from the To drop-down list.
  7. Select the group from the Groups drop-down list.
  8. Select the product from the Product Group drop-down list.
  9. Select the Email checkbox, if required.
  10. Select the Lock Case on Route checkbox, if required.
  11. Select the Require Password on Route checkbox, if required.
  12. Enter the number of days in the Normal Time (days) field.
  13. Enter the number of days in the Max. Time (days) field.
  14. Enter the number of units in the Units field.
  15. Select the preferred state for the rule from Preferred State.
  16. Select the relevant Advanced Condition, if any from the button.
  17. Enter the reason for not being able to route, if applicable, under Reason for not being able to route.
  18. Specify the access levels available to others from the Privileges to others drop-down list. The options available under this list are No Access, Read-Only and Read/Write.
    • Select the No Access option to disallow users outside the transition's group to open the case when it follows the transition.
    • Select the Read-Only option to enable users outside the transition's group to view the case, but not to modify it.
    • Select the Read/Write option to enable users outside the transition's group to modify the case when it follows the transition.
  19. Specify the checklist of items to appear under Checklist.

    Tip:

    The Checklist row cannot be left blank. Click Add and Delete to add and delete checklist items.
  20. Define custom attributes for a workflow rule under User Defined Attribute.
  21. Click Save to save the changes made.