- Administration Guide
- Using Advanced Conditions
- Creating Advanced Conditions
Creating Advanced Conditions
Use the following procedure to create advanced conditions.
- Select New from the Advanced
Conditions drop-down list or click the Advanced
Conditions icon.This displays a confirmation dialog.
- Select whether you wish to create a query set by using previous advanced condition query sets or by creating one through logical operators.
- Click Yes to create a new advanced condition query set.
- Click No to create a new advanced condition by associating logical operators (like AND, OR) with items from the Case Form.
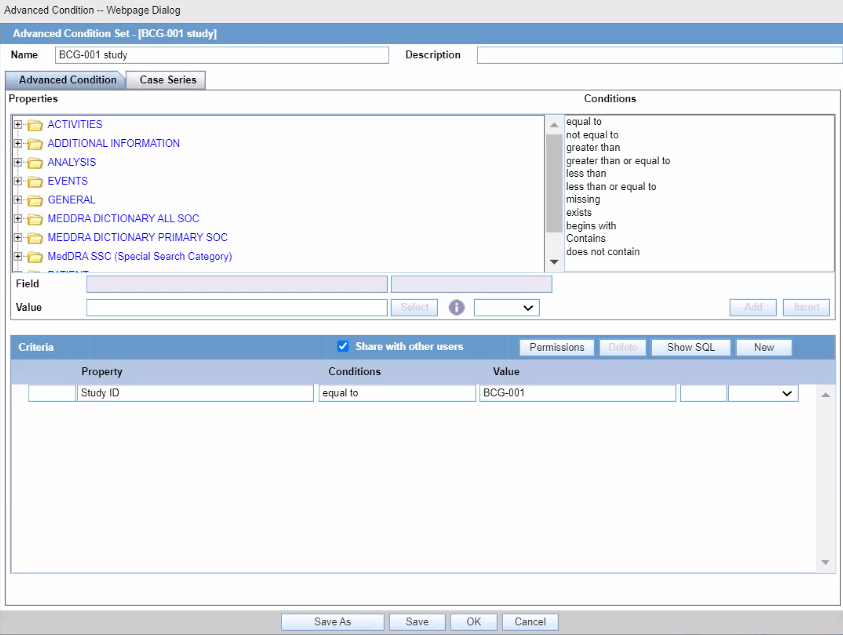
- If you select No, the Advanced Condition Set dialog is displayed.

Note:
The Advanced Condition Set dialog enables you to search for those entities under the Properties tree-list, which are from either the case data or from the code list. For this, the dialog provides two radio buttons - From Code List and From Case Data.- Select the relevant entity and one of the radio buttons, as applicable.
- This searches the entity based from the code list or case data, as specified.
- The radio buttons are displayed only if the selected entity belongs to a code list.
- If the selected entity is part of the code list, and
the user selects:
- From Code List - If this option is selected, the Value drop-down list displays the list of all values configured in the Code List.
- From Case Data - If this option is selected, the Value drop-down list displays the list of only those values, which are actually present in the cases.
- Select a property type from the Properties tree list.
The items available under the folders in the Properties list represent those fields on the Case Form that can be used to perform the search in the advanced conditions.
Note:
When a Property for which terms can be encoded is selected, the Select button is enabled. You can use the MedDRA Browser to select (possibly) multiple terms for the property.An SMQ icon is enabled when the SMQ-related properties are selected from the Properties tree-list. Click this icon to view the SMQ Info dialog. The SMQ Info dialog contains details about the selected SMQ.
- In the Conditions list, select a condition that must apply to the item selected
above.
The available conditions are "equal to", "contains", "less than", "greater than", "not equal to", "missing", "greater than or equal to", "less than or equal to", "exists", "does not contain" or "begins with".
- Under Value, enter the value which will apply to the property, or select an appropriate value from the list, as applicable.
- If the condition created in steps 3 through 5 above is to be linked with
another condition, select the appropriate logical operator in the list adjoining
Value.
Tip:
The logical operators that can be used to link the existing condition to a new condition are AND/OR. - Click Add to add the newly created condition to the advanced condition.
- Repeat steps 2 through 6 to add more conditions to the advanced condition.
- When each of the required conditions for the advanced condition is entered, click Save.
- Enter a name for the advanced condition and click
OK.
Note:
To enable other users to use the advanced condition, the Share with other users check box should be selected. More about sharing advanced conditions:- If an Advanced Condition is not shared with other users, it does not appear in the Advanced Condition list for any user except the Administrator and the user that created it.
- If the Advanced Condition is shared, all users can view
the advanced condition, but they cannot modify it.
- Not allowed if the Advanced Condition is in use in the system.
- Argus Console manages access to the Advanced Condition Library screen.
- The Advanced Condition
Library option has been added to enable or
disable (default) access to the following screen:
Access Management > Argus > Groups>
                                            Menus> Utilities (subarea) section
IMPORTANT! Customers should cleanup the aggregate case series data (such as cfg_adv_cond_hitlist and related tables) from the Advanced Condition Library which are no longer used or are not likely to be required in future.
With each periodic execution, the number of aggregate case series can keep growing in the system and it is up to the customers to manage these case series either by deleting them manually or by deploying an Oracle job.
Tip:
To enter a customized date range, select Custom Date Range from the list. Enter an appropriate date range in the custom date range dialog and click OK.Parent topic: Using Advanced Conditions