Creating and Modifying Database Roles
To modify menu security, you must access the Developer's Toolkit (DTK) menu in the Oracle Pharmaceutical Applications Navigator window. Entries on the DTK menu are accessible only to those database accounts granted the DTK_ADMIN role. The DBA should grant this role to those accounts with the responsibility for maintaining Oracle Clinical roles. This section assumes that your account has the DTK_ADMIN role.
For more information, see:
- Viewing Menu-Role Associations
- Modifying Menu-Role Associations
- Creating Custom Database Roles
- Associating Roles with Menus
- Adding a Custom Role to OPA_MENU_ROLES
- Granting a Custom Role Access to a Custom Module
Parent topic: Oracle Clinical Menu-Based Security
Viewing Menu-Role Associations
To view the activities covered by a particular database role, from the Navigator, expand Developer's Toolkit and select Maintain Menu Modules. In the form, press the Query by Role button for a list of values. Choosing a role causes a display of all activities associated with that role. A complete list of database roles and their relation to menu items can be generated by running the Menu Roles report from the Developer's Toolkit.
For more information, see:
Parent topic: Creating and Modifying Database Roles
Organization of the Menu Module Tree
This section describes the internal structure of the Navigator's menus, and the roles and role associations provided by Oracle Clinical.
Internal Menu Module Structure
All activities accessible through the Navigator are organized in a tree, with the root "OPA". Descending from OPA, a node exists for each installed application. For your installation, there will, at a minimum, be nodes for OCL (for Oracle Clinical activities), OPA (for menus and activities generic to all products of Oracle Health Sciences, formerly known as Oracle Pharmaceutical Applications), and DTK (for the Developer's Toolkit). In turn, each of node is the parent of other menu nodes, and ultimately of leaf nodes, which correspond to executable modules.
Many executable modules can perform more than one task, so to completely define an activity, there is also a task name and a query-only flag. For instance, the same form module, RXCRCMAI, performs both query and maintenance of local, installation, and system reference codelists. Consequently, there are six leaf nodes for this module — one for each combination.
The concatenation of nodes, starting at OPA, ending at the leaf node, and including the task and the query mode, is the internal analog of the Navigator menu path to the activity. For instance, the menu path OC, then Data Entry, and Initial Log-In, plus Entry corresponds to the series of nodes OPA:OCL:OCL_DATA_ENTRY:RXCDEMLI, plus the task name INITIAL LOG-IN AND FIRST-PASS ENTRY, and a clear ("no") query-only flag.
Role Association Structure
The access an application user has to each node in the menu-module tree is determined by the database role. Each node of the menu tree has associated with it one or more database roles that are allowed access to that node. A user that is not associated with the appropriate role cannot view its corresponding menu or module. The following examples illustrate how the role associated with a user account affects the access the user is given to different menus:
-
To view the OCL application menu, a user's Oracle account must be granted the OCL_ACCESS role. This is typically an automatic grant when an Oracle Clinical account is created, along with CONNECT, RESOURCE, RXCLIN_READ, RXCLIN_MOD, and RXC_ANY.
-
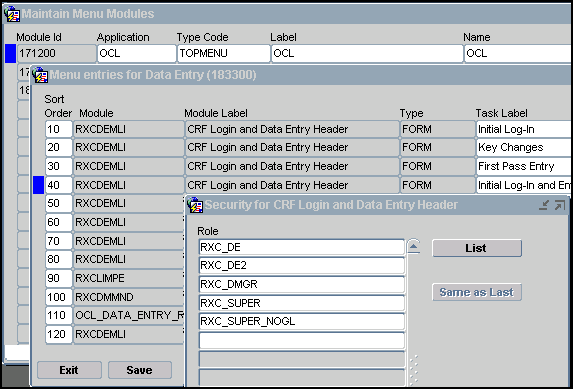
When Oracle-defined menu-role associations have not been modified, to see the Data Entry menu option of OCL your account must have one of these roles: RXC_DE; RXC_DE2; RXC_DMGR; RXC_SUPER; or RXC_SUPER_NOGL.
-
The Initial Log-In and Entry activity requires the same roles, according to the module-role association created in the database by Oracle. Therefore, to run Initial Log-In and Data Entry, your account needs at least two roles: OCL_ACCESS, and one of: RXC_DE, RXC_DE2, RXC_DMGR, RXC_SUPER, RXC_SUPER_NOGL.
Parent topic: Viewing Menu-Role Associations
Navigating the Menu Modules
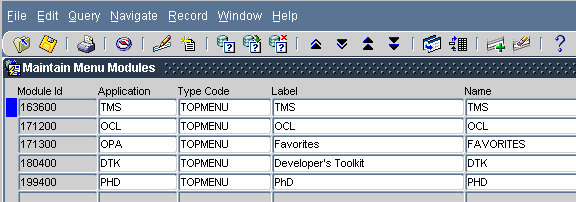
To view or modify the roles permitted access to the Oracle Clinical menus and activities, navigate to DTK, then Maintain Menu Modules. A Maintain Menu Modules window opens, as shown in Figure 2-4, with one entry per top-level menu node in the OPA Navigator menu. The record with a blue mark to its left has focus. Change focus by clicking once anywhere on the record of the node you want to examine.
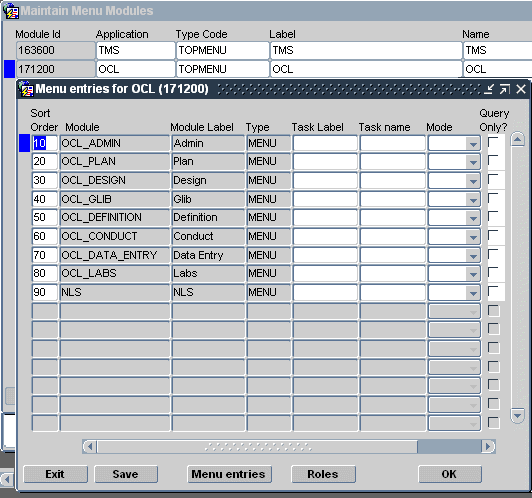
To drill down into the menu nodes from the currently selected node, click Menu Entries, or double-click anywhere in the node's record. Doing this from
The Maintain Menu Modules window brings up a new window, as in Figure 2-4, with a title bar naming the parent node, and with records describing the child nodes of that parent. You can continue to drill down within this window until you reach a leaf. If the record that has focus is a module, you have reached a leaf of the tree and the Menu entries button is disabled, as in Figure 2-5.
Parent topic: Viewing Menu-Role Associations
Modifying Menu-Role Associations
At any node of the menu-module tree, you can see or modify the database roles associated with the node by pressing the Roles button. This button brings up a Security for task dialog box where the roles enabling access to this node are listed and can be modified. Figure 2-5 illustrates this process for Initial Log-In and Entry.
You can also query the nodes accessible via a role through the Query by Role button, available in the Maintain Menu Modules and Menu Entries for module windows. If you click on this button, you are prompted for a role (an list of values is available). When you enter a role, all menu-module tree nodes accessible via that role are displayed. The Query Top Menus button returns you to a list of the application menu nodes (Figure 2-5).
Parent topic: Creating and Modifying Database Roles
Creating Custom Database Roles
This section describes how to create a new database role. This may be required if the database roles that are supplied as part of installation do not fit or cannot be modified to fit your business model.
After you create a new database role, grant it access to menu items (see Modifying Menu-Role Associations) and add it to a reference codelist (see Adding a Custom Role to OPA_MENU_ROLES).
Menu and module access role names must start with the three-letter designator of the application to which they will apply and must not exceed 11 characters total. The following table list the valid prefixes for the available applications.
Table 2-1 Prefixes for Role Name, by Application
| Prefix | Application |
|---|---|
|
DTK |
Developer's Toolkit |
|
OCL or RXC |
Oracle Clinical |
|
OPA |
Oracle Pharmaceutical Applications |
|
TMS |
Thesaurus Management System |
Examples of valid role names are OCL_CRA, RXCBROWSER, and DTK_HELP. The Oracle Clinical Remote Data Capture module has no special prefix; its role names are preceded by RXC.
To create a new database role, you must create the role in the database and explicitly grant all the database privileges required for users with the role to do the tasks you intend, including privileges on the related Oracle Clinical tables.
Log in to SQL*Plus as SYSTEM and enter the following:
create rolerole_name; grantprivilegeontabletorole_name;
For information on Oracle Clinical tables, see the Oracle Clinical Stable Interface Technical Reference Manual.
In this section:
Parent topic: Creating and Modifying Database Roles
Creating Custom Roles for Restricting DCI Access
You may want to create additional database roles to use in restricting access to DCIs. There is only one predefined role for investigators: RXC_INV. To hide one investigator's observations from another's you need more than one investigator role, for example Neurologist (RXC_NEUR, for example) and Oncologist (RXC_ONC, for example). You can create these two roles, create CRFs that are specific to each of those types of observations, and allow one investigator role access to the DCI corresponding to one CRF and the other investigator role access to the other.
Note the following additional tasks required:
-
Define default DCI Access for the role; see Changing the Default Access to DCIs. You must do this before any users assigned the role try to log in to RDC.
-
Assign the roles to users; see Granting Additional Database Roles to User Accounts. Be careful not to assign roles with conflicting DCI access to the same user.
Parent topic: Creating Custom Database Roles
Associating Roles with Menus
Once a new database role has been created and is accessible, select the Maintain Menu Modules option of the DTK menu to identify those menus and activities to which the role gives a user access.
Navigate to each node in the menu-module tree (see Modifying Menu-Role Associations) to which this role should give access, then click the Roles button. This brings up a dialog box where the roles that enable access to the node are listed. Add the new role to the list.
Parent topic: Creating and Modifying Database Roles
Adding a Custom Role to OPA_MENU_ROLES
Custom roles do not appear in the Menu Roles report until you add them to the OPA_MENU_ROLES installation reference codelist.
To add a custom role to this codelist:
-
Choose DTK, then Maintain all Codelists.
-
Query for the OPA_MENU_ROLES codelist.
-
Insert a new record, and define the short value and long value of the codelist. The long value must match the full name of the new database role exactly, and the short name must be three characters or fewer, and unique in that database. The system uses the short name of the role when it generates the Menu Roles report.
Parent topic: Creating and Modifying Database Roles
Granting a Custom Role Access to a Custom Module
Use these instructions if you are assigning a custom role to a custom module; see Adding Menu Items to Oracle Clinical. This procedure allows you to grant the role access to the module as well as to the individual menu items.
-
Open the appropriate menu module file in Oracle Developer Forms Builder.
-
Connect to the database as RXC.
-
In the Object Navigator, highlight the RXCUSER module (not the menu).
-
In the Menu Security property, add the new role. Use the same name as in the database.
-
Assign your new role to the appropriate menu items as described elsewhere in this section.
-
Save, compile, and distribute the resulting .mmx file.
Note:
To assign a new role to a standard Oracle Clinical module, see Modifying Menu-Role Associations.
Parent topic: Creating and Modifying Database Roles


