Generating a Blank Casebook Report
A Blank Casebook Report lets you create hard copies of all the planned CRFs in the casebook you specify. You can generate a Blank Casebook Report from the Reports page.
When you generate a Blank Casebook Report, you have two options:
- You can generate a generic blank casebook. The CRFs in the report include no CRF header information and no response data.
-
You can generate a patient-specific blank casebook.
In this case, the CRFs in the report include header information specific to the selected patient, but do not include response data. In addition, if the selected casebook is for a flexible study, the report includes all CRFs, whether they are expected for the patient or not.
With this option, you can print a casebook for a particular patient.
To generate a Blank Casebook Report:
- Click the Reports tab to open the Reports page.
-
Click New Blank Casebook Report.

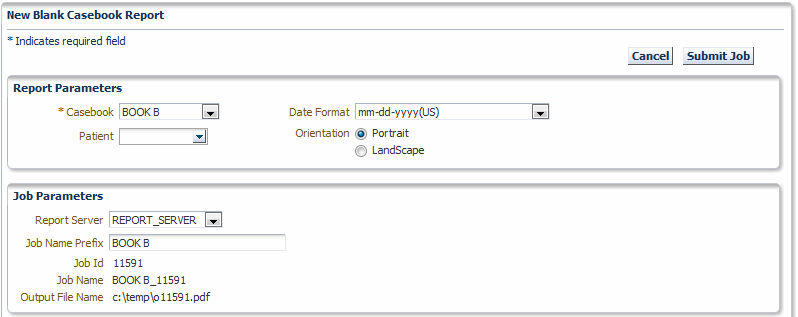
- Click the Casebook field, and then select a casebook from the list. You must select a casebook. The Blank Casebook Report consists of all the planned CRFs for the selected casebook.
-
Specify whether you want to create a generic or a patient-specific Blank Casebook Report as follows:
- To generate a generic blank casebook, do not specify a value in the Patient field. The CRFs in the report include no header data and no response data.
-
To generate a patient-specific blank casebook, click the Patient field and enter the ID of the patient. Alternatively, you can click the down arrow and select a patient ID from the list.
In this case, the CRFs in the report include header data specific to the selected patient, but do not include response data. In addition, if the selected casebook is for a flexible study, the report includes all CRFs, whether they are expected for the patient or not.
- Select the Date Format to use. Your options are US, Standard, European, Swedish, and Same as in Log-In header.
- Select the Orientation of the report. Your options are Portrait or Landscape. This value affects only the cover page of the report. The orientation of a CRF is always defined by its layout regardless of your selection.
-
Select the job parameters for the report.
- Select the name of the Report Server.
- Enter up to 8 characters for the Job Name Prefix. RDC Onsite automatically uses a unique number as the name of a report job, and then adds your specified prefix to the beginning of the job name. You can use the prefix value to easily search for your reports in the list on the Reports page.
RDC Onsite displays the Job Id, Job Name, and the Output File Name for your reference.
- Click Submit Job. RDC Onsite prompts for confirmation before continuing.
- Click Yes to generate the Blank Casebook Report.
Once you submit your request to generate the Blank Casebook Report, you can return to the Reports page to monitor the progress of your report job. You can also stop a job in progress or check error details if the report generation failed. See Monitoring the Status and Progress of Your Report Jobs for more information.
After RDC Onsite successfully generates the report, you can click the link in the View Report column on the Reports page to open and print your report. See Printing a Report for more information.
Parent topic: Generating CRF Reports