Resolving and Routing Discrepancies
After you search for and identify CRFs with discrepancies, you can click a CRF icon to open the CRF in a Data Entry window and take action on a discrepancy. While the Data Entry window is open, you can decide to work on one, some, or all the discrepancies for that CRF.
For more information, see:
- Highlighting the Discrepancies in a CRF
- Reviewing Discrepancies in the Navigator Pane
- Taking Action on Discrepancies
- Creating and Routing Manual Discrepancies
Parent topic: Managing Discrepancies
Highlighting the Discrepancies in a CRF
The Data Entry window uses the following colors to highlight the different types discrepancies in a CRF:
- Red highlights fields with active discrepancies
- Yellow highlights fields with other discrepancies
-
Green highlights fields with closed (manually resolved) discrepancies
Note:
RDC Onsite highlights fields according to the discrepancy that takes precedence. If a field has various discrepancies, then active discrepancies take precedence over other and closed discrepancies, and other discrepancies take precedence over closed discrepancies. For example, if a field has both active and other discrepancies, then RDC Onsite highlights the field in red.
In addition, RDC Onsite does not highlight fields that have only hidden discrepancies.
To highlight the fields that have one or more discrepancies:
-
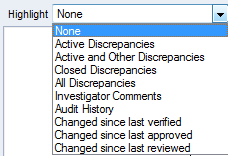
Click Highlight in the toolbar in the Data Entry window.
-
Select an option from the list. Your options for highlighting discrepancies are:
- Active Discrepancies — Highlights all fields associated with active discrepancies in red. Active discrepancies require action by your user role or group.
- Active and Other Discrepancies — Highlights all fields associated with active discrepancies in red and all fields associated with other discrepancies in yellow. Other discrepancies require action by another user role or group.
- Closed Discrepancies — Highlights all fields associated with a manually resolved (user closed) discrepancy in green.
- All Discrepancies — Highlights all fields associated with active, other, and closed discrepancies in their respective colors (red, yellow, and green).
- None — Highlights no fields.
Parent topic: Resolving and Routing Discrepancies
Reviewing Discrepancies in the Navigator Pane
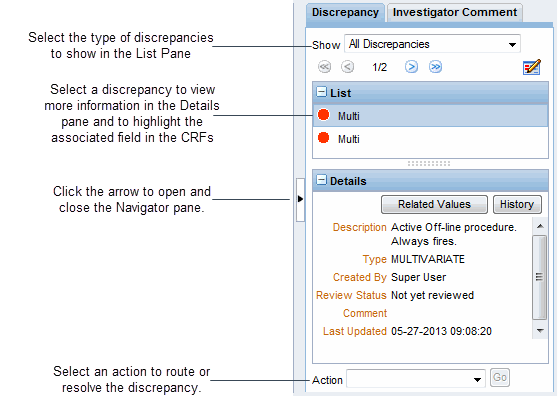
The Navigator pane, shown in the below image, displays on the right side of the Data Entry window. You use the Navigator pane to review, in list format, all discrepancies for a CRF. As you navigate through the list of discrepancies, the cursor simultaneously navigates through the associated fields in the CRF.
For more information, see:
- Opening, Closing, and Resizing the Navigator Pane
- Showing and Selecting Discrepancies in the Navigator Pane
- Reviewing Discrepancy Information in the Details Pane
- Viewing the History of a Discrepancy
- Viewing Related Values for Multivariate Discrepancies
- Reviewing the Audit History for a Discrepancy
- Updating Discrepancy Comments
Parent topic: Resolving and Routing Discrepancies
Opening, Closing, and Resizing the Navigator Pane
- To open the Navigator pane, click the arrow on the right edge of the Data Entry window.
- To close Navigator pane, click the arrow on its left edge.
- To resize the Navigator pane, drag the vertical and horizontal splitter bars to adjust the width and length of the opened pane.
Parent topic: Reviewing Discrepancies in the Navigator Pane
Showing and Selecting Discrepancies in the Navigator Pane
You can use the List and Details panes in the Navigator to review, highlight, and update particular discrepancies in a CRF.
To use the Navigator pane to display and review discrepancies:
-
Click the Show field and select a filter from the list. You can select to show:
- Active Discrepancies
- Active and Other Discrepancies
- Closed Discrepancies
- All Discrepancies
Based on your filter selection, the List pane displays the discrepancies for the current CRF. Note that:
- Discrepancies associated with multiple fields display as Multi.
- Hidden discrepancies do not display regardless of the filter you select.
- The total count displayed in the Navigator pane does not include hidden discrepancies.
-
Select the discrepancy you want to work with from the list. Note that:
- The Details pane refreshes and displays more information about the discrepancy.
- The discrepancy you selected in the List pane is highlighted in blue, and the associated field (or fields if multiple fields are associated with the discrepancy) in the CRF is outlined with a blue dashed line.
- If you also selected a Highlight option, then the discrepant field is additionally highlighted.
For long lists, use the scroll bar to view additional information in the List pane. In addition, click the + or - icon in the title bar to expand or collapse the pane.
Parent topic: Reviewing Discrepancies in the Navigator Pane
Reviewing Discrepancy Information in the Details Pane
Once you select a discrepancy in the List pane of the Navigator, the Details pane displays additional information about the selected discrepancy.
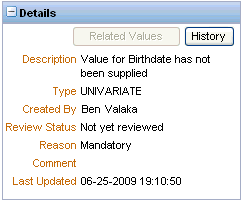
The information, which varies depending on the current status of the discrepancy and on how your sponsor customized RDC Onsite, can include:
- Description — A description of the discrepancy.
- Type — The type of discrepancy, for example, manual or univariate.
-
Created By — The name of the user who created the discrepancy. If this is a manual field or section discrepancy, the user role is included after the user name.
Note that this entry displays the name of the user who created the discrepancy. For the name of the user who last updated the discrepancy, click History to view the Discrepancy History dialog box.
- Review Status — The current review status of the discrepancy.
- Reason — The reason for the discrepancy. Note that the reason does not display if this is a multivariate discrepancy.
- Comment — Additional comment information, if entered when creating the discrepancy.
- Resolution — The resolution reason and the resolution comment, if the discrepancy was closed.
- Last Updated — The date and time the discrepancy was last updated.
- Discrepancy ID — The ID for the discrepancy. This information displays only if your sponsor customized RDC Onsite to include the ID.
If necessary, use the scroll bars to view additional information in the Details pane. In addition, click the + or - icon in the title bar to expand or collapse the pane.
Parent topic: Reviewing Discrepancies in the Navigator Pane
Viewing the History of a Discrepancy
Click the History button in the Details pane to view the history of the currently selected discrepancy.
The Discrepancy History dialog box displays the Date, Description, Updated by, Review Status, Comment, Resolution Reason, and Resolution Comment.
Parent topic: Reviewing Discrepancies in the Navigator Pane
Viewing Related Values for Multivariate Discrepancies
A multivariate discrepancy is a discrepancy that is dependent on two or more data points, or values. These data values can be within a single CRF or across multiple CRFs and visits.
When you select a multivariate discrepancy, you can click the Related Values button in the Details pane to list all reported values associated with the multivariate discrepancy.
For each value, the Related Values dialog box displays the CRF Name, the Visit, and the Question/Variable.
The Question/Variable column displays either the Question name or the Validation Procedure variable name associated with the discrepancy. A Validation Procedure variable is a calculated value. The variable might be used to process a validation check or to provide relevant information for discrepancy review.
For repeating groups, the Row Number displays in parenthesis next to the Question/Variable name.
Parent topic: Reviewing Discrepancies in the Navigator Pane
Reviewing the Audit History for a Discrepancy
If the discrepancy you selected in the Navigator pane has an audit history, you can view the audit trail by opening the Audit History pane at the bottom of the Data Entry window.
If a selected discrepancy is associated with multiple fields in the CRF (as with multivariate discrepancies), then the Audit History pane displays no information.
Parent topic: Reviewing Discrepancies in the Navigator Pane
Updating Discrepancy Comments
While reviewing a discrepancy in the Data Entry window, you can update its associated comment.
To update a discrepancy comment:
- Open the Navigator pane.
- Click the Discrepancy tab.
- Select the discrepancy you want to work with from those shown in the List pane.
- Click the Update icon. The Update Discrepancy dialog box opens.
-
Update the comment with your changes. In addition, you can update the discrepancy description in the following situations:
- If the discrepancy is either a manual field discrepancy or a manual section discrepancy, you can modify the description text by typing in the field. You can enter up to 2000 characters. When you click OK, RDC Onsite verifies the number of characters in the field. If you entered more than 2000 characters, RDC Onsite forces you to shorten the description before continuing.
- If the discrepancy is a system-generated discrepancy and more than one standard text exists for the category and type of discrepancy, you can select from a list of values containing the standard text.
- Click OK to save your changes.
Parent topic: Reviewing Discrepancies in the Navigator Pane
Taking Action on Discrepancies
You can use the Navigator pane in the Data Entry window to take action on the accumulated discrepancies for a CRF. These discrepancies include those raised during the validation process, as well as queries manually raised by monitors and data managers also using RDC Onsite.
For more information, see:
- Types of Discrepancy Actions
- Acting on Active versus Other Discrepancies
- Routing Discrepancies
- Resolving Discrepancies
Parent topic: Resolving and Routing Discrepancies
Types of Discrepancy Actions
There are two types of discrepancy actions: routing and resolution.
Routing actions assign the discrepancy to the members of another user group (that is, users with a certain role). For example, the Send to site action assigns the discrepancy to the Site user role. When you route a discrepancy, you can include a comment that RDC Onsite saves with the discrepancy.
In contrast, resolution actions immediately close the discrepancy. When you close a discrepancy, you must provide a resolution reason. In addition, you can enter a resolution comment.
By default, RDC Onsite provides the following standard routing and resolution actions that you can take to process a discrepancy:
- Send to site
- Send for classification
- Closed - resolved
- Closed - no resolution
However, your sponsor can customize and rename these default actions, assign the actions to particular user roles, and add other discrepancy actions.
Parent topic: Taking Action on Discrepancies
Acting on Active versus Other Discrepancies
Open discrepancies require action and resolution. An open discrepancy can have a status of active or other.
By default, RDC Onsite does not prevent you from taking action against any open discrepancy, regardless of whether the status is active or other.
Your sponsor, however, can customize RDC Onsite so you can only take action on active discrepancies. In this case, you can view discrepancies with a status of other, but you cannot route or resolve these discrepancies.
Parent topic: Taking Action on Discrepancies
Routing Discrepancies
You alert a different user group (users with a certain role) to the presence of a discrepancy by routing it. Routing causes discrepancy status to change from active to other. If the appropriate highlight option is chosen, RDC Onsite then highlights the associated other discrepancy icons in yellow.
To route a discrepancy:
- Click a CRF icon to open it in the Data Entry window.
- Open the Navigator pane and select a discrepancy from the list.
-
Click the Action field and select an action from the list.
The available actions are specific to your role. For example, a CRA can send a discrepancy to site (Send to Site) or to a manager (Send to Data Manager).
- Click Go. A Discrepancy Action dialog box opens and displays your selected action in its title. The Review Status displays the future selected status of the discrepancy.
- Modify, if required, the description of a user-entered discrepancy, or select a value from the list, if available.
- Enter a Comment if you want, explaining why the discrepancy is being routed.
- Click OK to route the discrepancy.
If you route a discrepancy to a hidden status, RDC Onsite removes it from the list and the discrepancy is no longer visible.
Parent topic: Taking Action on Discrepancies
Resolving Discrepancies
As you use the Data Entry window and its Navigator pane to review discrepancies, you may find discrepancies that you can resolve.
To resolve a discrepancy:
- Click a CRF icon to open it in the Data Entry window.
- Open the Navigator pane and select a discrepancy from the list.
- Click the Action field and then select an action to close or resolve the discrepancy. Actions are appropriate and specific to your role.
-
Click Go. A Discrepancy Action dialog box opens and displays your selected action in its title. The Review Status displays the future selected status of the discrepancy, for example, RESOLVED.
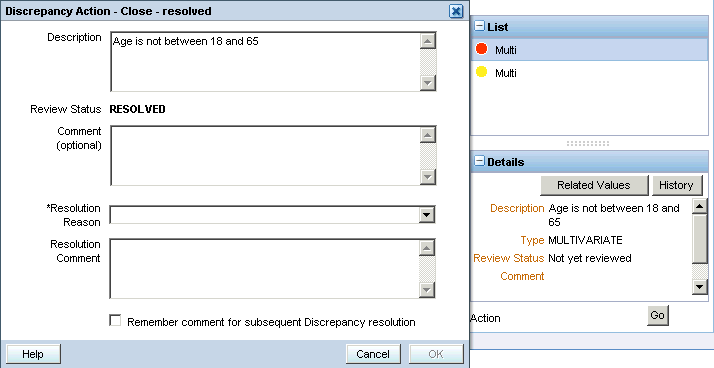
- Click the Resolution Reason field and select a reason from the list. If no default values exist, the list is empty. You must enter a resolution reason into this mandatory field.
- Enter a comment in the Resolution Comment text box if you want to provide more information about why you are resolving the discrepancy.
- Select the check box if you want RDC Onsite to remember your comment for subsequent use. Select this option only if you intend to reuse the same comment.
- Click OK to resolve the discrepancy.
When you resolve a discrepancy, RDC Onsite changes the color of its associated icons to green, if the appropriate highlighting option is selected. After you resolve or close a discrepancy, it cannot be updated nor can you perform any action on it.
Note:
RDC Onsite remembers the Resolution Reason you specified and the Resolution Comment you entered (provided you selected the remember comment check box), until you:
- Enter a different reason or comment
- Change your study
- Log out of RDC Onsite
If you get the following message upon saving a change to a discrepancy or blanking outone or more sections of the CRF: All responses in one or more sections have been deleted. If this is the desired action, please delete the entire document, or contact your help desk to change the status of the document, the problem is that the Save logic detected that the CRF was either batch loaded or in status Pass 2 Started, Complete, or Pending and all responses have been deleted in one or more sections. This is not allowed for CRFs that are either batch loaded or in status Pass 2 Started, Complete, or Pending.
Click OK in response to the message. The system displays the document with your changes to the discrepancy status or blanked fields. You can either delete the CRF or close it, using the option to discard changes -- and then contact your help desk to change the status of the document.
-
For new documents that have status PASS 2 and need to have their Blank flag set to Y, the workaround is to:
- Update the blank flag via RDCI key changes in Oracle Clinical.
- Migrate the documents so they can be opened again in RDC Onsite.
-
For documents that already have the problem, the workaround is the following:
- Create a RDCI Key change in Oracle Clinical to change the Blank flag from N to Y for the documents affected.
- Create a second RDCI Key change to change the Blank flag from N to Y N for the documents affected (the same ones updated in the first key change).
- Migrate the documents changed. After that it will be possible to open the blank documents in RDC Onsite.
Parent topic: Taking Action on Discrepancies
Creating and Routing Manual Discrepancies
With the appropriate privileges, you can create a manual discrepancy for a response field or a CRF section.
You can create only one manual discrepancy for a field in a CRF.
Note that if a field has an existing manual discrepancy and the review status is CLOSED, then you can create a new manual discrepancy on the field. In this case, RDC Onsite re-opens the existing manual discrepancy.
However, if any of the following conditions exist, RDC Onsite grays out the Field Discrepancy option in the Add Discrepancy dialog box:
- If a non-closed manual discrepancy already exists on a field, you cannot create another manual discrepancy on the same field. You can view the existing discrepancy, but you cannot create a new manual discrepancy.
- If a hidden, non-closed manual discrepancy exists on a field, you cannot create another manual discrepancy on the same field. In this case, you cannot see the hidden manual discrepancy associated with the field.
- If your user role has update discrepancy privileges only and the CRF is not Pass 1 complete, you cannot create a manual discrepancy.
To create and route a manual discrepancy:
-
Open the CRF in the Data Entry window.
- To add a manual discrepancy to a field, select the field.
- To add a manual discrepancy to a section, either select a response field in the section or click the section discrepancy bar to select the section.
-
Click the Add Discrepancy icon in the toolbar. Alternatively, you can right-click the field and then select Add Discrepancy from the menu.
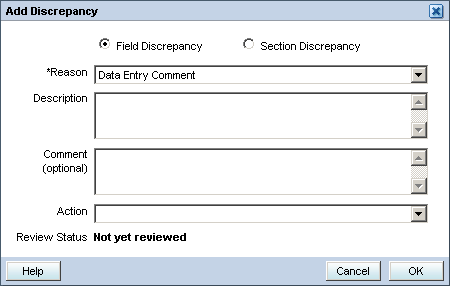
- Select Field Discrepancy or Section Discrepancy depending on the type of manual discrepancy you are adding.
- Click the Reason field and then select a reason from the list. You must specify the reason why you are entering this manual discrepancy. A reason is mandatory.
- Enter a Description of the discrepancy in the text field.
- Enter a Comment if you want.
- Click the Action field and then select an option for routing the discrepancy for review, if you want. Your selection is reflected in the Review Status field.
-
Click OK to add the discrepancy.
If the highlight option is selected, RDC Onsite highlights the field discrepancy in the CRF, in red, if not routed after initiation.
- If you click Highlight in the toolbar and select All Discrepancies, the RDC Onsite highlights the discrepancy in the CRF according to its current status.
- If you click the Show field in the Navigator pane and select All Discrepancies, the List pane displays and highlights the discrepancy according to its current status.
Parent topic: Resolving and Routing Discrepancies