Reviewing Discrepancies
To find, order, organize, and review CRFs with discrepancies, you can use the Review Discrepancies page, the Patient Casebooks page, or the Review CRFs page.
The way in which RDC Onsite displays and groups the information about discrepancies is different on each page. Depending on your work habits, you may have a preference for which page you want to use.
The following sections describe the advantages and details for using each page:
- Working with the Review Discrepancies Page
- Discrepancies and Extended Text Fields
- Using the Patient Casebooks Page to Review Discrepancies
- Using the Review CRFs Page to Review Discrepancies
Parent topic: Managing Discrepancies
Working with the Review Discrepancies Page
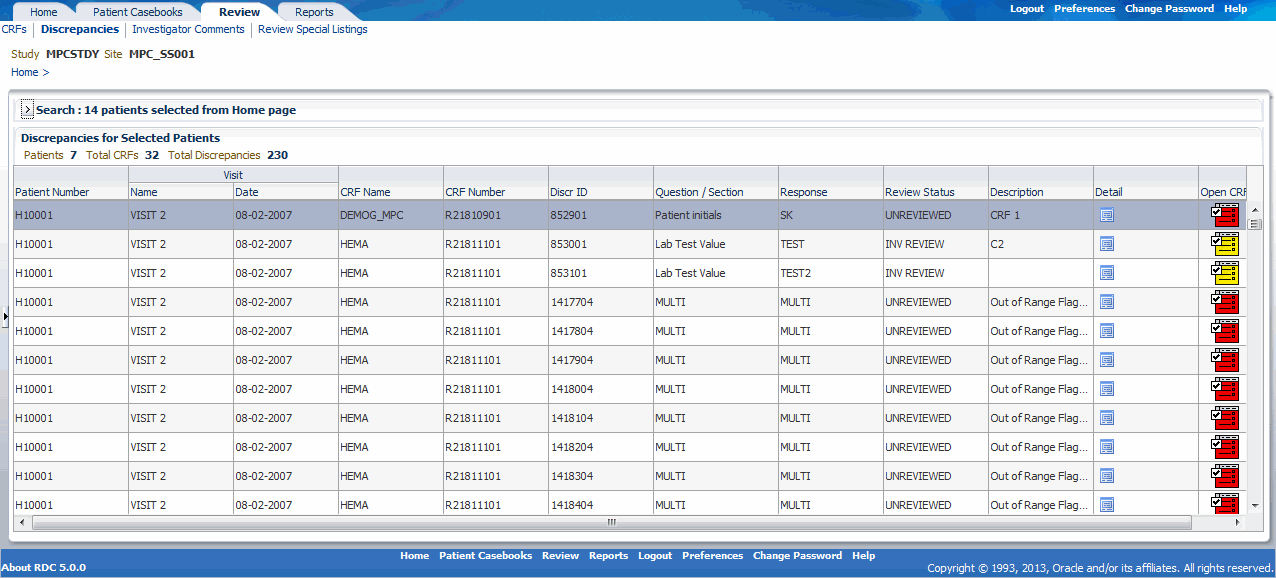
The Review Discrepancies page provides a list of discrepancies that you can scroll through and sort. .
Each row contains the information for one discrepancy. If a CRF has more than one discrepancy, RDC Onsite lists each discrepancy for that CRF in its own row.
The columns display the following information about each discrepancy:
- The patient number
- The visit name and date
- The CRF name, the question or section in the CRF, and the response that caused the discrepancy
- The review status for the discrepancy
- A description of the discrepancy

The Review Discrepancies page is especially useful for managing discrepancies because you can glance at the discrepancies across CRFs and look for patterns. You can view a brief description of each discrepancy without opening the CRF.
Other advantages of using the Review Discrepancies page to manage your discrepancies include:
- You can sort discrepancies by any column, such as by CRF name or by description. Sorting lets you organize your work.
- You can examine the details and history of a discrepancy without opening the CRF.
- You can preview discrepancies to organize them, determine priorities, and assess which ones to resolve or route.
For more information, see:
- Navigating to the Review Discrepancies Page
- Sorting Discrepancies
- Viewing the Details of a Discrepancy
Parent topic: Reviewing Discrepancies
Navigating to the Review Discrepancies Page
To navigate to the Review Discrepancies page, you can use any of the following methods:
- Select a customized activity on the Home page.
- Open the Review Discrepancies page directly and then search for CRFs with discrepancies.
- Drill down to the Review Discrepancies page with a patient selection from the Home page or the Patient Casebooks page.
- Drill down to the Review Discrepancies page with a CRF selection from the Review CRFs page.
Once you navigate to the Review Discrepancies page, you can:
- Review the information displayed on the Review Discrepancies page and sort the columns before deciding on which discrepancies to address.
- Click a CRF icon to open the CRF in the Data Entry window and work on the selected discrepancy.
- Click Reset to remove the current search criteria and then re-enter a different search.
Parent topic: Working with the Review Discrepancies Page
Sorting Discrepancies
Before you begin to resolve or route discrepancies, you may want to sort the list of discrepancies to help you organize your work.
By default, the Review Discrepancies page lists discrepancies in ascending order by patient number. However, you can click any column header to sort the list by the contents of that column.
You can sort the list in ascending order or descending order. An up arrow in the selected column indicates the list is sorted in ascending order; a down arrow indicates the list is sorted in descending order. You can click the same column heading to toggle between an ascending and a descending sort.
Sorting the list may also provide clues about CRF questions that often produce a discrepancy or about common data entry problems that need to be addressed. For example, you can:
- Sort by Description to find any preponderance of a particular type of discrepancy.
- Sort by Question/Section to see those questions that often produce a discrepancy.
- Sort by Review Status to group discrepancies according to their current status.
- Sort by Visit Date to view discrepancies by the date of the visit.
Note:
Depending on how you prefer to work or what your current task involves, limiting the search may be more useful than sorting the columns.
For the patient number, the visit name, and the CRF name, you can sort the list of discrepancies on those columns. Alternatively, you can enter Search criteria into the corresponding fields (Patient Range, Visit, and CRF Name) to limit the number of discrepancies found.
For example, you can search only for discrepancies in the CRFs for Visit 3. In this case, you would not need to sort the list by Visit Name because the list would only include CRF discrepancies for Visit 3.
Parent topic: Working with the Review Discrepancies Page
Viewing the Details of a Discrepancy
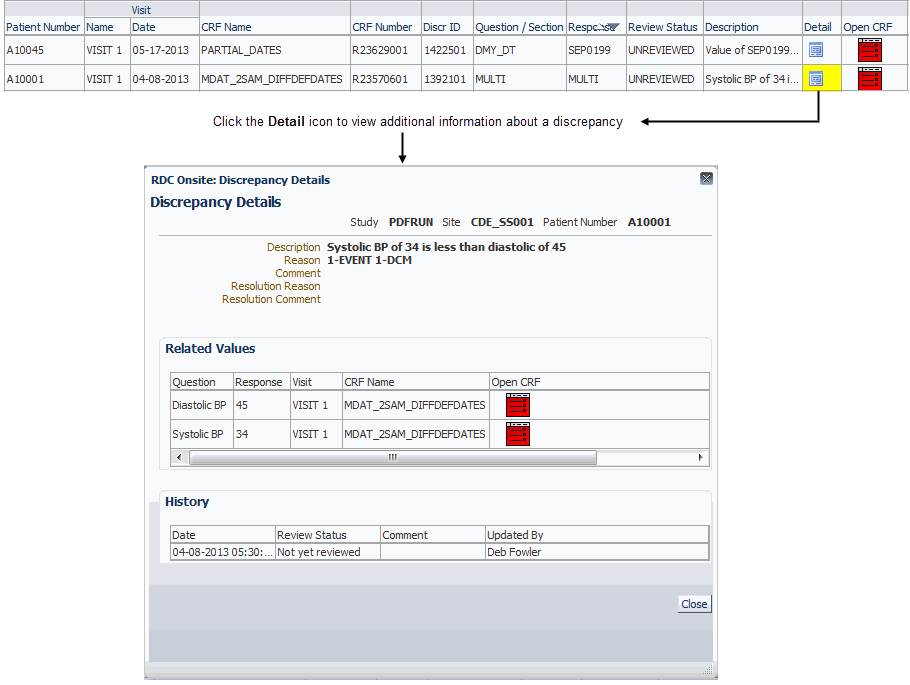
On the Review Discrepancies page, click the Detail icon in the Detail column to review any related values and a discrepancy history without having to open the CRF. See Figure 4-*.
For multivariate discrepancies, the Review Discrepancies page also displays a MULTI link in the Question/Section column and the Response column. You can click either the MULTI link or the Detail icon to view more information about a multivariate discrepancy.
Viewing additional details is especially useful when a multivariate discrepancy involves more than one CRF. For example, suppose the birthdate in the Demography CRF indicates the patient is 84 years old, but the Inclusion/Exclusion CRF indicates the patient is between 30 and 55 years. The discrepancy appears for the primary CRF, which is the Inclusion/Exclusion CRF in this example.
To view details and then take action on a multivariate discrepancy:
- Open the Review Discrepancies page.
- Sort by Description to find a group of the same type of multivariate discrepancy.
- Select the Detail icon for a discrepancy.
-
Review the Related Values section of the Discrepancy Details pane. This section lists the CRFs involved with the discrepancy.
The Related Values section does not display entries for related values from any CRFs that are hidden based on your user role.
- Select one CRF icon after the other, to view both the contributing CRFs in adjacent windows. Decide on your course of action, perhaps updating data in one or the other of the CRFs.

Parent topic: Working with the Review Discrepancies Page
Discrepancies and Extended Text Fields
You can add discrepancies to an extended text field. However, discrepancy listings for such fields do not display the complete extended text. Instead, a discrepancy listing displays the ATTACHMENT prefix followed by a truncated response text. The system reserves 24 characters of the defined field length for the ATTACHMENT prefix.
Therefore, the number of characters in the truncated response text is calculated as follows:
Characters in Truncated Reponse Text = Defined Field Length – 24
Extended text fields support the following types of discrepancies:
- Manual discrepancies.
- Multivariate discrepancies. Note that RDC Onsite runs this against the truncated response text, not the complete extended text.
- Hidden discrepancies.
In the Discrepancies Details pane, you can view only the ATTACHMENT prefix and the truncated response text.
Parent topic: Reviewing Discrepancies
Using the Patient Casebooks Page to Review Discrepancies
The Patient Casebooks page organizes CRF icons in patient rows and CRF columns in casebook order. This organization can be useful in finding discrepancies on a patient-by-patient or visit-by-visit basis.
Managing discrepancies from the Patient Casebooks page has another advantage. When you open a CRF from the Patient Casebooks page, the Next CRF and Previous CRF links are available in the Data Entry window. You can use these links to cycle through the CRFs and discrepancies for the selected patient, without having to return to the Patient Casebooks page.
For more information, see:
Parent topic: Reviewing Discrepancies
Using a Filtered Casebook Spreadsheet View
When you use the Next CRF and Previous CRF links along with search criteria, you can filter the casebook and display only the CRFs needed for your work. For example, you can search for and display only CRFs with active discrepancies.
In this case, clicking the Next CRF link in the Data Entry window navigates only to the CRFs with active discrepancies, skipping empty CRFs and CRFs with no active discrepancies, without having to return to the Patient Casebooks page.
Furthermore, the Patient Casebooks page displays only those CRFs that have active discrepancies for the filtered patients, resulting in a sparsely populated spreadsheet. For this example, the Patient Casebook spreadsheet:
- Displays all red CRF icons. (Icons are red because of the Active discrepancy search criteria. The display changes based on the specified search criteria.)
- Does not display CRF icons where data is expected, or where data has been entered, but the CRF has no active discrepancies.
Parent topic: Using the Patient Casebooks Page to Review Discrepancies
Using a Non-filtered Casebook Spreadsheet View
If you prefer to see CRF icons for all entered data, select All in the Discrepancy field in the Search pane. When you execute the search, RDC Onsite refreshes the spreadsheet on the Patient Casebooks page. The spreadsheet still displays only patients with discrepancies, but you see all entered CRFs for those patients, with or without discrepancies. You can then select any CRF icon to open it in the Data Entry window and take action on the discrepancies.
Parent topic: Using the Patient Casebooks Page to Review Discrepancies
Using the Review CRFs Page to Review Discrepancies
The Review CRFs page displays CRFs with discrepancies in a list format that you can scroll through and sort.
Similar to the Patient Casebooks page, you can use the Review CRFs page to identify all CRFs with discrepancies. The Review CRFs page provides additional information about each CRF, including the dates on which the CRF was last modified, verified, approved, and locked. You can sort the CRF list by any of the date fields. For example, sort by the Modified Date to work on the oldest CRFs first.
Tip:
Select the Show Timestamps check box to view time stamps in the date fields.Parent topic: Reviewing Discrepancies