|
|
|
|


Creating an autocode mapping
To create an autocode mapping:
- Do one of the following:
- Select Trial >Create Data Mappings > Autocode.
- In the Trial toolbar, click the Data Mappings button (
 ). In the Data Mappings Type dialog box, select Autocode and click OK.
 - In the Trial Objects window, right-click the Data Mappings node and select Create Autocode from the pop-up menu.
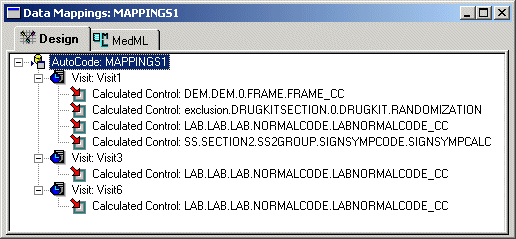
The InForm Architect application generates an autocode mapping and opens the Data Mappings window. The autocode mapping tree consists of the visits in which calculated controls have been defined and the control paths of each calculated control.
- Select the AutoCode node and edit the autocode mapping property values in the Properties window.
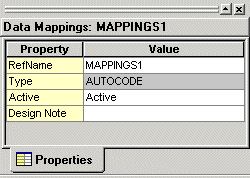
The following table describes the properties of an autocode mapping definition.
Property |
Description |
|---|---|
RefName |
RefName of the component. REQUIRED. For rules about the use of RefNames, see RefNames. |
Type |
AUTOCODE. READ ONLY. |
Active |
Active or Inactive, indicating whether the autocode mapping definition is accessible with the InForm Architect application. The default is Active. To disable an autocode mapping definition, set the value to Inactive and install the definition by saving it with the Install MedML When Saving option enabled or by using the MedML Installer utility. The autocode definition becomes inaccessible with InForm Architect application. OPTIONAL. |
Design Note |
Free-form text, with a maximum of 255 characters, containing any information you want to capture about the design of the component. This information is for documentation only. OPTIONAL. Design Note text is not transferred to the target tables. |