2 Cruise Property Management Border Control
You can perform a custom installation or a typical installation. A custom installation allows you to exclude the products that you do not need. If you choose to perform a typical installation, you can still remove/disable the features that you do not need post installation.
The installation requires the user performing the installation to have an Administrator privilege.
Installing Cruise Property Management Border Control 23.1x
-
Log in as a Microsoft Windows Administrative user.
-
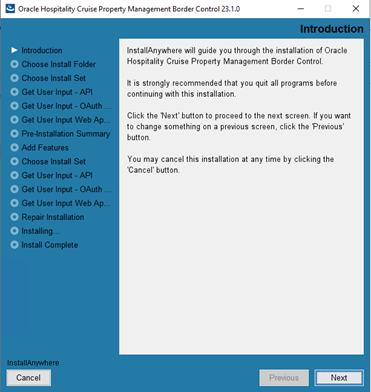
Start the installation program by right-clicking the CruiseBorderControl_23.1.0.exe and select Run as Administrator.
Figure 2-1 Cruise Property Management Border Control Installation Page

-
Click Next and navigate to the “Choose Install Folder”. The default folder is
“C:\”If you choose to install it in a different folder from the default, you need to grant the folder full permission so that the user can start the APIs or Apps.
-
To grant the folder permission,
-
Access the Properties dialog box.
-
Select the Security tab.
-
Click Edit.
-
In the Group or user name section, select the user(s) you wish to set permissions for.
-
In the Permissions section, use the check boxes to select the appropriate permission level.
-
Click Apply.
-
Click OK.
-
-
Click Next and navigate to “Choose Install Set” and if you choose,
-
Typical, most common application will be installed. This option is recommended for most users.
-
Custom, you can customize the features to be installed as either WebApp or API or both to install based on the requirement.
-
-
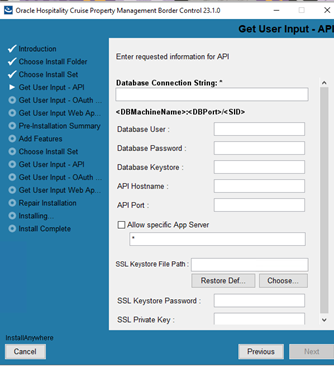
Click Next to input the below fields
-
Database connection String:
<DBMachineName>:<DBPort>/<SID> -
Database User: Database User
-
Database Password: Database Password
-
Database Keystore: DB Keystore’s password for database encryption. Minimum password length is 8 characters.
-
API Hostname: API Server’s Hostname.
-
API Port: API Server’s port number.
-
Allow specific App Servers: Check to enable input of server machines with APP installed that are allowed to access the API. Uncheck if it apply to all servers.
-
SSL Keystore File Path: Keystore file path which contain .JKS file extension.
-
SSL Keystore Password: Keystore password.
-
SSL Private Key: Private key/Alias used to generate the keystore
Figure 2-2 Cruise Property Management Border Control API Settings

-
-
Click Next to input the OAuth Configuration settings’ fields
-
OAuth Public Key File: OAuth public key file in .json file extension.
-
OAuth Private Key File: OAuth private key file in .json file extension.
-
-
Click Next to input the “Web Application” port
-
WebApp Port: Single instance of Border Control WebApp is supported. User need to choose an unused port for the installation.
-
API Gateway: By default, it is based on the API Hostname and port number defined in previous step. However, if the API is located at another server, user need to define the installed API server name.
-
Keystore File Path: If user has separate API server, then keystore file path has to be provided.
-
Keystore Password: Keystore file path for the API Gateway if it is different from the default API Server.
-
-
Click Next for Pre-Installation Summary and verify that it is the desired set up.
-
Click Install to begin installation.
Note:
For a better end user experience, at the end of the installation a
installer.propertiesfile containing all the configurations, encryption of passwords is created and added to folder where Border Control InstallAnywhere is placed.The installer.properties file’s content will be cleared once the InstallAnywhere application is triggered. If you would like to maintain the same configurations or information, please backup this file.
-
API’s configuration is stored in the
application.propertiesfile of the installed folder. -
At the end of the installation, the system creates two (2) new Windows Services; namely Oracle Hospitality Cruise Property Management Border Control WebApp and Oracle Hospitality Cruise Property Management Border Control API.
Figure 2-3 Cruise Property Management Border Control Window Services

-
The system will create a folder
Oracle Hospitality
Cruise\ Border Control\v23.1
under the directory if it does not exist, and one or two (2) sub-folders - ‘API’, and/or ‘WebApp’, depending on the installation type.
Uninstalling / Modifying Cruise Property Management Border Control 23.1x
Any modification or uninstallation are done through Windows Control Panel in a Maintenance mode. This would allow user to select the options to perform like add features, remove, or uninstall the product.
-
Start the installation program by right-clicking the CruiseBorderControl 23.1.0.exe and select Run as Administrator. If you have already installed the application, the Setup starts in Maintenance mode, allowing you to reinstall.
-
Add features: InstallAnywhere will guide you through adding features to the installed set. By default, WebApp and API will be disabled if already installed.
-
Remove features: InstallAnywhere will guide you through removing features of the installed product. User can uncheck the product features (WebApp / API) that need to uninstall. Checked features will remain installed.
-
Uninstall Product: InstallAnywhere will remove all the features that were installed during product installation. Files, folders and windows services will be removed.
-