3 Crew Members Function
The content below describes the function for accessing the crew data such as Crew Information, travel documents, invoice, crew history, group account, and others. You can create, amend and cancel a reservation, post a charge and check out a crew account. These functions are accessed by using the Crew Members drop-down menu.
Figure 3-1 Crew Handling
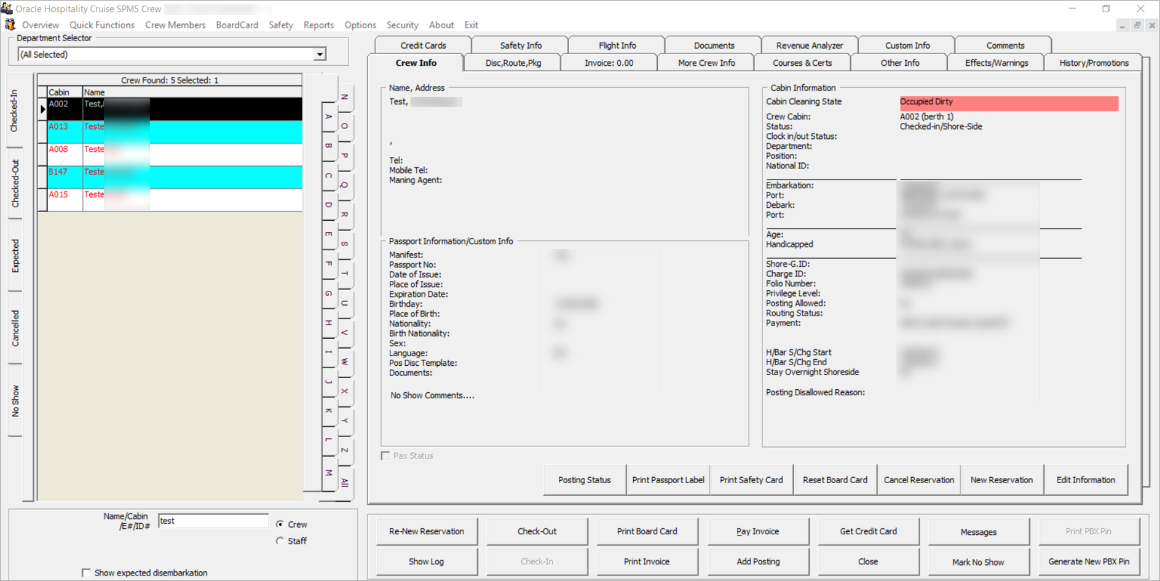
Crew Handling
Search Panel
The Search Panel function is a reservation look up by status in a tab view — Check In, Check Out, Expected, Canceled and No Show from the Crew Handling window.
Search Using the Search Panel
-
At the Search Panel, select the Status tab.
-
You can select an alphabet corresponding to the last name of the reservation or select ALL to list all reservations in alphabetical order.
-
You can further narrow down the search using either the crew name, document number, or cabin number and date.
Crew Info Tab
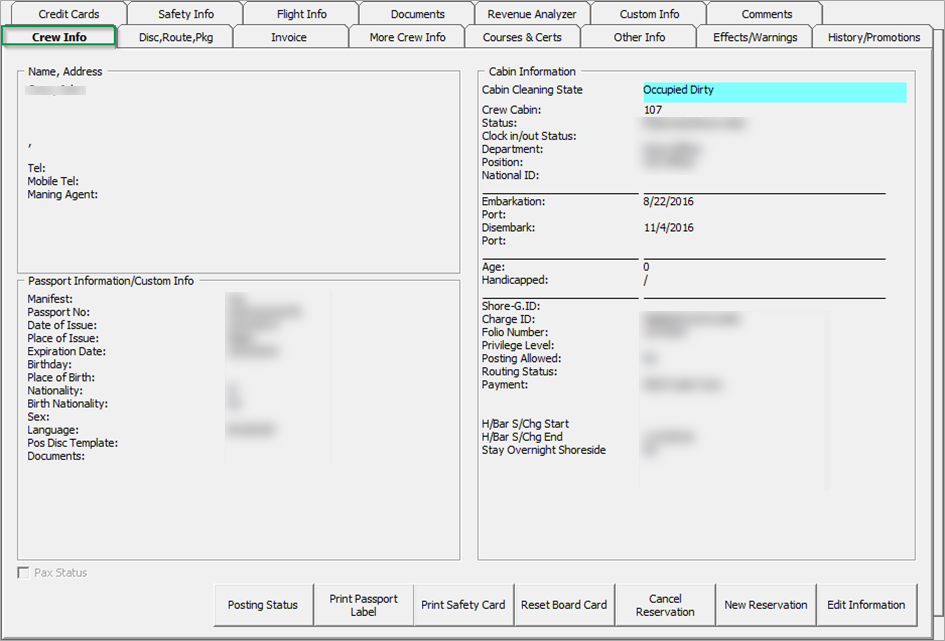
The Crew Info tab is the default tab after an account/reservation search. It provides a single view of crew’s information such as name, address, passport details, cabin information, and others that enable you to drill down further into the reservation for more information.
Figure 3-2 Crew Info Tab
New Reservation Function
The New Reservation function creates a new crew reservation. A reservation form is launched when you clicked the New Reservation button. Below are the definitions of the fields on the form.
Figure 3-3 New Crew Information Window
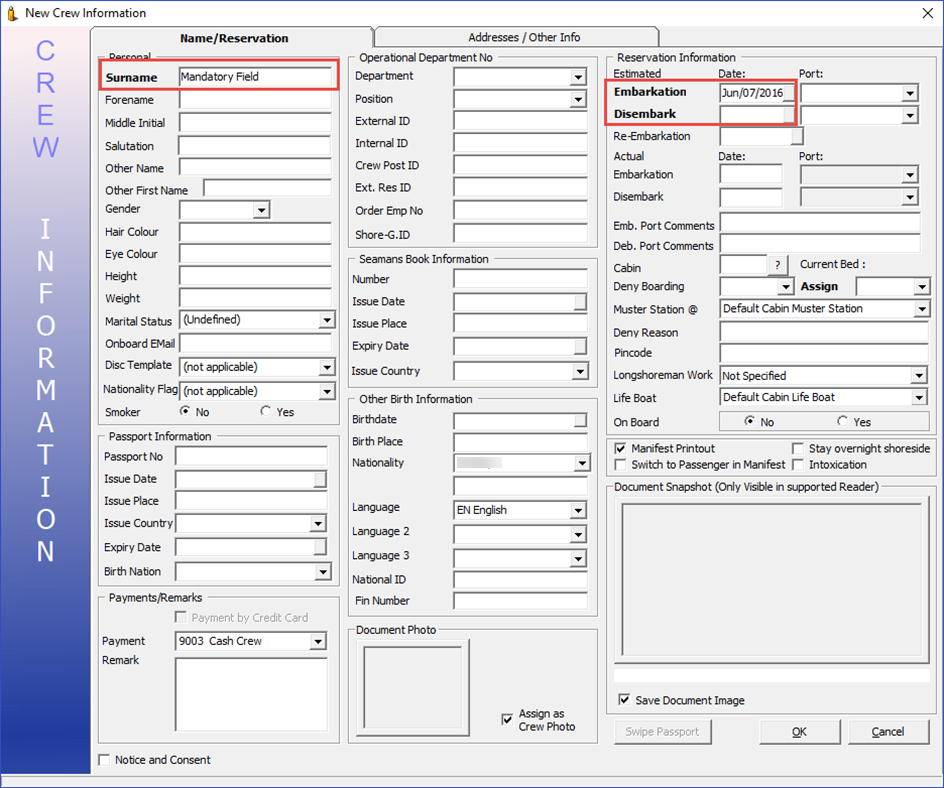
Table 3-1 Field Definition of Crew Information Tab (Name)
| Field | Description |
|---|---|
|
Name |
|
|
Surname |
Last name of the crew. |
|
Forename |
First name of the crew. |
|
Middle Initial |
Middle name of the crew. |
|
Salutation |
Salutation of crew. |
|
Other Name |
Other Last Name in passport/ID. |
|
Other First Name |
Other First Name. in passport/ID. |
|
Gender |
Gender Identifier. |
|
Marital Status |
Marital Status. |
|
Onboard Email |
Email contact while on board. |
|
Disc Template |
Available discount templates. |
|
Nationality Flag |
Flag to determine if the crew nationality belongs to European Union (EU) or Non-European Union. |
|
Smoker |
Smoker Identifier. |
Table 3-2 Field Definition of Crew Information Tab (Passport Information)
| Field | Description |
|---|---|
|
Passport Information |
|
|
Passport No |
Passport number of the crew. |
|
Issue Date |
Date travel document was issued. |
|
Issue Place |
Place travel document was issued. |
|
Issue Country |
Country travel document was issued. |
|
Expiry Date |
Expiry date of travel document. |
|
Birth Nation |
Original nationality of the crew if differ from Nationality field. |
Table 3-3 Field Definition of Crew Information Tab (Operational Department No.)
| Field | Description |
|---|---|
|
Operational Department No. |
|
|
Department |
Operational department assigned. |
|
Position |
Operational position assigned. |
|
External ID |
External System Crew ID. |
|
Internal ID |
Internal Crew ID. |
|
Crew Post ID |
Waiter ID number used in POS system. |
|
Ext. Res ID |
External System Reservation ID. |
|
Order Emp ID |
Employer number of crew incentive program. |
|
Shore.G-ID |
Unique Identifier for FMS. A user definable label. |
Table 3-4 Field Definition of Crew Information Tab (Seamans Book Information)
| Field | Description |
|---|---|
|
Seaman’s Book Information |
|
|
Number |
Seaman Book number. |
|
Issue Date |
Date of issue of Seaman book. |
|
Issue Place |
Place of Issue of Seaman book. |
|
Expiry Date |
Expiry date of Seaman book. |
|
Issue Country |
Country Seaman book were issued. |
|
Other Birth Information |
|
|
Birthdate |
Birthdate of the crew. |
|
Birth Place |
Birthplace of the crew. |
|
Nationality |
Nationality of crew. |
|
Language |
Main language spoken. |
|
Language2 / 3 |
Other spoken language. |
|
National ID |
Local identification document, for example, ID or Driving License. |
Table 3-5 Field Definition of Crew Information Tab (Reservation Information)
| Field | Description |
|---|---|
|
Reservation Information |
|
|
Estimated Embarkation/ Disembarkation Date |
Embarkation/Disembarkation date. |
|
Estimated Embarkation/ Disembarkation Port |
Port of embarkation/ Disembarkation. |
|
Re-Embarkation |
Crew expected return date. |
|
Actual Embarkation/ Disembarkation Date |
Actual Embarkation/Disembarkation date. |
|
Actual Embarkation/ Disembarkation Port |
Port of embarkation/ Disembarkation. |
|
Emb. Port Comments |
Sign-on harbour comments. |
|
Deb. Port Comments |
Sign-off harbour comments. |
|
Cabin |
Cabin number assigned. |
|
Deny Boarding |
Deny boarding identifier. |
|
Assign |
Current Berth Assigned. |
|
Muster Station |
Muster Station assigned. Linked to Cabin number. |
|
Deny Reason |
Reason boarding is denied. |
|
Pincode |
Pin code setup for outgoing calls and access to Kiosk. |
|
Longshoreman Work |
Indicate crew to perform longshoreman work during next port. |
|
Life Boat |
Life Boat assigned to crew. Linked to Cabin number. |
Table 3-6 Field Definition of Crew Information Tab (Other Parameter)
| Field | Description |
|---|---|
|
Other Parameter |
|
|
Manifest Printout |
Indicates manifest has been printed. |
|
Switch to Passenger in Manifest |
Indicates reservation has been moved to Passenger manifest. |
|
Stay overnight shoreside |
Indicates that crew stays overnight at shore side. |
|
Intoxication |
Intoxication identifier. |
Table 3-7 Field Definition of Crew Information Tab (Others)
| Field | Description |
|---|---|
|
Others |
|
|
Document Image Snapshot |
Displays snapshot of scanned passport. |
|
Photo |
Displays saved crew photo. |
|
Notice and Consent |
Mandatory field. Indicates passenger accept and agrees to the Notice and Consent Terms. |
Figure 3-4 Crew Information Address/Other Info
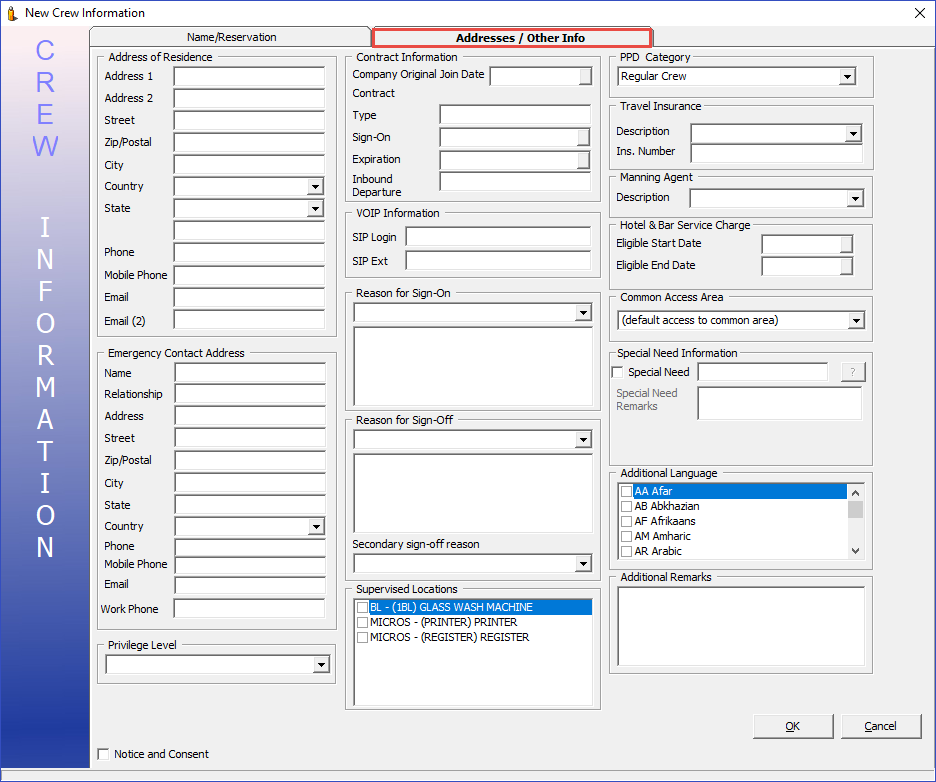
Table 3-8 Field Definition of Crew Information Address Tab (Address / Temporary Address)
| Field | Description |
|---|---|
|
Address / Temporary Address |
|
|
Address 1 |
Address 1. |
|
Address 2 |
Address 2. |
|
Street |
Street name. |
|
Zip/City |
Zip code/ Name of city. |
|
Country |
Country. |
|
State |
State. |
|
Phone |
Phone number of guest. |
|
Email 1 |
Email address of guest. |
|
Email 2 |
2nd Email address of guest. |
Table 3-9 Field Definition of Crew Information Address Tab (Emergency Contact Address)
| Field | Description |
|---|---|
|
Emergency Contact Address |
|
|
Name |
Name of Emergency contact person. |
|
Relationship |
Relationship of Emergency contact person and guest. |
|
Address |
Address. |
|
Street |
Street. |
|
Zip/City |
Zip code/ City. |
|
State |
State. |
|
Country |
Country of Residency. |
|
Phone |
Phone number of contact person. |
|
Mobile Phone |
Mobile number of contact person. |
|
|
Email address of contact person. |
|
Work Phone |
Business phone number of contact person. |
Table 3-10 Field Definition of Crew Information Address Tab (Contract Information)
| Field | Description |
|---|---|
|
Contract Information |
|
|
Company Original Join Date |
Crew join date for payroll contract use. |
|
Contract Type |
The type of contract the linked to crew member. |
|
Sign On |
Contract sign on date. |
|
Expiration |
Contract expiration date. |
|
Inbound Departure |
Track inbound departure date for Crew members. |
Table 3-11 Field Definition of Crew Information Address Tab (VOIP Information)
| Field | Description |
|---|---|
|
VOIP Information |
|
|
SIP Login |
VOIP login ID. |
|
SIP Ext |
VOIP extension on board. |
|
Reason for Sign-On |
Reason to sign on onboard. |
|
Reason for Sign-On |
Reason to sign on off board. |
|
Supervised Locations |
Locations that are tagged as 'crew supervision assignment'. |
|
PPD Category |
Add PPD category assignment to a crew or guest. |
|
Travel Insurance |
Travel insurance type. |
|
Manning Agent |
Travel insurance number. |
Table 3-12 Field Definition of Crew Information Address Tab (Hotel & Bar Service Charge)
| Field | Description |
|---|---|
|
Hotel & Bar Service Charge |
|
|
Eligible Start/End Date |
Service charge eligible start / end date. |
|
Common Access Area |
Common areas of accessible for the onboard card. |
|
Handicapped Information |
Special need information. |
|
Additional Language |
Additional language other than default language. |
|
Notice and Consent |
Mandatory field. Indicates passenger accept and agrees to the Notice and Consent Terms. |
Creating New Reservation
- At the Crew Handling window, click the New Reservation button to open a Crew Information form.
- Enter all relevant information, particularly the mandatory fields and read the Notice and Consent clause to the crew before selecting the checkbox. You are not allowed to proceed if the checkbox remains deselected when you click the OK button, and the system prompts a warning message.
- Note that the ship operator sets the mandatory fields. Refer to your company standard operating procedure.
- Click OK to save the form.
- Saved information is updated and shown under the Crew Info tab and categorizes the crew as Expected Arrival.
Editing a Reservation
-
Search the reservation using the Search Panel, then click Edit Information under the Crew Info tab to open the existing Reservation Form.
-
Edit all relevant information, and click OK to save the changes.
Cancelling a Reservation
-
Select the Expected crew from the Search Panel, and click Cancel Reservation under the Crew Info tab. You can only cancel an Expected crew reservation.
-
Selecting Yes at the Cancel Reservation prompt places the booking under the Cancelled tab.
Posting Status
The Posting Status function enable/disable an account from accepting postings coming from food and beverage or retail outlets, and provides a better management of the crew account so that it does not exceed the credit limit allowed.
Enabling a Posting
-
Search the crew account from the Search Panel and click Posting Status at Crew Info tab.
-
The system prompts for a response to enable the account. Selecting Yes at the prompt resets the Posting status to allowed, or No to remain as unchanged.
Disabling a Posting
-
Repeat step 1 of the above.
-
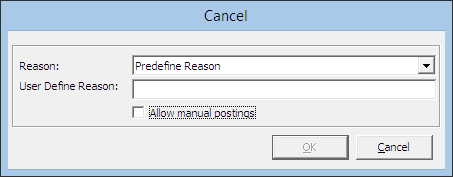
Enter the reason to disable the posting when prompted, either by selecting a predefined reason from the drop-down list or by entering them manually.
Figure 3-5 Predefined Reason to Disable Posting
-
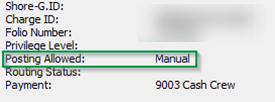
If Allow manual postings is selected, this only disables postings through the interfaces. Manual posting within the Crew Handling window is still permissible.
-
Click OK to set the posting status for the account to a No or Manual.
Figure 3-6 Manual Posting Allowed Status
Print Passport Label
The Print Passport Label prints the crew’s information on a label, which are then pasted into the crew’s passport for ease of identification. A label must be set up in Administration, Report Printing, Crew – General group.
Print Safety Card
The Print Safety Card prints the Blue Card of the crew as an identification of the manning station they should report to during an emergency. Information printed on the card derives from the Safety Info tab.
Show Log
The system logs a chronological record of activities such as crew movements, financial transactions, and system events. To enable the reconstruction and examination of the sequence of events and/or changes made, you can view such information in the Show Log function.
-
Retrieve the reservation from the Search Panel.
-
Click the Show Log in Crew Info tab.
-
A list of events appears on the window, ordered by date/time.
-
Click the Print button to send a copy of the log to the printer.
-
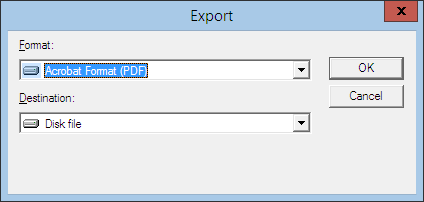
Click Export to export the log into a supported file format.
Figure 3-7 File Export Prompt
Disc Route Pkg Tab
The Discount, Route, Package function routes the charges within the same invoice or to other crew prior to crew check-in if set up. The functions enable allowable discounts in SPMS and MICROS. It also gives an overview of the Package Plan entitlement.
Routing
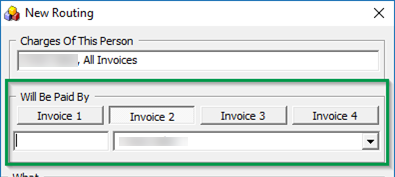
The Routing function automates the transfer of charges within the crew account or to multiple accounts, allowing you to consolidate charges into one invoice/account. The use of this function is to facilitate the invoicing process at group reservations level or party/family traveling together. Depending on the requirements, the routing can be set up using one of these options: Pay for or Pay by.
Figure 3-8 Routing Tab
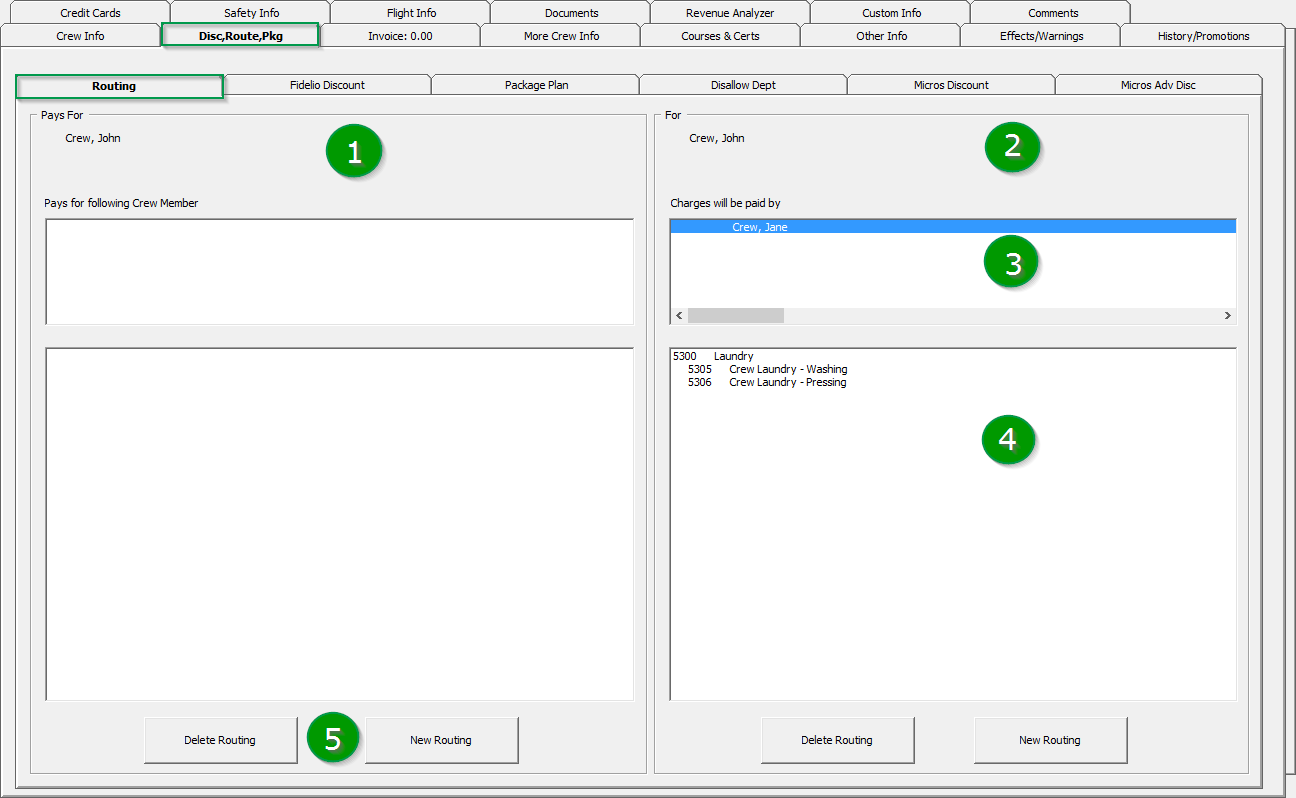
Table 3-13 Routing Tab Definition
| Section | Description |
|---|---|
|
1 |
Pays for - This section defines the payer account and whom the account is paying. |
|
2 |
For - This section defines where the assigned financial department is routed. |
|
3 |
Cabin number and name of crew payer is responsible. |
|
4 |
Financial Department code assigned. |
|
5 |
Button to set up or remove routing instructions. |
Before moving/routing the charges, be sure to first check the current routing arrangements to avoid duplication of routing, which may result on charges not being re-directed as planned.
Paying for another Party
Using the following setup steps, you can route a charge when crew A pays for crew B.
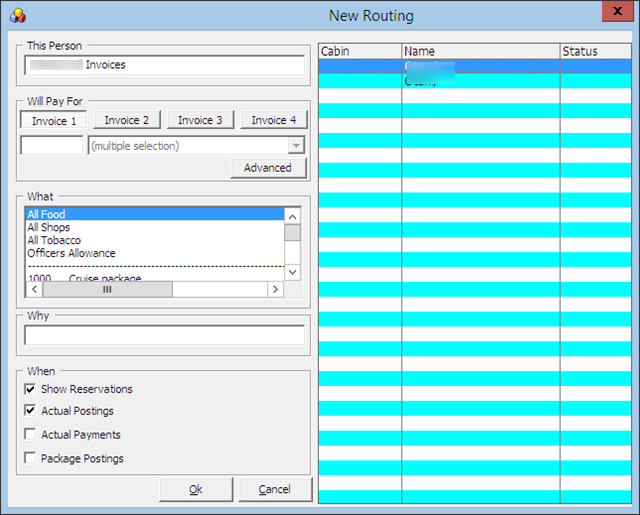
Figure 3-9 New Routing — ‘Will Pay For’
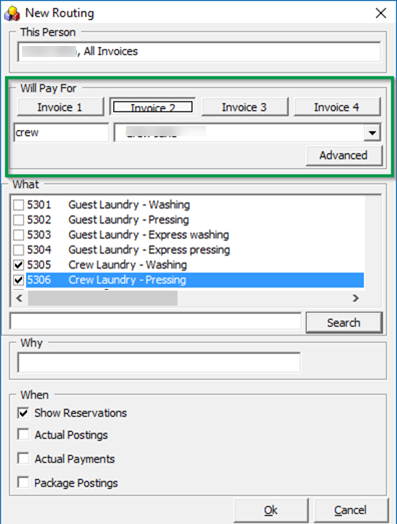
Table 3-14 Definition of Routing Options
| Field | Description |
|---|---|
|
Show Reservations |
Include expected to embark and reserve bookings. Only display checked in bookings if it is deselected. |
|
Actual Postings |
Where the Actual postings are routed. |
|
Actual Payments |
Where the Actual payments are routed. |
|
Package Postings |
Only route package postings. |
-
Search the crew account and navigate to the Disc, Route, Pkg, Routing tab.
-
Click New Routing under the Pays For section to open the routing dialog box.
-
Select the Invoice number where the charges are routed.
-
For charges within the same account, leave the cabin number and crew name as it is.
-
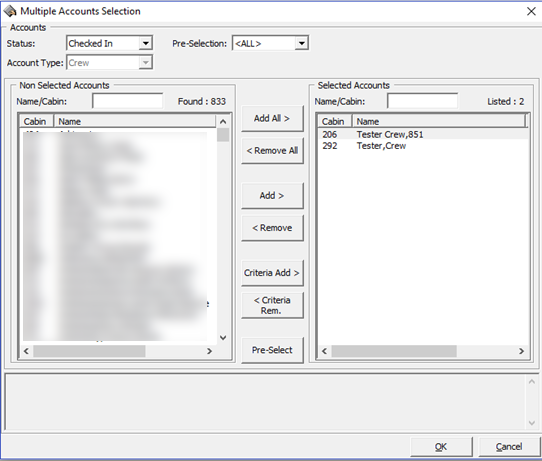
In the event where crew is paying for another account, change the cabin number and select the respective guests.
-
Select the Financial Department group or codes to be routed and enter the routing reason.
-
Select the options where applicable and click OK to save.
-
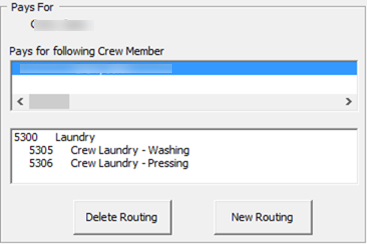
Once saved, the selected assignment is added to Pays for in the Routing tab.
Figure 3-10 Routing Pays for Window
Advanced Routing
Assigning a Discount
-
In the Disc, Route, Pkg, Fidelio Discount tab, click New Discount to open the discount dialog box.
-
Insert the Percentage and the number of times the discount is given in the Apply Count field. For example, enter one to specify a one-time discount for every selected department code, or blank for unlimited discounts for every selected department.
-
Select the Posting Department entitled to discount, either by selecting department group or individually; for example, All Food/Beverage or Room Service Food only.
-
You can also use the Discount Template by selecting the checkbox and selecting a template from the drop-down list if they are pre-configured. See the Administration User Guide for setup procedures.
-
Select whether the discount is applicable to Actual or Future Postings, and click OK to save.
WARNING:
Once a discount is applied to an actual posting, it cannot be reversed. If the discount has a count indicator, the system then post the discount until it reaches the count indicated and no discount will be accorded thereafter. -
The assigned discounts is saved in SPMS Discount tab. Similarly, these are added when Future Postings is selected in Criteria Discount.
Figure 3-14 Disc, Route, Pkg — Discount Tab
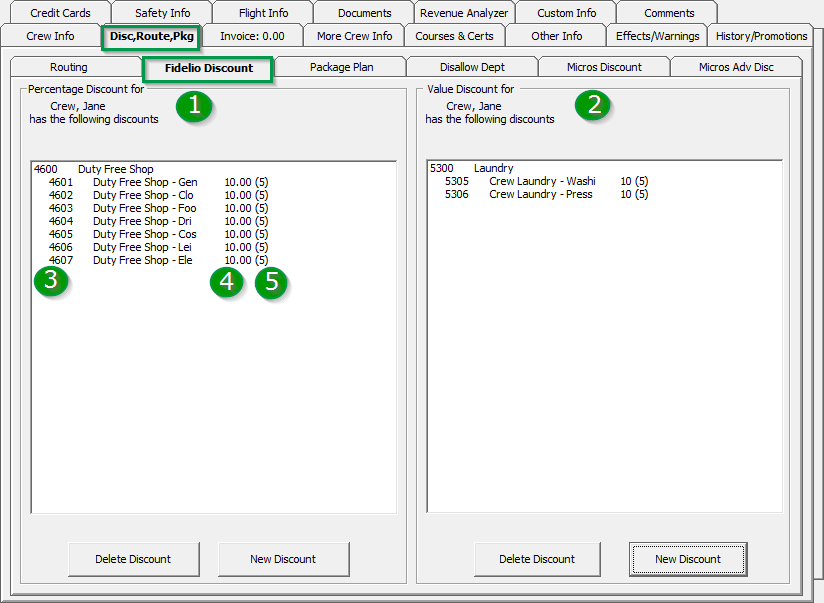
Table 3-15 Financial Department Codes
No. Description 1
Financial Department codes entitled to Percentage discount.
2
Financial Department codes entitled to Value discount.
3
Financial Department codes and description.
4
Discount value (percentage or value).
5
No of count assigned to each financial code. 0 = unlimited.
-
If an Actual Posting is selected, the system post an adjustment (reverse) against the original posting and sets the adjusted posting to No Print automatically. It then reposts the correct value with the discount is indicated.
Deleting a Discount
-
In the Disc, Route, Pkg, Discount tab of the account.
-
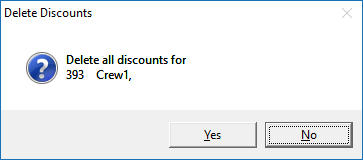
If Delete Discount is clicked without first selecting a Financial code, this process deletes all assignments from the respective window.
Figure 3-15 Delete Discount Prompt
MICROS Discount
Figure 3-16 Disc, Route, Pkg — MICROS Discount
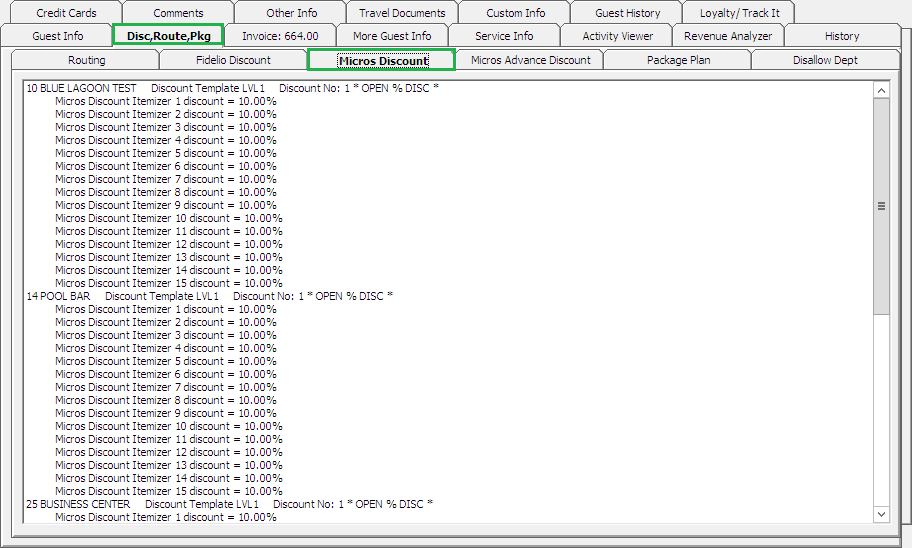
The MICROS Discount tab displays discounts accorded to crew using MICROS Discount Itemizer level. These discounts appear when crew has discount level assigned in the Crew Info, Edit Information, Discount Template field.
Assigning a POS Discount Level
-
In the Crew Info tab of the account, click Edit Information to open the Edit Crew Information window.
-
In the Name section, select the discount template from the drop-down list, then click OK to save.
Figure 3-17 MICROS Discount Level Assignment
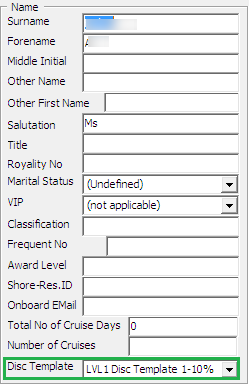
-
The assigned POS Discount template appears in the Passport/Custom Information section.
-
To view the eligible POS Discounts by Itemizer level, go to the Disc, Route, Pkg, MICROS Discount tab.
See also the Administration User Guide, POS Discount section on how to configure the Discount Itemizer.
MICROS Advance Discount
The MICROS Advance Discounts works similarly to the MICROS Discount, with the exception that the discounts are applied to the MICROS Major Group, Family Group, and Menu Item level instead of the Itemizer Level.
Figure 3-18 Disc, Route, Pkg — MICROS Advance Discount
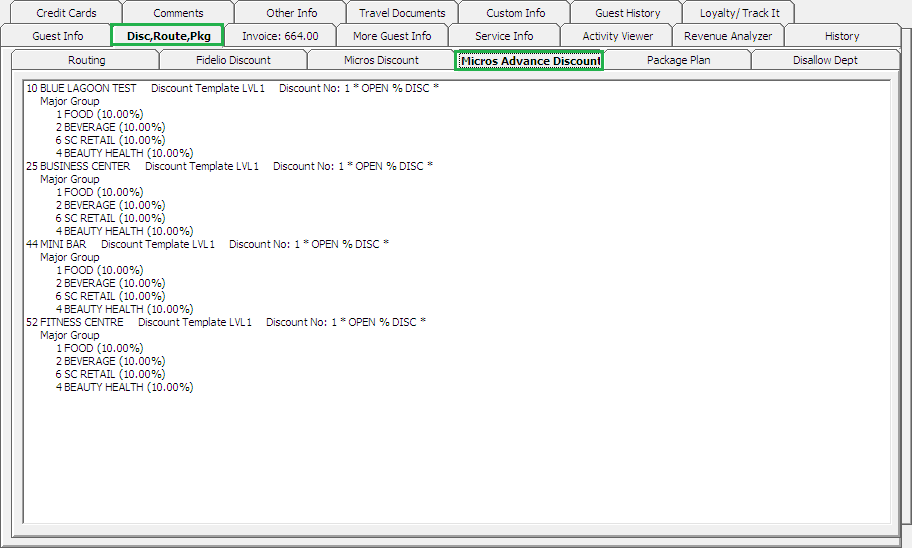
See also the Administration User Guide, POS Discount section on how to configure the Advance MICROS Discount.
Disallow Department
The Disallow Department function manages posting from being posted from restricted outlets to the crew account, for example, Casino Bar, or all tobacco and others.
Setting up a Disallow Department
-
In the Disc, Route, Pkg, Disallow Posting tab, select the Financial Department codes to disallow, either by Group or individual department code from the list and then click Save.
Figure 3-19 Disallow Department Tab
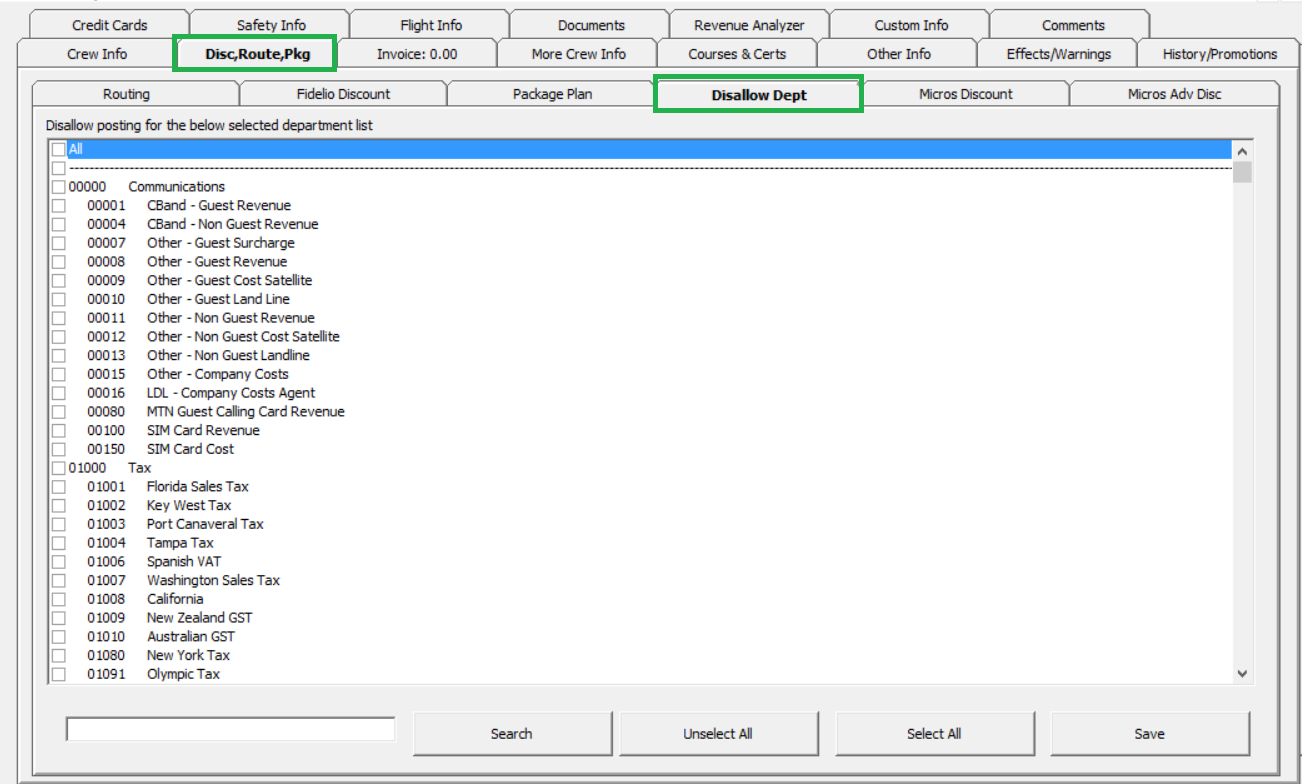
-
When a posting is for a disallowed department, the system displays a Posting Failure popup informing you that the posting is not allowed. See Figure 3–20 below.
Figure 3-20 Disallow Department Posting Failure Prompt
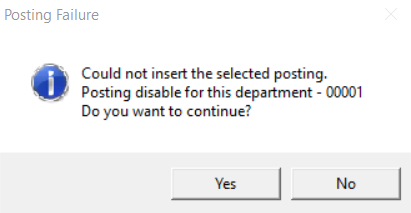
-
Click Yes to exit without posting and No to return to the Add posting window.
Package Plan
Package Plan
The Package Plan function enables you to customize a cruise package that suits the crew requirements, combining different food and beverage outlets, excursions, or activities using the flexi package plan option.
Assigning / Purchasing a Package Plan
Assigning the correct package plan to the crew account enables you to post transactions accurately throughout the cruise and assign packages within the crew account.
-
At the Disc, Route, Pkg tab of the crew, select the Package Plan tab.
-
Select one of these options:
-
Assign package Plan: This assigns an available package that does not have a pre-set Purchase price.
-
Purchase Package Plan: This purchases a package setup with the purchase price.
-
-
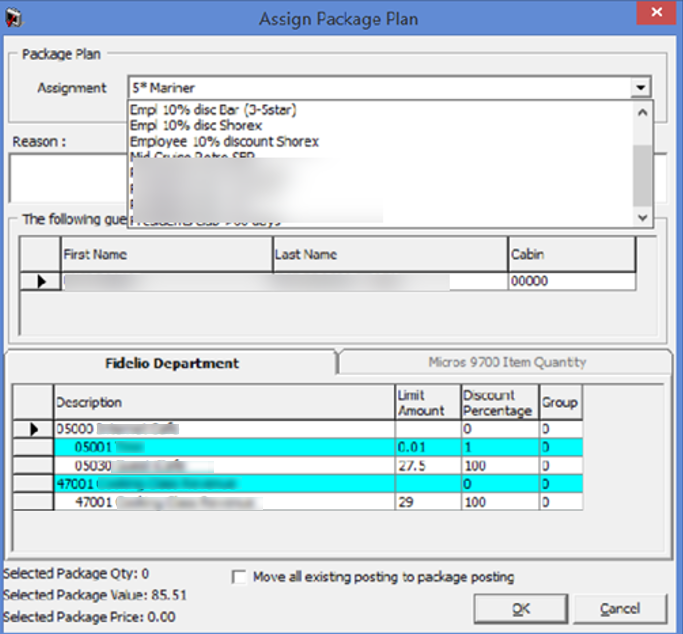
To assign/purchase a package, select the available package from the drop-down list and enter the Reason.
Figure 3-21 Package Plan Assignment Window
-
Select only the Move all existing posting to package posting checkbox to move the existing postings to a package plan. For example, a crew purchases the package part way through the cruise, and past postings that meet the package elements are considered as a package plan.
-
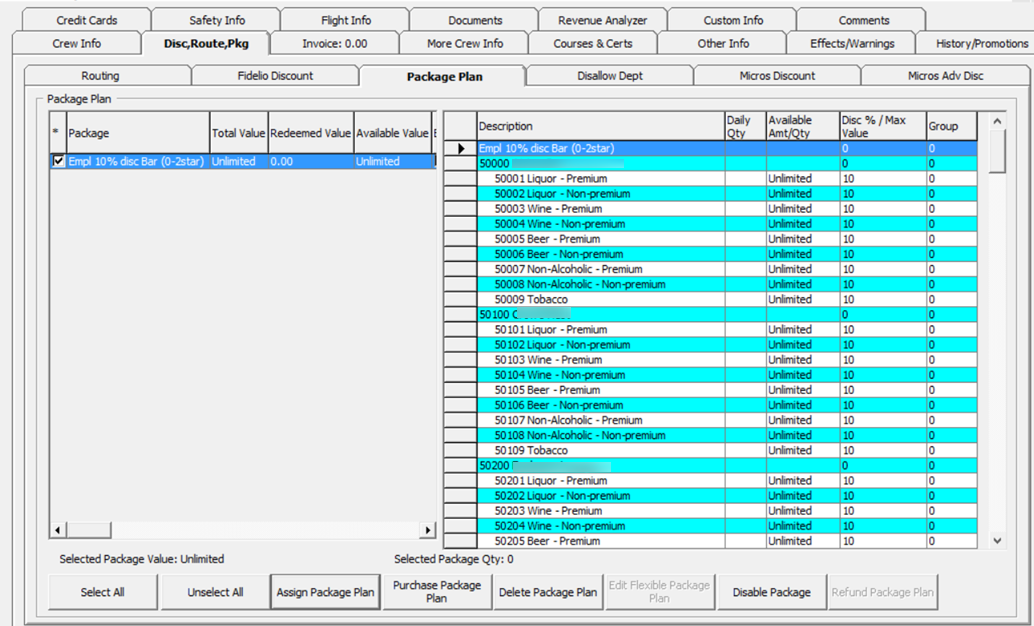
Click OK to save. Information pertaining to the package are available in the Package Plan tab and the status is Active.
Figure 3-22 Package Plan Assigned / Purchased
Refunding a Package Plan
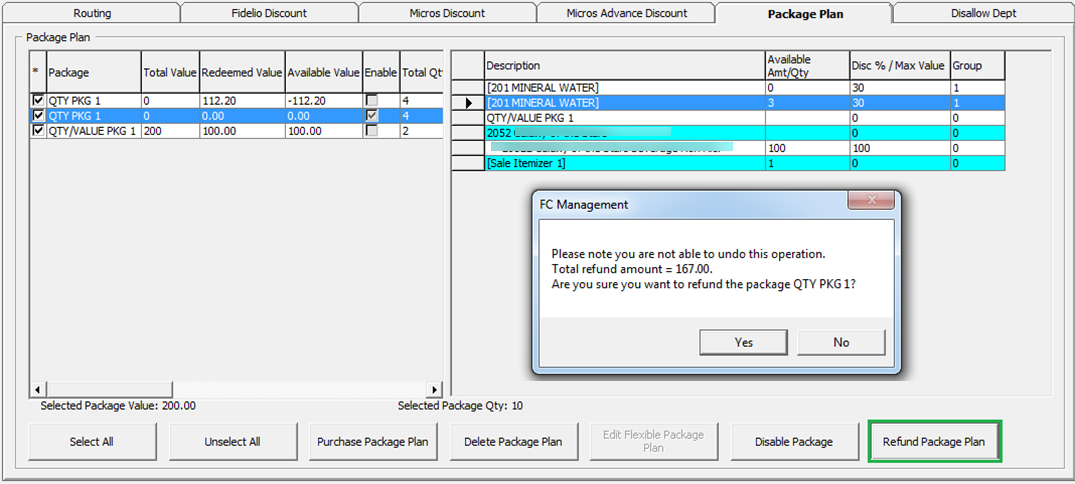
The unutilized package plan is refundable to the crew at the end of the cruise. Below are the steps to refund a Value based package, Quantity based and Mix package.
-
In the Disc, Route, Pkg tab of the crew account, select the Package Plan tab.
-
Select Refund Package Plan.
Figure 3-23 Package Plan Refund Option
WARNING:
Once a Refund is processed, it is not possible to reverse the changes. This process also disables the package plan. -
Once the package plan is refunded, the system disables the package and displays the remaining value/quantity for reference only.
-
If the postings are more than the package price, the system prompts that a refund is not allowed.
Routing a Package Plan Posting
Routing a package plan posting depends on two parameters: Do not allow post package to both buyer and payer and Package Plan Before Routing.
When both payer and buyer haves a package, all postings go to the payer. Once the payer package is fully utilized, subsequent postings are posted the payer account as normal postings.
Auto Balancing a Package Plan
You can set up Auto Package Plan balancing using Enable Package Auto Balance as 1 parameter, which allow the system to automatically balances the package invoice/account after each transaction and reduces the total package value or quantity at the same time.
Figure 3-24 Package Plan Invoice Window
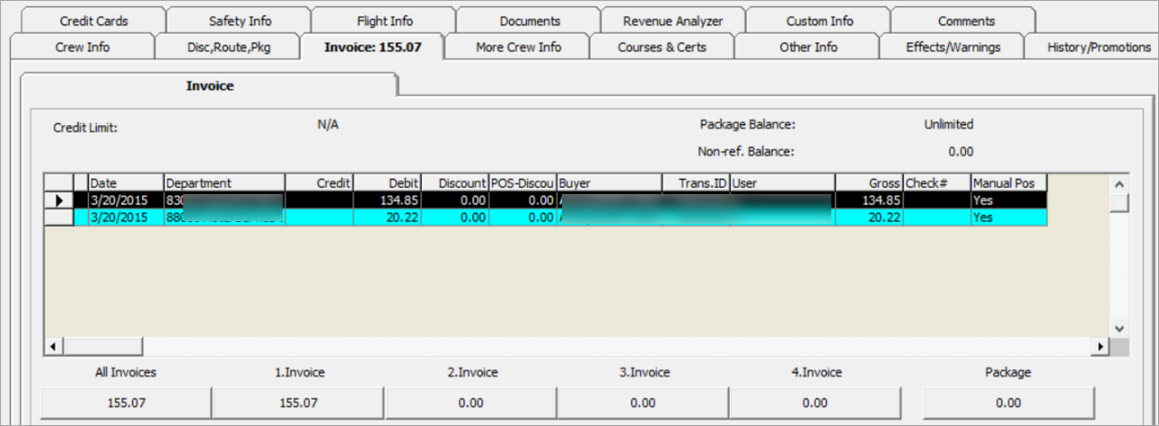
If the parameter above is set to zero, manual balancing of the package invoice/account is required using the Pay Invoice function.
Manually Balancing a Package Invoice
-
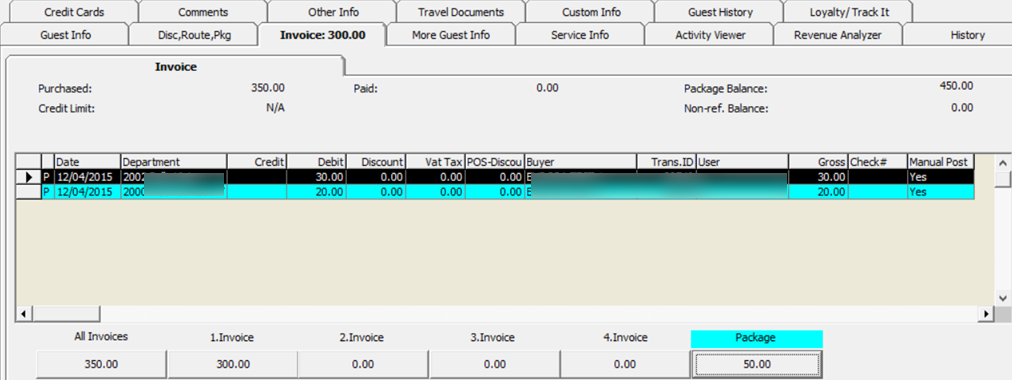
Select the crew account from the Search panel, navigate to the Invoice tab, and click the amount under the Package Invoice.
Figure 3-25 Settling a Package Plan
-
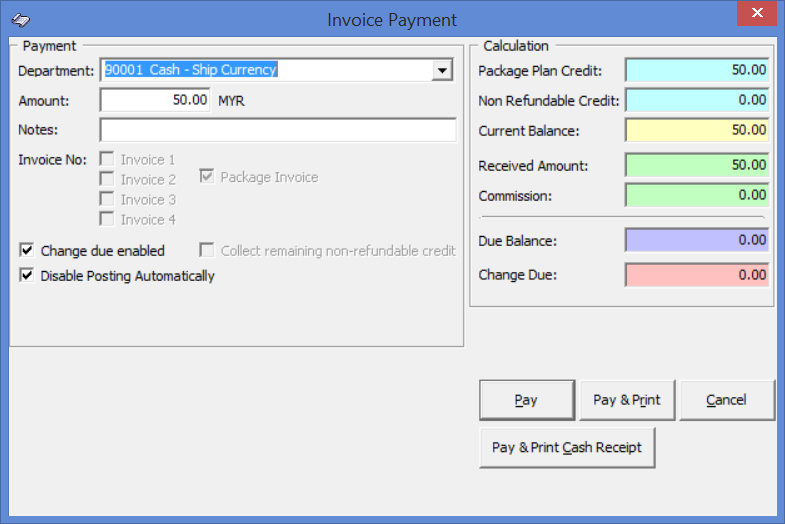
Select the Payment method and verify the amount to settle when prompted.
-
Select Pay or Pay & Print to pay and print the invoice and reduce the Package Invoice at the same time.
Figure 3-26 Paying an Invoice
Invoice Tab
The Posting Handling function provides you with four invoices per crew and it enables you to post a manual charge to an account, route postings, and post various payment types.
Figure 3-27 Add Posting Window
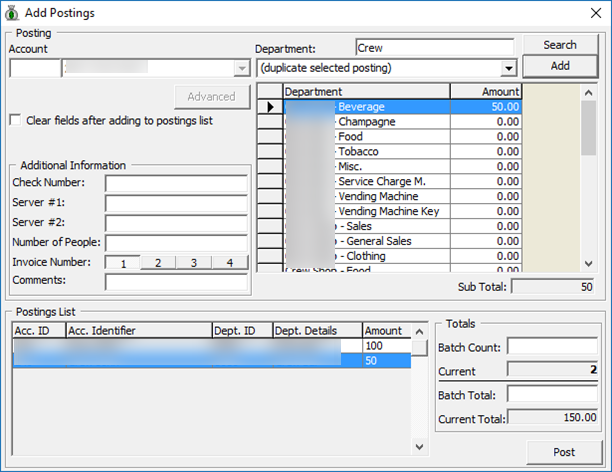
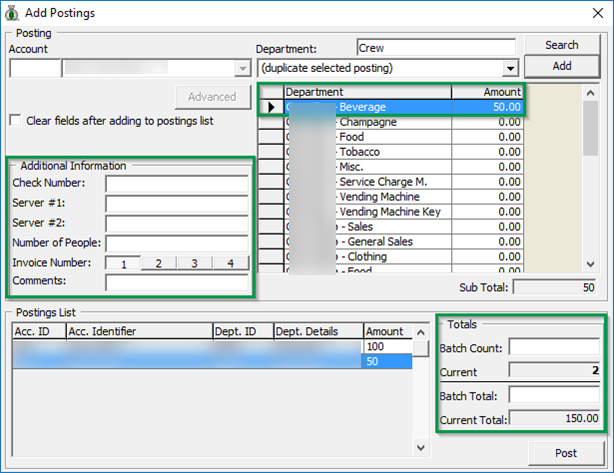
Table 3-16 Field Definition of Add Posting Window
| Field | Description |
|---|---|
|
Account |
Crew Account by Cabin No. and Name. |
|
Clear fields after adding to posting list |
Clear all information in Additional Information section after adding posting. |
|
Check Number |
Check Number from POS System or any manual posting reference. |
|
Server #1: |
Server name appeared on POS check. |
|
Server #2: |
Server name appeared on POS check. |
|
Number of People |
No. of crew that dined. Information from POS System. |
|
Invoice Number |
Invoice number to post to |
|
Comments |
Additional comments. |
|
Posting List |
List of postings added. |
|
Batch Count |
Confirmation of number of postings added in Quick Posting function. |
|
Current Count |
System count on Postings List. |
|
Batch Total |
Confirmation of total value posted in Quick Posting function. |
|
Current Total |
Accumulated value to post. |
Adding a Posting
-
Select the crew account from the Search panel and click Add Posting in the Crew Handling window.
-
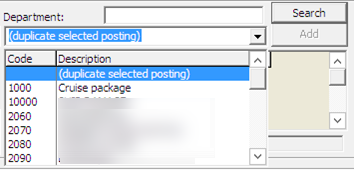
In the Add Postings form, select the Financial Department from the drop-down list or use the Search option for a department code.
Figure 3-28 Add Posting Financial Department Selection
-
Insert the Value, Check Number, select the Invoice number to post, and click Add. This transfers the posting to the Postings List, enabling you to post more than one charge.
Figure 3-29 Adding a Charge
-
Item count increases automatically when the posting is more than one.
-
Click Post to finalize the postings and the posted transaction appears in the Invoice tab among earlier posted charges.
Voiding a Posting
-
In the Invoice tab of the crew account, select the transaction to void and click the Void button.
-
The system prompts for confirmation on the charge to void. Click Yes to confirm the void and No to return to the previous window.
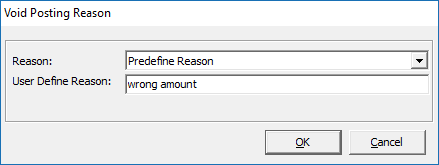
In the Void Posting Reason window, insert the void reason or select from the drop-down menu, then press OK.
Figure 3-30 Void Reason Prompt
-
Void postings appears with a matching debit and credit amount.

Pay Invoice
The Pay Invoice function posts a settlement against an invoice, whether a partial or full payment. The process of settling an invoice by credit card and foreign currency differs from cash settlement. This function requires an open Cashier session to post.
Figure 3-31 Invoice Payment Window
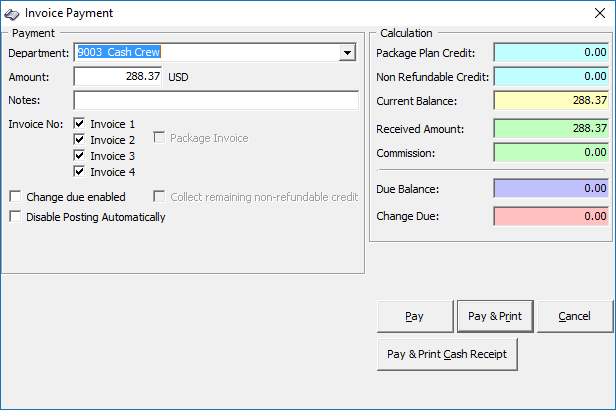
Table 3-17 Field Definition of invoice Payment Window
| Field | Description |
|---|---|
|
Department |
Financial Department codes - Credit. |
|
Amount |
Total amount due by guest, depending on the invoice no. selection. |
|
Notes |
Additional Notes pertaining to this payment. |
|
Invoice Number |
Invoice number to apply the payment. |
|
Change due enabled |
Enable auto calculation of change due to guest. |
|
Disable Posting Automatically |
Disable postings being posted into the invoice. This sets the Posting Allowed to No in Crew Info tab. |
|
Package Plan Credit |
Eligible credit value for Package Plan posting. |
|
Non Refundable Credit |
Credit value non-refundable to guest. |
|
Current Balance |
Current Invoice Balance. |
|
Received Amount |
Amount received. |
|
Commission |
Applicable credit card/foreign exchange commission value. Calculate when Charge 1% Commission is ticked or when foreign exchange has commission defined. |
|
Due Balance |
Outstanding sum after deducting payment applied. |
|
Change Due |
Balance due to crew when payment applied is more than invoice value. |
|
Pay |
Apply payment receipted and does not print cash receipt. |
|
Pay & Print |
Apply payment receipted and print invoice at the same time. |
|
Pay & Print Cash Receipt |
Apply payment receipted and print cash receipt at the same time. |
Payment by Cash, Change Due
The Change Due function calculates the amount of change due to a crew when the payment method is either cash or foreign currency. You can set the "change due enabled" to be permanently selected. If this is not set as the default, you must check this option to activate automatic change due calculation when applying a payment.
Paying an Invoice by Cash
-
Retrieve the crew account from the Search Panel and click Pay Invoice in the Crew Handling window.
-
The system defaults the payment department according to the payment method defined during check-in. Select Payment Department from the drop-down menu, either Cash or Foreign Currency.
-
Select an invoice to apply the payment and the system calculates the total amount due by guest.
-
Enter the amount to settle.
-
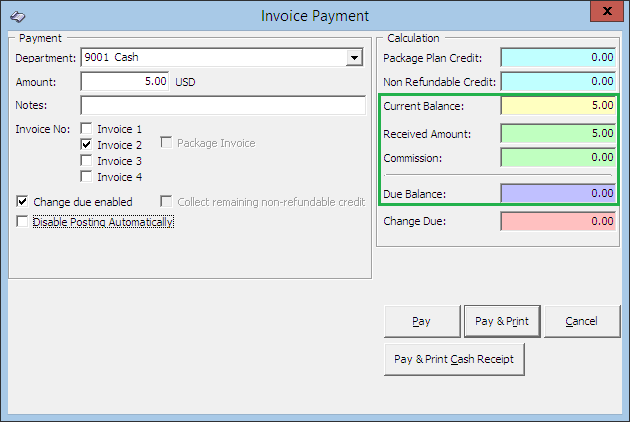
If Change due enabled is selected, and the amount entered is more than the Current Balance, the system automatically calculates the amount and sets the invoice to Zero balance. See Figure 3-32.
-
If the payment is applied without the Change due enabled selected, the system posts the amount as a negative value in Due Balance field, resembling a deposit. See Figure 3-33.
-
If the payment is an exact amount, the system posts the value as payment receipted with the Due Balance or Change Due amount field as 0.00. See Figure 3-34.
Figure 3-32 Invoice Payment with Change Due
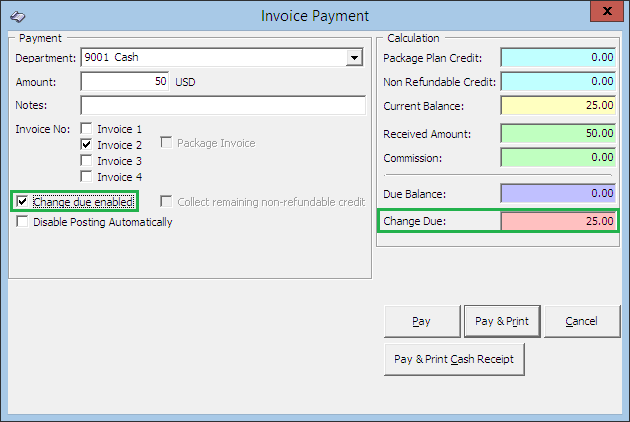
Figure 3-33 Invoice Payment without the Change Due
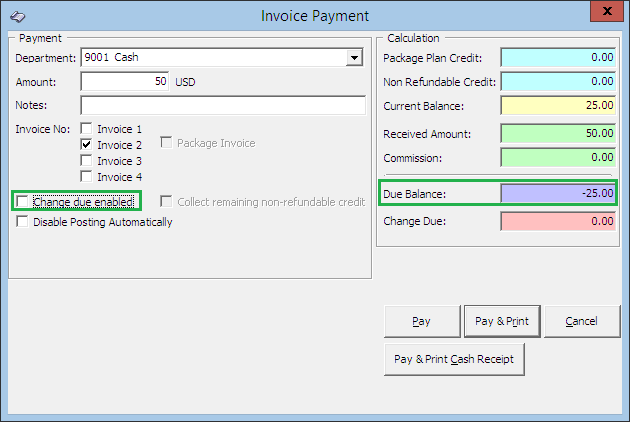
Figure 3-34 Invoice Payment with Exact Amount
-
-
Press either Pay, Pay & Print or Pay & Print Cash Receipt to complete the transaction. If Pay is selected, print a copy of the invoice for crew reference.
Paying an Invoice with Foreign Currency
-
Repeat steps 1 and 2 of the above and select a Foreign Currency Financial Department.
-
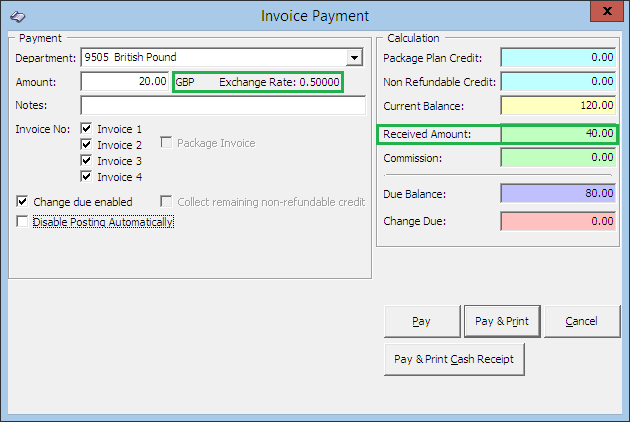
The exchange rate of the selected payment method appears next to the amount field.
-
Enter the foreign currency amount in the Amount field and the converted value appears in Received Amount.
Figure 3-35 Invoice Payment with Foreign Currency
-
If the exchanged amount in foreign currency is more than the invoice amount, the system automatically calculates the change due amount in Ship currency when Change Due Enable is set as default.
-
Select an invoice to apply this payment to and recalculate the total amount due by guest.
-
Select either Pay, Pay & Print, or Pay & Print Cash Receipt to complete the transaction.
Paying an Invoice by City Ledger
-
Retrieve the crew account from the Search panel, then click Pay Invoice.
-
In the Payment Department field, select a City Ledger code.
-
Select an invoice to settle, and the system calculates the total amount due by guest.
-
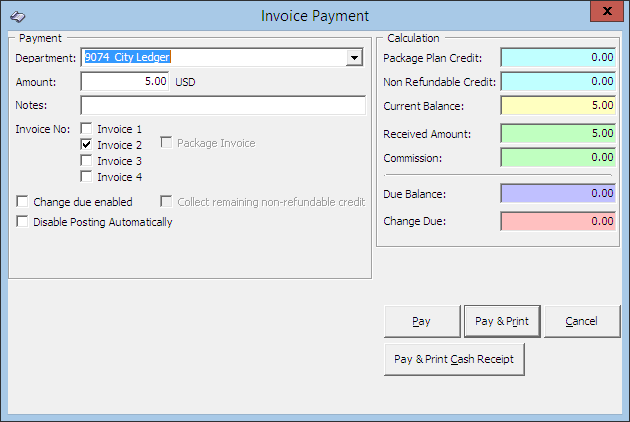
Insert the amount to settle. If the exact amount is paid, the system sets the value as payment receipted and Due Balance is 0.00.
Figure 3-36 Invoice Payment by City Ledger
-
Select Pay or Pay & Print to complete the transaction. If Pay is selected, print a copy of the invoice for crew reference.
Disabling a Posting
In the Invoice Payment window, selecting the Disable Posting Automatically checkbox sets the Posting Allowed to No in the Crew Info tab when the invoice balance is 0.00.
Figure 3-37 Disable Posting Automatically
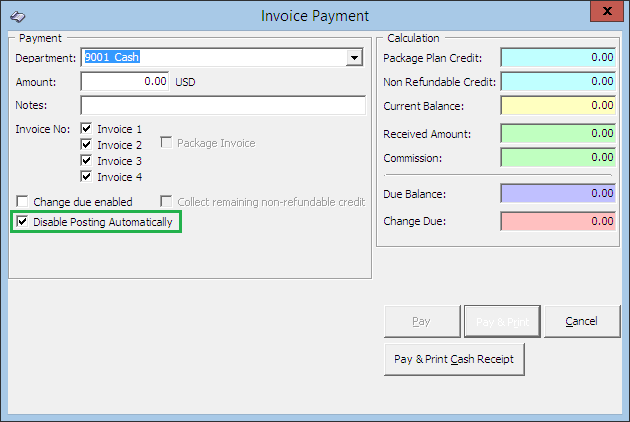
Figure 3-38 No Posting Allowed in Crew Info Tab

You will receive a notification when you try to post a charge to the invoice, and the posting will be rejected.
Resetting Posting Status to Allowed
-
Click the Posting Status in the Crew Info tab.
-
At the Enable Posting prompt, select Yes to confirm. This will reset the posting to allow.
Figure 3-39 Reset Posting Status

Payment by Credit Card
-
Retrieve the crew account from the Search Panel, and click Pay Invoice.
-
In the Invoice Payment form, select the Payment department from the drop-down list if it is different from the previous payment method.
-
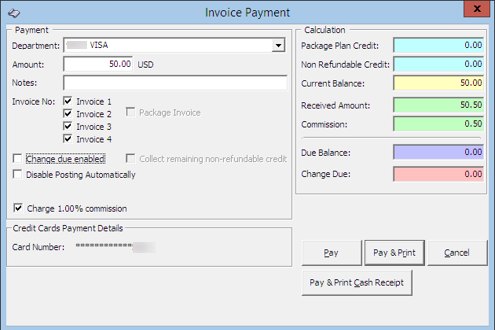
The amount indicated is based on the current outstanding invoice (selected), for example, Invoice 1 balance = $30, Invoice 2 balance = $20. When all invoices are selected, the total becomes $50. If you are paying a specific invoice, deselect the other invoices and adjust the amount accordingly.
-
The percentage (%) commission shown is based on the commission rate set up in Administration, Financial Department codes and is selected by default. The commission chargeable appears in the Commission field. If the commission is not applicable, deselect the field.
-
Press Pay or Pay & Print to complete the transaction. If Pay is selected, print a copy of the invoice for crew reference.
Figure 3-40 Credit Card Commission Selection
Print Invoice
The Print Invoice function is similar to the Guest Handling print invoices. It enables you to print invoices in different layouts made available by the Ship. It has a preview function that allows you to view an invoice/statement prior to printing a hard copy invoice.
Printing an Invoice
-
Retrieve the reservation from the Search Panel, and click Print Invoice.
-
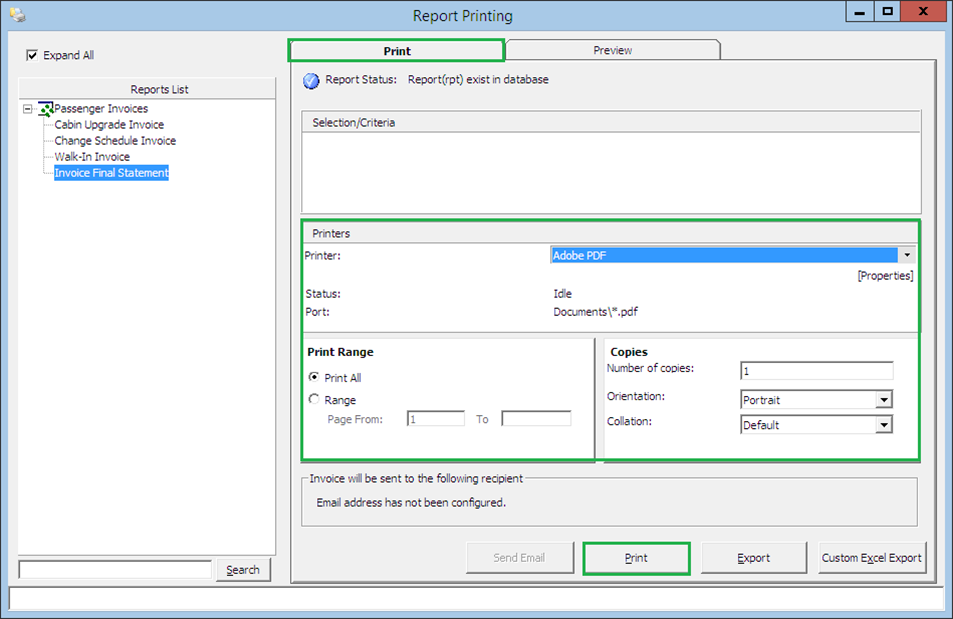
Select the invoice report to print from the Report List.
-
In the Print tab, select the printer, print range, and copies to print.
-
Press Print to send the print job to printer.
Figure 3-41 Print Invoice Window
Previewing an Invoice
-
Repeat steps 1 to 2 of Printing an Invoice.
-
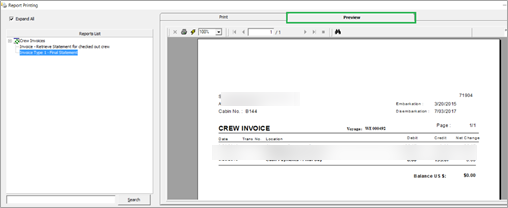
Navigate to the Preview tab to view the invoice.
-
Press the Printer icon to send the print job to printer.
Figure 3-42 Preview Invoice Before Printing
Email Invoice
In a paperless environment, you can send a copy of the invoice to the guest's email account only when you have an on-board email account listed in the crew account. A special setup by the System Administrator is required before you can email an invoice.
Email an Invoice
- Repeat steps 1 to 2 of Printing an Invoice.
- In the Print tab, select Send Email. The system prompts a dialog box once the email is sent successfully.
- Click OK to close the dialog box.
Exporting an Invoice
Repeat steps 1 to 2 of Printing an Invoice.
-
In the Print tab, select Export.
-
Select the file format and destination type from the drop-down list when prompted.
-
Select the page range to print.
-
Enter the file name and location path when the system prompts for file saving location.
Custom Excel Export
This function exports the invoice into a predefined Excel format.
- Repeat steps 1 to 2 of Printing an Invoice.
- In the Print tab, select Custom Excel Export.
- Enter the file name and location path when the system prompts you for a file saving location.
Move & Route
The Move and Route function enables you to set up your bills at the time of credit sign up, during the cruise or at the end of the cruise when a crew would like to separate certain charges from the main invoice. You can move the charges easily using the drag and drop method and other available methods that suit the operations.
Setting up a Charge Route
The following functionalities allow crew to separate certain charges to be posted to another invoice throughout the cruise or route them to another account. It might be more feasible to set up routing instructions to move both current and future postings to a new invoice.
-
Select the crew account and navigate to the Invoice tab.
-
Click Move & Route to open a Move posting menu.
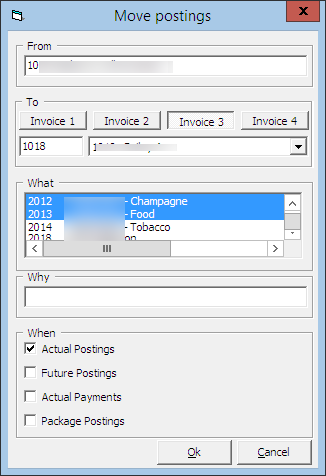
Table 3-18 Definition of Move Posting Tab
Field Description From
Default to Crew account, All Invoices.
To
Selectable invoice from Invoice 1 to 4 or another guest/payer account.
What
Department Group or Financial Department code to route.
Why
Reason why charges were routed.
When
Type of postings to route.
Figure 3-44 Move Posting Tab
-
The system default main invoice is All Invoices. Select the invoice where the charges should be routed.
-
To route the charge to another guest/payer, enter the cabin number and select the crew name.
-
Select either the department group or financial department code to route, and insert the routing reason.
-
Select the type of posting to route — actual/future postings or actual payments.
-
If Future Postings is selected, the system automatically places the department code in Disc, Route, Pkg tab, Routing window.
See also Disc, Route, Pkg Tab.
Criteria Discount
The following function works the same as Percentage Discount in Disc, Route, Pkg tab and has an additional checkbox for Actual Postings, allowing you to apply a discount to the actual posting. This function creates a record in the discount section of Disc, Route, Pkg tab when Future Posting is selected.
See Disc, Route, Pkg Tab, SPMS Discount on how to apply a discount.
Item Discount
The Item Discounts deducts a specific percentage of selected postings on the crew invoice. The Percentage discount cannot be used as a value discount.
According an Item Discount
-
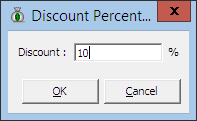
On the Invoice of the account, mark the posting entitled to the discount, and click the Item Discounts button.
-
Insert the percentage value in the discount field, and click OK to proceed.
Figure 3-45 Item Discount
-
The system posts an adjustment (reverse) against the original posting, sets the adjusted posting to No Print automatically, and reports the correct value with the discount value indicated.
Figure 3-46 Example of Item Discount Transactions

Hide No Print
This function hides transactions that are marked with No Prints, giving an organized view of the invoice. For example, a voided transactions.
Hiding/Showing No Prints Transactions
Hiding/Showing No Prints Transactions
-
Click the Hide No Prints to change the button from Hide No Prints to Show No Prints, or vice versa.
-
Transactions marked with No Prints (pale yellow) are hidden from the invoice window until you click the Show No Prints.
NoPrint
Resetting No Print Transactions to Original State
-
Select the NoPrint transactions, and click No Print.
-
Transactions revert to normal postings and no longer appear in pale yellow.
Set Credit Limit
The floor limit is pre-set within the Financial Credit Sub-Department code and is adjustable for specific crew at the jurisdiction of the Chief Purser.
Setting a Credit Limit
-
On the Invoice tab, click Set Credit Limit button.
-
Insert the credit value in the dialog box, and click OK to override the pre-set credit limit defined in Credit Sub-Department code.
-
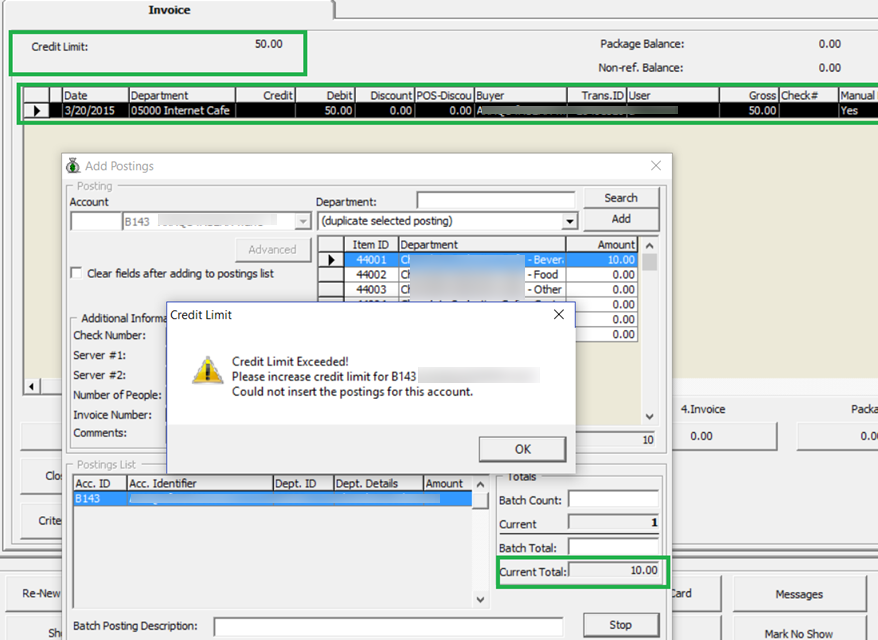
If the account exceeds the floor limit or the individual limit, the system prompts a ‘Credit Limit Exceeded’ on both SPMS and MICROS System during posting and you cannot proceed to post. The same warning prompt appears if the account is routed and payer has a Credit Limit defined.
Figure 3-47 Warning Prompt When Credit Limit Exceeded
Consult your Chief Purser/Front Desk Manager or refer to the Ship’s Operating procedure for the next course of action.
WARNING:
Once the account is closed, this cannot be undone.