2 Gift Card Handling
This section describes the features available in Gift Card handling within the Management module.
Gift Card Import
Gift Card sales records are importable from OHC Data Import and the OHC DGS ResOnline module. The imported Gift Card are flagged as Pre-Paid or Pre-Sold to Guests, and have an Inactive status shown. These cards activate upon first use at MICROS, Simphony and/or OHC SPMS. Upon activation, the purchase is then posted to the System Account.
Importing Gift Card Data using OHC Data Import
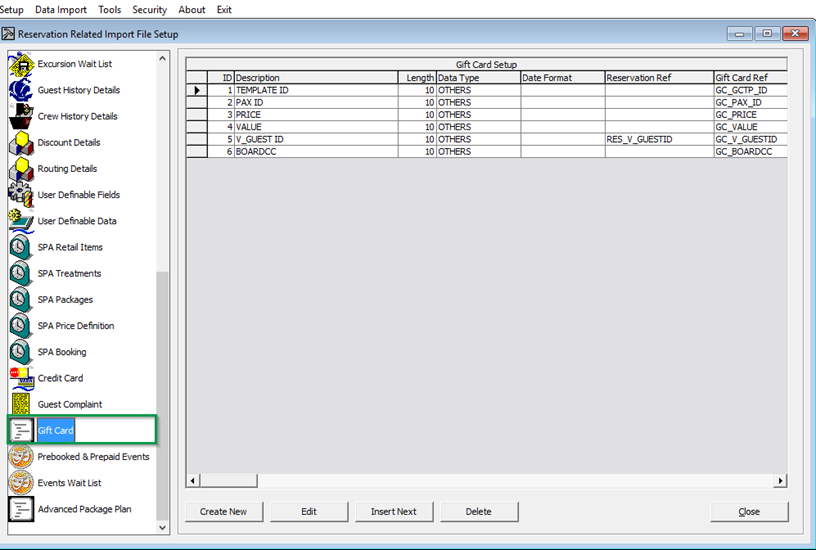
Prior to performing an import, you must set up a Gift Card Import file with the seven or more mandatory fields.
Figure 2-1 OHC Data Import — Gift Card
-
Launch OHC Data Import program.
-
From the File menu, select Setup, Reservation Related and then Gift Card.
-
Click Create New and insert the number 7 in the New Import File Setup window, and then click OK.
-
Insert the field description per the table below and, click Close.
Table 2-1 Gift Card Data Import Field Setup
Field Data Type (Length) Database Field Reference Description GC Template
Text (10)
GC_GCTP_ID
Gift Card template code
GC Guest Account
Text (20)
RES_V_GUEST_ID or RES_BOARDCC
Guest association with Gift Card
GC Price
Text (10)
GC_PRICE
Gift Card selling price
GC Value
Text (10)
GC_VALUE
Gift Card face value
GC Number
Text (20)
GC_BOARDCC
Gift Card unique number
GC Card Remark
Text (30)
GC_REMARKS
Gift Card special message
GC Special Department Group
Text (2)
GC_ENABLED_GCEL_ID_SPECIAL
Gift Card special department enable
-
Navigate to the Data Import menu and select Prepaid Gift Card from the drop-down list.
-
In the General Data Import form, select the file name and click Importto process the data import. See Appendix C –Sample Gift Card Data Import File Layout.
Importing Gift Card Data using OHC DGS ResOnline
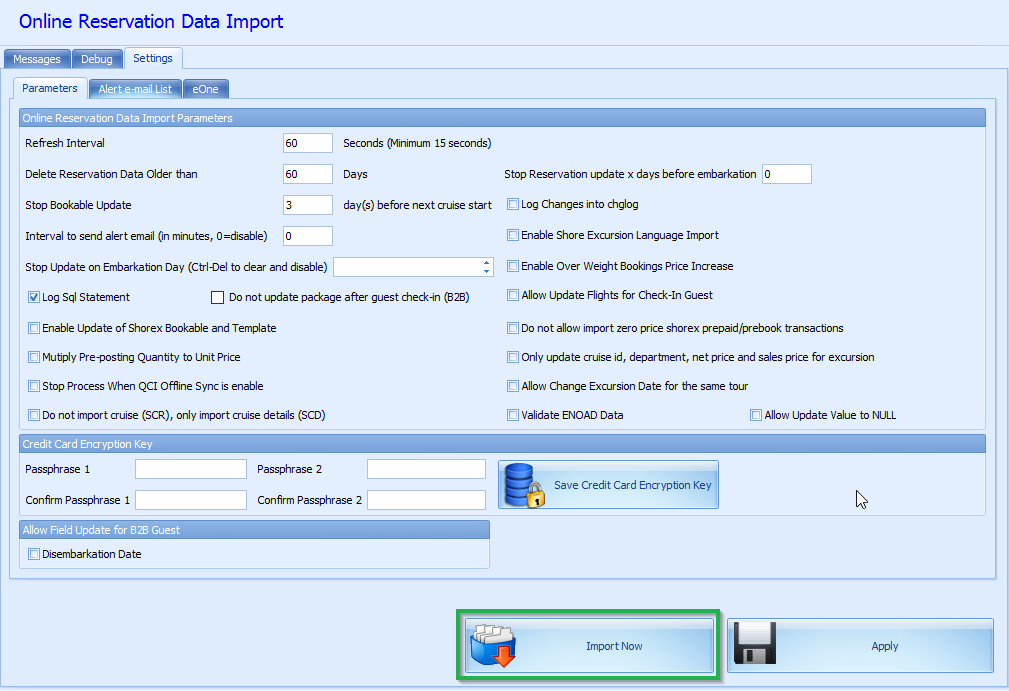
‘RESERVATIONS_MSGS’ with MSSG_NOTES = RESERVATIONSDATA.Figure 2-2 DGS ResOnline Import
-
Launch OHC Data Import program and wait for the import process to begin.
-
If the process does not start automatically, manually trigger the import from the Settings, Parameter tab.
-
Reservation: : <GIFT_CARD_RES_ID> = <RESERVATION_RES_ID>
-
Amenity: <GIFT_CARD_OID> = <AMENITY_OID>
-
If the field value is null, it imports one Gift Card.
-
If the field value is two, it imports two Gift Cards.
-
If the field value updates from two to one, it cancels one of the Gift Cards.
-
If the field value update from two to three, it inserts one more Gift Card.
See Appendix D — Sample Gift Card DGS RESONLINE File Layout - for detailed sample XML file format.
Gift Card Printing
The application provides a few ways to print a Gift Card, either by individual account or by batch, and the print task is performed in the Management module.
Print using Advanced Board Card Printing
Additional setup is required in the Administration module in order to print a Gift Card using the Advanced Board Card Printing function.
Setting up Gift Card Template
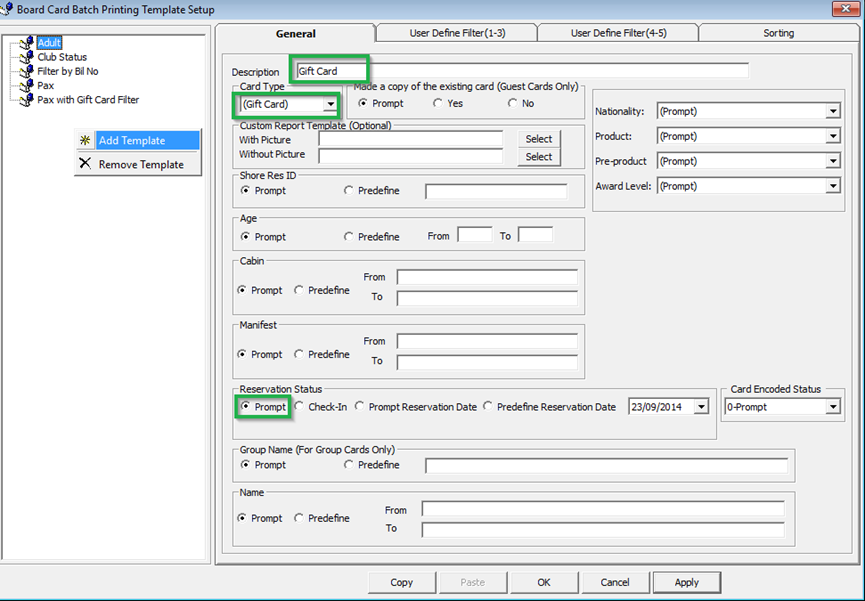
Figure 2-3 Board Card Batch Printing Template Setup
-
Launch the Administration program.
-
In the Administration module, then select Board Card Printing Template.
-
In the Board Card Batch Printing Template Setup, right-click and select Add Template.
-
Click Apply to save the template.
-
To print a Guest Onboard card that is linked to the Gift Card, contact the Oracle Customer Support as an additional setup is required in the Gift Card Template.
-
Log in to Management module and navigate to Front Desk, Advanced Board Card Printing.
-
On the Advanced Board Card Printing window, select the BCard Template from the drop-down list.
-
Under the Reservation Status section, select Reservation to print an inactive Gift Card, or Check In to print an activated gift card, and then select the date to print.
-
Click Print to start the print job and select Yes when prompted.
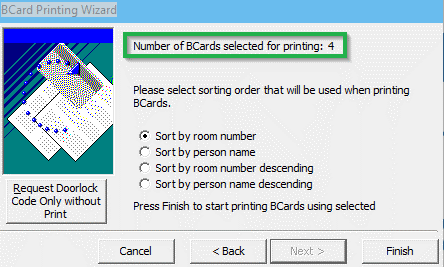
Printing from Board Card Wizard
-
Click Next to begin the print process.
-
In the ‘What type of BCards would you like to print?” window, select Gift Cards and click Next.
-
In the ‘Would you like to print BCards …. ‘ window, select one of the options and click Next.
-
Select the additional print criteria, if any, and then click Next.
-
Select the preferred sort order and click Finish to process the print job.
Figure 2-4 BCard Printing Wizard
Printing Individual Gift Card
You can print the Individual GC from Management, Cashier and Gift Card function. See Gift Card Creation section for more details.
Gift Card Creation
-
Log in to the Management module, Cashier, Gift Card.
-
Click New Gift Card.
-
In the Create New Gift Card window, enter all relevant information in the respective fields.
Figure 2-5 Create New Gift Card
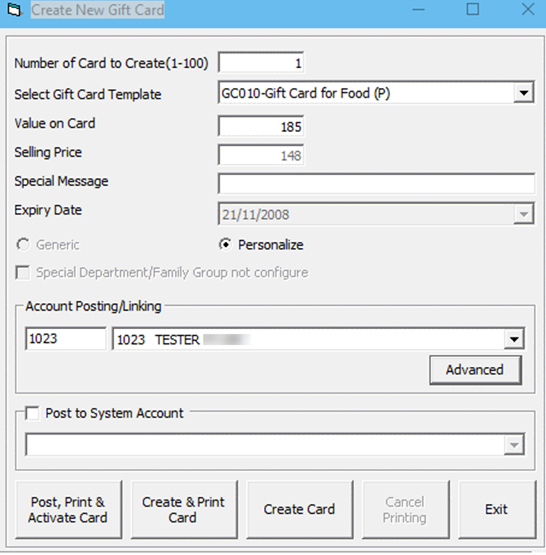
Field Name Description Number of Card to Create
Defines number of card to create.
Gift Card Template
Refers to Gift Card Template Setup. When a template is selected, all predefined settings will populate accordingly.
Value on Card
Defines the card value if the card is a Percentage pricing type. System will recalculate the Selling Price based on the value entered.
Selling Price
The Selling Price is re-calculated based on the value entered, unless template selected is a Fix Value type, then field is grey out.
Special Message
Special notification message.
Expiry Date
Expiry Date auto calculates based on the setup and not editable.
Generic/Personalize
Define the type of card: Generic or Personalize.
Enable Usage for Special Department/Family Group
Define if Gift Card is allowed for use in special eligibility departments.
Account Posing/Linking
Account Posting/Linking of guest account is optional during creation. However, if no account is linked, it is not possible to activate the gift card.
Advanced
Enable selection of multiple guest reservations. The number of gift card printed must be set to one, or else an error message prompts: When select multiple guest, the number of card must set to one.
Post to System Account
Check when prepaid Gift Cards are imported. The application posts the purchase to System Account and the buyer is assigned to the Guest Account when it is select manually.
Post, Print & Activate Card
Post, print and activate card when GC template is assign.
Create & Print Card
Create and print without activation. However, you can activate later when the Gift Card is sold is to customer. The gift card purchased will be printed and encoded.
Create Card
Create Gift Card without activation or print.
Cancel Printing
Cancel the print job. Applicable when printing more than one card.
-
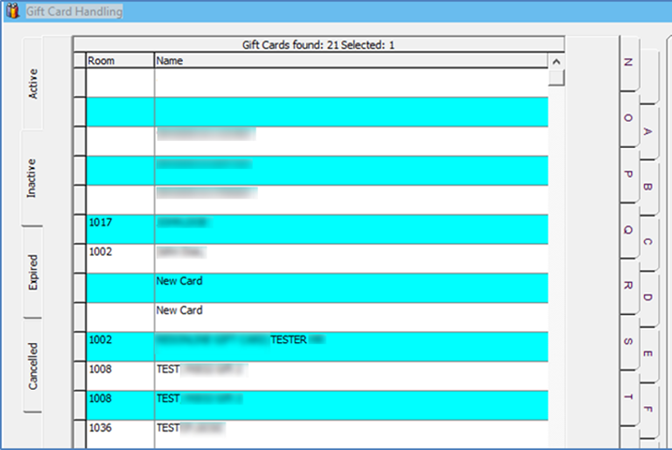
The newly created cards created will appear in the Gift Card Listing in the following tabs.
-
Inactive
-
New Cards without guest account assigned.
-
Cards created with ‘Create & Print Card’ carry the Gift Card number.
-
-
Active
-
Cards created using ‘Post, Print & Activate Card’ function and guest name will appear.
-
-
Figure 2-6 Gift Card Account Listing
Note:
Gift Card creation and activation is available to ‘Expected Guests’ only.Gift Card Activation
The physical Gift Card does not carry any value until it is sold, in which a cashier or agent selects a pre-defined value or manually enters the credit amount purchased onto the card by way of creation and activation. A card must at least have a cabin associated with it, and only those guests with an assigned cabin can activate the Gift Card.
-
In the Gift Card Handling window, select the Gift Card from the list and click Activate Card.
-
The application will prompt an Edit Gift Card form for the Guest Account or Gift Card template to be assign if they are not present.
-
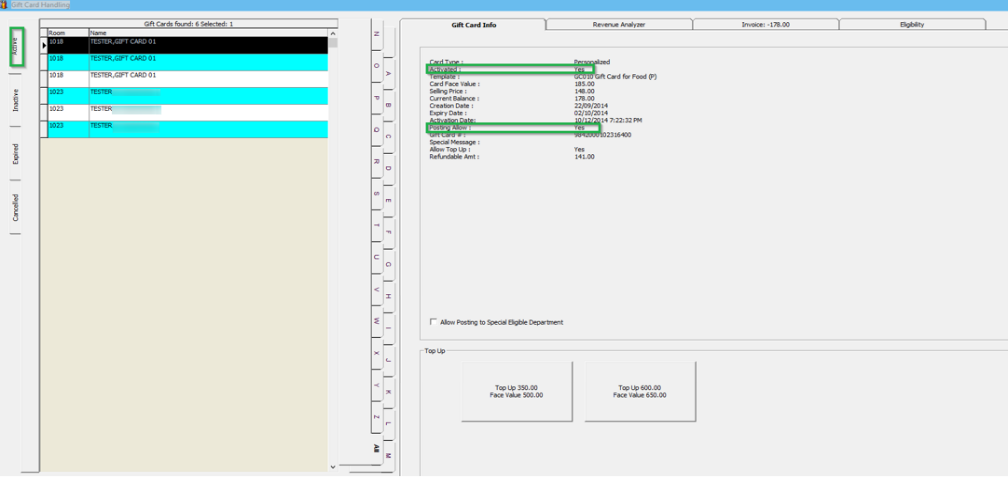
The card information is transposed to the Active tab upon activation.
-
The Gift Card balance and posting status is also reflected in the Gift Card Info tab, and the amount purchased is posted to the guest account as ‘Gift Card Posting’.
Figure 2-7 Gift Card Details
-
Under the Guest Info tab in the Guest Handling window, select the guest account and click Gift Card to associate it with the card.
Figure 2-8 Gift Card Button

Reprinting of Cards
-
In the Gift Card Handling window, click the Print Gift Card button. The Gift Card will print with an incremental GC number and disables the previously printed Gift Card.
Note:
Changing of Guest Account or GC Template is not allowed since the detail for the card was initialized earlier. -
Check the Eligibility tab to view the eligible department in SPMS and MICROS of the selected Gift Card.
Figure 2-9 Gift Card Eligibility

-
The program would not activate the Gift Card if the associated guest account has exceeded its credit limit, and if posting is disabled or under expected status.
Gift Card De-Activation and Re-Activation
-
In the Gift Card Handling Active tab, select the card and click De-Activate Card.
-
Select the De-Activation Reason from the drop-down list or enter a reason using the free text option. Card information is then transposed to the Inactive tab.
-
To re-activate the card, click Re-Activate Card and select the re-activation reason from the drop-down list.
Note:
The De-Activation and the Re-Activation process only changes the Gift Card status and posting allow status instead of re-posting the transaction.Gift Card Cancellation
-
In the Active tab, select the gift card and click Cancel Card.
-
At the confirmation prompt, click OK to continue
Note:
The above process will disassociate the guest details from the card and no posting will occur in the guest account. -
At the prompt “There is no undo to cancel card operation, do you want to proceed?” select Yes.
-
Select the Cancellation Reason from the drop-down list or manually enter the reason and, then click OK to proceed with cancellation.
-
The card information is transposed to the Cancelled tab, with its status shown as Cancel.
Gift Card Expiration
As cards are sometimes lost or forgotten, the Gift Card is no longer valid for posting after its expiration. To minimize fraud, the remaining balance is not be refunded to the Guest or Crew. Expiration trigger based on either System Cruise Change or System Date Change defined in System Parameter Setup. Once the card expiry date is past the system date, the Gift Card status is automatically changed to expired, and information is transposed to the Expired tab in the Gift Card Handling window.
-
System automatically sets the posting to Posting No Allow.
-
Remaining balances are transferred to the System Account as define in Financial Department Setup, Gift Card Template setup.
Figure 2-10 Gift Card Expiration Information
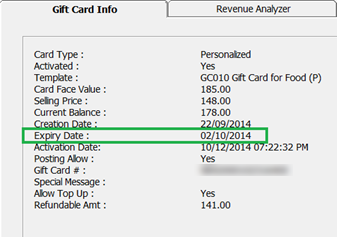
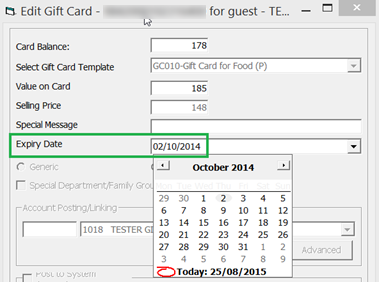
It is possible to alter the expiration of an activated gift card provided the expiry date is greater than or equal to the current workstation date.
Figure 2-11 Edit Gift Card Expiry Date
Gift Card Top Up
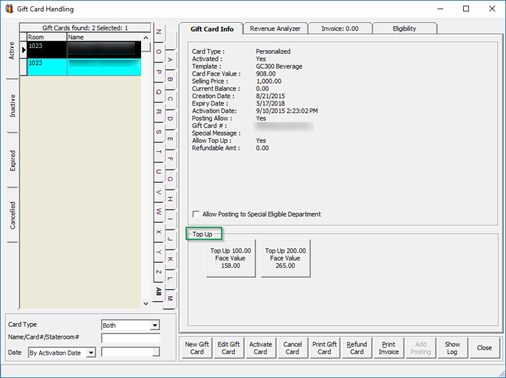
Value top up on current active card is permissible and the process is similar to a gift card purchase, with the top up charges being posted to the guest account.
There are 10 top-up options available for guests to choose, and each top-up option can have a different selling price and value based on the setup in the GC (Gift Card) Template. However, the top up option is not available on expired, inactive, and cancelled Gift Cards.
Figure 2-12 Gift Card Top Up Option
-
Select the guest account from the Active tab.
-
At the Top Up section in Gift Card Info tab, select the top up value, and then click Yes at the confirmation prompt.
-
A receipt is printed and a charge is posted to the guest account with the top up value added to the card.
Gift Card Refund
-
Card is still active and not expired.
-
Has a credit balance after deducting the discounts given.
-
In the Gift Card Handling window, click the Refund Card.
-
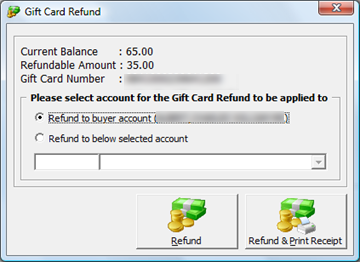
In the Gift Card Refund window, select either Refund to buyer account or Refund to below selected account and select the account from the drop-down list.
Figure 2-13 Gift Card Refund Window
-
Click Refund or Refund & Print Receipt to print a refund receipt.
-
Once the Gift Card balance is refunded, the Gift Card automatically becomes expired.
-
Note:
For cards that have multiple top up transactions, the program refunds the first top up selling price. If it still has balance, the program fully refunds the next top up selling price. The refundable calculation is = [Face Value – Total Posting] – [Face Value – Selling Price]. If the current balance is less than [Face Value – Selling Price], the refund amount will be zero. For more refund scenarios, see Appendix E. Gift Card Refund Scenarios.Gift Card Quick Refund
Gift Card Quick Refund allows you to refund the unused balance on the gift card based on the selection criteria.
Table 2-2 Gift Card Quick Refund
| Field | Description |
|---|---|
|
Gift Card Expiry Date |
Filter to display cards where the expiry date is the same or less than date defined. |
|
Gift Card Template |
Display active cards of selected template. |
|
Included Unactivated Prepaid Gift Card |
Include prepaid Gift Card (GCDT_PREPAID=1) linked to guest account where the Gift Card expiry date is based on the guest’s disembarkation date. |
|
Included Gift Card with Refund Amount =0, and Balance >0 |
Included Gift Card with refundable amount = $0 and balance is not $0. |
-
Log in to the Management module, Cashier, Gift Card Quick Refund.
-
Click Search Gift Card to search for all valid Gift Cards, or use the filters to select the desired information.
-
In the guest list Selected column, deselect the checkbox of cards to exclude from the refund process.
-
Click Proceed to set all selected Gift Cards to Expired and refund the amount to the default buyer account. The process is not reversible.
Gift Card Quick Collect
Gift Card Quick Collect enables the Chief Purser to make a quick collection of unutilized Gift Card amounts at the end of the cruise. All unutilized amounts collected will post to the Gift Card revenue department and generate a report.
Figure 2-14 Gift Card Quick Collect

-
Log in to the Management module, Cashier, Gift Card Quick Collect.
-
In the Quick GC Collection Unutilized Amount window, click Search Gift Card to populate valid Gift Cards into the grid list.
Note:
The Gift Card Expiry Date field is by default set to the current system date and is disabled to prevent you from accidentally collecting unused Gift Card balances when guests have not disembarked. The system filters the Gift Card where Gift Card’s expiry date is same as or smaller than the default date. -
Select the Gift Card Template from the drop-down box to populate Gift Card by the selected template.
-
Select Included Unactivated Prepaid Gift Card to include prepaid Gift Cards not activated.
-
Deselect the Selected checkbox of each Gift Card to skip any account.
-
Click Proceed to post the unutilized GC amount to the GC revenue department as cruise revenue and set card as Expired.
WARNING:
This process is not reversible.Gift Card Posting
Gift Cards can post from various modules such as Management, Casino, Shore Excursion, or FCUI. As each of the posting steps can vary, follow the steps below for each module.
-
Log in to the Management module, and select from the menu Cashier, Gift Card.
-
In the Gift Card Handling window, select Add Posting.
-
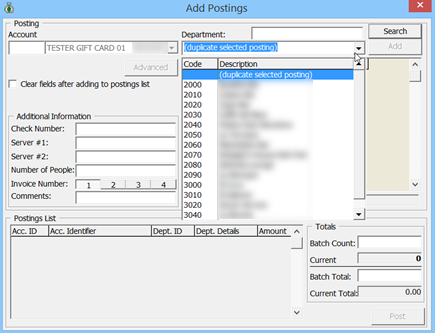
In the Add Posting
form, only the eligible departments appear in the department drop-down list. -
Select the department, enter the value in the respective sub-department, and click Add.
Figure 2-15 Add Gift Card Posting in Management Module
-
Click Post to confirm posting and deducting the sales from the GC account.
-
Once the GC balance becomes zero, the Add Posting button becomes disabled.
-
When a transaction is Void, the amount is credit back to the GC account.
-
When a discount is applied, the Item Discount or Criteria Discount on the sales transaction is credited to the Gift Card account.
-
Move and Route transactions from another account is acceptable in GC posting. For more posting scenarios, See Appendix F. Gift Card Posting in Management Module.
Gift Card Posting in Casino Module
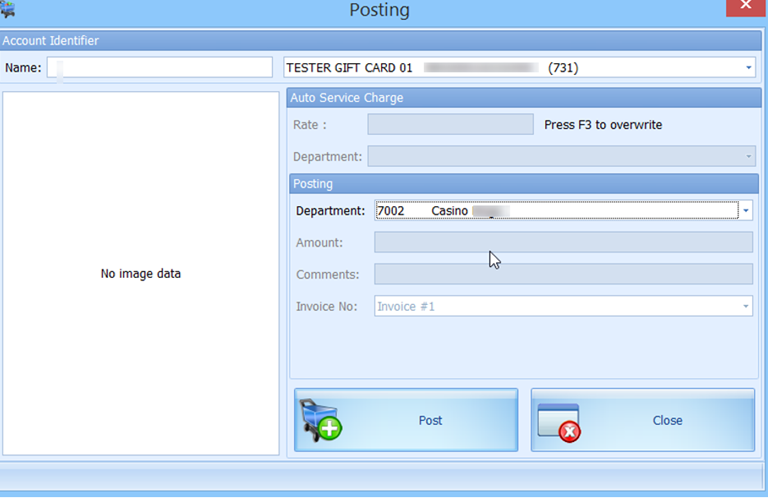
Figure 2-16 Gift Card Posting in Casino Module
-
Log in to the Casino module, Cashier, or Posting.
-
In the Posting window Name field, enter the name or swipe the Gift Card.
-
Select the Casino Posting Department from the drop-down list, enter the Amount, and then click Post to post the charge.
For more posting scenarios, see Appendix G. Gift Card Posting in Casino Module.
Gift Card Posting from Shore Excursion
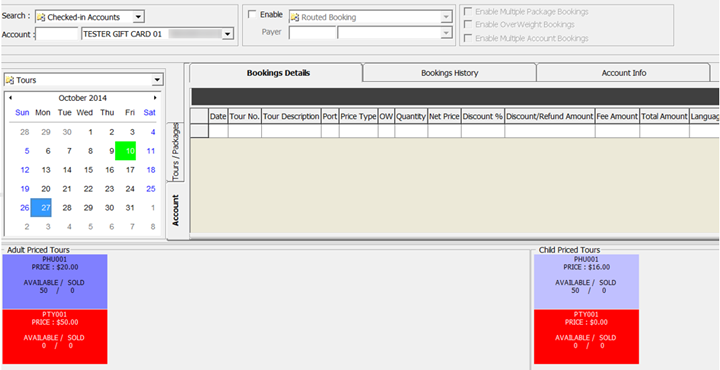
Figure 2-17 Gift Card Posting in Shore Excursion Module
-
Log in to the Shore Excursion module and select Bookings or Quick Bookings from the Book menu.
-
In the Search box, enter the name/cabin or swipe the GC to purchase an excursion. The excursion purchased will deduct from Gift Card account.
Note:
Multiple Account Bookings is disabled upon swiping the Gift Card. Posting can route to the selected payer when enabling the Prepaid Booking option (payer can be a System account, Gift Card account or Guest account). The Wait list is not allowed for the Gift Card. -
System credits the Gift Card account when the purchase is voided and posts the Cancellation fee, if any.
-
You can view the transaction purchased with gift card in:
-
Excursion Handling, Account / Control No Handling, and Batch Ticket Printing window.
-
All posted excursions by GC can be viewed in
-
View, Handling List.
-
View, Account/Control No. Handling window.
-
Batch Ticket Printing and Export window.
-
-
For more posting scenario, see .
Gift Card Posting from FCUI
-
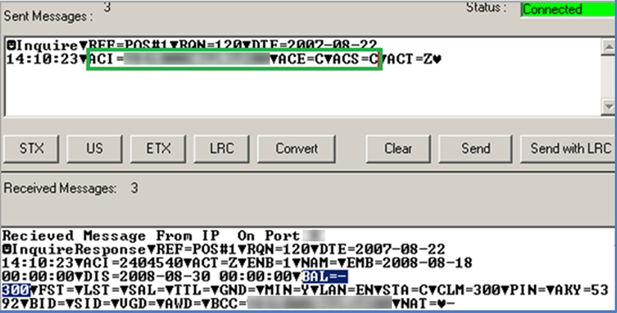
The Inquiry message must be set to ACT=Z for Gift Card type.
-
Define Gift Card status in ACS per the following.
-
Define ACS = C for inquiry about activated, de-activated, and cancelled Gift Card balance.
-
Define ACS = R for enquiry about inactive Gift Card balance.
-
Define ACS = Z for enquiry about expired Gift Card balance.
Figure 2-18 Gift Card Posting in Universal Interface
-
-
Define the GC number in ACI. The balance shows the current value when the message is received.
-
The Universal Interface is capable of accepting Posting, Book Excursion and Book Excursion Packages from an external system.
-
Any purchase deducts from the Gift Card account.
-
The Universal Interface does not allow making any posting against invalid gift cards.
For more posting scenarios, see Appendix I. Gift Card Posting in Universal Interface.