6 Setting Up SPMS Desktop Application Clients
The SPMS Application Clients can be installed on any machines that have the full Oracle Client installed, including the Oracle Data Access Components (ODAC) component.
Prerequisites
-
Ensure you uninstall all the components older than SPMS 23.1.
-
Ensure that the Microsoft .NET Framework 2 and 3.5 and 4.8 are enabled in Window Features before installing Oracle Full Client and CruisePropertyManagementDesktopApps_23.1.exe file.
-
Oracle 19c Database client with ODAC is installed on the target machine. See topic Oracle Database Client and ODAC Installation.
-
SAP Crystal Report runtime engine for .NET Framework (32-bits) version 13.0.33 is installed on the target machine. See How to Install/ Upgrade Crystal Reports runtime engine for .NET Framework (32-bit) for further information.
-
SPMS 23.1 Installer is downloaded and available in the target machine. See topic SPMS Installation File for download instructions.
-
SPMS 23.1 Package is downloaded and available in the target machine. See topic SPMS Package File for download instructions.
-
Ensure that the Windows Regional and Language Settings on the target machine is configured to US/UK and the language setting is set to English. This important to ensure that you get the expected SPMS functionality.
SPMS Desktop Application Clients Installation Steps
The SPMS Desktop Application Clients Installer is now available in two formats: EXE or MSI format. MSI format is a Windows Installer format that uses Microsoft’s Windows Installer service to configure or update installer packages. MSI format is normally the preferred format by Windows users to distribute in enterprise environments.
Install Desktop Apps (EXE file path) through Windows Batch File
Installing via the batch file will be the preferred method to install SPMS Application Client. Alternatively, SPMS Application Client can be installed manually from the UI. To install, just run the (InstallDesktopClient.bat) batch file and leave it unattended until installation completes.
Note:
The InstallDesktopClient.bat does two things: Uninstalling older version of SPMS Application Client, and installing new SPMS Application Client.
The command to install SPMS Application Client silently.
CruisePropertyManagementDesktopApps_23.1.exe /s /v"/qn /log "SPMS23_1.log””
Follow the instructions below to install the SPMS Application Client:
-
Download both the SPMS Installer and Package. See topic Where to Download to prepare the SPMS 23.1 Application Client Installation Package.
-
To prepare the SPMS Application Client Installation Package, copy the SPMSClientInstall folder from the SPMS Package to the
C:\Tempfolder. -
Copy the SPMS Installer: CruisePropertyManagementDesktopApps_23.1.exe file to the
C:\Temp\SPMSClientInstallfolder. The folder is now ready for SPMS Application Client installationFigure 6-1 SPMSClientInstall Folder SPMS Package

-
After this, you may copy the SPMSClientInstall folder to other target machines that require SPMS Application Client installation.
Note:
You will only need to prepare the SPMS Application Client Installation Package once. Once you have the package ready, you can remotely copy the package to any target machine and run the one-step SPMS Application Client installation remotely.
-
You can now start the unattended one-step installation of the SPMS Application Client by navigating to the
C:\Temp\SPMSClientInstall\folder. -
Run the InstallDesktopClient.bat with the Windows Administrative privilege by right-clicking the file and selecting Run as Administrator.
Note:
You may refer to the batch file to get the commands used to uninstall or install SPMS Application Client. Two options are provided for uninstallation: wmic uninstall method, or the Powershell Uninstall-Package cmdlet.
Powershell method is faster and is the default method to uninstall. By commenting out the variable FAST_INSTALL, the batch file will switch to use wmic uninstall method.
-
Once the installation starts, leave it running unattended until it completes.
-
After installing the SPMS Application Client, a Windows Scheduled Task is created to handle the SPMS DLLs registration automatically.
-
For customers who wish to have both SPMS 7.0 / 7.30 and 23.1 Application Clients exist on the same machine, you can run the highlighted batch file to create another Windows Scheduled Task to handle the SPMS 7.0 / 7.30 DLLs registration automatically. The batch file shown below resides under the
RegisterSpmsfolder of the SPMS installed directory.Figure 6-2 Scheduled Task in Task Scheduler

Note:
The Windows Scheduled Task, Cruise Property Management 7.X Desktop Apps Registration will auto-registers SPMS components for SPMS Version 7.0 / 7.30 and below.
The Windows Scheduled Task, Cruise Property Management Desktop Apps Registration will auto-registers SPMS components for SPMS Version 8.0 / 20.X / 23.1 and above.
Note:
If you intend to run both the SPMS Application Client Version 7.0 / 7.30, and Version 8.0 / 20.X / 23.1 or later on the same machine, you must disable the SPMS Version 7.0 / 7.30 FC Updater from running as it will interfere with the auto-registration of the SPMS DLLs in Windows Scheduled Tasks.
-
To disable SPMS Version 7.0 / 7.30, navigate to the SPMS Installed folder for Version 7.0 / 7.30 and rename the “FC Updater.exe” file to “FC Updater.exe.bak”
Install Desktop App Installer in MSI format using Windows MSIEXEC command
-
Download both the SPMS Installer and Package. See topic Where to Download to prepare the SPMS 23.1 Application Client Installation Package.
-
Copy the SPMS Installer — CruisePropertyManagementDesktopApps_23.1.msi file to the
C:\Tempfolder. -
Call the msiexec command to install. For command details, see: https://docs.microsoft.com/en-us/windows-server/administration/windows-commands/msiexec
Switching between SPMS Application Clients Versions
Before SPMS Version 8.0.14, it was only possible to run one version of SPMS Application Client on the same machine. To switch to another SPMS Application Client version, users have to perform a manual registration of the SPMS DLLs, which require Windows Administrative privilege. This is not ideal because to have more than one version of SPMS Application Client on one machine, users must be granted Windows Administrative privilege.
From SPMS Version 8.0.14 onwards, it is now possible to have both SPMS Application Client Version 7.0 / 7.30 and Version 8.0 / 20.X / 23.1 on the same machine, without needing to grant Windows Administrative privilege to the users, as the DLLs registration is now automated by the Windows Scheduled Tasks. Therefore, the users no longer require Windows Administrative privileges to switch between SPMS Versions.
When switching from SPMS Application Client Version 7.0 / 7.30 to SPMS Application Client Version 8.0 / 20.X / 23.1, the Windows Scheduled Task triggers the Cruise Property Management Desktop Apps Registration batch file, thus, registering the required SPMS DLL, automatically using the Windows SYSTEM privilege.
Similarly, when switching from SPMS Application Client Version 8.0 / 20.X / 23.1 to Version 7.0 / 7.30, the Windows Scheduled Task triggers the Cruise Property Management 7.X Desktop Apps Registration batch file, thereby, automatically registering the required SPMS DLLs using the Windows SYSTEM privilege.
Switching to SPMS Application Client version 7.0 / 7.30
-
Run the FC Launch Panel of SPMS Version 7.0 / 7.30.
Figure 6-3 OHC Applications in Windows Explorer

-
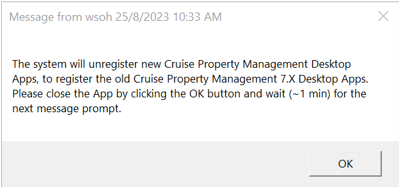
Once launched, the prompt shown in the Figure below notifies you that the SPMS DLLs registration process will take place. You are to wait for the next message prompt before proceeding to the next step.
Figure 6-4 Auto Registration Notification of SPMS 7.0/7.30
-
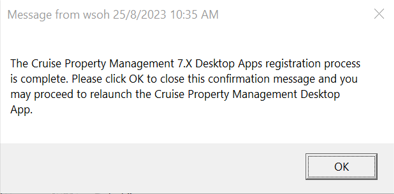
Once the DLL registration completes, a new message prompt as shown in the figure below appears.
Figure 6-5 Completion of SPMS DLLs version 7.30 Auto Registration
-
Follow the instructions in the message prompt and relaunch the FC Launch Panel for SPMS Version 7.0 / 7.30.
Note:
If you did not get the message prompts, navigate to the folder
C:\tempDLLand check whether the folderRegisteredSPMSv7_3exists. -
If the folder
RegisteredSPMSv7_3exists, this means that the SPMS DLLs are registered successfully, and you can relaunch the FC Launch Panel for Version 7.0 / 7.30.
Switching to SPMS Application Client version 8.0 / 20.X / 23.1
-
Launch the version of OHC Launch Panel you wish to work on from the
Oracle Hospitality Cruisefolder. -
Once the program opens, you will receive a notification prompt that registering the SPMS DLLs will take place.
-
Click OK and wait for the next message prompt before continuing. You will receive a confirmation prompt once the registration process completes.
-
Click OK to close the message and proceed to relaunch the SPMS application.
-
Follow the instruction in the message prompt and relaunch the OHC Launch Panel for SPMS Version 8.0 / 20.X / 23.1.
Note:
If you did not get the message prompts, navigate to the folder
C:\tempDLLand check whether the folderRegisteredSPMSv8_0exists. -
If the folder
RegisteredSPMSvNewexists, this means the SPMS DLLs are registered successfully and you can relaunch the OHC Launch Panel for Version 8.0 / 20.X / 23.1.
Loading DLLs from SPMS Allowlisted Path
This feature is designed to prevent an unscrupulous party from performing a malicious attack on the SPMS application through DLLs replacement. By default, SPMS will allow DLLs from the following:
-
C:\Windows, -
C:\Program Files, -
C:\Program Files (x86), -
C:\Oracle
Therefore, it is of utmost importance that you ensure the four folders above require Administrator level write access.
Should you intend to have an allowlist path other than the listed
four, you should create an allowlist file (path.env) in the SPMS Installed
folder – C:\Program Files (x86)\Oracle Hospitality Cruise.
The format of the allowlist entry path is shown below. Each path is delimited with a semicolon character.
<AllowlistPath1>;<AllowlistPath2>;<AllowlistPathN>
You can refer to the SPMSClientInstall folder in the SPMS Package for a sample path.env file.
Connecting to Different SPMS Database using Different TNS
It is now possible for SPMS Application Client to easily connect to different SPMS Databases using different Database TNS Names by creating a new Database entry in the local OHCSecurity.par file using a different Database TNS Name from the actual Database TNS Name used in the SPMS Database Server. With this, the SPMS Application Client can connect to the SPMS Database using a TNS Name different from the actual Database TNS Name used in the SPMS Database Server.
Note:
For each local Windows user that runs SPMS application, you need to perform the below steps to ensure the new entry for the Windows user is added to the local OHCSecurity.par.-
Using the Windows Administrative privileges, run the command
“OHC Tools.exe” /m.See Figure 4-6. -
On the OHC Tools Main screen, click the Create New Connection button to create a new Database entry in the local OHCSecurity.par file using a different Database TNS Name
-
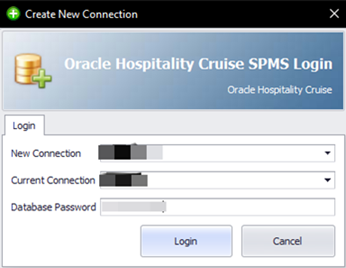
At the Create New Connection window, enter the following:
-
New Connection: The new DB TNS Name.
-
Current Connection: Existing DB TNS Name.
-
Database Password: Current DB Password.
Figure 6-6 SPMS Database TNS Creation Screen
-
-
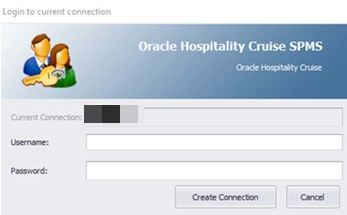
After clicking the Login button, the SPMS User Authorization form appears.
Figure 6-7 SPMS User Authorization Screen
-
You must authorize using the SPMS Login credential to create a new Database entry to the local OHCSecurity.par file using a different Database TNS Name.
-
After the process completes, you can now connect to the same SPMS Database using the new Database TNS Name.
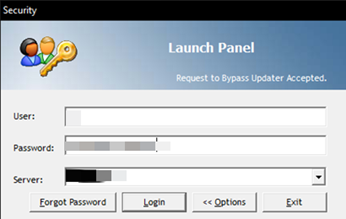
Figure 6-8 SPMS Launch Panel Login Screen
Uploading SPMS Applications or Libraries to Database
For the OHC Updater to automatically download the latest binaries or files on all SPMS Application Client machines, follow the instructions below to upload binaries or files to the SPMS Database.
-
Navigate to
C:\Program Files (x86)\Oracle Hospitality
Cruise
folder, launch the Launch Panel and log in using a Bypass Updater, by holding down the ALT Key + clicking the female user icon. -
In the Launch Panel program, manually add the following SPMS applications and DLLs to the respective group by pressing F12 and selecting the group from the drop-down list:
-
For Utilities group:
-
OHC UpdaterWatchdog.exe
-
-
For System Files group:
-
OHCSPMSMobile.dll
-
OHCSPMSUI.dll
-
OHCWebSockets.dll
-
-
For REGASM Files group:
-
CRUFLFC.dll
-
OHCSPMSData.dll
-
OHCSPMSBusiness.dll
-
OHCSPMSUtils.dll
-
-
For Special Applications File group:
-
OHC Updater.ini
-
Note:
You need to upload the OHC Updater.ini to the Special Applications Files group if the file is distributed in the package for a patch or hot fix to be applied.
-
-
Additionally, on the Launch Panel, Utilities tab, update the Launch Panel, Updater, and UpdaterAgent to the latest program file from the downloaded patch set by right-clicking the program and selecting Properties. Click Update file and then click OK to save.
Downloading SPMS Applications or Libraries from Database
-
On the target SPMS Application Client machine, log in to Launch Panel without Bypass Updater to update all the programs.
-
A program UpdaterWatchdog is added to monitor and ensure the Updater remains active in the Task Manager, enabling the latest program to be downloaded from SPMS Database. If the Standard User cannot connect to the Updater, reinstall the SPMS Application Client
See topic: Install Desktop Apps (EXE format) through Windows Batch File in SPMS Desktop Application Clients Installation Steps
Converting Credit Card Payment from Non-OPI to OPI Tokenization
-
Set up the OPI Manager. See topic OPI Shipboard Property Management System Installation Guide in Oracle Payment Interface 20.3.
-
Set up the OPI in SPMS. See topic: OPI Handling User Guide in the Oracle Help Center.
-
Convert the existing credit card records to OPI Token at the Get Token tab.
-
Select profile type and reservation to process.
-
Click the Start button to start the process.
-
Purge all OPI log files from
C:\Users\Public\Documents\Oracle
Hospitality Cruise
folder.
-
Working with Invalid SPMS Encryption Key
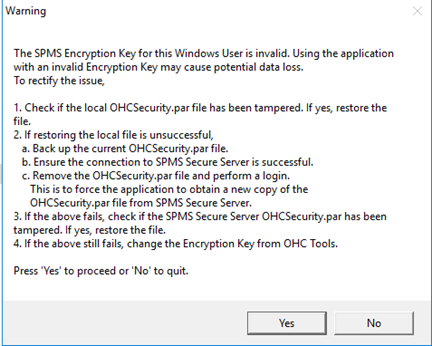
SPMS Encryption Key is securely stored in SPMS Secure Server and SPMS Database. The system will prompt a warning if the SPMS Encryption Key is found to have been tampered with and the key becomes invalid. The steps to resolve the invalid key is shown in the Warning prompt.
Figure 6-9 Invalid SPMS Encryption Key Warning
Uninstalling SPMS Application Client
-
Open the Control Panel and select Programs, Programs and Features.
-
Select Oracle Hospitality Cruise Property Management Desktop Apps from the program listed.
-
Click Uninstall on the menu bar.
-
Follow the instructions on the screen.
Troubleshooting
See Common Errors in SPMS Desktop Application Client Installation.