7 Profile
-
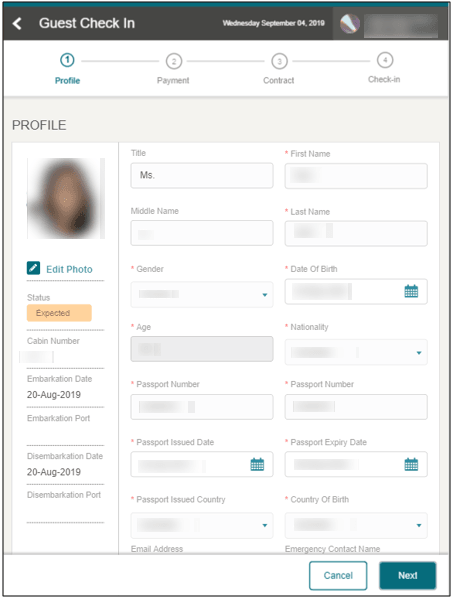
Reservation Details: Details of the reservation. This information is for view only. Editing is not allowed.
-
Profile Details: Details of the profile with mandatory fields marked with asterisk.
-
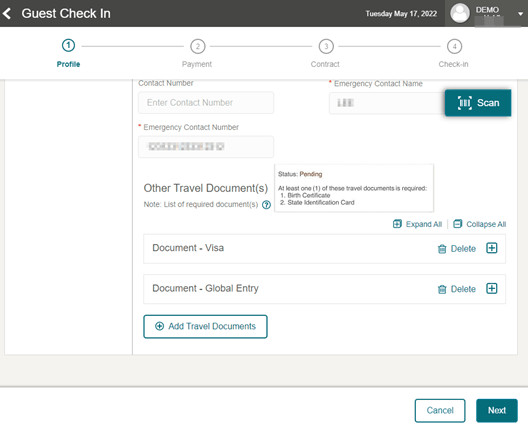
Other Travel Document(s): Contain information of other travel document(s). Adding, editing and deleting other travel document is allowed.
Figure 7-1 Profile Details

Table 7-1 Reservation Details
| Field | Description |
|---|---|
|
Status |
Reservation Status – Based on the Configuration Search template setup |
|
Cabin Number |
Guest Cabin Number |
|
Embarkation Date |
Guest Embarkation/Check-In Date |
|
Embarkation Port |
Embarkation Port/Harbor |
|
Disembarkation Date |
Guest Disembarkation/Check-Out Date |
|
Disembarkation Port |
Disembarkation Port/Harbor |
Table 7-2 Profile Details
| Field | Description |
|---|---|
|
Title |
Guest Title |
|
First Name |
Guest First Name |
|
Middle Name |
Guest Middle Name |
|
Last Name |
Guest Last Name |
|
Gender |
Gender selection |
|
Date of Birth |
Guest Date of birth |
|
Age |
Auto-populate based on the guest date of birth |
|
Nationality |
Guest Current Nationality |
|
Document Type |
Travel Document type used for this checked in |
|
Document Number |
Travel Document number of the selected document type |
|
Document Issued Date |
Issued date of the Travel Document |
|
Document Expiry Date |
Expiry date of the Travel Document |
|
Document Issued Country |
Country of issuance for this Travel Document |
|
Country of Birth |
Guest Place of Birth |
|
Country of Residence |
Guest Current Country of residence |
|
Contract Number |
Guest contact number |
|
Alternative Contact Number |
Alternative contact number |
|
Email Address |
Guest email address |
|
Emergency Contact Name |
Detail of emergency contact person |
Editing Profile Details
- On the Profile page, select the field to enter a new value.
- Click Next to continue. You cannot proceed further if the mandatory fields are blank.
Overwrite Profile Details with Scanned Passport
Figure 7-2 Verify Scanned Passport Details

-
When retrieving a profile through passport scanning, the confirmation dialog will list the changes in two columns - Existing Value versus New Value. You must confirm whether to overwrite the profile information with the newly scanned passport details or not.
-
The scanned passport details populate onto the profile fields when you select Populate.
-
To retain the existing profile details, click Cancel.
-
On the Profile screen, if you want to re-scan the passport, click Scan to initiate the camera function.
-
Place the passport near the camera and select the Capture Image button. A progress bar appears, showing “Scanning in Progress”, followed by a confirmation dialog once the passport details are scanned successfully.
Other Travel Document(s)
On the Profile page, you can add, delete or edit the other travel document record. If the Travel Document Rule template is used in Check In Wizard, a note listing the required document(s) appear below the header. Hover or click the ? icon to open the Tooltip, which list the required document type and the status set up in Administration - Travel Document Rule Setup.
To view multiple rows of records in detail, click Expand All, or Collapse All to minimize. Clicking the + / - allows you to view or minimize the details the selected row.
Figure 7-3 Other Travel Document

When you click the Next button to continue, the following validation appears:
-
Mandatory field checking.
-
Travel Document Rule validation where applicable.
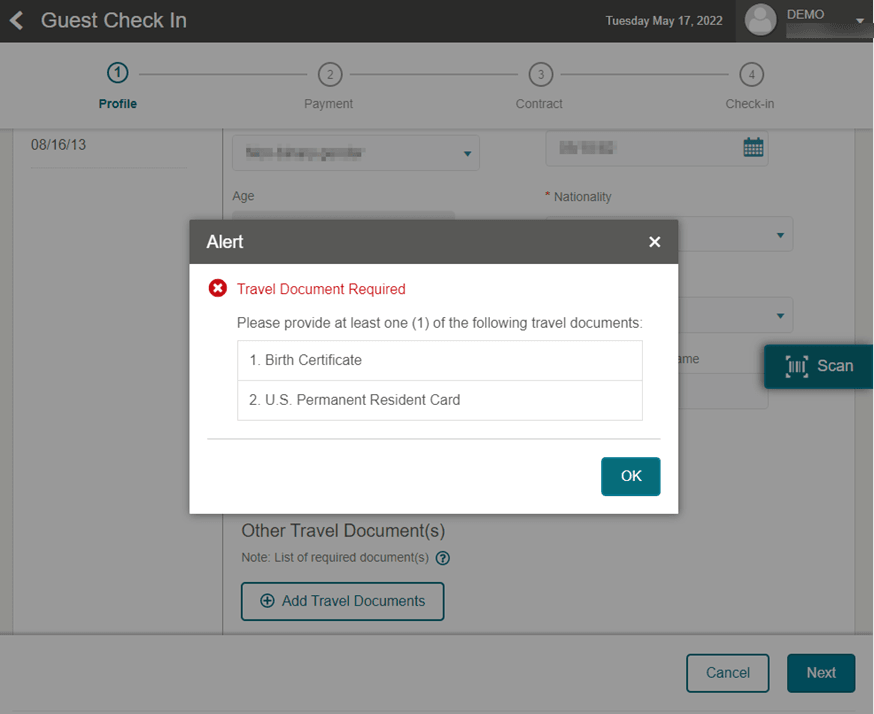
The system does not allow you to continue if the mandatory fields are blank or travel document rules are not fulfilled. An alert message shall prompt, indicating the missing travel document.
Figure 7-4 Other Travel Document Alert

Adding Other Travel Document
-
On Profile page, click Add Travel Document button.
-
Select the Document Type from the drop-down list.
-
Upon selecting the document type, the predefined mandatory or optional travel document fields appear. For predefined travel document field configuration, see Administration – Travel Document Types Setup.
Table 7-3 Predefined Travel Document Field
Field Description Description Document Number
Document Number
Document Expiry Date
Document Expiry Date
Document Issued Date
Document Issued Date
Document Issued Place
Document Issued Place
Required Birth Certificate State
State of Country
Required Photo ID Type
Supported Driver License, US State ID, Military ID and Student ID
Required ID State
State of Country
-
Enter the travel document information and click Next button.
-
If travel document validation passes, the travel document is added to the profile.
-
To add more travel document, click Add Travel Document button.