16 Role Manager
Figure 16-1 Role Manager
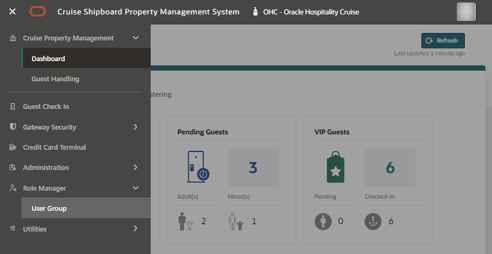
The Role Manager function is a security feature that enables the assignment of user access by user groups, in which you can further assign certain functionality to the users, either by expertise or position. If you are granting the user multiple user groups, the system deems all the assignment in the various user groups as their main role.
To access this page, the login user must at least have a View access granted. Login user granted with View access only is not allowed to modify any of the predefined access, whereas login user granted with Edit access only is not allowed to view the user group listing. If login user needs access to modify the predefined access, then both View and Edit access must be granted. To assign the access rights to a group, see section Modifying User Group Predefined Access.
User Group
In the User Group page, it lists all the User Group that exists in the Cruise Property Management Desktop Application User Security module, and you can grant/un-grant the predefined access for the User Group. Each of the records has a user group code, description, and status - active or inactive. The fields, description, and status are now editable.
You can use the Search option at the top of the page to search the user group by code and description. You can also toggle the Active/Inactive button to see all groups by status.
To assign the access rights to a group, click the Ellipsis action button of the user group record followed by Edit.
You can create a new user group with Create option on the user group listing page. During the creation process, users can manually configure each group for with different access rights for different roles. If no access rights are granted for this action, the system hides the Create button.
Figure 16-2 Create Button

When there are no records at all in both the Active or Inactive tabs, the screen displays the below message on both tabs. “Set up a record to begin your task” along with a 2 Create buttons on the User group landing page. However, if there are records displayed in one tab, like the “Active” tab, but no records are available in the other tab, such as “Inactive” tab, a specific message will show, indicating the absence of records in the latter. For example, when there are no records to display in the “Inactive” tab, the message will state “You don’t have any records”.
Figure 16-3 Create First Record

Figure 16-4 No Record in One User Group (Active/Inactive)

Figure 16-5 Create User Group
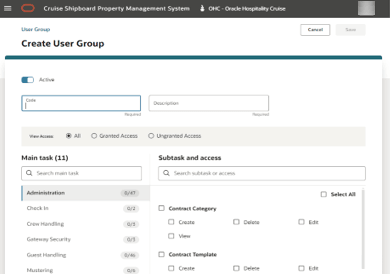
The fields are identical to those on the ‘Edit User Group’ page. There are two buttons at the top right corner, ‘Cancel’ and ‘Save’.
-
Always enabled.
If you click Cancel after entering valid details in the mandatory fields while creating a user group, you will be prompted with a dialog to either discard, save or cancel. Clicking Cancel or Discard will return you to the user group listing page without saving the changes.
This ensures straightforward navigation and system validation, giving users the flexibility to exit the creation process without saving incomplete or unintended changes incomplete or unintended changes.
-
Enabled only when all mandatory fields are filled and are valid.
-
Saves the content and returns to the User Group Listing page, highlighting new record.
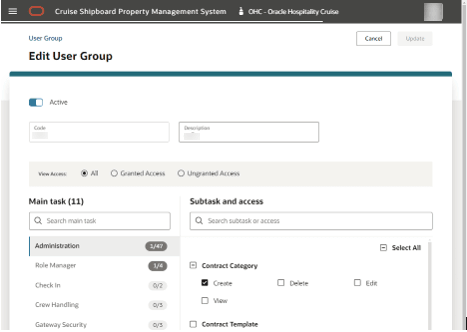
Figure 16-6 User Group
Modifying Predefined Access in User Group
-
On the User Group Listing page, click the Ellipsis button.
-
Select Edit button to open the Edit User Group screen.
-
At the Edit User Group screen, you can edit the User Group Description and in the User Group Status field it allows you to change the status to either Active or Inactive. By default, the status for the User Group should be set to Active.
-
At the Edit User Group screen, all the main tasks, subtasks, and predefined access is listed, allowing you to grant and un-grant accesses to the selected user group.
-
Each of the main task has a count indicator of the number of access granted versus the total predefined access records.
-
Select the main task. All the subtasks associated with the main task will be listed, along with the predefined access.
-
To look up on a main task, enter a keyword for the main task in the search main task field and select Enter. When a matching record is found, the searched records appear in the main task list. Otherwise, it prompts “no record found” message.
-
To look up on a subtask or predefined access, in the search box field, enter a keyword of the subtask name or predefined access name and then select Enter. The record appears if a matching record is found. Otherwise, it prompts “no record found” message.
-
Selecting any of the below options will gives you a different view and process.
-
Granted Access
-
Ungranted Access will show ungranted access for all the main tasks or subtasks.
-
Subtask checkbox to grant all the predefined access for the subtask.
-
Select All checkbox to grant all the predefined access for the main task.
-
Predefined Access checkbox to grant certain predefined access for the subtask.
-
Update after the changes is made to the user group.
-
-
If there are changes made in Edit User Group page and the Cancel button is clicked, a confirmation message “Save your changes?” appear, prompting you to select one of the below:
-
Cancel to close the dialog box.
-
Discard to close the Edit User Group and return to User Group page without saving.
-
Save to update the changes.
-
Viewing Predefined Access in User Group
-
On the User Group Listing page, click the Ellipsis button.
-
Select View button to open the View User Group screen.
-
In View Access, choose one of the options:
-
All - shows both granted and un-granted.
-
Granted - only shows main and subtask.
-
Un-granted - only un-granted main and subtask.
-
-
You can search for the main or subtask using a keyword or predefined access in the respective field and then select Enter.
-
Modification of the predefined access is not allowed here. To modify, see section Modifying Predefined Access in User Group.
Deleting a User Group Record
-
On the User Group Listing page, click the Ellipsis button.
-
Select the Delete button to remove the user group.
-
The Delete option is also available on the View User Group page. When selected, a prompt will appear, asking the user to confirm the deletion of the user group.
-
Delete: the record will be removed, if there is no user linked to the user group and the screen will return to the User Group Listing page.
-
Cancel: the record will not be removed, and the screen will return to the User Group Listing page with the same user group highlighted.
-
-
If there is user linked to the user group, a prompt appears, informing that there are users assigned to the said user group and deletion is not possible.
Copy access from
The Copy access from functionality enables users to duplicate a new user group access rights of an existing user group. Additionally, users can replicate access rights in an existing user group from another existing user group.
The Copy access from button is available on both the Create User Group and Edit User Group pages. It remains hidden to user lacking the Edit access. If edit access is granted but the mandatory fields (User Group Code and User Group Description) are empty, the button will be disabled.
Figure 16-7 Copy Access From (Hidden for User without Role Manager-Edit Rights)

Figure 16-8 Copy Access From (Visible for User with Role Manager-Edit Rights) - Disabled Until Code and Description Entered

Figure 16-9 Copy Access From (Enabled After Code & Description Entered)

Creating User with Copy access from function
-
Navigate to the Role Manager, User Group.
-
Click Create button.
-
Insert a Code and Description to enable the Copy access from button. Click the button once it is enabled. This opens the Select User Group to Copy Access From page.
-
The Select User Group to Copy access from field is always empty by default. You can choose the user group with the below option.
-
Dropdown Selection: Click the drop-down box and choose a user group.
-
Search by Typing: Type in the field to search and match user group descriptions. The system will suggest the nearest matches.
-
Upon selecting a user group, the access rights for that group are displayed below:
-
Figure 16-10 Copy Access From (Select User & Access to Copy Access From)

Once selected, use the search filter or checkbox under Main Task to copy.
Note:
Apply and Cancel button are available at the bottom right of the screen. However, the Apply button is enabled post selection of at least 1 Main Task or Subtask. When selecting the Apply, it will return to Create User Group page with the access being copied where as the Cancel button will return to Create User Group page without adding/copying any access.When creating a new user, you have the option to copy the access from the multiple user groups. Start by selecting one user group and applying its access to the new user. Once you apply the access from the first group, select another user group to apply its access. You can repeat this process as needed to ensure the new user has the required access from all relevant groups.
Figure 16-11 Copy Access From (Save Enabled After Selection of Access Applied)

Copy access from to existing User Group
-
Navigate to Role Manager, User Group
-
Select the User group which needs additional access and click Edit.
-
Click Copy access from button. Choose the access with the below options
-
Dropdown Selection: Click the drop-down box and choose a user group.
-
Search by Typing: Insert a keyword of the user group. The system will suggest the nearest match. When you select a user group, the access rights for that group will appear. Use the search filter or checkbox under the Main Task to copy the selected access.
-
Figure 16-12 Copy Access From Apply Disabled Until Main Task Selected

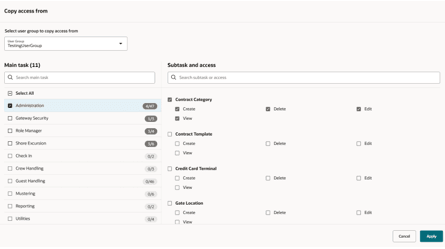
Figure 16-13 Copy Access From (Apply Enabled After Main Task Selected)
-
Apply Button:
-
Disabled until at least one Main Task is selected.
-
Once enabled and clicked, it returns to the Create User Group/Edit User Group page, automatically populating access checkboxes based on the selected Main Tasks.
-
-
Cancel Button:
-
Returns to the Create User Group/Edit User Group page without making any changes.
-
Copy access to function
The Copy access to button enables users to duplicate access rights from one user group to multiple active user groups. Users can either copy full access rights for all available main tasks or copy partial access rights based on the chosen main task for the target user groups.
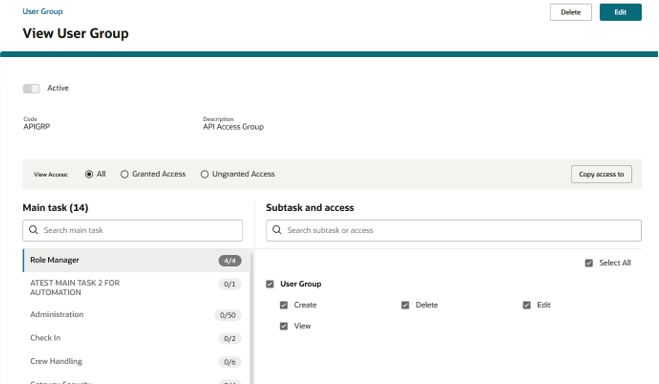
The Copy access to button is available on both the Edit User Group and View User Group pages and it will remain hidden to user that does not have the edit permission. On the Edit User Group page, the button will only be enabled when all changes are saved. If the button is disabled, users must first save any pending changes on the page to enable it, before redirecting you to the user group page and allowing you to click the Update button.
Figure 16-14 Copy Access to Button in Edit User Group Page

Figure 16-15 Copy Access to Button in View User Group Page
-
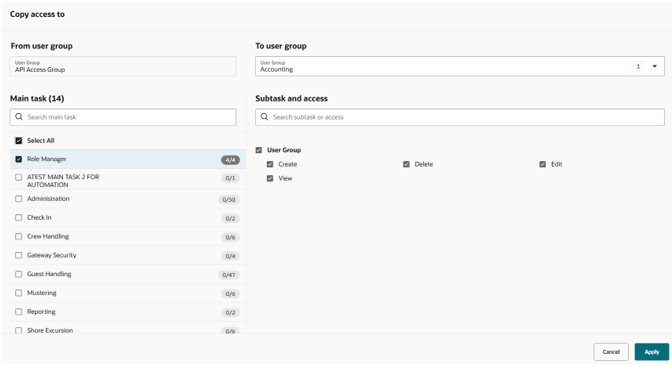
From user group: This is a read-only and pre-populated with the details of the user group being edited on the Edit User Group page.
-
To user group: Allows the user to select multiple active user groups to which the access rights will be copied.
-
Select access rights for specific main tasks using the checkbox next to each main task.
-
Choose all main tasks once using the Select All checkbox.
Note:
The selection is limited to main tasks, the subtasks are read-only and cannot be individually selected.Additionally, the Administrator User Group will not be available for selection in the To user group field.
Figure 16-16 Copy Access To
Apply Button
When the user clicks the Apply button, a confirmation prompt appear, asking whether to override the access rights of the selected user groups. If confirmed, the system replaces the existing access rights with new in the selected user groups. The Apply button is enabled only when at least one Main Task is selected, and the To user group field contains at least one user group. Once the user confirms the override action, the system processes the copy operation and returns to the Edit User Group page. When using the copy access feature, only the main task(s) selected for copying will be overwritten in the target User Group, while all other main tasks remains unaffected.
Cancel Button
Clicking the Cancel button perform no actions. It simply navigates back to the Edit User Group page, without saving any changes.
Related Topics