Bookings
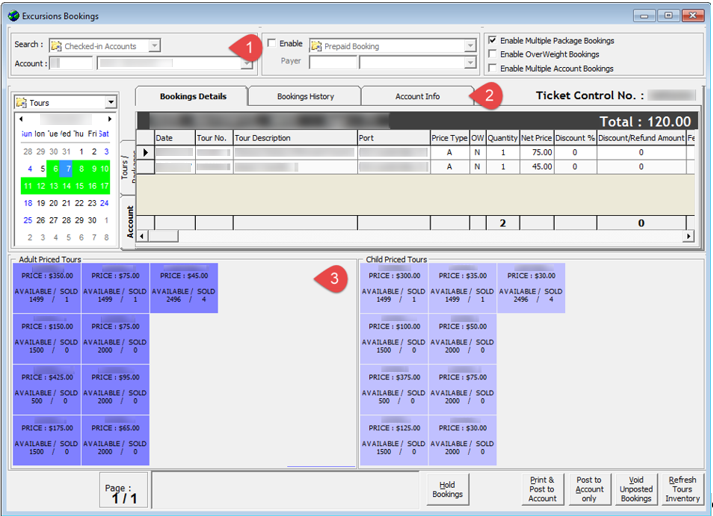
The Booking functionality provides an overview of available tours by date, price, and tour information. It shows information of the selected account and booking history, if any. The available tours are shown in a menu pane by Adult/Child Price for the selected date.
Figure 4-17 Excursions Bookings Window

-
Account Search.
-
Booking details, including Booking History and Account Info.
-
Available Tour Code and Prices.
Adding a Booking
-
At the Account Search section, swipe/tab the board card though an MSR or RFID device or manually search for the cabin number or name, and select the guest name from the result list.
-
Above the Date editor, select the type of tour and select the booking date.
-
Available tours are shown in the Adult/Child Price Tours panel and placing the mouse over the tour code displays the tour information. Select the desired tour by clicking on the tour code.
-
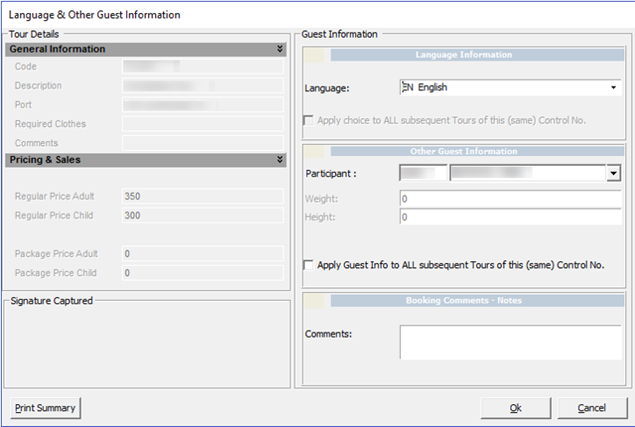
If the Use Language Module parameter is enabled, the system prompts a Language & Other Guest Information window for you to select a language. Select Apply choice to ALL subsequent Tours of this (same) Control No if the same selection is to be applied to multiple bookings.
Figure 4-18 Language and Other Guest Information Window

-
Similarly, the Weight & Height fields are enabled if the tour has Weight limit defined. If the entered weight value exceeds the defined weight limit, an extra charge is imposed per item defined in the bookable tour.
-
Click OK at the Language & Other Guest Information window. This adds the selected tour to the Booking Details tab.
-
Click on the same tour to increase the quantity or select another tour code to add to the booking.
-
If the booking is entitled to a discount, right-click on the booking at the Booking Details grid and select Apply Discount. Multiple selections are allowed.
Figure 4-19 Discount, Refund and Alter Sales Price

-
At the Discount Details section, select the type of discount and then enter the value in the field.
-
Enter a comment or reason for the discount and click OK to save.
-
Complete the booking by selecting one of the following options:
-
Hold Bookings: Places the booking on hold.
-
Print & Post to Account: Posts the booking and print the ticket and summary.
-
Post to Account only: Posts the booking without printing the ticket.
-
Void Unposted Bookings: Removes all unposted bookings from the grid.
-
Refresh Tours Inventory: Refreshes the booking counts for all tours on the page.
-
To add more than one tour before completing the booking, repeat the above from step 2. The tour will be added to the booking list. Click the Post button, to complete the booking after it is confirmed.
Edit Booking Information
This option enables you to alter the booking information such as a discount and language.
-
At the Booking Details tab, select one or multiple bookings from the grid.
-
Right-click and select one of the options.
-
Apply Discount: Applies a discount in percentage, value, or a fixed sales price for the selected booking.
-
Remove Discount: Removes the discount applied on selected booking.
-
Void: Removes the selected booking from being posted.
-
Edit Info: Updates language and other information on the selected booking.
-
Multiple Account Bookings
You can book the same tour for a group of guests using the by selecting the Enable Multiple Account Bookings checkbox and the below steps.
-
Repeat step 1 to 10 in the Adding a Booking section.
-
Select Post to Account only or Print & Post to Account.
-
In the Multiple Accounts Selection window, select the Status, Account Type and Pre-Selection from the drop-down list.
-
Search for name/cabin, click Add All>, Add> or Criteria Add> to add the accounts into the booking and click OK.
-
At the confirmation prompt, click OK to confirm posting or Cancel to abort.
Route Booking
A route booking is a booking paid by another person. This function is enabled when you select the Enable checkbox and the Routed Booking checkbox.
After the Routed Booking is enabled, repeat steps 1 to 11 in the Adding a Booking section to book.
Upon completing the booking, the buyer shown is the selected guest who made the booking, whereas the booking charges are posted to the routed account.
Prepaid Booking
The booking is marked as prepaid and paid through the system account. This function is enabled when you select Enable checkbox and the Prepaid Booking checkbox.
After the Prepaid Booking is enabled, repeat steps 1 to 11 in the Adding a Booking section to book.
Upon completing the booking, the booking is marked as Prepaid booking and posted to the selected account.
Package Booking
-
At the Account Search section, swipe/tab the board card though an MSR or RFID device or manually search for the cabin number or name, and then select the guest name from the result list.
-
Above the Date editor, select the type of package followed by the date.
-
Available packages are shown in the Adult/Child Price Tours panel.
-
Select the desired package by clicking on the package code. The Linked Tours by Groups is prompted if the package is linked to a Package Combination Type.
-
If the Use Language Module parameter is enabled, the system prompts a Language & Other Guest Information window for language selection.
-
Similarly, the Weight & Height fields are enabled if the tour has a weight limit defined. When weight value exceeds the defined weight limit, extra charges applies per the rate defined in the bookable tour.
-
Click OK on the Language & Other Guest Information window. This adds the selected package to the Booking Details tab.
-
Click the Tours / Packages tab for a list of the tours belonging to the package in the Package Overview tab.
-
Continue to complete the booking by selecting one of the following options:
-
Hold Bookings: Places the booking on hold.
-
Print & Post to Account: Posts the booking and print the ticket and summary.
-
Post to Account only: Posts the booking without printing the ticket.
-
Void Unposted Bookings: Removes all unposted bookings from the grid.
-
Refresh Tours Inventory: Refreshes the booking counts for all tours on the page.
-