Crew Quick Billing
The Selection Criteria tab in the Crew Quick Billing function determines the type of invoices to print/pay based on the criteria entered for all disembarking crews. For example, crew paying by credit card or only crew with x outstanding amount.
-
From the Quick Billing, Selection Criteria tab, select an Invoice Type, Balancing Begin Date, Disembarkation Date, Payment Type, Folio Balance (if applicable), Division, and Position.
-
At the Printer section, select an invoice printer, enter the number of copies to print, select the print orientation, and click Print.
-
At the Quick Printing prompt, select Yes to continue.
Apart from printing invoices by batch, balancing of the new crew account is only possible when there is a credit card on file.
-
Repeat steps 1 to 3 of the above.
-
In the Disable accounts field, select the appropriate Posting status from the drop-down list.
-
Navigate to the Selected tab to verify the results and adjust the selection until you achieve the desire result.
-
To exclude a crew from the search results, right-click on the name, and click Remove. When a crew is removed from the grid, the statistic count is updated accordingly.
-
At the Confirmation prompt, click Yes to confirm and click Balance.
-
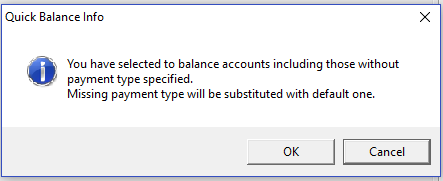
At the Quick Balance prompt, select Yes and click OK at the Quick Balance Info prompt.
Figure 7-10 Quick Balance Info Prompt

-
In the Quick Balance Info warning prompt, read the warning, and click OK to proceed.
Figure 7-11 Quick Balance Info Window

-
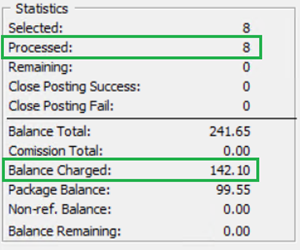
The total amount charged and the number of the account processed appear in the Statistic section once the account is balanced successfully.
Figure 7-12 Statistic of Account Processed and Value Charged

-
Click Close Postings to disallow postings as close on these accounts.
All Crew that haves an on-board email account can opt to receive a copy of their invoices through email. This function is controlled by a parameter. Consult your IT Department for setup if this is not pre-configured.
-
Repeat steps 1 to 4 of Quick Bill Balance.
-
Navigate to the Selected tab and click Send eMail. The Send eMail feature is disabled if no printer is assigned.
-
Without balancing the invoice, click Send eMail.
-
At the Quick Printing prompt, click Yes to proceed. An ‘e-Mail sent’ status is added in the Auth column when the invoice is sent successfully.
Figure 7-13 Invoice Successfully Emailed Indicator
