1 Steps to Configure Identity Federation in OCI IAM Identity Domain without Just-In-Time Provisioning
OPERA Cloud Identity Management provides the capability of identity federation by determining which customers can integrate their identity provider with OPERA Cloud to implement single sign on with OPERA Cloud. Leveraging OPERA Cloud Identity Management’s identity federation feature, customers can use their corporate credentials to log on to OPERA Cloud, which eliminates the necessity to separately manage users and their access to OPERA Cloud.
This document provides the steps to configure identity federation.
Note:
Only follow these steps if the customer identity provider is Microsoft Azure AD.
- Step 1: Download the SAML Metadata in OCI IAM Identity Domain
- Step 2: Add OCI IAM Identity Domains as an Enterprise Application in Azure AD
- Step 3: Configure OCI IAM Identity Domain as an Enterprise Application in Azure AD
- Step 4: Configure User Attributes and Claims
- Step 5: Download the Azure AD SAML Metadata Document
- Step 6: Assign User Groups to the Application
- Step 7: Add Microsoft Azure AD as an Identity Provider in OCI IAM Identity Domains
- Step 8: Configuring Just In Time Provisioning Attribute Mapping using Postman
- Step 9: Test SSO Between Azure AD and OCI IAM
Step 1: Download the SAML Metadata in OCI IAM Identity Domain
- Log in to Oracle IAM Domain Admin Console.
- Open the navigation menu and click Identity & Security.
- Under Identity, click Domains.
- Click the name of the identity domain in which you want to work.
- Click Security on the left navigation and then click Identity providers.
- Click Export SAML metadata.
- Select Download XML under Metadata with self-signed certificates.
Step 2: Add OCI IAM Identity Domains as an Enterprise Application in Azure AD
Note:
You can skip this step if the enterprise application for OCI is already created as part of setting up Azure AD synchronization with OCI.
- In the Azure portal, on the left navigation panel, select Azure Active Directory.
- In the Azure Active Directory pane, select Enterprise applications. A sample of the applications in your Azure AD tenant appears.
- At the top of the All applications pane, click New application.
- In the Add from gallery region, enter Oracle Cloud Infrastructure Console in the search box.
- Select the Oracle Cloud Infrastructure Console application from the results.
- In the application-specific form, you can edit information about the application. For example, you can edit the name of the application.
- When you are finished editing the properties, select Create.
The getting started page appears with the options for configuring the application for your organization.
Step 3: Configure OCI IAM Identity Domain as an Enterprise Application in Azure AD
- Under the Manage section, select Single sign-on.
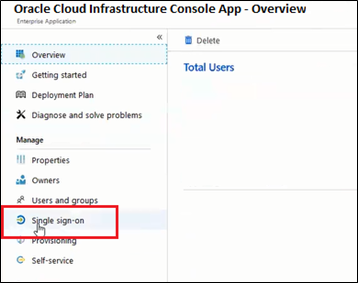
- Select SAML to configure the single sign-on. The Set up Single Sign-On with SAML page appears.
- At the top of the page, click Upload metadata file.

- Locate the federation metadata file (metadata.xml)
you downloaded from Oracle Cloud Infrastructure in Step 1 and upload
it here. After you upload the file, the following Basic SAML Configuration
fields are automatically populated:
- Identifier (Entity ID)
- Reply URL (Assertion Consumer Service URL)
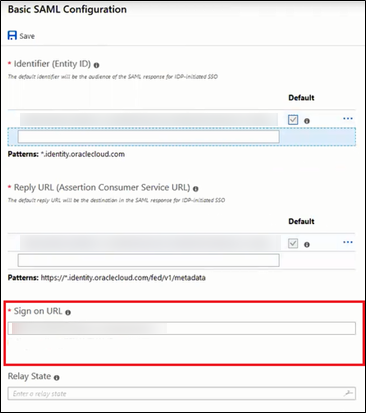
- In the Basic SAML Configuration section,
click Edit. On the Basic SAML Configuration
pane, enter the following required information:
- Sign on URL:
-
Enter the OPERA Cloud User Interface URL for your OPERA Cloud Environment if you have a single OPERA Cloud environment.
For example: https://customerocua.oraclehospitality.eu-frankfurt-1.ocs.oraclecloud.com/IDENTITY/operacloud/ where IDENTITY is the ENTERPRISE ID of the customer.
Or
-
Enter the OPERA Cloud Identity Management Portal URL if you have multiple OPERA Cloud environments.
For example: https://ocimqa.oraclehospitality.us-phoenix-1.ocs.oraclecloud.com/IDENTITY/ocimportal/ where IDENTITY is the ENTERPRISE ID of the customer.
-
- Sign on URL:
- Click Save.
Step 4: Configure User Attributes and Claims
The Oracle Cloud Infrastructure Console enterprise application template is seeded with the required attributes, so there is no need to add any. However, you must make the following customizations:
- In the User Attributes & Claims section, click Edit in the upper-right corner. The Manage Claim panel appears.
- Next to the Name identifier value field, click Edit.
- Under Required claim, select Unique User Identifier (Name ID).
- Select Email address and change it to “Persistent.”
- For Source, select Attribute.
- For Source attribute, select user.userprincipalname.
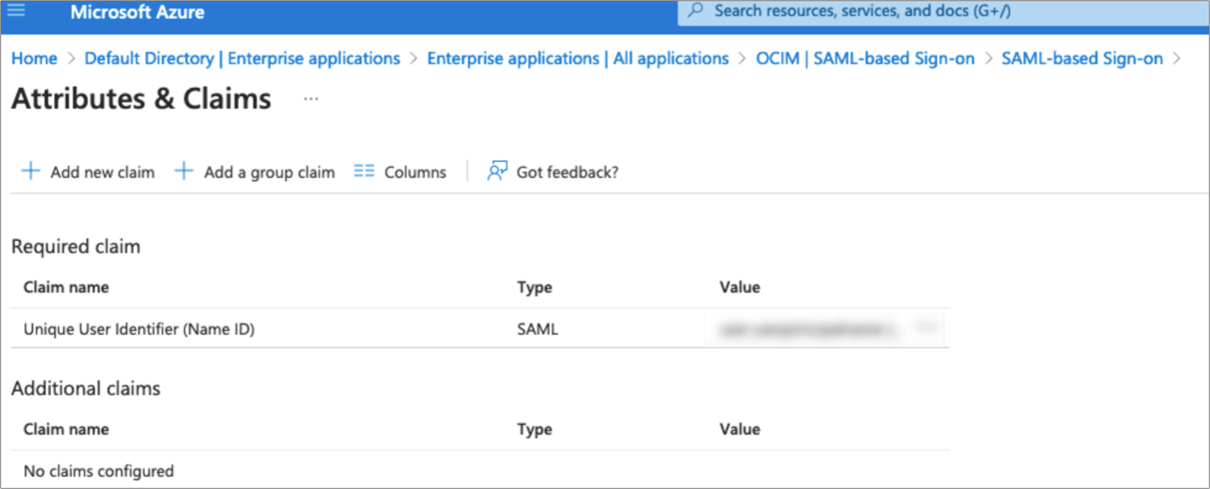
- Click Save.
Table 1-1 SAML Attribute Mapping
| SAML User Attribute Type | SAML User Attribute Name | IAM Domain User Attribute | Value | Mandatory Attribute |
|---|---|---|---|---|
|
Attribute |
#upper($(assertion.oc_ownercode)) |
urn:ietf:params:scim:schemas:idcs:extension:custom:User:OC_UserOwnerCode |
N/A |
No |
|
Attribute |
oc_employeenumber |
urn:ietf:params:scim:schemas:idcs:extension:custom:User:OC_UserEmployeeNo |
N/A |
No |
|
Attribute |
oc_primaryworklocation |
urn:ietf:params:scim:schemas:idcs:extension:custom:User:OC_PrimaryWorkLocation |
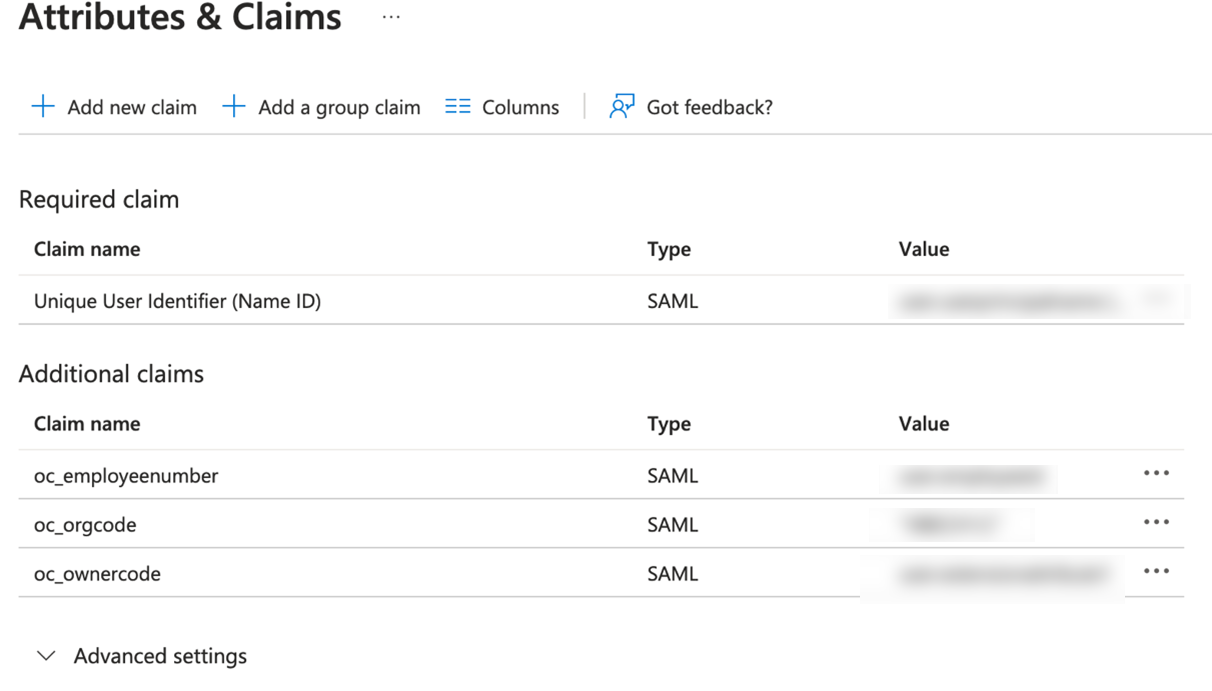
Mandatory Single Valued User Attribute. Indicates the user’s primary work location. Primary Work Location can have values <ENTERPRISE_IDCHAINCODE>:EC for multi chain customers derived from the user profile. For customers having only a single chain, the source value can be set to constant <ENTERPRISE_ID>:E <CHAINCODE>:C for all users. <ENTERPRISE_ID><CHAINCODE> will be oc_orgcode. This mapping is required and mandatory only if oc_primaryworklocation cannot be sent in the SAML claims from IdP. |
Yes |
Figure 1-1 Attributes & Claims
Step 5: Download the Azure AD SAML Metadata Document
- In the SAML Signing Certificate section, click the download link next to Federation Metadata XML.
- Download this document and make a note of where you save it. You will upload this document to the IAM Domain Console in the next series of steps.
Step 6: Assign User Groups to the Application
To enable Azure AD users to log in to Oracle Hospitality OPERA Cloud, you must assign the appropriate user groups to your new enterprise application.
- On the left navigation pane, under Manage, select Users and Groups.
- Click Add at the top of the Users and Groups list to open the Add Assignment pane.
- Click the Users and groups selector.
- Enter the name of the group you want to assign to the application into the Search by name or email address search box.
- Hover over the group in the results list to see a check box appear. Select the check box to add the group to the Selected list.
- When you are finished selecting groups, click Select to add them to the list of users and groups to be assigned to the application.
- Click Assign to assign the application to the selected groups.
Step 7: Add Microsoft Azure AD as an Identity Provider in OCI IAM Identity Domains
- Navigate to the Oracle IAM domain console.
- On the navigation menu, click Security and then click Identity providers.
- Click Add IdP and then click Add SAML IdP.
- Enter the following information:
- Name: Enter the name of the IdP.
- (Optional) Description: Enter a description of the IdP.
- (Optional) Identity provider icon: Drag and drop a supported image or click select one to browse for the image.
- Click Next.
Ensure that Import identity provider metadata is selected, and browse and select, or drag and drop the Azure AD metadata XML file into Identity provider metadata. This is the metadata file you saved earlier from Azure AD.
- Click Next.
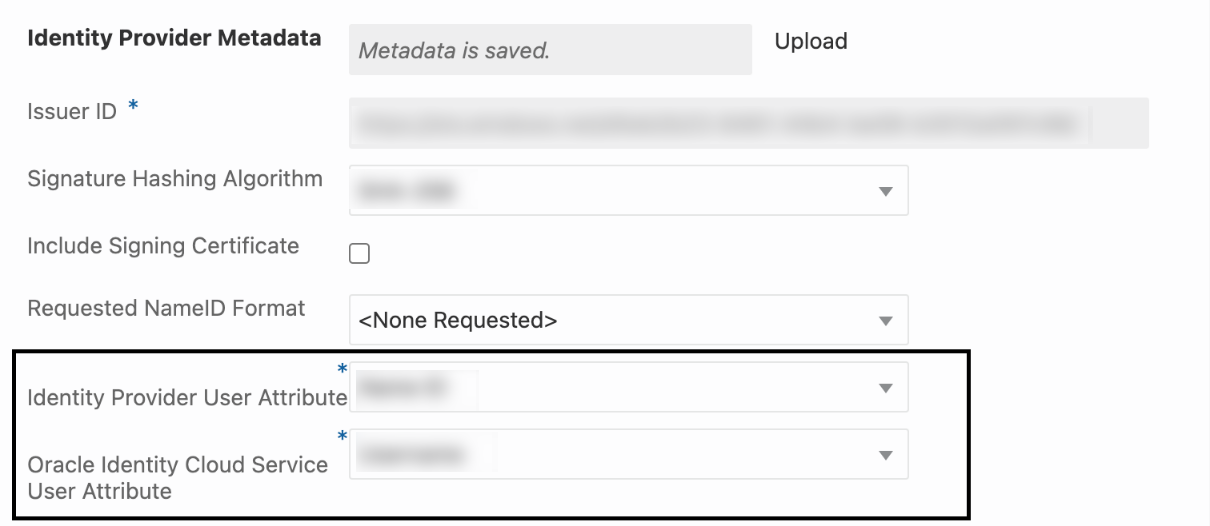
- In Map user identity, set the values as shown in the following
screenshot.
- Click Next.
- Under Review and Create, verify the configurations, and then click Create IdP.
- Click Activate.
- Click Add to IdP Policy Rule.
- Click Default Identity Provider Policy to open it, and from the context (three dots) menu choose Edit IdP rule.
- Click Assign identity providers and then click Azure AD Identity provider to add it to the list.
- Click Save Changes.
- Go back to Security and click Sign-on policies.
- Click Default Identity Provider Policy to open it, and in the Sign-on rules from the context (three dots) menu on the right, select Edit IdP rule.
- Select Azure AD.

- Save your changes.
JIT Attribute Mapping
-
In the OCI console, open the navigation menu and click Identity & Security.
-
Under Identity, click Domains.
-
In the respective domain, navigate to Security and then navigate to Identity Provider.
-
Under the respective Identity Provider, click Configure JIT.
-
Turn on the Enable Just-In-Time (JIT) provisioning option and select the Update the existing identity domain user option.

-
Save your changes.
-
Create a Confidential Application
-
In the OCI identity domain, open the navigation menu and click Identity & Security.
-
Under Identity, click Domains.
-
Click the name of the identity domain that you want to work in. You might need to change the compartment to find the domain that you want. Then, click Integrated applications.
-
Click Add application.
-
In the Add application screen, select Confidential Application, and then click Launch workflow.
-
On the Add application details page, enter an application name and description, and then click Next.
-
On the Configure OAuth page, under Client configuration, select Configure this application as a client now.
-
Under Authorization, select only Client Credentials as the Allowed Grant Type.
-
At the bottom of the page, select Add app roles and then click Add roles.
-
In the Add app roles panel, select Identity Domain Administrator, and then click Add.
-
Click Next and then click Finish.
-
On the application detail page, scroll down to General Information. Copy the Client ID and the Client Secret and save it in a secure place for later.
-
After the application is created, click Activate.
Note:
Once JIT Configuration is completed, this Client application can be deactivated.
-
Step 8: Configuring Just In Time Provisioning Attribute Mapping using Postman
Set the Environment Parameters in Postman
-
Open Postman, select Environments, and click Import.
-
On the Import screen, Import the file OCI IAM Identity Domain.postman_environment.json. For the JSON file downloads, refer to the following Customer Support Portal article: https://iccp.custhelp.com/app/answers/answer_view/a_id/1016088.
-
In the imported environment, update the environment variables by entering the following values, and then click Save.
-
HOST: The Oracle IAM Domain URL.
-
CLIENT_ID and CLIENT_SECRET: The Client ID and the Client Secret from the confidential application.
-
Import the OCIM Federation Postman Collection
-
On the Postman main page, select Collection and click Import.
-
In the Import dialog box, import the file OCIM Federation.postman_collection.json. For the JSON file downloads, refer to the following Customer Support Portal article: https://iccp.custhelp.com/app/answers/answer_view/a_id/1016088.
Request an Access Token
-
On the Collections tab, expand OCIM Federation and select Obtain access_token (client credentials). Click Send.
The access token is returned in the response from Oracle Identity Domain.
-
Highlight the access token content between the quotation marks and then right-click.
-
In the shortcut menu, select Set: OCI IAM Identity Domain. In the secondary menu, select access_token. The highlighted content is assigned as the access token value.
Get the Identity Provider Name
-
Select Get the Identity Provider Name and click Send.
-
Note the partnerName in the response for the type: SAML. The partnerName should be the Identity Provider configured in Identity Domain.
Get the Identity Provider Id by passing the Identity Provider Name
-
Select Get the Identity Provider Id by passing the Identity Provider Name.
-
Replace partnerName in the URI with the partnerName from the 'Get the Identity Provider Name' section (see previous steps).
-
Click Send.
-
Note the jitUserProvAttributes.value.
Update the JIT Attribute Mapping
-
Select Update the JIT Attribute Mapping.
-
Replace the <jitUserProvAttributes.value> in the URL with the value from the ‘Get the Identity Provider Id by passing the Identity Provider Name’ section (see previous steps).
-
Click Send.
Note:
Status: 200 OK should be received in the response.
Confirm the JIT Mappings are Created
-
Go to the OCI Identity Domain console, navigate to Identity Provider, and select the provider.
-
Click Configure JIT and confirm the JIT mappings have been created.
Step 9: Test SSO Between Azure AD and OCI IAM
Note:
The configurations in the 'Setting Up Synchronization with Microsoft Azure AD' guide must be completed before you can test the SSO between Azure AD and OCI IAM.
In this section, you can test that federated authentication works between OCI IAM and Azure AD.
- Open a supported browser and enter the OCI Console URL:
- Enter your Cloud Account Name, also referred to as your tenancy name, and click Next.
- Select the identity domain in which AzureAD federation has been configured.
- On the sign-in page, you can see an option to sign in with Azure AD.
- Select Azure AD. You are redirected to the Microsoft login page.
- Provide your AzureAD credentials.
- On successful authentication, a ‘Connection Successful’ message appears.