10 Item Flow Exceptions Task
The Item Flow Exceptions workflow manages item-store exceptions for Short Life Cycle (SLC) products and extends the approved Item Flow plan to the store level. While Long Life Cycle (LLC) products are managed through broader replenishment systems, SLC items require more detailed weekly planning because of their shorter selling window. This workflow supports both Single Drop and Multiple Drop strategies, allowing planners to adjust receipt timing, frequency, presentation minimum, and safety stock for specific stores.
Once Item Flow is approved at the style-color, cluster, and assortment period level, planners can review and refine plans at the style-color, store, and assortment period level within the Item Flow Exceptions task. This enables tailored receipt planning for specific stores, such as earlier drops, different order frequencies, or store-specific stock requirements.
The system generates weekly sales and receipt recommendations based on the selected planning method, sales curve, and exception parameters. Planners review the results, adjust buy quantity for Single Drop items or weekly sales and receipts for Multiple Drop items, and approve the exception plan when ready.
Create the Item Flow Exceptions Segment
When working in a segment, limit wizard selections to the specific scope being planned to improve navigation and UI responsiveness. The workspace should include only the items and stores impacted by exceptions, and Item Flow plans must already be approved before creating Item Flow exceptions.
To create the Item Flow Exceptions segment:
- From the Oracle Home page, navigate to the Oracle Retail icon to open the task selection panel.
- Locate the Item Flow Exceptions task using the available navigation options or by entering Item Flow Exceptions in the search field.
- Select the Item Flow Exceptions task. The wizard dialog opens.
- Click Create New Plan.
- Enter a plan label and click OK.
- In Select Assortment Period, choose an assortment period and click Next.
-
In Select Product, choose one or more style-color and click Next. Best practice is to limit selection.
The wizard automatically filters to approved Short Life Cycle items.
- In Select Location, choose one or more stores and click Next. Best practice is to limit selection.
- Click Finish.
Step: Define Item Flow Exceptions
The Item Flow Exceptions workflow extends the Item Flow process to the store level, using the same core planning logic but applying it to individual store-level exceptions rather than the cluster-level plan.
The Item Flow workflow begins with defining parameters for Short Life Cycle (SLC) items, including the delivery strategy and sales curve. Planners select a planning method (Single Drop or Multiple Drop), choose a sales curve, and review default receipt parameters such as lead time, order frequency, and safety stock.
Planners then execute the Create Sales and Receipt Plan application action to generate weekly sales and receipt projections. For Single Drop items, planners review and adjust buy quantity. For Multiple Drop items, planners review and refine weekly sales and receipt distributions.
Once the plan is validated, planners execute approval of the Item Flow. Additional views support review of sales curves and administrative parameters to ensure alignment with planning objectives.
Tab and Views in this Step:
Application Actions
Create Sales & Receipt Plan
Generates weekly sales and receipt unit recommendations based on defined Item Flow parameters.
Approve Exceptions
Moves Working Plan (Wp) assortment to the Original Plan (Op) and Current Plan (Cp) version for use in downstream process steps. As a Pre-Season process this creates both Op and Cp versions.
Export Placeholders
Exports placeholder items for downstream processing, such as item creation or integration with external merchandising systems.
Refresh Rollup
Creates alternate hierarchies based on selected location or product attributes for aggregated analysis.
Define Item Flow Exceptions Tab
In this tab, the Buyer or Planner Reviews the delivery strategy and Sales Curve, reviews, and updates the Receipt Parameters to manage exceptions, and plans the weekly sales and receipts units for Short Life Cycle (SLC) items for exception item-store combinations.
Define Item Flow View
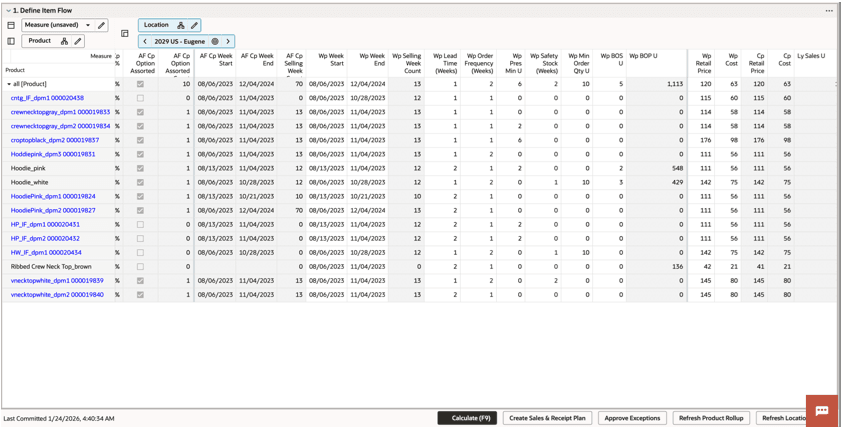
The Define Item Flow view supports planning of SLC items store exceptions by defining key parameters such as Planning Method (Single Drop or Multiple Drop), sales curve selection, and selling start and end weeks.
Receipt parameters—including lead time, order frequency, and safety stock—are auto-populated from approved Item Flow plans by cluster and can be adjusted as needed.
For the Item Flow Exceptions task, Smart Curves are sourced from the prior process step of Item Flow task. If a Smart Curve recommendation is not available for a selected style-color, the Smart Start Alert is activated and the Bell Curve is used to generate the sales and receipt plan unless another sales curve source is selected.
The Create Sales and Receipt Plan application action generates weekly sales and receipt projections. Weekly sales for both Single Drop and Multiple Drop items are based on the selected curve and date range.
For Single Drop items, buy quantity is calculated using sell-through, sales units, lead time, and minimum order quantity. For Multiple Drop items, receipts are calculated using sell-through, order frequency, safety stock, and related parameters.
Filters enable aggregation and analysis across Single Drop and Multiple Drop products.
If new placeholders are created and recommended sales potential values are desired, return to the Assortment Fit step to generate sales potential before proceeding. Otherwise, Like Item can be assigned for seeding sales.
The steps to complete this process:
- (Optional) Assign Like Items to seed Item Flow parameters:
-
Unhide Wp Copy Like Item and Wp Like Item measures.
Wp Like Item is a picklist measure available at the All Location level.
-
Select a Wp Like Item from an existing style-color in the workspace.
-
Set Wp Copy Like Item to True.
-
Execute the Copy Like Item application action to copy the following values into the selected style-color: AF Cp Sales U, AF Cp Week Start/End, Wp Retail Price, and Wp Cost.
-
Once Wp Sales U is populated, default receipt parameters populate automatically.
-
-
Review alert:
-
Smart Start Alert
Triggers when the selected style-color does not have a recommended Smart Curve. The real-time alert identifies the affected style-color, and the Bell Curve is used to generate the sales and receipt plan unless another Wp Sales Curve Source is selected.
-
- Define item flow parameters, including Wp Planning Method, Wp Sales Curve Source, Wp Sales U (Initial), and Wp Week Start/End.
- Switch measure profiles as needed to support different planning methods and delivery strategies.
- Review and adjust receipt parameters such as lead time, order frequency, presentation minimum, and safety stock.
- Select Wp Create Sales and Receipt Plan for the desired style-colors.
- Execute the Create Sales and Receipt Plan application action to generate sales and receipt flows.
- Navigate to subsequent views to review and refine results.
Measure Profiles
-
Default Profile
Defines the core item flow parameters, including Wp Planning Method, Wp Sales U (Initial), Wp Sales Curve Source, Wp Sell Thru % (Initial), and Wp Week Start/End.
-
Multiple Drop Profile
Extends the Default Profile with additional parameters required for multiple delivery planning, including Wp Lead Time (Weeks), Wp Order Frequency (Weeks), Wp Pres Min U, Wp Safety Stock (Weeks), and Wp Min Order Qty U.
-
BOS Override Profile
Enables override of Beginning of Season (BOS) inventory values for carryover item.
Adjust Buy Quantity View
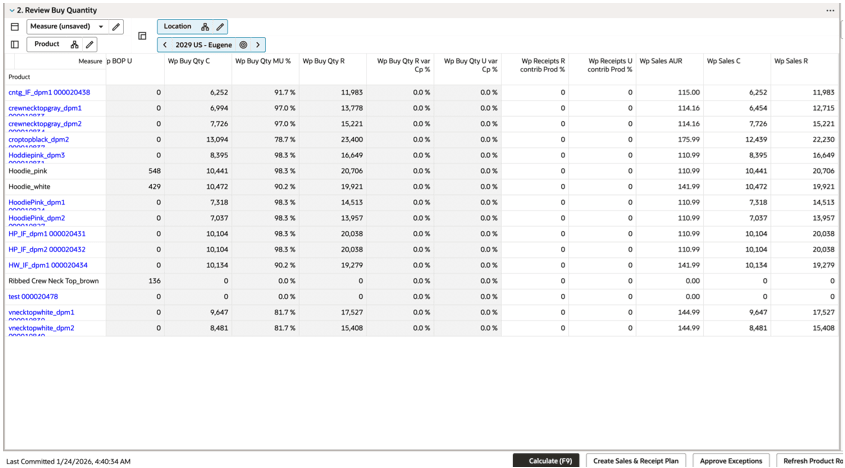
The Adjust Buy Quantity view enables planners to define buy quantity for Single Drop (only one delivery) items by adjusting sell-through percentage.
This view focuses on items with a single receipt. Weekly sales are derived from the selected sales curve, ensuring alignment with expected demand patterns. Buy quantity is defined at the assortment period level and distributed to weeks in downstream steps.
The steps to complete this process:
- Review result for single drop items.
- Review the system recommended Wp Buy Qty U and adjust as needed based on sell-through and business expectations.
Adjust Weekly Flow View
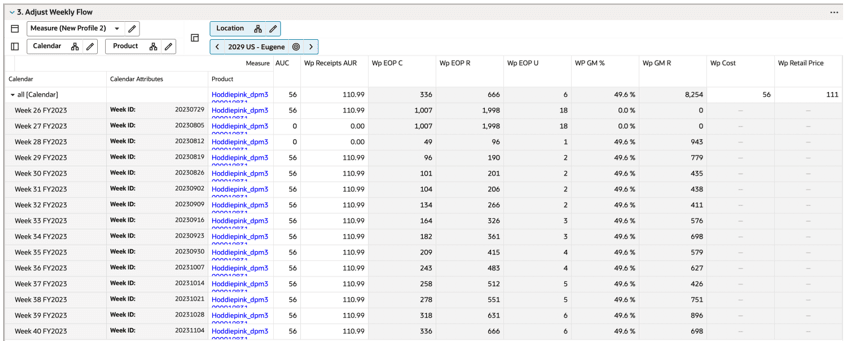
The Adjust Weekly Flow View enables planners to review and refine weekly sales and receipt plans for both Single Drop and Multiple Drop items. This view provides a detailed, week-level breakdown of sales, receipts, and inventory.
For Single Drop items, a single receipt is scheduled based on Start Week + Lead Time, and sales are distributed using the selected sales curve. For Multiple Drop items, receipts are phased across weeks based on order frequency and other receipt parameters, with sales aligned to the selected curve.
The view also displays Beginning of Period (BOP) and End of Period (EOP) inventory, supporting inventory management and validation of stock levels. Receipt flow is driven by parameters defined in the Define Item Flow View, including lead time, order frequency, presentation minimum, and safety stock.
Measure profiles and filters support analysis across sales, margin, receipts, and inventory, allowing planners to evaluate performance and refine plans.
The steps to complete this process:
- Review weekly results for Single Drop and Multiple Drop items.
- Switch measure profiles as needed to analyze sales, margin, receipts, or inventory.
- Review system recommended Wp Sales U and Wp Receipts U and adjust as needed.
- Review alerts:
-
Missing Receipt Alert
Triggers when a style-color is assorted, and Wp Sales U is greater than 0 but Wp Receipts U is 0 for the assortment period.
-
BOP Inventory Alert
Triggers when a style-color is assorted and Wp BOP U is less than the required presentation minimum and safety stock units.
-
Measure Profiles
-
Default Profile
Provides a concise view of key KPIs across sales, receipts, and inventory.
-
Weekly Sales & Margin Profile
Focuses on sales and margin metrics, including comparison to last year.
-
Weekly Receipt & Inventory Profile
Focuses on receipts and inventory KPIs such as sell-through and forward cover, including comparison to last year.
Approve Exceptions View
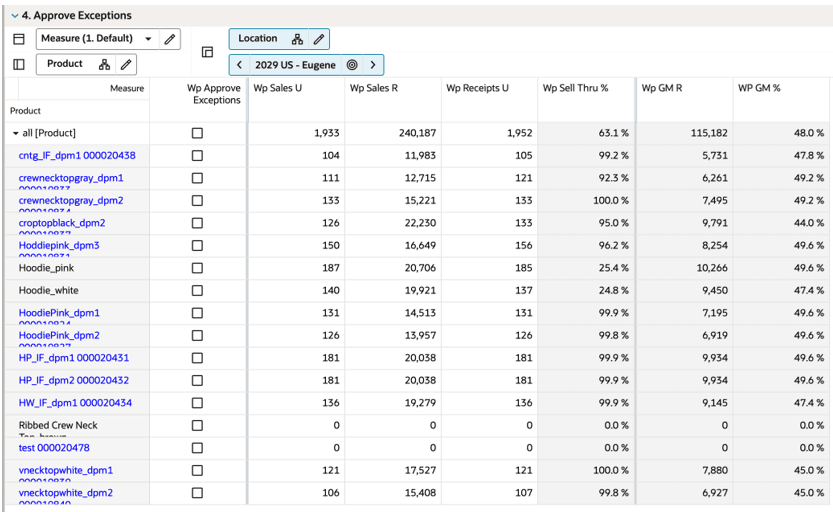
The Approve Item Flow view serves as the final step to review and approve the Item Flow plan. Planners review weekly sales, receipt flows, and inventory projections to ensure alignment with strategy and financial targets. Once validated, the Approve Exception application action finalizes the plan by replacing the Op/Cp item flow plans created by cluster.
As a pre-season process, approval creates both an Original Plan (Op) and a Current Plan (Cp) version. The Original Plan remains a static snapshot, while the Current Plan is used for in-season tracking, where actuals replace plan values for elapsed periods to create a combined actual + plan view.
If store-level Item Flow exceptions are required, Item Flow must first be approved at the Assortment Period and Cluster level before planning exceptions in the Item Flow Exception workspace.
The steps to complete this process:
- Review the finalized Item Flow plan, including weekly sales, receipts, and inventory projections.
- Select Wp Approve Exception Boolean measure for the style-color or aggregated level to be approved.
- Execute the Approve Exception application action to copy Working Plan (Wp) values to Original Plan (Op) and Current Plan (Cp).
Measure Profiles
-
Default Profile
Provides a concise view of key KPIs across sales, receipts, and inventory.
-
Wp to Prior Cp
Enables comparison between the current working plan and previously approved plans to support iterative planning.
Review Sales Curve View
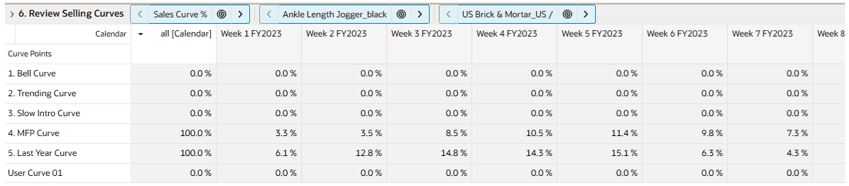
The Review Sales Curve view enables planners to review the sales curves available in the system and evaluate how each curve shapes weekly sales projections. The system provides predefined curves to support a range of planning needs, and planners can review them in graphical form or in pivot table format by percent distribution.
Planners can use these predefined curves, or custom curves where available, or AI- recommended Smart Start curves, to support weekly sales planning and align sales projections with product behavior, market conditions, and strategic goals
Review Admin Parameters View
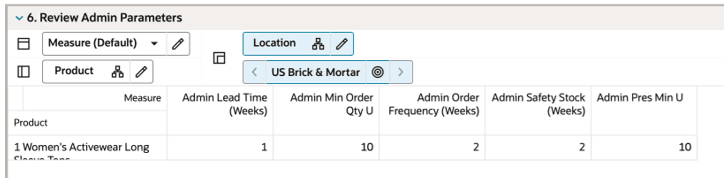
The Review Admin Parameters view enables planners to review default receipt parameters defined in Planning Administration.
These parameters—such as Lead Time, Order Frequency, Safety Stock, and Minimum Order Quantity—serve as the foundation for receipt planning and are automatically populated into the Item Flow process.
After review, planners can return to the Define Item Flow view to adjust parameters as needed to reflect specific business requirements or product characteristics. Adjustments can be made at the style-color level or higher product aggregations. For example, subclasses with longer supplier lead times or higher safety stock requirements can be modified to reflect these conditions.
Refresh Product Rollup View
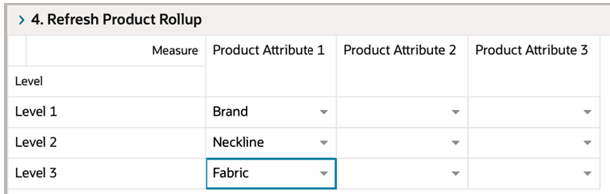
The Refresh Product Rollup view creates dynamic, attribute-based hierarchies for analyzing assortments, enabling planners to evaluate performance across multiple attribute combinations and view aggregated results at different levels of detail.
The steps to complete this process:
- Select up to three dynamic product attributes from the drop-down list.
- Execute the Refresh Rollup application action. This generates dynamic location hierarchies based on selected attributes, enabling alternative rollup views for analysis.
-
To view the product attribute aggregations:
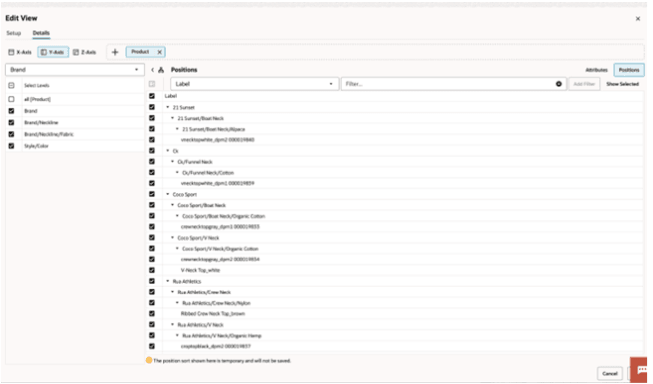
- In a view that displays style-color level, click the Product Hierarchy tile.
- Select the attribute (Attribute 1 or 2 or 3) that you would like to view in the nested dynamic rollup.
- Click OK.
Refresh Location Rollup View
The Refresh Location Rollup view creates dynamic, attribute-based hierarchies for analyzing assortments, enabling planners to evaluate performance across multiple attribute combinations and view aggregated results at different levels of detail.
The steps to complete this process:
- Select up to three dynamic location attributes from the drop-down list.
- Execute the Refresh Rollup application action. This generates dynamic location hierarchies based on selected attributes, enabling alternative rollup views for analysis.
- To view the location attribute aggregations:
- In a view that displays store level, click the Location Hierarchy tile.
- Select the attribute (Attribute 1 or 2 or 3) that you would like to view in the nested dynamic rollup.
- Click OK.