9 Project Administration
Administration activities are performed by the Project Administrator and Project Manager.
Project Administrator Authority Profile
This Authority Profile can be assigned to Retailer users who need to have the ability to configure Project, Product, and Activity templates and the associated administration options:
-
View what has been set up for Project, such as, templates, teams, and pick list values.
-
Create, amend, or delete Projects, Activities, and Briefs.
-
Schedule projects.
-
Unlink records from a project.
-
Access and maintain the system calendar.
-
Access the Global Changes option in order to reassign the project manager for a project. Mass changes to project managers and users can be made using the Change Project Project Manager and Change Project User Names Global Changes options.
Project Manager Authority Profile
This Authority Profile can be assigned to users who need to be able to create projects and edit schedules:
-
View what has been set up for Project, such as, templates, teams, and pick list values.
-
Create, edit, or delete Projects, Activities, and Briefs.
-
Schedule projects.
-
Unlink records from a project.
To access the administration options for Project, select the Project Management Admin option. The Admin - Project Management tab opens. In the left pane, select an option and a page opens for that option. For more information on each option, see the following topics in this chapter:
Project Folders
This list of folders is used in the Project and Activity templates to allow lists to be filtered when selecting templates to be used in Projects or templates. To edit the list of folders, select the Edit action. The page opens in edit mode. From this page, you can update the translations, add a folder, or delete an existing folder.
Figure 9-1 Project Folders Page

Activity Status
The list of activity statuses is defined by the system. The Status ID and default status description cannot be changed. To edit any of the translated descriptions, select the Edit action. The page opens in edit mode.
Figure 9-2 Activity Status Page

Activity Sub-Status
Activity Sub-Status is a configurable list of sub-status codes that may be used as a secondary, but separate field option, to the system workflow status. The Activity Sub Status page has the same format as the Activity Status page shown in Figure 9-2.
To edit the sub-statuses, select the Edit action. The page opens in edit mode. From this page, you can update translations for the sub-status codes, add a new sub-status, or delete an existing sub-status.
Note:
The general sub-statuses for COMPLETED, MESSAGE SENT, MESSAGE ACCEPTED, and MESSAGE FAILED must be configured. If these sub-statuses are not present, integration with the Artwork module will fail.
Activity Type
An activity is a defined task or link. Activities can be used to link to other elements within the system (such as, Specification request) and can be auto-completed using the status changes of linked elements. Activity Type names appear in the Activity Type pick-list on the Activity Template record.
The Activity Type page lists the defined Activity Type names and record numbers. To edit an existing activity type, select the activity type and then select the Edit action. A tab opens in edit mode.
To create a new activity type:
-
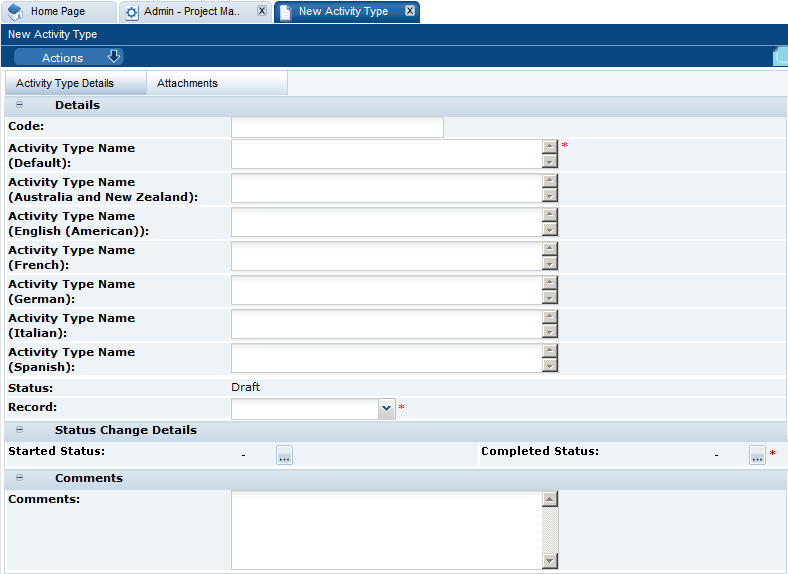
Select the New action. The New Activity Type tab opens.
Figure 9-3 New Activity Type Page
-
Enter the Activity Type name in the default language. This field is mandatory. Enter any translations.
-
In the Status Change Details section, select the record type from the drop-down list.
-
In the Status Change Details section, select the states that trigger the activity to be set to Started or Completed. Whenever the status of a record that has been linked to the activity changes, the system checks for the selected states. If there is a match, it changes the activity's status. Where the status selected in both fields matches the record's state, the system changes the Activities status to Completed. These fields are mandatory:
-
To select the triggers for Started status, click the icon. The Select Started Statuses dialog box appears. Select the statuses and then click Ok.
-
To select the triggers for Completed status, click the icon. The Select Completed Statuses dialog box appears. Select the statuses and then click Ok.
-
-
Enter a code and comments. These fields are not mandatory.
-
In the Attachments tab, add attachments to the activity type.
-
Select the Save action.
Activity Template
Templates for activities can be created and then assigned to Project Templates. These are single elements which can form part of the critical path or run in parallel to the main time-line. The Activity Template page shows the list of defined activity templates. For each activity, the sequence number, name, description, and duration in days are shown.
Figure 9-4 Activity Template Page
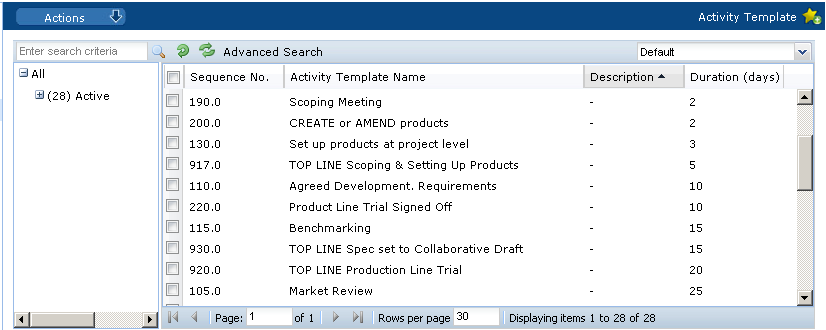
To edit an existing template, select the template and then select the Edit action. A tab opens in edit mode.
To create a new Activity Template:
-
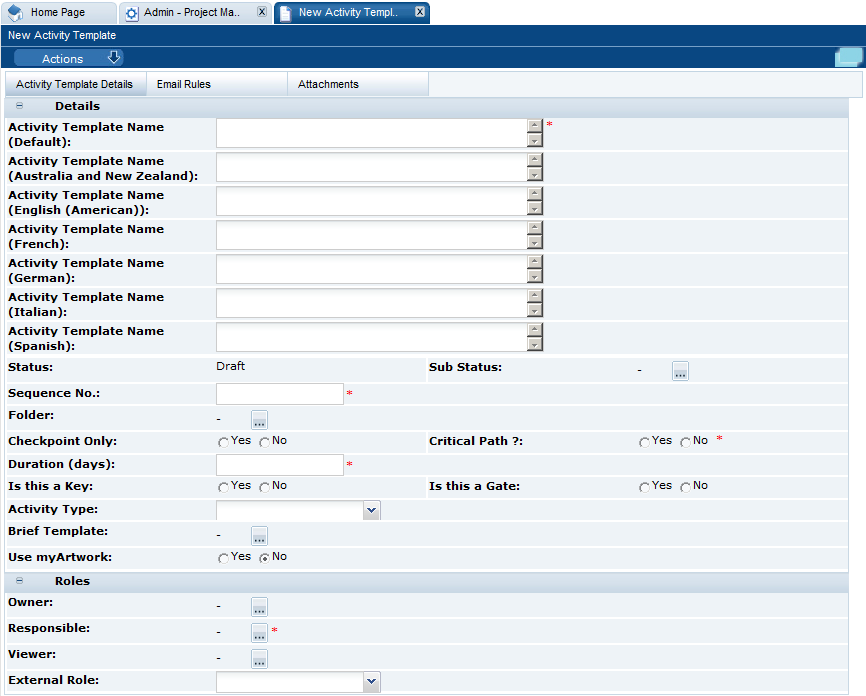
Select the New action. The New Activity Template page opens.
Figure 9-5 New Activity Template Page
-
In the Details section:
-
Activity Template Name: Enter the template name for the default language. This is a mandatory field. Enter any translations.
-
Status: The status is set to Draft.
-
Sub Status: Select the icon. Select the allowed sub-status in the Select Allowable Sub-Statuses dialog box and click Ok.
-
Sequence No: Enter a sequence number. This field is mandatory.
-
Folder: Select the icon. Select the folder in the Select Folder dialog box and click Ok. This field is mandatory.
-
Checkpoint Only: Check whether this template is only for checkpoint activities.
-
Critical Path: Check whether this template is for critical path activities. This field is mandatory.
-
Duration (days): Enter the duration in number of days. This field is mandatory.
-
Is this a Key: Check if this is a key activity.
-
Is this a Gate: Check if this is a gate activity. If Yes is selected, the Gate Type field appears. Select whether the gate type is Auto Complete or Approval Required.
-
Activity Type: Select the activity type associated with this template from the drop-down list.
-
Brief Template: Select the icon. Select the Brief Template that provides the questions for this activity in the Select Brief Template dialog box and click Ok.
-
Use Artwork: Select whether the Artwork module is used.
-
-
In the Roles section, select the Owner, Responsible, and Viewer roles from the list of portal owner roles. Responsible is a mandatory field. The options for External Role are Supplier Responsible and Supplier Viewer.
-
In the Email Rules subtab, the rules used to trigger email are listed.
-
In the Attachments tab, add attachments to the template.
-
Select the Save action.
Brief Templates
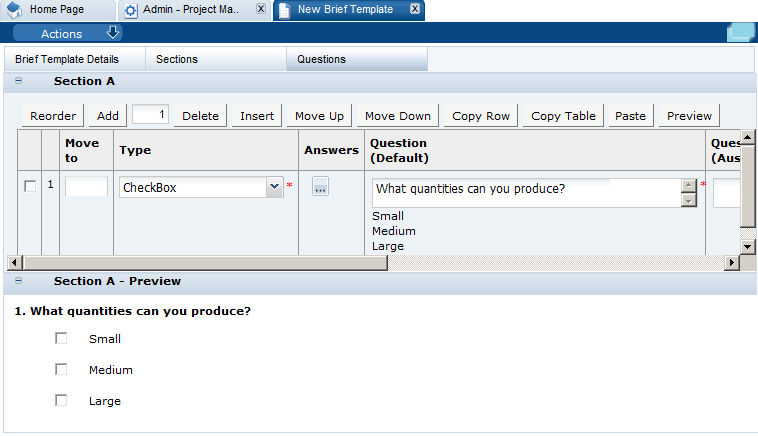
A Brief is a questionnaire which is held in either the activity or product (can be linked to specifications) and is completed as part of an activity by either the solution owner's user or supplier. A Brief Template pulls together the sections, questions, and answers and defines the order in which these appear on the screen. To edit an existing template, select the template and then select the Edit action. A tab opens in edit mode.
To create a new template:
-
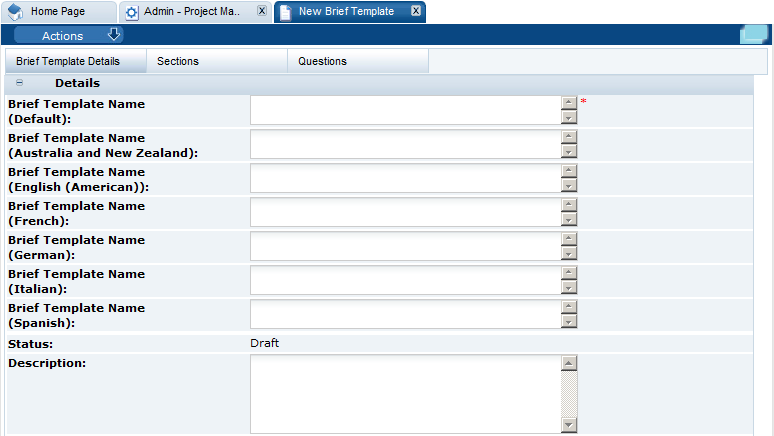
Select the New action. The New Brief Template tab opens.
Figure 9-6 New Brief Template Page
-
In the Brief Template Details subtab:
-
Enter the template name for the default language. This is a mandatory field. Enter any translations.
-
The status of the template is set to Draft.
-
Enter a description. This is not a mandatory field.
-
-
In the Sections subtab, to add a section to the Brief, select Add and enter the description and any translations. You can define multiple sections.
-
In the Questions subtab, you can define questions for each section:
-
Select the type of answer from the drop-down list.
-
To select the possible answers, click the icon in the Answers column. The Select Allowable Answers dialog box opens. Enter the answers and click Ok.
-
Enter the question in the default language. This is a mandatory field. Enter any translations.
-
To see what the questions will look like on a screen, select Preview. This displays a preview of the questions for that section.
Figure 9-7 New Brief Template Questions Page
-
-
Select the Save action.
Project Status
The list of project statuses is defined by the system. The Project Status page has the same format as the Activity Status page shown in Figure 9-2. The Status ID and default status description cannot be changed. To edit any of the translated descriptions, select the Edit action. The page opens in edit mode.
Project Type
Project Type is a configurable list of project type codes. The Project Type page has the same format as the Activity Status page shown in Figure 9-2.
To edit the project types, select the Edit action. The page opens in edit mode. From this page, you can update translations for the codes, add a new project type, or delete an existing project type.
Project Template
A Project Template is used to define a set of activities and associated roles so that different processes and project schedules can be configured. It contains general project information, project details, key personnel involved, and activities. The Project Template page lists the available templates and the folder for each. To edit an existing template, select the template and then select the Edit action. A tab opens in edit mode.
To create a new project template:
-
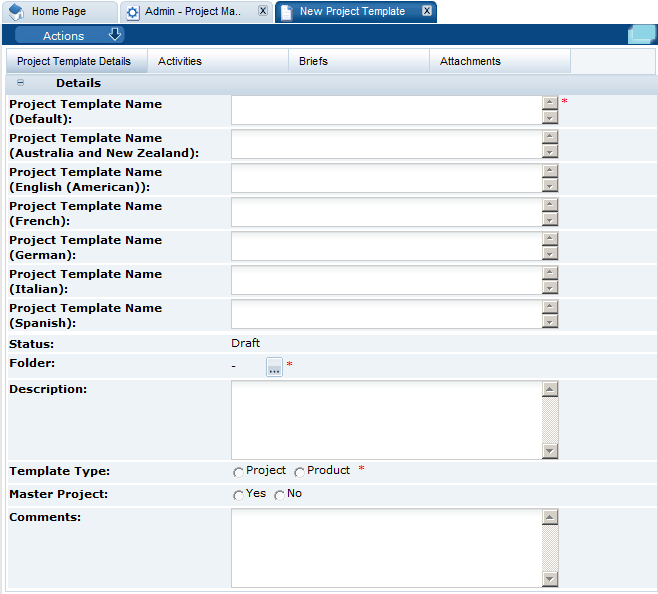
Select the New action. The New Project Template opens.
Figure 9-8 New Project Template Page
-
In the Project Template Details subtab:
-
Project Template Name: Enter the name of the project template in the default language. This field is mandatory. Enter the translations for any supported languages.
-
Status: The status of the template is set to Draft.
-
Folder: Select the icon. Select the folder in the Select Folder dialog box and click Ok. This field is mandatory.
-
Description: Enter a description. This field is not mandatory.
-
Template Type: Select the template type. This field is mandatory.
-
Master Project: Select whether this template is for a master project. If set to Yes, these template can be used to identify projects in the following records of the system:
-
The initial or the start project in a hierarchy.
-
As an indicator to export to third-party systems, for example, Artwork.
-
The initial project which can be the top level project for reports.
-
-
Comments: Enter any comments. This fields is not mandatory.
-
-
In the Activities subtab, add the activities to the template. Select the Add action. The Select Activity dialog box opens. Choose the activities and click Ok.
-
In the Briefs subtab, select the Brief templates to be added to this Project Template.
-
In the Attachments tab, add attachments to the template.
-
Select the Save action.
Team
Team administration can help a Project Manager by populating and adding users to roles which then populate the roles listed in an activity. On the Team page, the list of teams and roles associated with each team are shown. To edit an existing team, select the team and then select the Edit action. To create a new team:
-
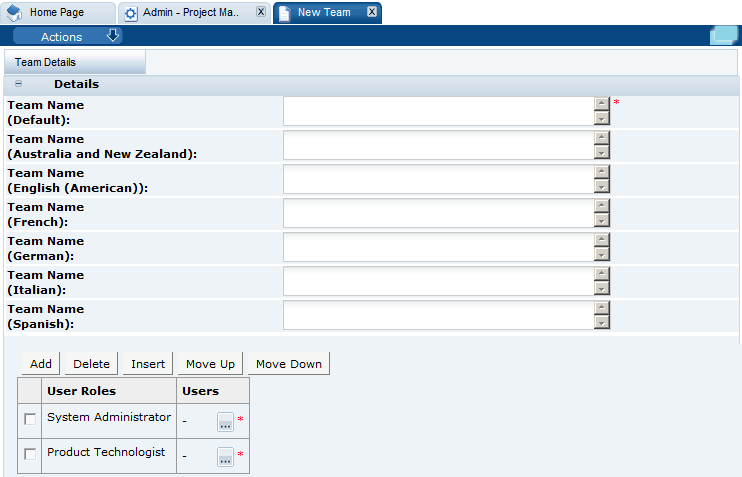
Select the New action. The New Team tab opens.
Figure 9-9 New Team Page
-
Team Name: Enter the team name for the default language. This is a mandatory field. You can also define the translated team names.
-
User Roles: This field is mandatory. To add a role to the team:
-
Select Add. The Select User Role dialog box appears.
-
Select the roles and click Ok.
-
To add users for a role, select the icon. The Select Users dialog box. Select the specific users for the team and click Ok.
-
-
Select the Save action.
System Parameters
To maintain the parameters used to support Project, select the System Control option and then System Parameters.
Table 9-1 shows the specific system parameters, by subtab on the System Parameters page, used to support Project.
Table 9-1 System Parameters to Support Project
| Subtab | Parameter | Description |
|---|---|---|
|
Urgent Items |
Show Project Activities |
If set to Yes, Project activities are shown in the UIM. Default is Yes. |
|
Project |
Hide Activities Already Linked option when linking records to Projects |
Use this to set the default value of this field when linking records to Projects. Default is unchecked. |
Email Templates
The email templates used to notify users as projects and activities they are associated with progress through their workflow stages are:
-
Activity Status Change email template (PROJECT1)
-
Activity Notification email (PROJECT2)
The contents of the emails can be amended by the administrator in the Notifications / Email Templates page in Admin area.
The following parameters are also available for use in the Project email templates:
-
$supplier_name - The name of the supplier, in the business language.
-
$supplier_local_name - The name of the supplier, in the local language.
-
$site_names - The names of the sites, in the business language.
-
$site_local_names - The names of the sites, in the local language.
-
$showInternationalNames - Whether international names are used.
-
$project_id - The id of the project.
-
$recipients - The list of recipients.
-
$recipients.personName - The names of the recipients.
-
$recipients.email - The email addresses of the recipients.
Table 9-2 shows an example of the parameters being used in the email template.
Table 9-2 Usage of Parameters in Project Emails
| Example Use in Template | Example Output in Email |
|---|---|
|
Status: $activity_status |
Status: Started |
|
Use international names: $showInternationalNames |
Use international names: true |
|
Supplier Name: $supplier_name Supplier Name Local: $supplier_local_name |
Supplier Name: ABC Supplies Ltd. Supplier Name Local: ABC Supplies Ltd. |
|
Site Names: $site_names |
Site Names: ABC Nottingham, ABC Leicester |
|
Site Names Local: $site_local_names |
Site Names Local: ABC Nottingham, ABC Leicester |
|
Project ID: $project_id |
Project ID: PR000009 |
|
Recipients: #foreach( $recipient in $recipients ) $recipient.personName ($recipient.email) #end |
Recipients: John Smith (john.smith@example.com) Joe Bloggs (joe.bloggs@example.com) Joan Doe (joan.doe@example.com) |
Upload Project Data
Retailer users with the Upload Administrator authority profile have access to the Upload Data option for the upload of projects. The upload only allows for the creation of projects, not for updates to existing projects.
Multiple projects may be uploaded; the details are created based on the specified Project Template. The Project Status is set to Created. Activities associated with the template are created and linked to the Project.
If a valid Parent Project is specified, the project is linked to that parent, with the Master Concept and Project Concept fields being populated accordingly.
Team users are assigned according to the Roles and User Ids specified in the spreadsheet. The Team specified on the Project Template is populated with values from the spreadsheet. If a role in the template is not populated in the spreadsheet, the role it is to still appear in the project, but without any user assigned.
The upload does not automatically schedule the projects; the Add Activity and Schedule action must be used to select and schedule the new projects, after they have been created.
To upload new Projects:
-
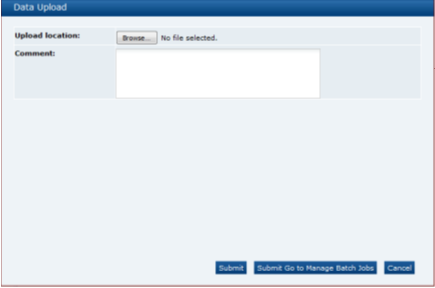
Select the Import action from the Projects view’s actions menu. The Data Upload dialog box opens.
Figure 9-10 Data Upload Dialog Box
-
Click Browse to search for the upload file.
-
Enter any comments to describe the reason for the upload.
-
To upload the file, select either the Submit or Submit Go to Manage Batch Jobs action. At this point, the system will create a background job to process the spreadsheet. The spreadsheet used to upload the data will be stored within the Attachments tab of the batch job.
Note:
An email will be sent to the job submitter if the data within the upload file fails validation.
Download Project Upload Spreadsheet
Retailer users with the Project Administrator or Project Manager authority profile also have access to the option to download a blank spreadsheet.
To download the latest version of the upload spreadsheet:
-
Select the Download Blank Spreadsheet action from the Projects view’s actions menu. An operating system specific dialog box opens with the option to either open or save the file.
-
Select the save option to download the ZIP file to your desktop.
Note:
The ZIP file contains a spreadsheet workbook with the first tab used to upload the data. The second tab contains guidance notes and the remaining tabs contain the valid glossary values.
The column heading text shown on the first tab is in the user's language. If translations are not present for the user's language, the portal's default language is substituted. An asterisk (*) is shown in a column heading if an entry is mandatory.