6 List Views
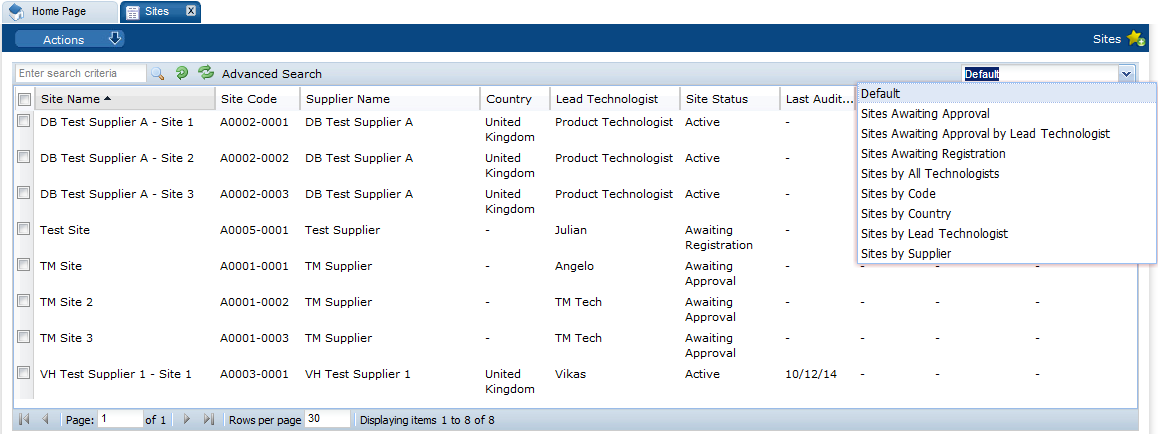
This chapter describes the functionality available for list views including adding and removing columns, sorting, and advanced searching. Figure 6-1 shows an example of a list.
Figure 6-1 List View Example

Note the following about views:
-
The system default view is the initial view displayed the first time a tab is opened.
-
When you close the tab, the view being displayed is remembered. The next time you open the tab, that view appears.
-
In the View Selector drop-down list, you can select a view. When you click a view in the list, the page is updated. The available list view names appear in alphabetical order.
-
The rows per page is initially set from the value in the user preferences. The number of rows per page can be changed while viewing the list, but the value in the user preferences is used the next time the tab is opened.
-
The options to search and change list views are not available for those list views that are embedded within a record, such as, the list of Sites within the Supplier records, list of Scorecards within the Site record, and so on.
Table 6-1 describes the icons are available for lists.
Table 6-1 List View Icons
| Icon | Description |
|---|---|
|
|
Select this icon to search the list based on the search criteria. |
|
|
Select this icon to clear the search criteria and reset the list. |
|
|
Select this icon to refresh the list. |
Changing the List View
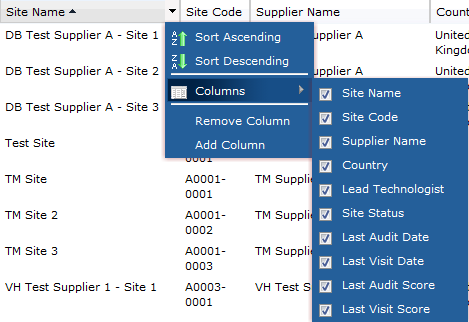
Options are available to change how columns and rows displayed in the list view.
Figure 6-2 Options for Changing the List View

-
To sort the order of the rows, select either Sort Ascending or Sort Descending.
-
To select the columns for the view, select Columns. Check the box for each column that you want in the view.
-
To remove a column from the view, select the column and then select Remove Column.
-
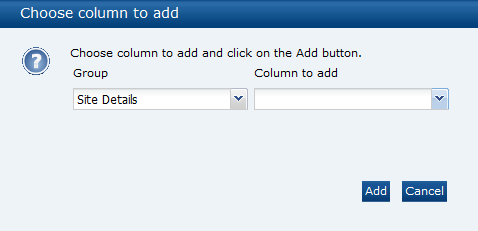
To add a column to the view, select Add Column.
Figure 6-3 Choose Column to Add Dialog Box

Select a group from the drop-down list. Select a column to add from the drop-down list. The choices available in this list are dependent on the value selected for the group. Select Add. The column is added to the list as the right-most column.
Resize Column Width
You can also resize the width of a column. Place the mouse on the right-hand side of the column. When the cursor appears, move it to the left or right to change the width of the column.
Export a View
To export the list view, select the Download action. The following export options are available:
-
Export to Excel
-
Export to CSV
-
Export to XML
Only the columns shown in the view are exported.
View or Edit a Record
To view or edit the record for an entry in the list, select the row and select the Edit action. The record is opened in a new tab.
Searches
There are two types of searches, simple and advanced.
Simple Search
To perform a simple search, select the column to be searched, enter the search text, and select the search icon. The list is updated to only include those entries that contain the text entered as the search criteria in the specified column.
For example, if the Supplier Name column is selected and db is entered as the search criteria, the list shown in Figure 6-4 now only shows those entries that contain the text db.
Figure 6-4 Simple Search Results Example

Search Results appears at the top of the page to indicate the list content is the result of running a search.
Note:
The search is only applied to the selected column. If columns are added or removed, the list of selectable columns is adjusted accordingly.
The following columns are excluded:
-
Columns that are derived from other records.
Note that although the Product Specification's product coverage fields (Variant Name, Quantity, and Product Number) are derived from the associated Product Record, it is possible to search these values by adding columns to the list view from either the Header or Product Record groups of fields.
The product coverage values in the Product Record group reflect the values on the Product Record. The values in the Header group are a snapshot of the Product Record's values at the time the specification progressed past Collaborative Draft status.
Therefore, for specifications at a draft status, the snapshot values will not be searchable (because they are empty); for specifications beyond Collaborative Draft status, the snapshot values are searchable, but may not necessarily be the same as the Product Record's current values (because the Product Record may have been edited since the snapshot was taken).
-
Date columns - the Advanced Search must be used, which has a specific date picker.
-
Boolean (yes/no or true/false) columns - the Advanced Search must be used, which has a specific Boolean type selector.
The search is not applied if:
-
Either the search column or the search criteria is missing.
-
Text search criteria is entered for a numeric column (such as searching for Spec Number xyz).
Advanced Search
Advanced search enables you build an expression to be used to determine what entries are included in the list. You can group rows in the search criteria by using parentheses and also use logical operators (And, Or).
To perform an advanced search:
-
Select Advanced Search. The Search Criteria opens.
Figure 6-5 Advanced Search Criteria Example

-
Enter the search criteria:
-
Group: Select a group from the drop-down list.
-
Field: Select a field from the drop-down list. The choices available in this list are dependent on the value selected from the Group list.
-
Operator: Select an operator from this list. This sets how the Value field is used in the search. The available options in this list are dependent on the selection in the Field list.
-
Select the search option. The selection is dependent on the selection in the Field list. For example, you may select whether the case should be ignored for any text fields or if the current date should be used.
-
Value: Enter the value for the search based on the selection from the Field list.
-
Select open and closing parentheses as needed.
-
Select a logical operator.
To add a row to the search criteria below the current row, select the icon with the plus sign. To delete a row, select the icon with the x on that line.
-
-
Select Search. The list is updated to only include those entries that meet the search criteria.
Figure 6-6 shows the list with only those entries that meet the search criteria shown in Figure 6-5.
Figure 6-6 Advanced Search Results Example
