7 Foundation Data
Figure 7-1 Foundation Data

Manage Locations
-
Search for a location(s)
On the Foundation Data page, select Setup. The Locations page appears.
Note:
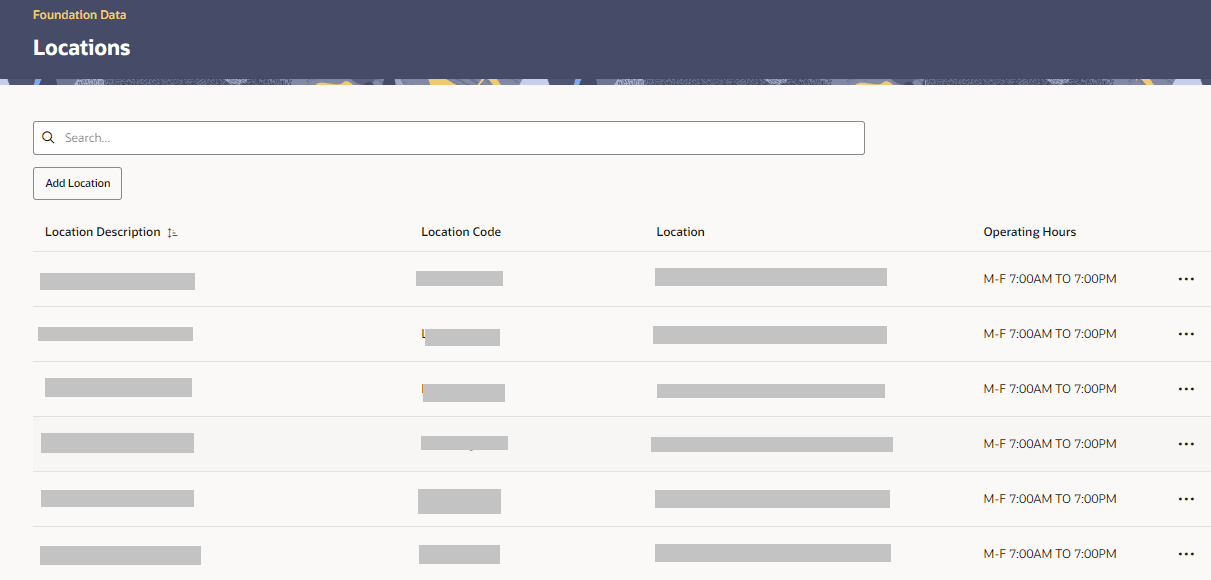
Click the column headings to sort the table by column in ascending or descending order. If the results cover more than one page, click Next > to display the next page of records.Figure 7-2 Locations Page
-
Location Description
-
Location Code
-
Location Address
-
Operating Hours
-
Actions Menu — Displayed as an ellipsis, the Actions Menu allows you to view, edit or delete the selected location.
Add Location
-
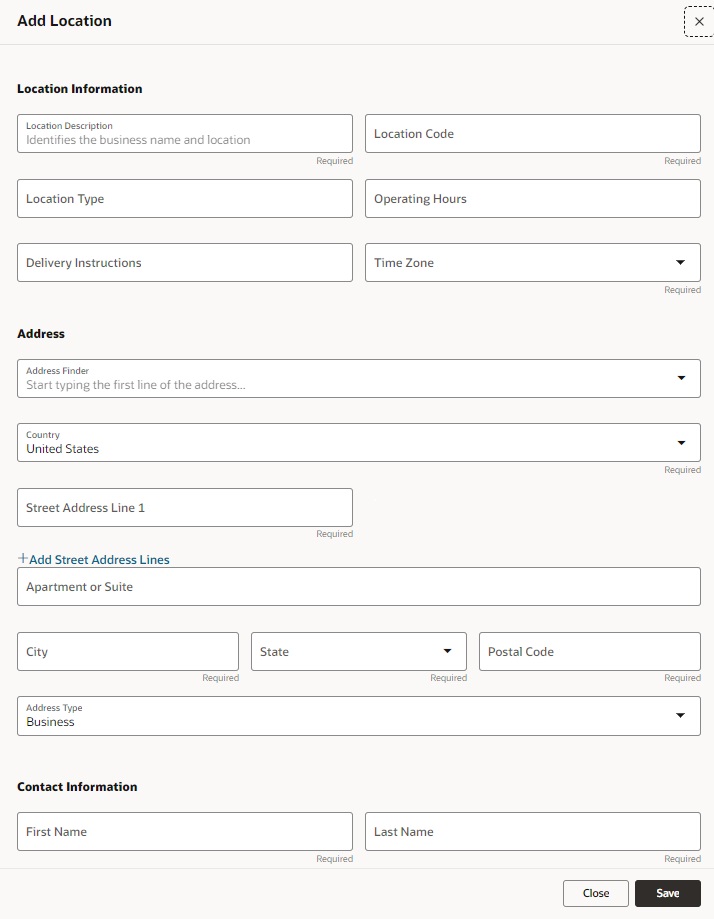
On the Locations page, select Add Location. The Add Location page appears.
Figure 7-3 Add Location
-
Complete the following fields.
Table 7-1 Location Information
Field Description Location Description Enter a description of the location to easily identify it. This is a required field. It is recommended to include both the business name and the location name as the description. This will be used when creating Package Labels, so including the business name will be helpful to the courier. Location Code Enter a unique code associated to the location that is shared across the business systems. This must be unique for the courier provider. Location Type Enter a type or category to classify the location. Operating Hours Enter the operating hours of the location. Delivery Instructions If necessary, enter delivery instructions for the location. Time Zone Select a time zone for your location from the list. This is a required field. Table 7-2 Address
Field Description Address Finder Enter the first line of the address. Country Select a country for your location from the list. This is a required field. Street Address Line 1 Enter the address for the location. Street Address Line 1 is a required field. Add Street Address Lines Select the Add Street Address Lines link, if you need more than one Street Address Line. You can enter up to four Street Address Lines. Apartment or Suite Optional City Enter the city of the location. This is a required field. State Select or search for a state for the location. This is a required field. Postal Code Enter the postal code for the location. This is a required field. Address Type Select the Address Type from the list. Available options are Business (default value), Residential or No Distinction. This is a required field. Table 7-3 Contact Information
Field Description First Name Enter the contact’s first name for the location. This is a required field. Last Name Enter the contact’s last name for the location. This is a required field. Phone Number This is a required field. Email Address Optional -
Then select one of the following options.
-
Click Close to reject the entries and close the window.
-
Click Save to add the new location to the location list.
-
View Location
-
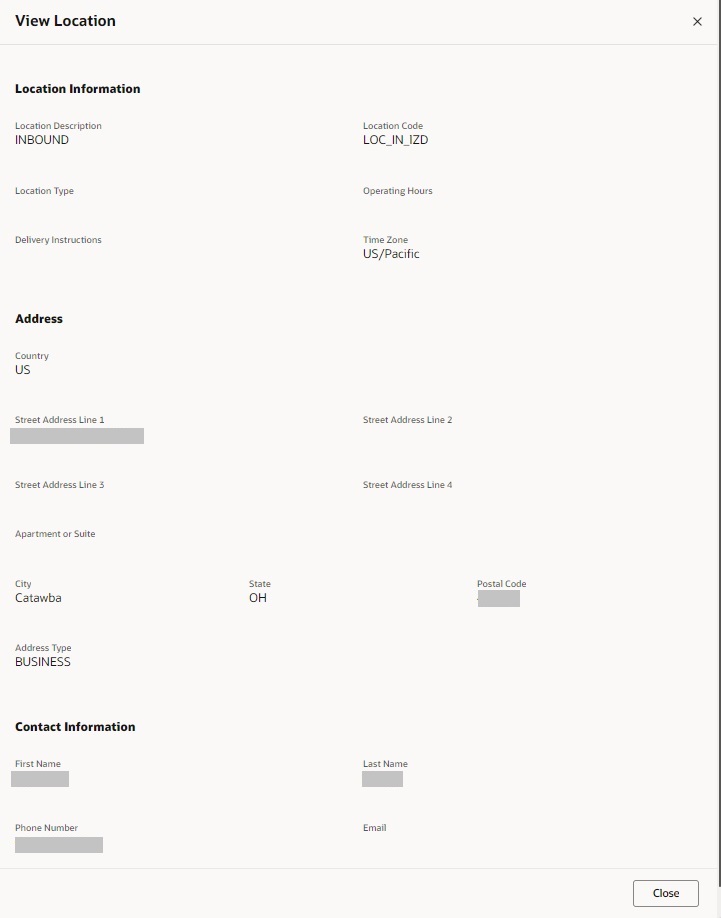
Select a row in the location list. Then select the View option in the Actions Menu, displayed as an ellipsis. The View Location page appears.
Figure 7-4 View Location
-
Click Close to close the window.
Edit Location
-
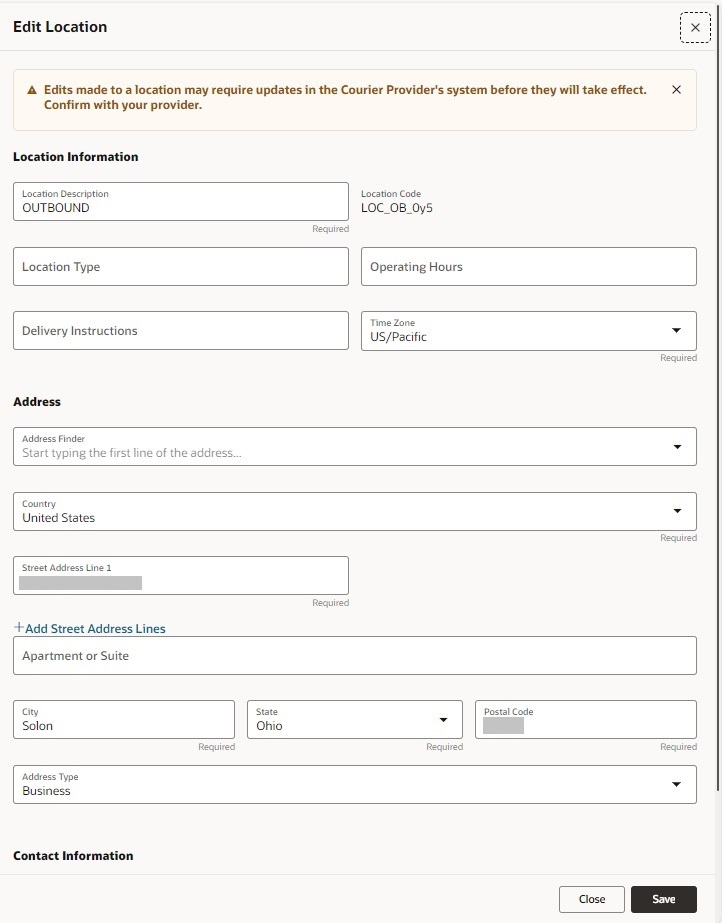
Select a row in the location list. Then select the Edit option in the Actions Menu, displayed as an ellipsis. The Edit Location page appears.
Figure 7-5 Edit Location
-
Edit the fields as required.
Note:
You cannot edit the Location Code field.Note:
Edits made to a location may require updates in the Courier Provider's system before they take effect. Confirm with your provider. -
Then select one of the following options.
-
Click Close to reject the entries and close the window.
-
Click Save to update the current location.
-
Configure Package Dimensions
-
Search for a package dimension(s)
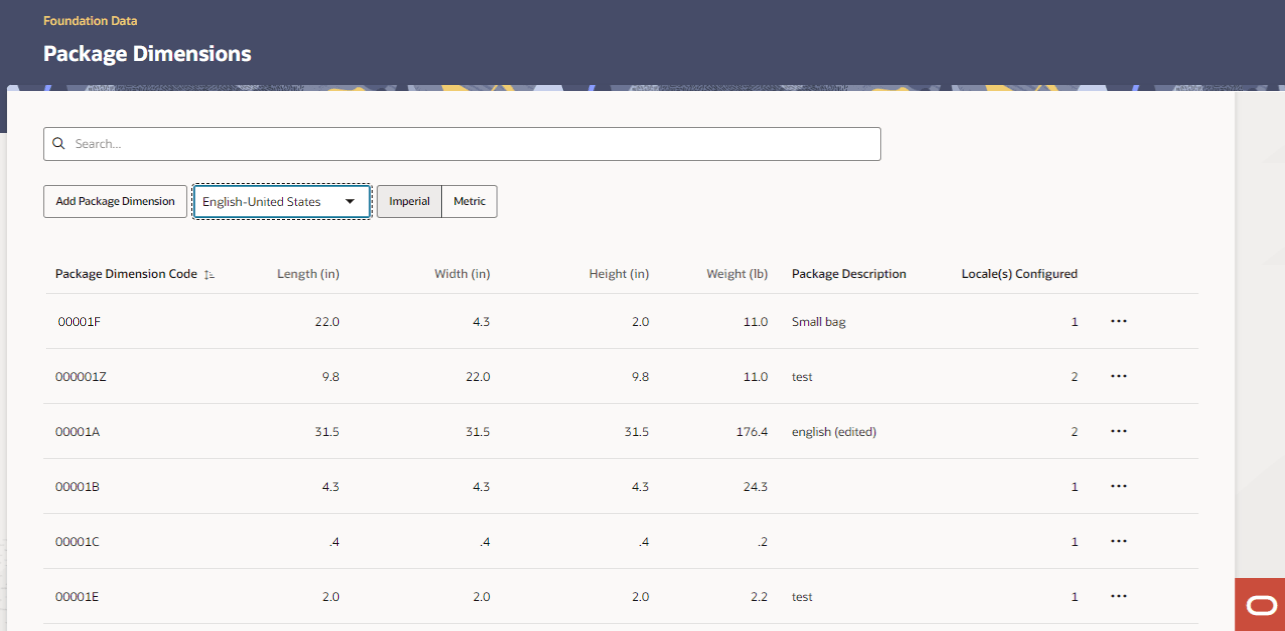
On the Foundation Data page, select Setup. The Package Dimensions page appears.
Note:
Click the column headings to sort the table by column in ascending or descending order. If the results cover more than one page, click Next > to display the next page of records.Figure 7-6 Package Dimensions Page
-
Package Dimension Code
-
Length
Note:
You can switch between the imperial and the metric system by selecting the Imperial or Metric button above the table. -
Width
-
Height
-
Weight
-
Package Description
-
Locale(s) Configured
Note:
You can select a locale from the list to see the associated package description, if configured. -
Actions Menu — Displayed as an ellipsis, the Actions Menu allows you to view, edit or delete the selected package dimension.
Add Package Dimension
-
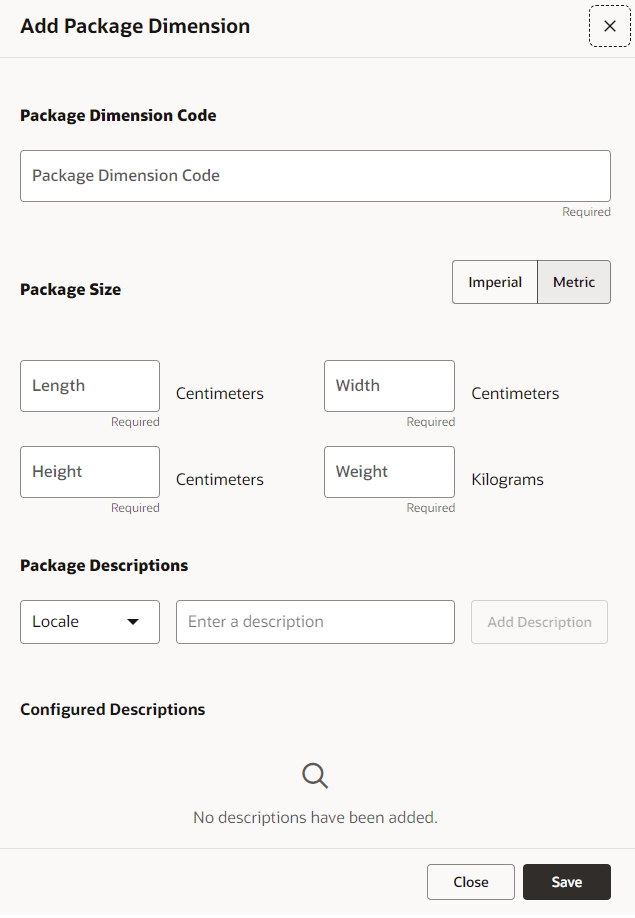
On the Package Dimensions page, select Add Package Dimension. The Add Package Dimension page appears.
Figure 7-7 Add Package Dimension
-
Complete the following fields.
Table 7-4 Package Dimension Code
Field Description Package Dimension Code Enter a package Dimension code. The code must be unique. This is a required field. Table 7-5 Package Size
Field Description Imperial Metric button You can switch between the imperial and the metric system by selecting the Imperial or Metric button.
This is a required field.
The Length, Width, Height are in centimeters when Metric toggle is selected and will be changed to Inches for Imperial. The Weight is in Kilograms for Metric and Pounds in Imperial.
Length Enter the length of the package. Height Enter the Height of the package. Width Enter the Width of the package. Weight Enter the Weight of the package. Table 7-6 Package Descriptions
Field Description Package Description You can add a new Package Description in this section:-
Select a Locale from the list in the language of the locale selected.
-
Enter a description in the language of the locale selected.
-
Select Add Description. The new description is displayed in the Configured Descriptions section.
Configured Descriptions -
If you want to update an existing description, use the Update icon next to the configured description. Update your entries in the Package Descriptions section and select Update Description.
-
If you want to delete an existing description, use the Delete icon next to the configured description. You are prompted if you want to delete the description.
-
-
Then select one of the following options.
-
Click Close to reject the entries and close the window.
-
Click Save to add the new package dimension to the package dimension table.
-
View Package Dimension
-
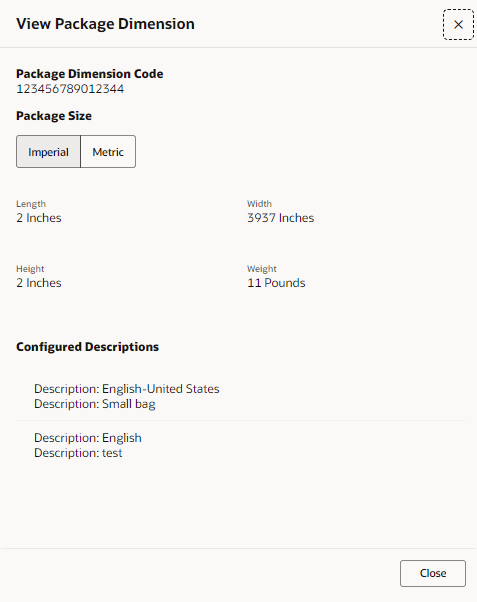
Select a row in the package dimension table. Then select the View option in the Actions Menu, displayed as an ellipsis. The View Package Dimension page appears.
Figure 7-8 View Package Dimension
Note:
You can switch between the imperial and the metric system by selecting the Imperial or Metric button. -
Click Close to close the window.
Edit Package Dimension
-
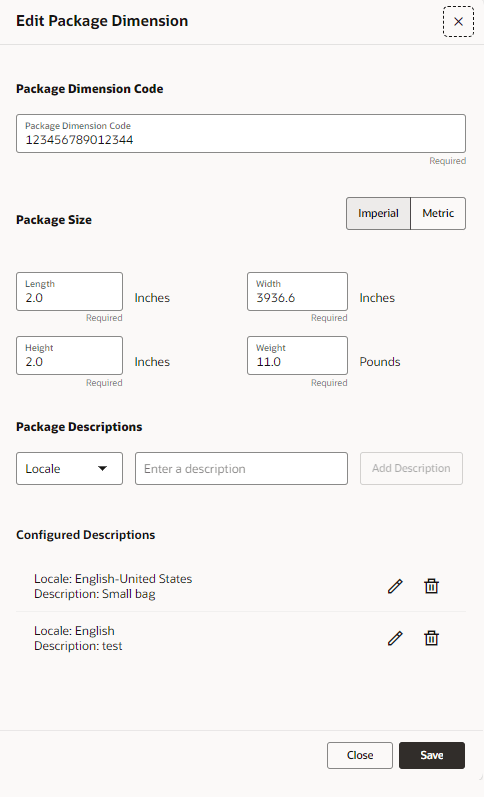
Select a row in the package dimension list. Then select the Edit option in the Actions Menu, displayed as an ellipsis. The Edit Package Dimension page appears.
Figure 7-9 Edit Package Dimension
-
Edit the fields as required.
Note:
For more information about the fields and sections of the Edit Package Dimension Page, see the Add Package Dimension section. -
Then select one of the following options.
-
Click Close to reject the entries and close the window.
-
Click Save to update the current package dimension.
-
Delete Package Dimension
Note:
If you delete a package dimension code, all descriptions configured for this code are deleted, not just the one displayed on the main list page.
-
Select a row in the package dimension list. Then select the Delete option in the Actions Menu. You are prompted, if you want to delete the package dimension.
-
Click Yes to delete the current package dimension and close the window.
-
Click No to keep the package dimension and close the window.
-
Configure Reason Codes
-
Search for a reason code(s)
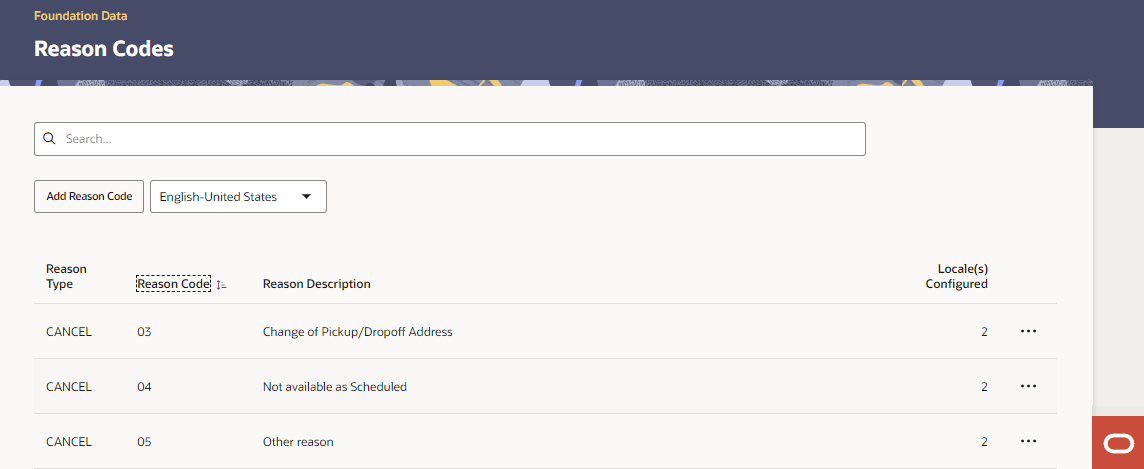
On the Foundation Data page, select Setup. The Reason Codes page appears.
Note:
Click the column headings to sort the table by column in ascending or descending order. If the results cover more than one page, click Next > to display the next page of records.Figure 7-10 Reason Codes Page
-
Reason Type
-
Reason Code
-
Reason Description
-
Locale(s) Configured
Note:
You can select a locale from the list to see the associated package description, if configured. -
Actions Menu — Displayed as an ellipsis, the Actions Menu allows you to view, edit or delete the selected reason code.
Add Reason Code
-
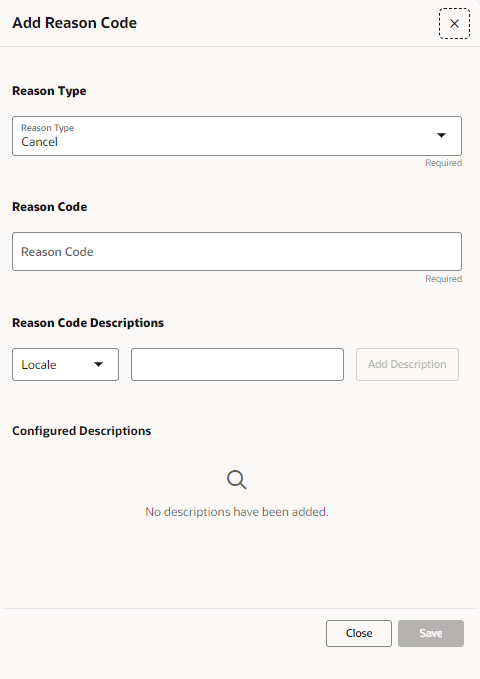
On the Reason Code page, select Add Reason Code. The Add Reason Code page appears.
Figure 7-11 Add Reason Code
-
Complete the following fields.
Table 7-7 Reason Type
Field Sections Description Reason Type Select a reason type from the list This is a required field. Table 7-8 Reason Code
Field Sections Description Reason Code Enter the Reason Code. The code must be unique for the reason type. This is a required field. Table 7-9 Reason Code Descriptions
Field Sections Description Reason Description You can add a new Reason Code Description in this section:-
Select a Locale from the list.
-
Enter a description in the language of the locale selected.
-
Select Add Description. The new description is displayed in the Configured Descriptions section.
Configured Descriptions -
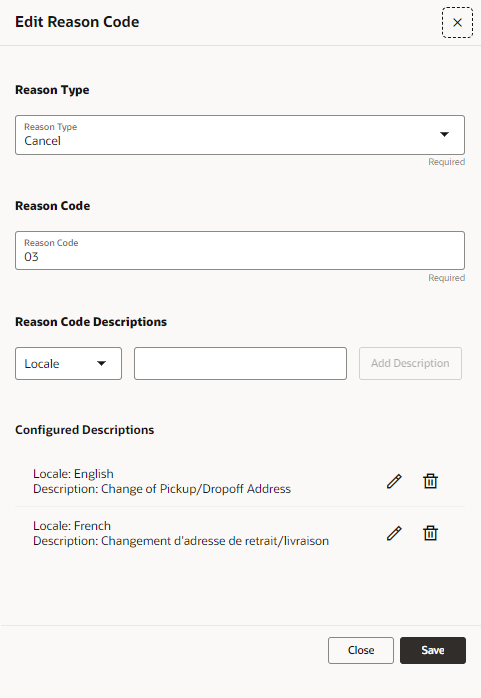
If you want to update an existing description, use the Update icon next to the configured description. Update your entries in the Reason Code Descriptions section and select Update Description.
-
If you want to delete an existing description, use the Delete icon next to the configured description. Your are prompted if you want to delete the description.
-
-
Then select one of the following options.
-
Click Close to reject the entries and close the window.
-
Click Save to add the new package dimension to the reason code list.
-
View Reason Code
-
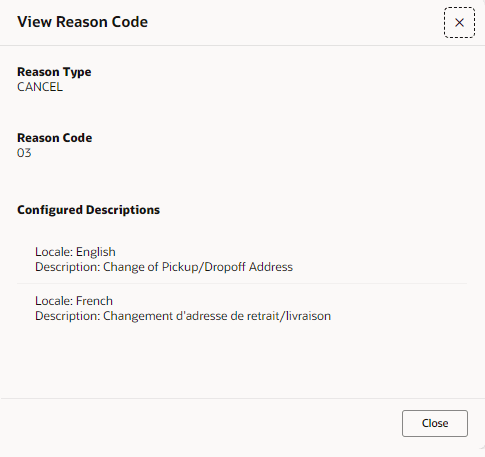
Select a row in the reason code list. Then select the View option in the Actions Menu, displayed as an ellipsis. The View Reason Code page appears.
Figure 7-12 View Reason Code
-
Click Close to close the window.
Edit Reason Code
-
Select a row in the reason code list. Then select the Edit option in the Actions Menu, displayed as an ellipsis. The Edit Reason Code page appears.
Figure 7-13 Edit Reason Code
-
Edit the fields as required.
Note:
For more information about the fields and sections of the Edit Reason Code Page, see the Add Reason Code section. -
Then select one of the following options.
-
Click Close to reject the entries and close the window.
-
Click Save to update the current package dimension.
-
Delete Reason Code
Note:
If you delete a reason code, all descriptions configured for this code are deleted, not just the one displayed on the main list page.
-
Select a row in the reason code list. Then select the Delete option in the Actions Menu. You are prompted, if you want to delete the reason code.
-
Click Yes to delete the current reason code and close the window.
-
Click No to keep the reason code and close the window.
-