2 Customer Home
Customer records store basic information about each customer. These records can be associated with a card or an account used to track transactions and provide incentives to customers.
Customer records can be used to track individual customers and their shopping preferences, habits, and tendencies. This allows locations and chains to target promotions to customers most likely to take advantage of purchase incentives given by the location or chain.
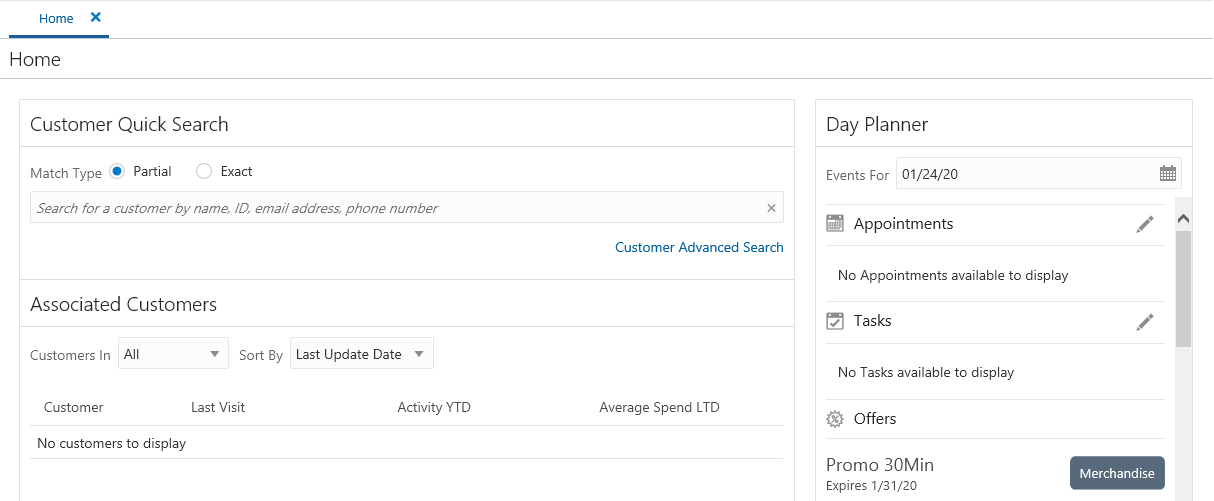
When you log in to the application, it first displays the Home page with the Customer Quick Search panel and the Day Planner panel. If you have customers assigned to you, the Home page search panel will also have a list of Associated Customers. See Associate Assignment for more information about associated customers.
Figure 2-1 Home Page

Search for a Customer
You can search for additional customers by entering the customer name, customer id, alternate key, email address, or phone number in the Search bar. Select Partial, if you want to results that match part of what you enter, or select Exact if you only want results that are an exact match.
Click the Customer Advanced Search link to do an advanced search. See Customer Search for more information.
Associated Customer List
You can filter for customers by segment and select from a list of sort criteria. There are several actions available on an Action menu in each customer row, including Add to Personal List, Create Appointment, Create Note, Create Registry, and Create To Do.
This information is displayed for each customer in the Associated Customers grid:
-
Customer - The customer image, icon or initials and the customer's name and address.
-
Last Visit - The date of the customer's last purchase.
-
Activity YTD - The total amount of the customer's purchases year-to-date, displayed in the base system currency.
-
Average Spend LTD - The average amount of the customer's purchases life-to-date (the total amount of the customer's purchases life-to-date divided by the number of purchases). Displayed in the base system currency.
Filtering by Segment
By default the Associated Customers list includes all customers assigned to the associate regardless of the segments to which they belong. If you do not want to filter by segment, keep the default selection in the Customers In field, as All.
To Filter the Associated Customers list by Segment:
-
Click the drop-down list in the Customers In field.
-
Click a segment from the list to filter for only the customers in that segment.
Sorting Associated Customers
You can sort customers in the Associated Customer list by any of the information contained in the grid by making a selection from the items in the Sort by list. These include:
-
Average Spend LTD
-
Activity YTD
-
Last Visit
-
Last Name
-
First Name
-
Address
-
City
-
State
-
Last Update Date
Linking to the Customer Dashboard
You can click a customer name or image icon in the Associated Customers list to view them in the Customer Dashboard.
Associated Customer Actions
The Actions menu in each row, in the Associated Customers list, provides access to the actions described below:
Add to Personal List
To add a customer to your personal list:
-
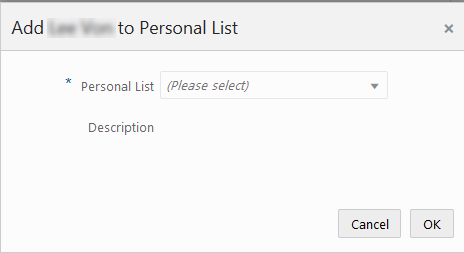
In the row of the customer that you want to add, click the Actions menu and choose Add to Personal List. This displays the following prompt:
Figure 2-2 Add Customer to Personal List

-
Select a list from the Personal List drop-down. A description of the selected list is displayed in the Description field.
-
Click OK. This adds the customer to the list.
Create Appointment
To create an appointment for a customer:
-
In the row of the customer for whom you want to create an appointment, click the Actions menu and choose Create Appointment. This displays the Create Task window for the customer with the Task Type, Appointment selected.
-
Enter the rest of the details for the appointment and click OK when you are done. This creates the task and returns you to the Associated Customers list.
For more information, see: Tasks
Create Note
To create a note for a customer:
-
-
In the row of the customer for whom you want to create a note, click the Actions menu and choose Create Note. This displays the Create Note dialog for the customer.
-
Select the Note Type and enter the note in the Note field. If you do not want the note to be seen by others select the Mark as Private check box.
-
Click OK when you are done. This creates the note and returns you to the Associated Customers list.
For more information, see: Notes
-
Create Registry
To create a registry for a customer:
-
In the row of the customer for whom you want to create a registry, click the Actions menu and choose Create Registry. This displays the Create Registry window for the customer.
-
Enter the registry details and click OK when you are done. This creates the registry and returns you to the Associated Customers list.
For more information, see: Registries
Create To Do
To create a To Do task for a customer:
-
In the row of the customer for whom you want to create a To Do task, click the Actions menu and choose Create To Do. This displays the Create Task window for the customer with the Task Type, To Do selected.
-
Enter the rest of the details for the task and click OK when you are done. This creates the task and returns you to the Associated Customers list.
For more information, see: Tasks
Day Planner
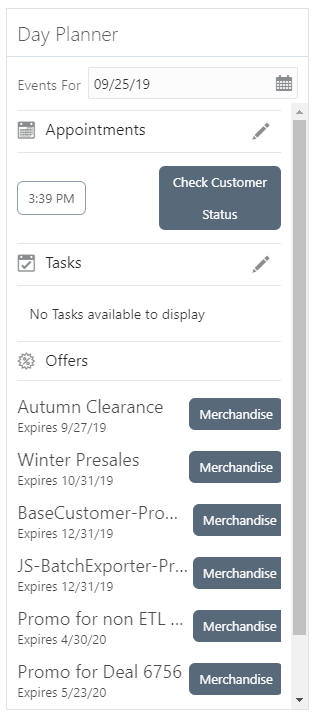
The Day Planner shows a list of appointments and tasks assigned to the associate as well as offers for a given day.
Figure 2-3 Day Planner

Click the Calendar icon in the Events field to select a different date.
The following information is displayed for the selected date:
-
Appointments - Shows the appointments for the selected date. No expired appointments are shown. The maximum number of appointments displayed is 25. If there are no appointments, the message
No appointments available to displayis shown. -
Tasks - Shows the tasks assigned on the selected date. No expired tasks are shown. The maximum number of tasks displayed is 25. If there are no tasks, the message
No tasks available to displayis shown. -
Offers - Shows all active offers based on the selected date. The offers are shown for the default location of the associate. If there is no default location identified, all offers for the chain are shown. No expired offers are shown. The maximum number of offers displayed is 25. If there are no offers, the message
No offers available to displayis shown.