7 Segments
Customer Segments organize Customers into groups related by certain, specified criteria. These Segments can be used to define the Segment/Target Eligibility rules used by various Customer Engagement elements.
There are three types of Customer Segments:
-
Stratified - Segments in which the Customers belonging to the segment are divided into stratified subgroups (or levels) determined by certain criteria, such as year-to-date total purchases, Customer age, annual income, or some other criteria. These Segments are described in Stratified Segments.
-
Unstratified - Segments in which Customers belonging to the segment are not subdivided into different groups; that is, the Customers within the Segment are not differentiated into subgroups by the Segment. These Segments are described in Unstratified Segments.
-
Personal Lists - Segments created by selecting Customers one-by-one. Associates can use Personal Lists to create Favorite Customer lists. These Segments are described in Personal Lists.
Segment Quick Search
Segments Quick Search displays a list of results as you type in characters in the search box. To use the Segments Quick Search do the following:
-
Click Tasks.
-
Click Segment.
-
Click Segment Home.
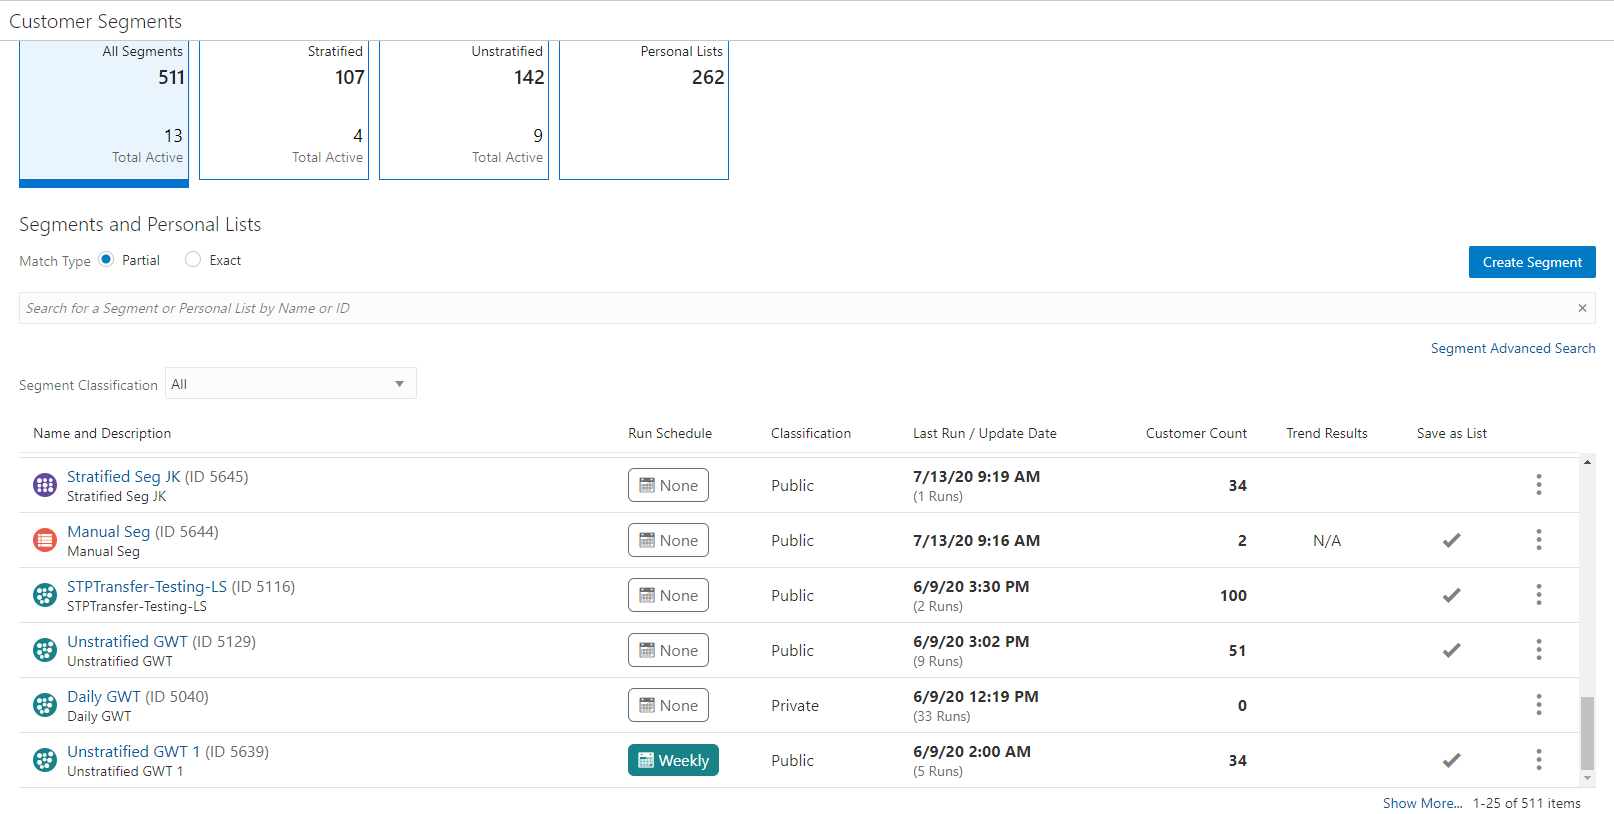
Figure 7-1 Segment Home - All Segments Metric Tile
-
Select a Metric Tile, options include:
-
All Segments
-
Stratified
-
Unstratified
-
Personal Lists
-
-
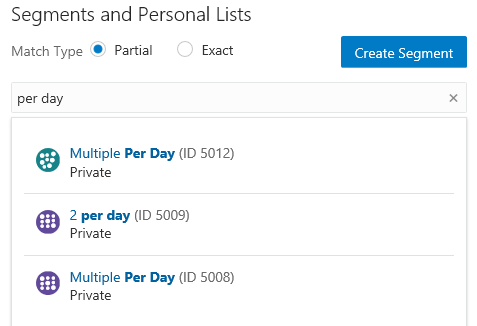
In the Search for Segments field, enter the Name or ID of the Segment or Personal List you want to search for. Click Partial to search for Segments or Personal Lists that partially match the search text, or click Exact, to search for an exact match.
Figure 7-2 Segments and Personal List Results
Note:
If more than 25 Segments or Personal Lists match the search criteria, the first 25 Segments or Personal Lists are displayed. Select Show More... at the bottom of the page to display more Segments or Personal Lists.
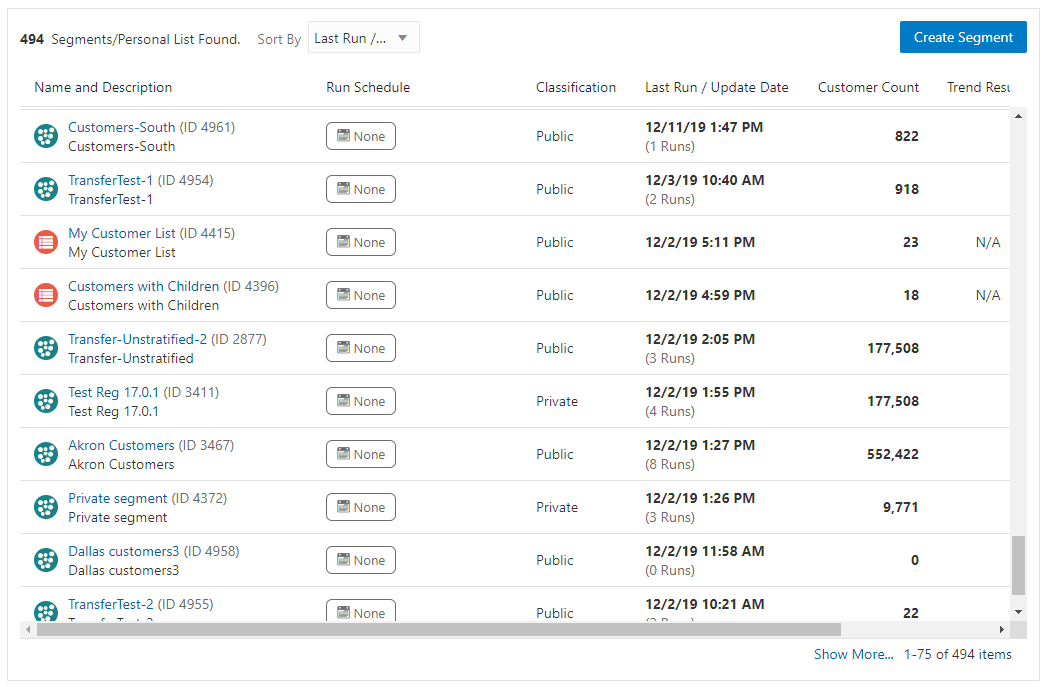
The search results display the following fields:
-
Name and Description
-
Run Schedule
-
Classifications
-
Last Run
-
Customer Count
-
Trend Results
-
Save as List
-
-
The search results can be filtered by Segment Classification. The options include:
-
All (Default)
-
Open Access
-
Private
-
Public
-
-
Hover over any Run Schedule field to see a tooltip listing the following information.
-
Job ID
-
Run Interval
-
Status of Last Run
-
Duration
-
Started Date/Time
-
Ended Date/Time
-
Planned Next Run Date/Time
-
-
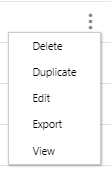
Click the Name which appears as a link for any Segment to open the Segment Scorecard. See Segment Scorecards for more information. Use the Overflow Menu to Delete, Duplicate, Edit, Export, or View the segment. See Deleting Segments/Personal Lists, Duplicating Segments/Personal Lists, Editing Segments/Personal Lists, Exporting Segments, or Viewing Segments/Personal Lists for more information.
Figure 7-3 Action Menu Options - Segments Quick Search
Segment Advanced Search
The Segment Advanced Search allows you to select more criteria that are not available in the Segment Quick Search box. The Segment Advanced Search is accessed by the following methods:
-
Click the Advanced Search Link below the Segment Quick Search box in the Segment Home window.
-
Click Segment Search in the Segment Task menu. See Navigation for more information.
Figure 7-4 Segment Advanced Search Window
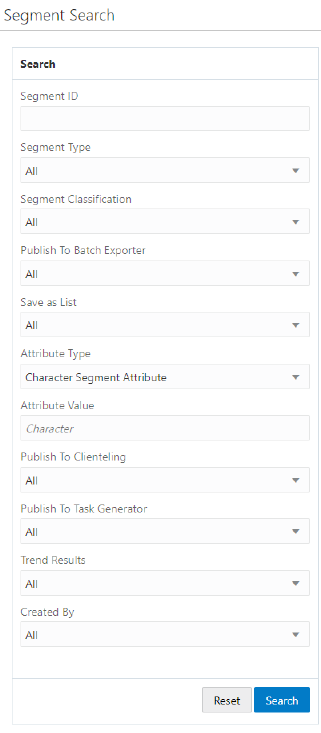
The following Search fields are available:
-
Segment ID - This Text Field searches all the Segments currently present in the application. The default is an empty field.
-
Segment Type - Search by Segment Type. The default field is All.
-
All
-
Personal Lists
Note:
When the selected Segment type is Personal list, the search parameter Trend Results will not display
-
Stratified
-
Unstratified
-
-
Segment Classification - Search the Segment by the classification assigned to the Segment. The field will default to All.
-
All
-
Open Access
-
Private
-
Public
-
-
Publish to Batch Exporter - The following options include:
-
All (Default)
-
Yes
-
No
-
-
Save as List - The following options include:
-
All (Default)
-
Yes
-
No
-
-
Attribute Type - Search for the Segment by the Attribute Type assigned to the Segment. The default is All.
-
Attributes Value - Enter or select a value according to the Attribute Type selected above.
-
Publish to Clienteling - The following options include:
-
All (Default)
-
Yes
-
No
-
-
Publish to Task Generator - The following options include:
-
All (Default)
-
Yes
-
No
-
-
Trend Results - The following options include:
-
All (Default)
-
Yes
-
No
-
-
Created By - List of users who have created segments. The default is All. Use this to search for segment types a user personally created.
Note:
Only Public segments can be returned for any user other than the one logged. A user shouldn't be able to see other users private segments unless they are the user's private segments or the user has system admin privileges.
Searching Segments
Once all the desired information has been entered, click Search to see the results. If more than 25 results are returned, click the Show More… link to show the next 25 Segments or Personal Lists.
Figure 7-5 Segment Search Results
Note:
Click Reset to clear all fields and return list values to the default selections. You can also click Search without entering any criteria to see a complete list of Segments and Personal Lists.
Sorting Segment Results
The sort options will re-sort just the current 25 segments displayed in the window. Sorting options include:
-
Last Run / Update Date - Segment results are sorted by the Last Run (Stratified and Unstratified) or Last Update (Personal Lists) in descending order (Default).
-
Segment ID - Segment results are sorted by Segment ID in descending order by default.
-
Segment Name - Segment results are sorted by Segment Name in ascending order.
-
Customer Count - Segment results are sorted by the Customer Count in descending order
-
Save as List - Segment results are sorted by Save as List in ascending order.
Note:
For Personal Lists, the Save as List setting is always Yes, so the sort order does not apply.
Creating a Segment or Personal List
There are a two choices available to start the process of creating a Segment or Personal List. The Create Segment button is available in both the Segment Home window as well as the Segment Search window.
Creating a Segment or Personal List - Segment Search
Figure 7-6 Segment Search

To Create a new segment from the Segment Search screen, click the Create Segment button, which will open the segment wizard on the Information tab. Proceed to Step 6 in Creating a Segment or Personal List - Segment Home.
Creating a Segment or Personal List - Segment Home
To create a new Segment or Personal List from the Segment Home window do the following:
-
Click the Tasks icon.
-
Click Segment.
-
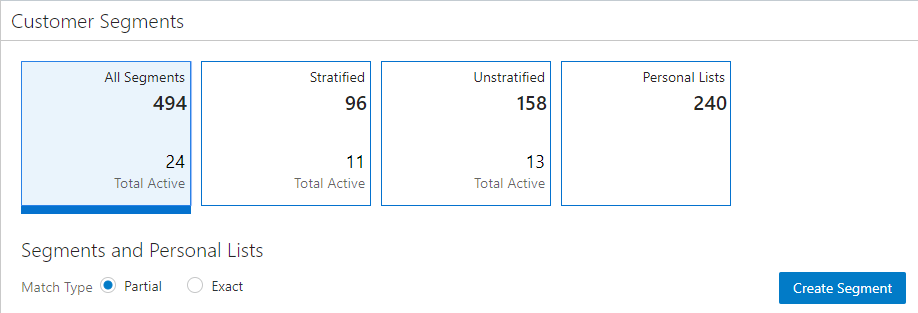
Click Segment Home. The All Segments Tile is defaulted.
Figure 7-7 Segment Home
-
There are two options to start the Create process:
Option 1
-
With the All Segments Metric tile highlighted, select the Create Segment button which opens the Segment Wizard to the Information tab, with the Stratified Segment type defaulted. You can then change the Segment type, if desired.
-
Select one of the Metric Tiles (Stratified, Unstratified, or Personal List), and from there select the Create Segment button, which will default that segment type in the Information tab of the segment wizard.
Option 2
-
Create a new segment from the Segment Search screen: Select the Create Segment button, which will open the segment wizard on the Information tab.
-
-
Click Create Segment. The Create Segment wizard may contain any of the following tabs, depending on configuration and the selected Segment Type.
-
Information
-
Franchisees
-
Segment Query
-
Stratification
-
Message
-
Strata Query
-
Attributes
-
Segment Members
-
Schedule
-
Review
-
-
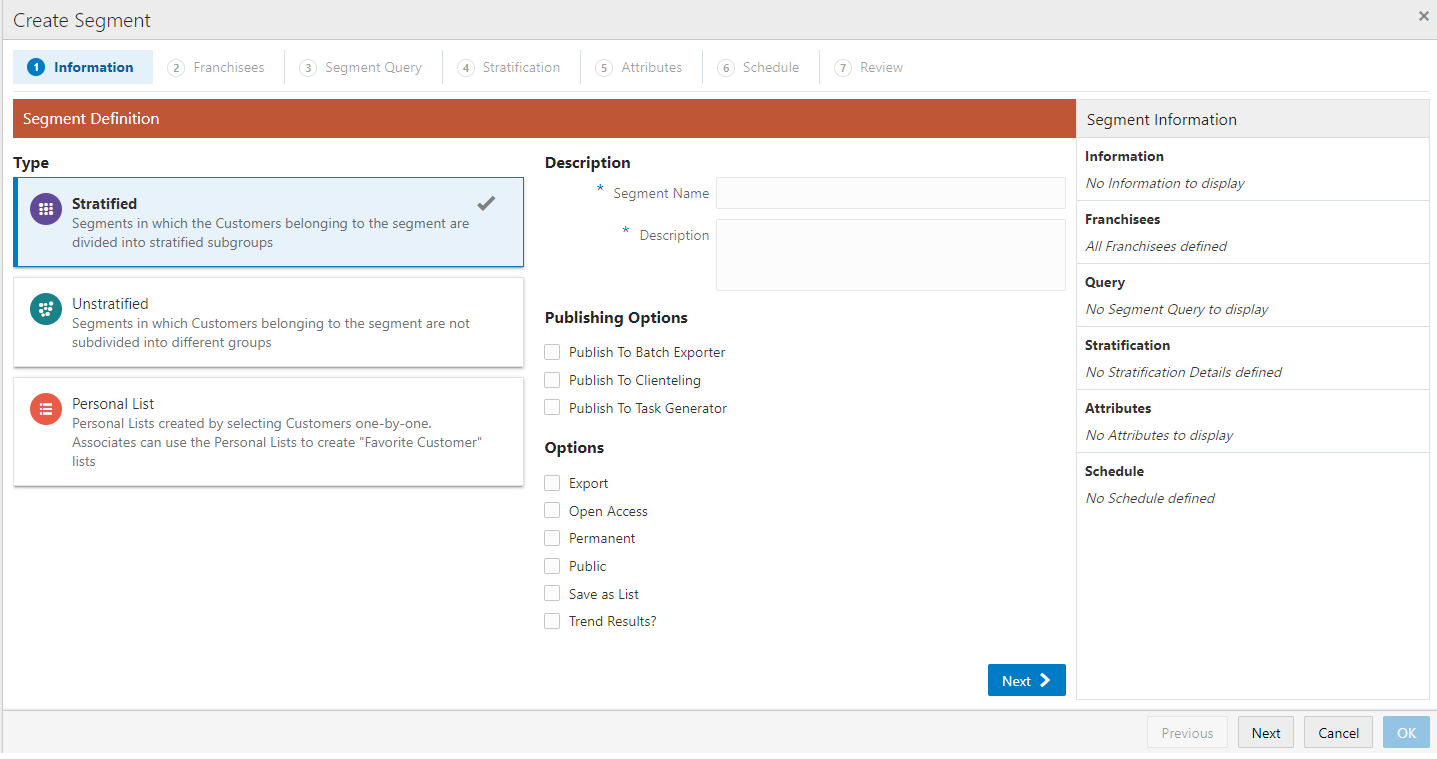
Enter the following items for the Information Tab:
Figure 7-8 Information Tab
Note:
The read-only Segment Information Panel displays details throughout most of the tabs of the wizard.
-
Type - Select the type of Segment from the available options:
-
Stratified - Segments in which the Customers belonging to the segment are divided into stratified subgroups.
-
Unstratified - Segments in which Customers belonging to the segment are not subdivided into different groups.
-
Personal List - Personal Lists created by selecting Customers one-by-one. Associates can use the Personal Lists to create "Favorite Customer" lists.
-
-
Description
-
Segment Name - The name of the Segment (Required).
-
Description - Any Segment specific additional description (Required).
-
-
Publishing Options
-
Publish To Batch Exporter - Determines whether or not the Segment is available to export to a Marketing system.
Note:
If the Publish to Batch Exporter option is selected, the following options are automatically checked: Export, Permanent, Public, and Save as List. All other check boxes are unchecked and unavailable.
-
Publish To Clienteling - Determines whether or not the Segment is available to the Clienteling module.
Note:
If the Publish to Clienteling option is selected, the following options are automatically checked: Permanent, Public, and Save as List. All other check boxes are unchecked and unavailable.
A User must be assigned the Publish Clienteling Segment Role to see this option. See the Oracle Retail Customer Engagement Implementation Guide for more information about Roles.
-
Publish to Task Generator - Determines whether tasks are created for this Segment.
Note:
If the Publish to Task Generator option is selected, the following options are automatically checked: Export, Permanent, and Save as List. All other check boxes are unchecked and unavailable.
A User must be assigned the Task Manager Role to see this option. See the Oracle Retail Customer Engagement Implementation Guide for more information about Roles.
-
-
Options
-
Export - Determines whether or not the Segment results are automatically exported after the Segment Query is run. The Export option is not available for Personal Lists.
Note:
If the Export option is selected, Save as List is automatically checked and the Export and Trend Results? check boxes are unavailable.
-
Open Access - Determines whether or not the Segment has Open Access.
Note:
If the Open Access option is selected, Permanent, Public, and Save as List, are automatically checked and the check boxes are unavailable; Export and Trend Results? are automatically unchecked and the check boxes are unavailable.
-
Permanent - Determines whether or not the Segment is kept, even if it meets the criteria for deletion by the housekeeping job.
-
Public - Determines whether or not the Segment is Public.
-
Save as List - Determines whether a List of matching Customer IDs are created when the segment is created. If this option is not checked, the Segment will only create a count of the Customers that meet the criteria.
-
Trend Results? - Determines whether the results of the Segment run are kept to provide trend information about the Segment.
-
-
-
When finished entering the Segment information on the Information tab, click Next to continue to the Franchisees tab.
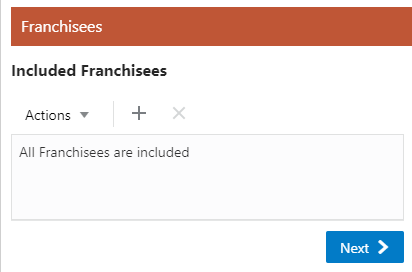
The Franchisees Assignment tab allows you to add or change the Franchisees you wish to assign to the segment.
Note:
The Franchisee tab will only be visible if the
EnableFranchiseSupportconfiguration is enabled, and Franchisees are defined. By default, all franchisees are included on the Segment. If you are assigned to specific franchisees, only those franchisees you are associated to are shown.-
If Franchisees are enabled in Customer Engagement, the Franchisees Tab appears. Proceed to Step 8.
-
If Franchisees are not enabled in Customer Engagement and the Segment Type is Stratified or Unstratified, the Segment Query tab appears. Proceed to Step 10.
-
If Franchisees are not enabled in Customer Engagement and the Segment Type is Personal List, the Attributes Tab appears. Proceed to Step 18.
Figure 7-9 Franchisee Tab
-
-
To assign a Franchisee:
-
Assigning a Franchisee
-
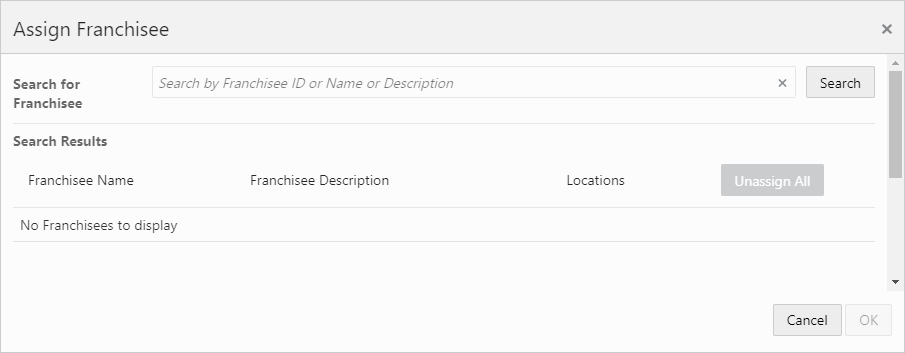
Click the Action Menu, and click Assign, or click the Add (+) icon. This opens the Assign Franchisee window.
Figure 7-10 Assign Franchisee
-
By default, all franchisees are assigned to the segment. To make changes to those assignments, you can search for specific franchisees by entering all or part the franchisee Name, ID, or Description. Click Search in the Search for Franchisee search box.
Note:
You also have the option to enter no search criteria and click Search to retrieve all available franchisees from which to select for assignment.
-
In the Included Franchisees results list, click Assign All to assign all the search results, or click Assign for a specific franchisee to add to the segment.
-
Click OK to accept the changes or Cancel to close the window without saving.
Note:
A confirmation notification appears to confirm the Franchisees has been assigned.
After a Franchisee is assigned, it appears at the top of the list. The rest of the Franchisees are ordered by ID.
Figure 7-11 Confirmation Notification

-
-
Unassigning a Franchisee
If you need to, there are two ways to unassign any of the assigned franchisees on the segment.
-
In the Assign Franchisee window, click Unassign on any Franchisees currently assigned to the segment. Then click OK to accept the changes or Cancel to close the window without saving.
-
If Franchisees are listed on the Franchisee tab in the Included Franchisees table, highlight the row, and then select the Action Menu, and click Unassign, or click the Unassign X icon to remove the associated Franchisee.
Figure 7-12 Assign Franchisee (Using the Unassign Button)
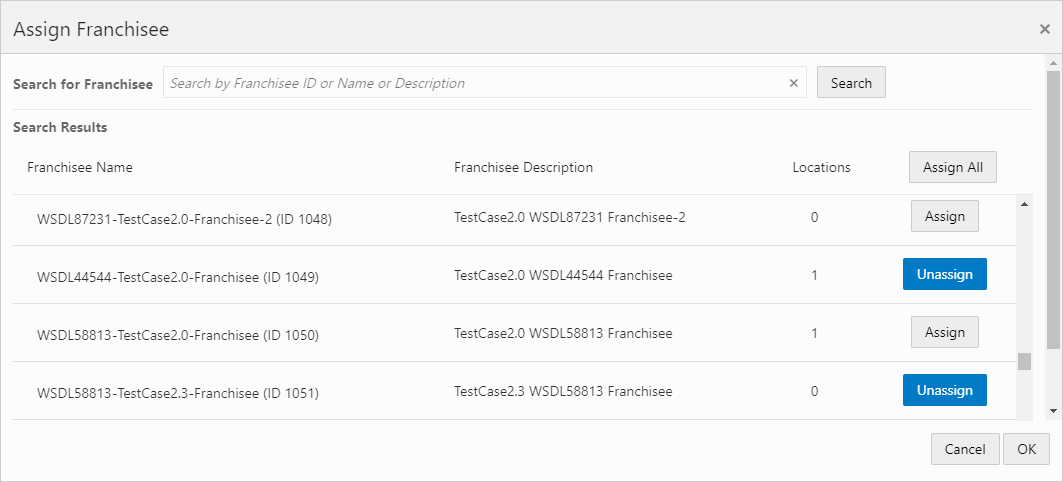
Note:
A confirmation notification appears that confirms the Franchisees are deleted.
Figure 7-13 Confirmation Notification

-
-
-
When finished selecting the franchises on the Franchisee tab, click Next to continue to the next tab.
-
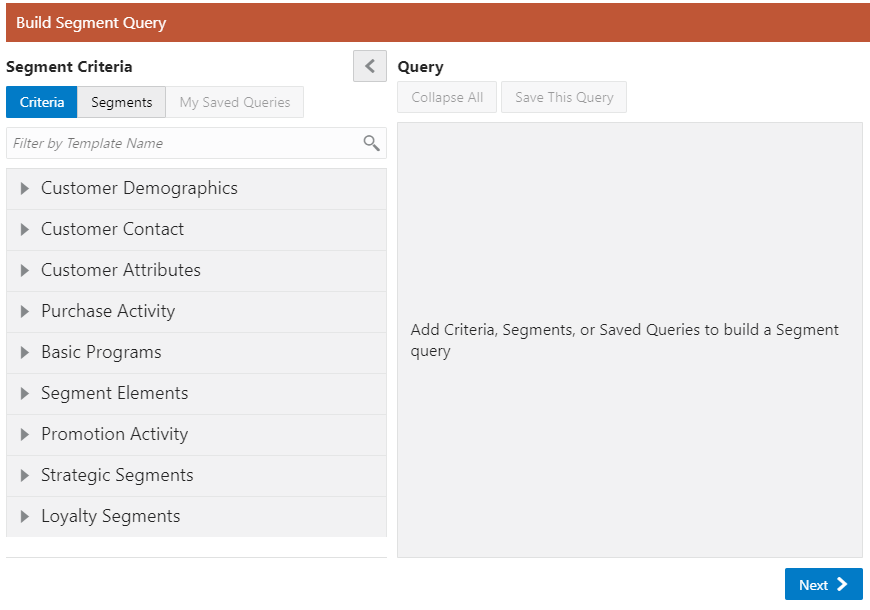
The Segment Query tab, used for Stratified or Unstratified segments, provides three choices to populate the Query window. They include:
-
Criteria
-
Segments
-
Saved Queries
Note:
The My Saved queries are private to the user that created the query or the system administrator.
Note:
The query window can be populated singularly, or by using any combination of the three choices previously listed.
Figure 7-14 Build Segment Query
Building the Query
-
To start the query criteria selection, you can either filter by Template name or you can select one of the Templates shown to expand the criteria selections.
Note:
The following steps also apply when selecting Segments, or My Saved Queries in Step 10.a
-
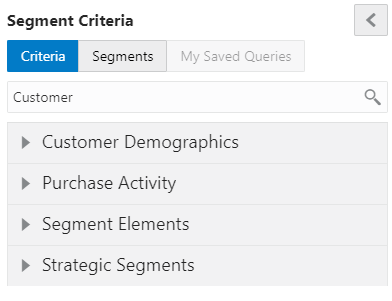
To filter by Template Name: In the Filter by Name box, enter part or all of a Template Name
Press Enter, or click the Search icon.
Figure 7-15 Criteria - Filtered
Note:
To see the available criteria in your filtered list, expand the Template to see the available choices from which to select.
To reset the filter, highlight the words and press Delete. Then press Enter, or click the Search icon.
-
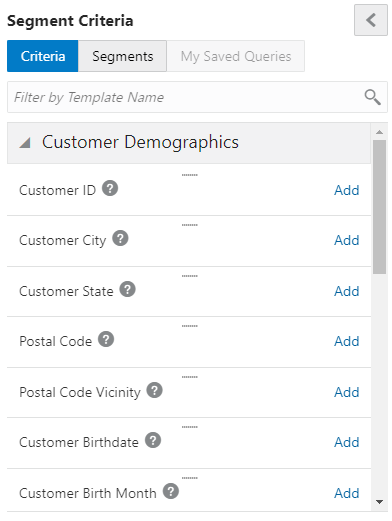
In the Template selection list, click a template group to expand its list of query criteria options. See Segment Queries for more information about criteria group organization.
Figure 7-16 Expanded Criteria List
-
Click the Add link, or drag and drop the Criteria Name into the Query window.
Figure 7-17 Adding Criteria to Query
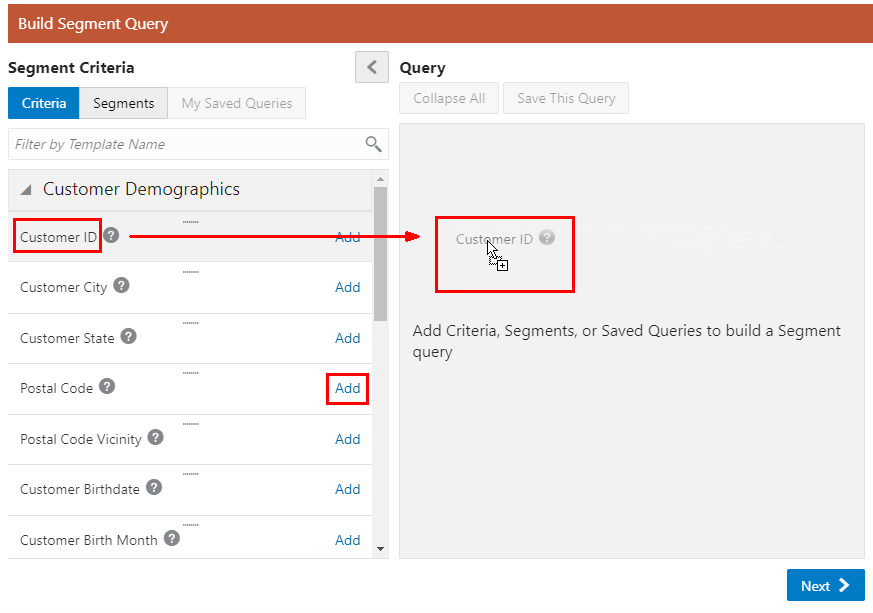
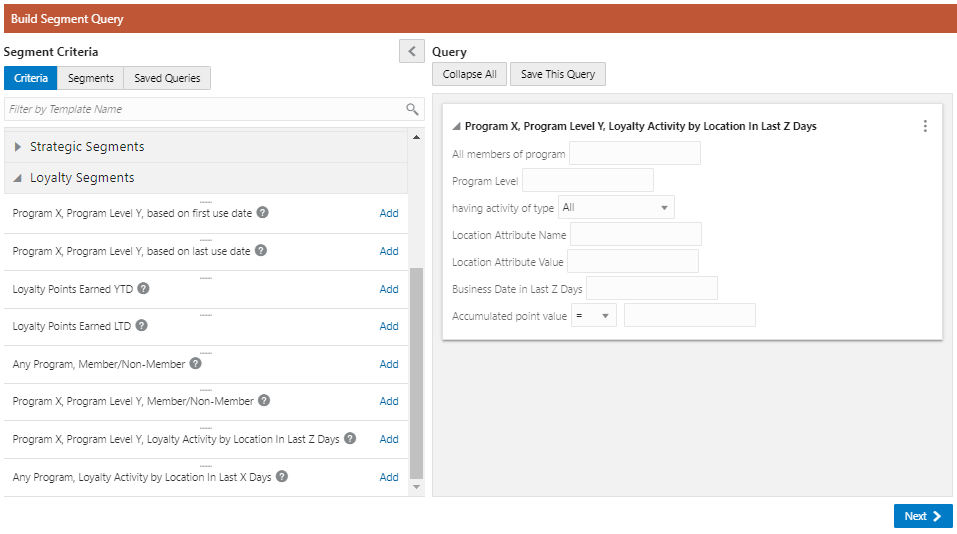
Figure 7-18 Added Criteria
-
Repeat the previous step until all criteria are added.
Note:
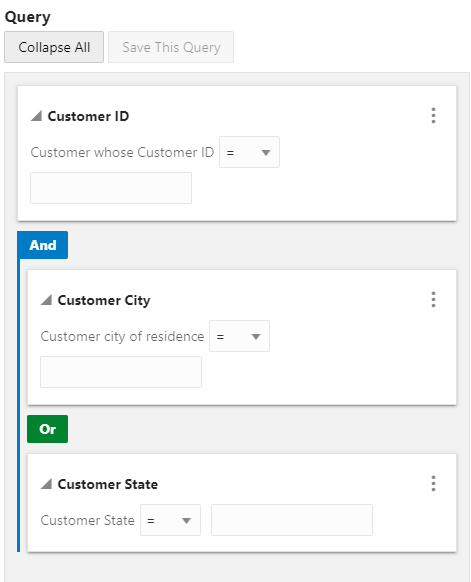
As shown in Figure Figure 7-19, the logical conditions And and Or appear between each of the criteria.
Figure 7-19 Query Window
-
To change the logical conditions, click either And or Or to switch between the two options.
Note:
If you use And, a record will only be included in the node if it matches all of the criteria in the subnodes. If you use Or, a record is included in the node if it matches any of the criteria in the subnodes.
Figure 7-20 Criteria

-
Enter the Search Criteria into the appropriate fields. See Segment Queries for more information about criteria fields.
Figure 7-21 Query Options

-
After entering the search criteria you can collapse or expand the details at any time. To collapse a criteria in the list, click the arrow next to each criteria. To change all criteria at once, click Collapse All/Expand All to Collapse/Expand.
-
When you need to clear a criteria from the query, click the Action Menu and then click Remove.
-
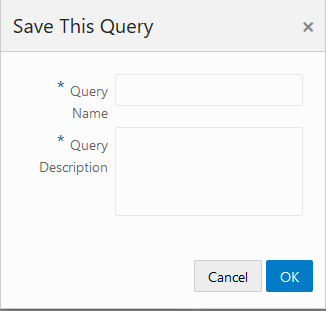
Optional: Any Query can be saved for use in other Build Segment Queries, by doing the following: Click Save this Query. The Save this Query window appears.
Figure 7-22 Save This Query
-
Type a Query Name.
-
Type a Query Description.
-
Click OK. The query is saved for use with other Segments/Personal Lists. See Step 10 for information on how to access Saved Queries.
-
-
When finished building a query on the Segment Query tab, click Next.
-
Enter the following for the Stratification tab.
Stratification Details (Select One)
Note:
The Based on and Field to Stratify On fields are dynamic and their options are based on the Strata Type selected.
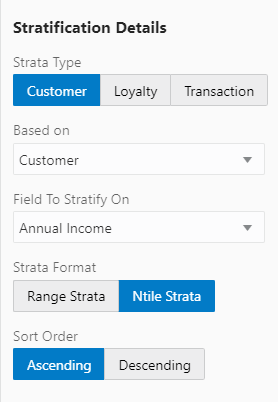
Figure 7-23 Stratification Details
-
Select the Strata Type: Customer - Customer Data
-
Based on: Customer (Default) - Field to Stratify On options include:
Field Description Annual Income
Customer's Annual Income
Customer Net Worth
Customer's Net Worth
Lifetime Sales
Lifetime total amount of all sales made to the Customer.
Lifetime Returns
Lifetime total amount of all returns made by the Customer.
Lifetime Transaction Count
Lifetime total number of transactions.
Lifetime Sold Item Count
Lifetime total number of items sold
Lifetime Return Item Count
Lifetime total number of items returned.
Lifetime Profit Percent
Lifetime percentage of profit on all Customer transactions.
YTD Sales
Total amount of all sales during the year to date.
YTD Returns
Total amount of all returns during the year to date.
YTD Trans Count
Total number of transactions during the year to date.
YTD Sold Item Count
Total number of items sold during the year to date.
YTD Return Item Count
Total number of items returned during the year to date.
YTD Profit Percent
Percentage of profit on all Customer transactions during the year to date.
Customer Age
Age of the Customer.
Days Since Purchase
Number of days since the Customer's last purchase.
Attributes
Attribute values.
-
-
Select the Strata Type: Loyalty - Loyalty Account Information
-
Based on: Loyalty Summary - Field to Stratify On options include:
Field Description Earned Points Balance
Current balance of earned points.
YTD Points
Total number of points earned during the year to date.
LTD Points
Total number of points earned over the lifetime of the Loyalty Account.
-
Based on: Loyalty Detail - Field to Stratify On options include:
Field Description Sum Number of Points
Total number of points in the Loyalty Account.
Count Number of Transactions
Total number of Loyalty transactions.
Days Since Last Activity
Days since the last Loyalty transaction.
-
-
Select the Strata Type: Transaction - Transaction Information
-
Based on: Header - Field to Stratify On options include:
Field Descriptions Sum of Transaction Amount
Total amount of all transactions.
Number of Transactions
Total number of transactions.
Days Since Purchase
Number of days since the last purchase transaction.
-
Detail: - Field to Stratify On options include:
Field Description Sum of Line Item
Sum of all line items in all transactions.
Days Since Purchase
Number of days since the last purchase transaction.
Sold Item Count
Total number of items sold.
Transaction Count
Total number of transactions.
-
-
Select a Strata Format
-
Range Strata - Strata are determined by configured ranges.
-
Ntile Strata - Strata are placed into equally-sized groups of Customers.
Select the Sort Order for Ntile Strata:
- Ascending - The Strata having the lowest values are displayed first.
- Descending - The Strata having the greatest values are displayed first.
-
Figure 7-24 Strata Levels

Strata Levels
The default number of strata levels is three. You can increase or decrease the number of strata levels.
-
There are three ways to increase the number of Strata Levels
-
Number of Strata: Enter a numeric value and press Enter.
-
Click the arrows to increase or decrease by one increment.
-
Click the + Add Another link.
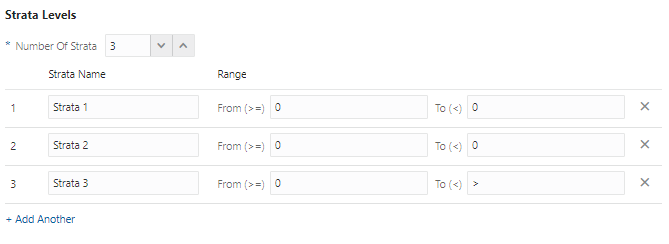
Figure 7-25 Strata Levels - Ntile Strata
-
-
Enter a Strata Name for each Strata Level
-
Click the Delete icon to remove a Strata Level.
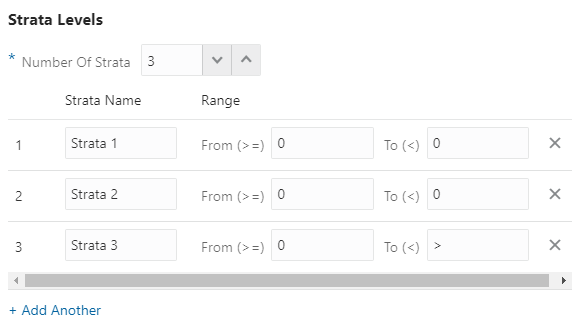
Figure 7-26 Strata Levels - Range Strata
Strata Levels - Range Strata
-
Enter a Strata Name for each Strata in the Segment.
-
In the Range From (>=) fields, enter the minimum value of each Strata.
If the Strata Field value for the Customer equals this value, it isincluded in this Strata.
-
In the Range To fields, enter the maximum value of each Strata.
If the Strata Field value equals this value, it is not included in this Strata.
-
-
When finished entering Stratification Details click Next.
-
If the Open Access Check Box was checked in the Information tab (see Step 6 Options), the Message tab displays. Proceed to Step 14.
-
If the Open Access check box was unchecked in the Information tab (see Step 6 Options), and the Strata Type: Customer was selected in Stratification Details (see Step 12), the Attributes Tab displays. Proceed to Step 18.
-
If the Open Access check box was unchecked in the Information tab (see Step 16 Options), and the Strata Type: Loyalty or Transaction was selected in Stratification Details (see Step 12), the Strata Query tab displays. Proceed to Step 16.
-
-
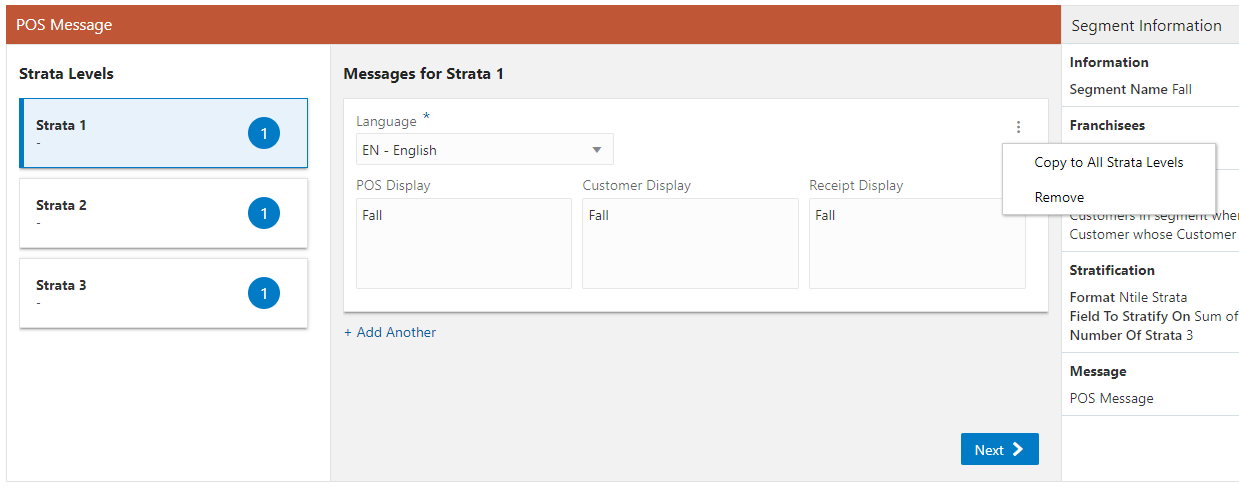
The Message tab enables you to a add message for displaying at the Point-of-Sale for a Customer or Receipt display for upselling or other marketing campaigns. Enter the following for the Message tab:
Figure 7-27 POS Message
-
Highlight a Strata Level.
-
In the Messages for Strata # section where # represents a number, select a Language from the options list.
Note:
A language code can only be used once, per strata.
Note:
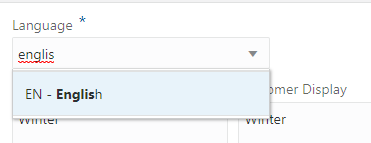
You can also enter part or all of a Language Name or Language Code in the Language selection menu. Click the desired language from the list of results.
Figure 7-28 Language Selection Menu
-
In the POS Display Text Area field, enter the text that will be displayed to the associate using the Point-of-Sale system.
-
In the Customer Display Text Area field, enter the text that will be shown on the customer-facing display and, depending on the configuration of the POS system, the signature capture device, while the transaction is being performed.
-
In the Receipt Display Text Area field, enter the text that will be printed on the customer receipt.
Note:
For the POS, Customer, and Receipt Display messages, only one is required to have content. You can enter values in each.
-
Optional: Click +Add Another to add an additional message in a different language to the Strata Level.
-
Repeat Steps 14.a - f for each Strata Level.
-
-
When finished entering all Strata Level messages on the Message tab, click Next.
-
The Build Strata Query appears when one of the following conditions from Step 12 are met:
-
Stratification Details: Loyalty
-
Stratification Details: Transaction
-
Stratification Details: Customer and Field To Stratify On = Attributes
Figure 7-29 Build Strata Query: Loyalty Criteria
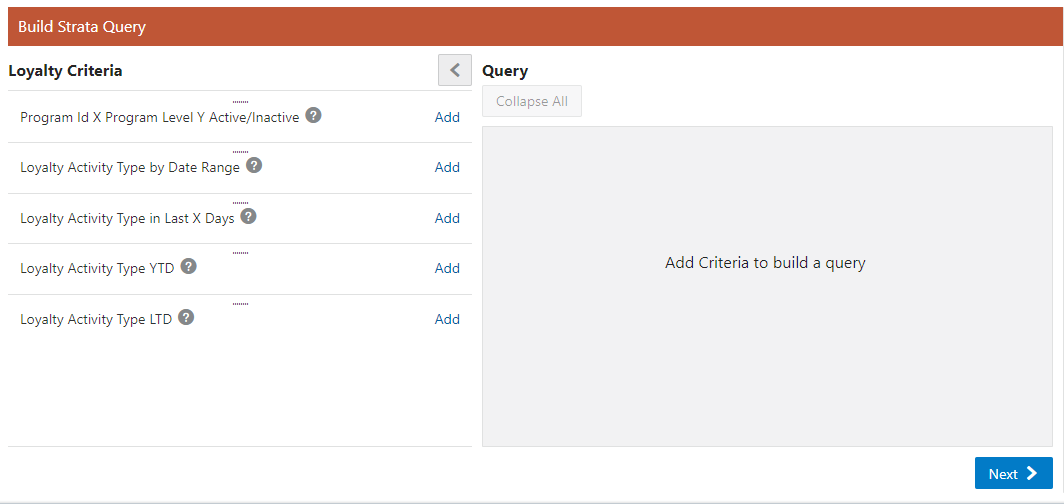
Figure 7-30 Build Strata Query: Transaction
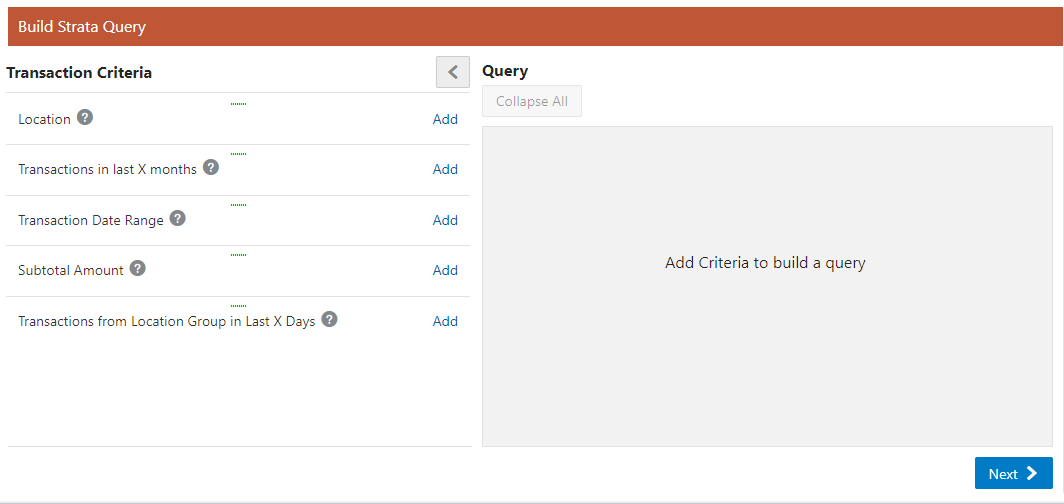
Figure 7-31 Build Strata Query: Customer - Attributes
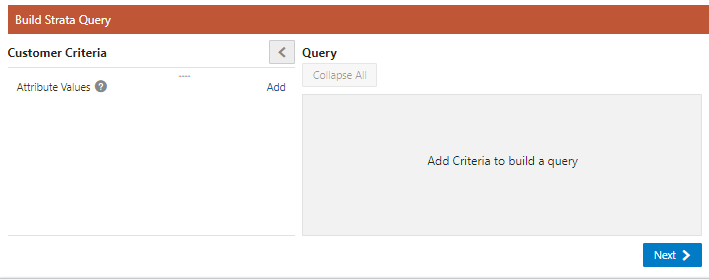
The following steps work for any of the preceding Build Strata Query options.
-
Click the Add link, or drag and drop the Criteria Name into the Query window.
Figure 7-32 Adding Criteria to Query
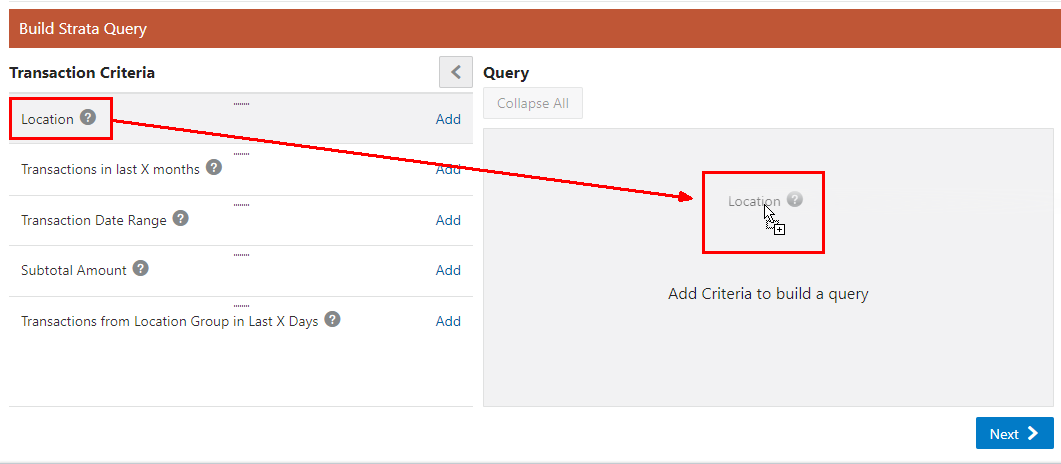
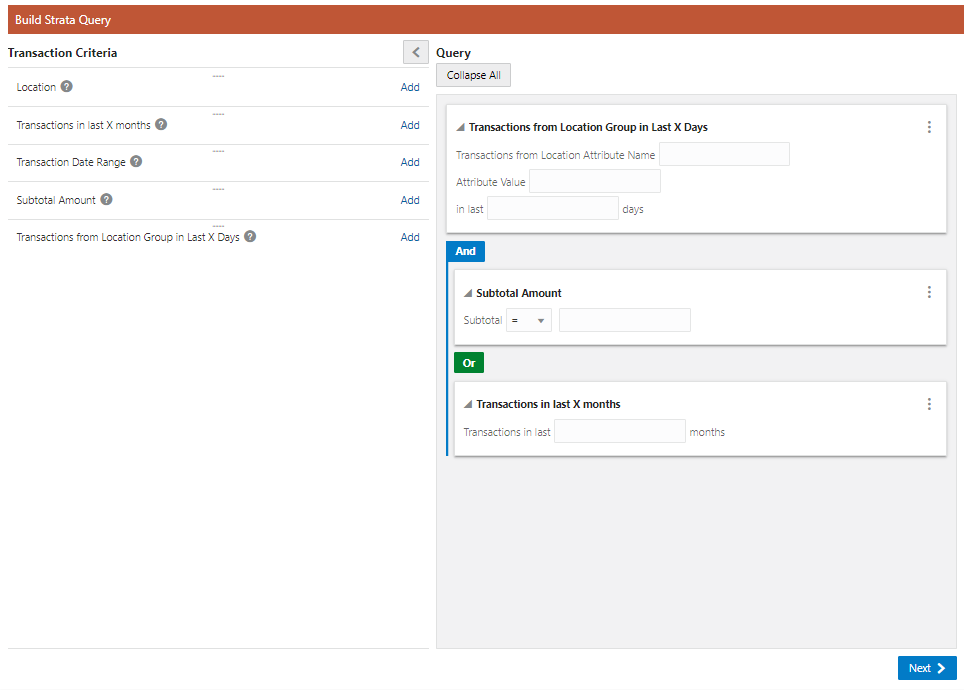
Figure 7-33 Criteria Added
-
Repeat Step 16.a until all criteria are added.
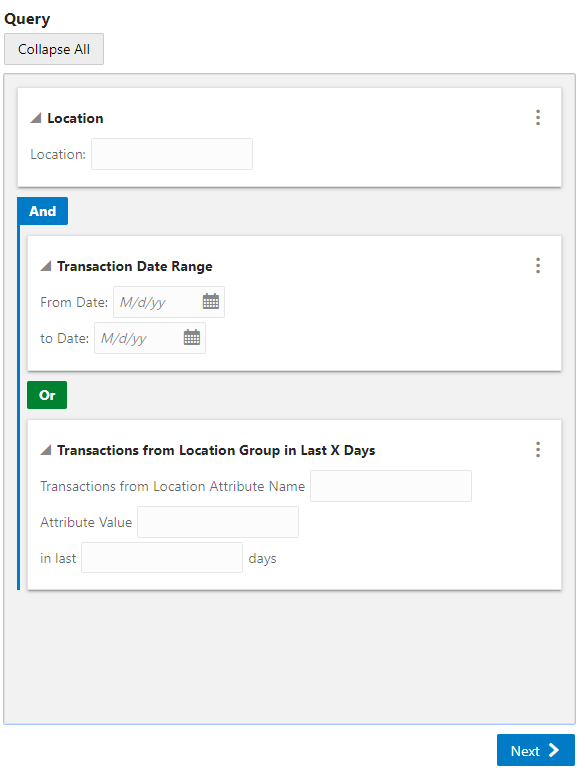
Note:
As shown in Figure Figure 7-34, the logical conditions And and Or appears between each of the criteria.
Figure 7-34 Query Window
-
To change the logical conditions, click either And or Or to switch between the two options.
Note:
If you use And, a record is only included in the node if it matches all of the criteria in the subnodes. If you use Or, a record is included in the node if it matches any of the criteria in the subnodes.
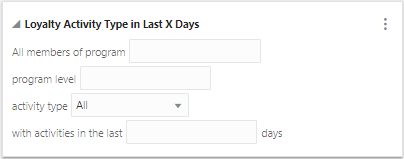
Figure 7-35 Segment
-
Enter the Search Criteria into the appropriate fields. See Segment Queries for more information about criteria fields.
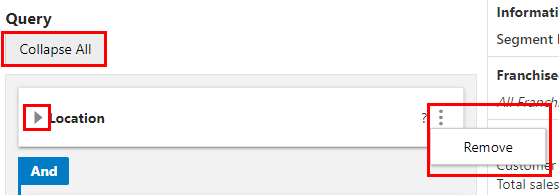
Figure 7-36 Query Options
-
After entering the search criteria you can collapse or expand criteria at any time. To Collapse a criteria click the arrow next to each criteria. To change all criteria at once, click Collapse All/Expand All to Collapse/Expand.
-
When you need to clear criteria from the query, click the Action Menu and then click Remove.
-
-
When finished building the strata query, click Next to select or enter Attributes to the segment.
-
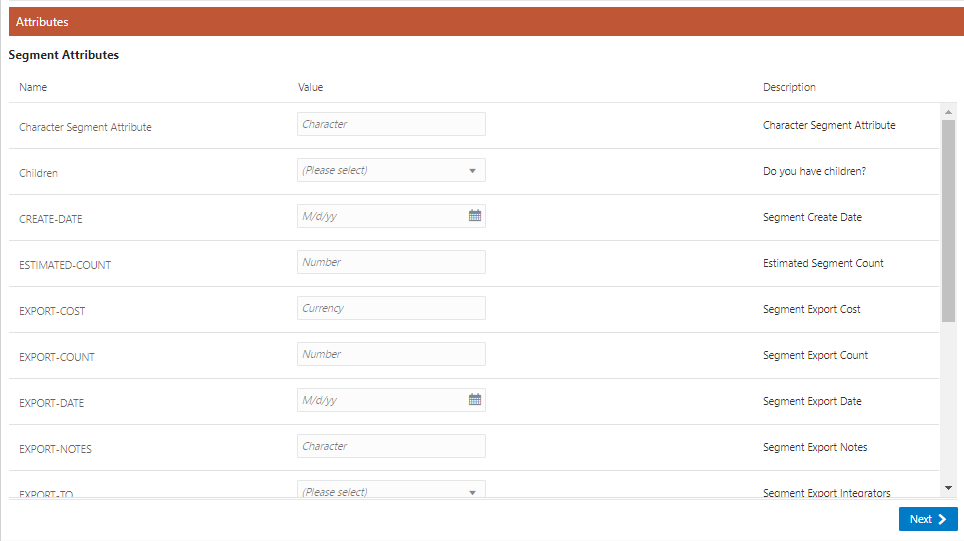
Attributes can be added to the Segment to further distinguish qualifications for the Segment.
Figure 7-37 Segment Attributes Tab
-
Select or enter the configuration values for each of the required Segment Attributes (shown with an asterisk*).
-
Add values for any Optional Segment Attributes.
-
Select or enter the configuration value for the Segment Attribute.
-
Repeat Step 18 for all optional Attributes you wish added to the Segment.
-
-
When finished defining any attributes for the Segment, click Next.
-
If the Segment Type is Stratified or Unstratified proceed to Step 22.
-
If the Segment Type is Personal List proceed to Step 20, Segment Members.
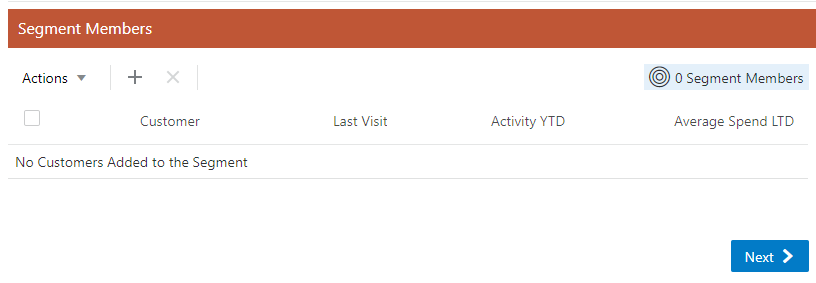
Figure 7-38 Segment Members Tab
-
-
To Assign Segment Members do the following:
-
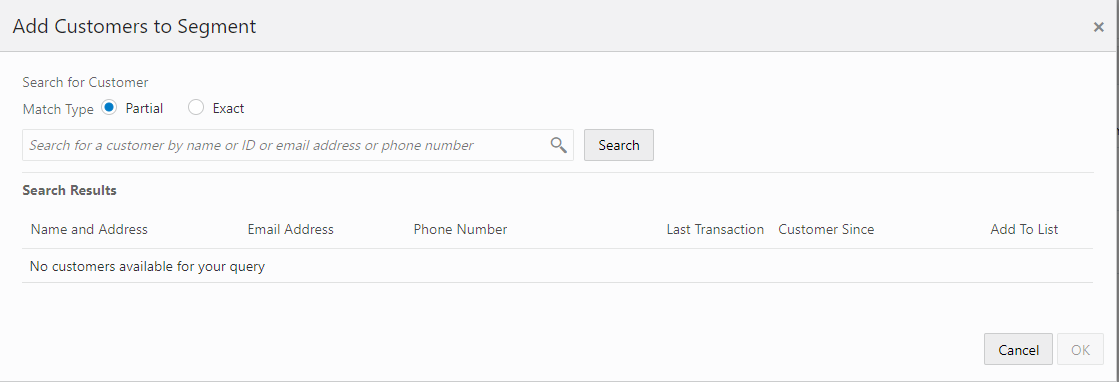
Click the Actions Menu, and click Add, or click the Add (+) icon. This opens the Add Customers to Segment window.
Figure 7-39 Add Customers To Segment
-
In the Search for Customers field, enter the Name, ID, Email Address, or Phone Number of the customer you want to search for. Click Partial to search for Customers that partially match the search text, or click Exact, to search for an exact match.
Note:
You also have the option to enter no search criteria and click Search to retrieve all available Customers from which to select for membership.
-
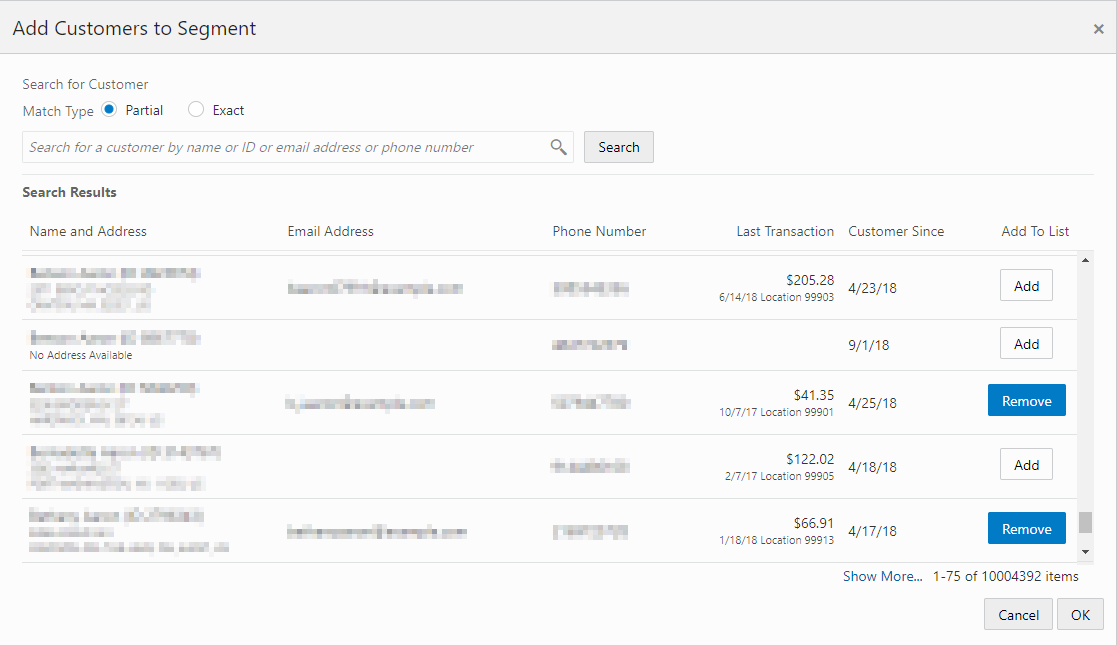
Add Customer to Segment
Figure 7-40 Add Customers to Segment
-
Click Add for every customer you wish to add to the Personal List.
-
When you are finished adding customers from each search, you can either click OK to close the window and save the changes or click Cancel to close the window without saving the changes.
-
-
Editing Segment Members
Figure 7-41 Segment Members List
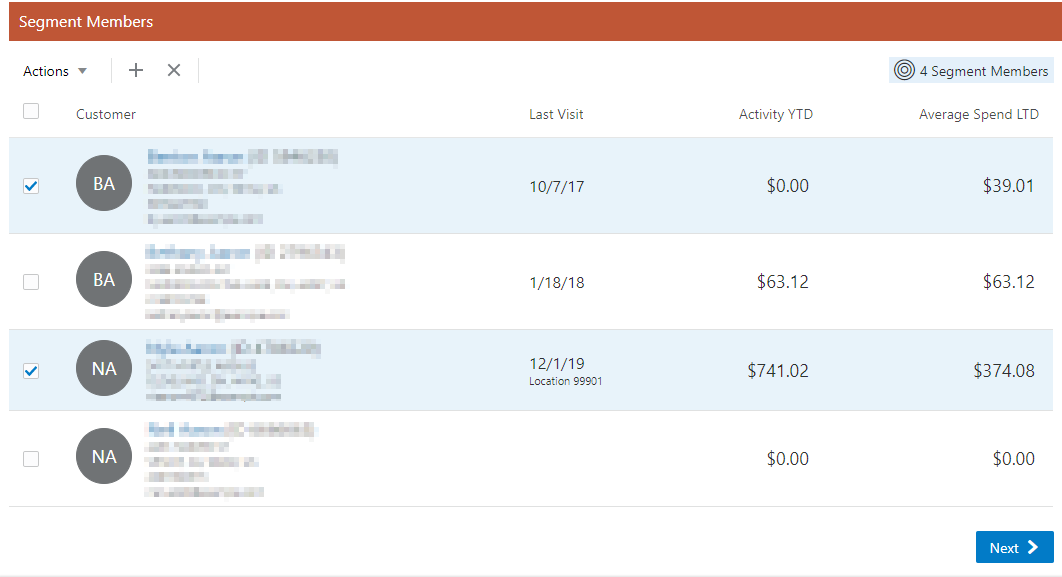
Segment Member lists can be edited. Do the following to edit a Segment Members list.
-
Select the Customer check box located next to each customer you wish to remove. To select all customers in the list, select the Customer check box at the top of the list.
-
To remove any selected names immediately, click the Actions Menu, and then either click Remove or the Remove (x) icon.
-
-
-
When finished editing the customers to the segment, click Next. Continue to Step 28, the Personal List: Review tab.
-
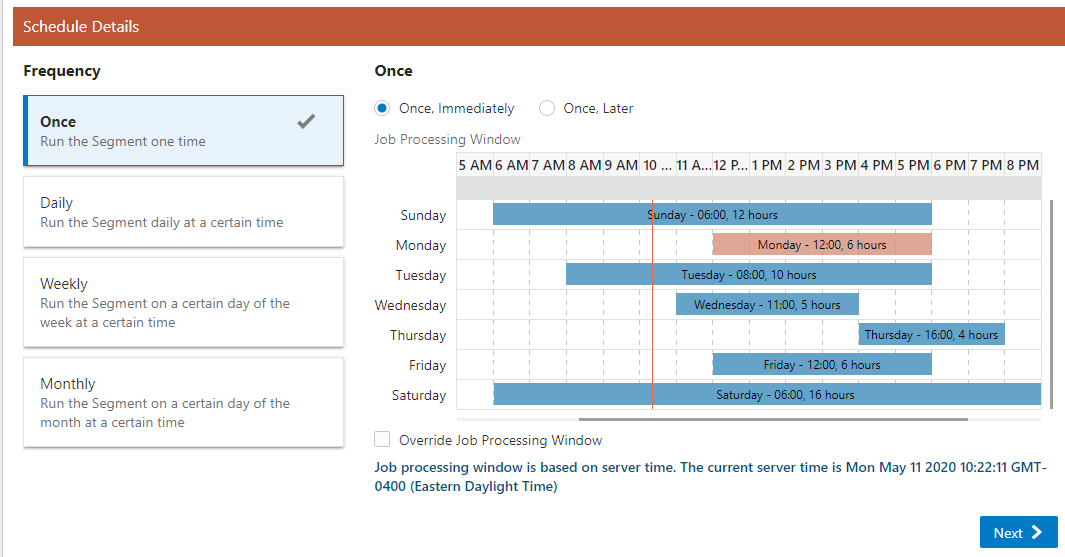
Define the Schedule on which the Segment Query is run. Select one of the following Job Execution Frequencies:
Figure 7-42 Frequency: Once, Immediately
-
Once, Immediately - Run the Segment Query as soon as the Segment has been completed. If you select this option, proceed to Step 24 for Stratified or Step 26 for Unstratified.
Note:
This option is not available if Publish to Clienteling is selected in the Segment Name step (see Step 6).
Figure 7-43 Frequency: Once, Later
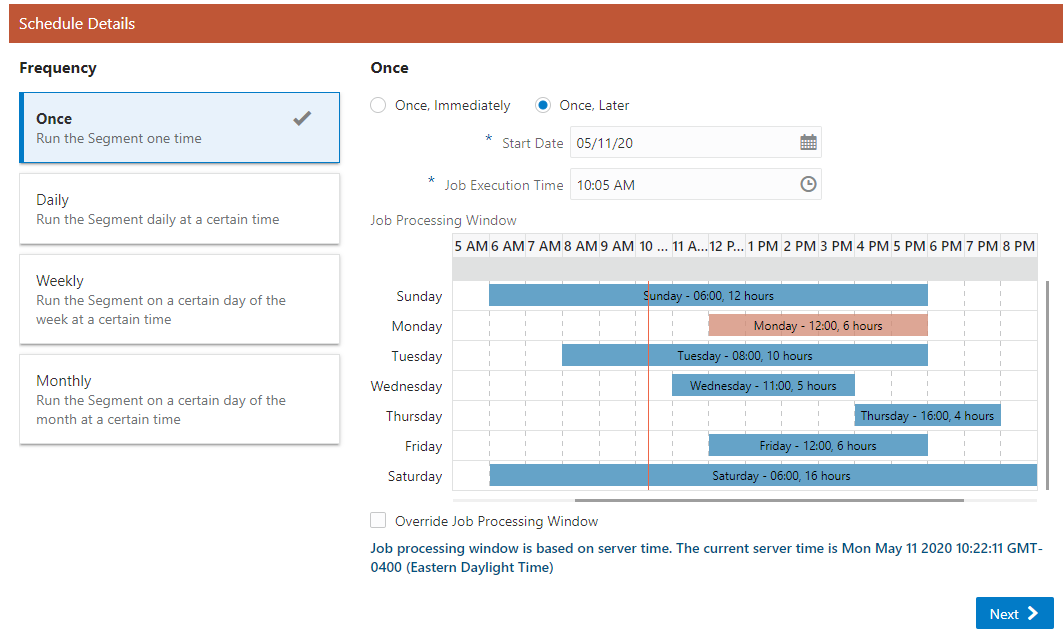
-
Once, Later - Run the Segment Query at a later date or time. Proceed to Step 22.a.
Figure 7-44 Frequency: Daily
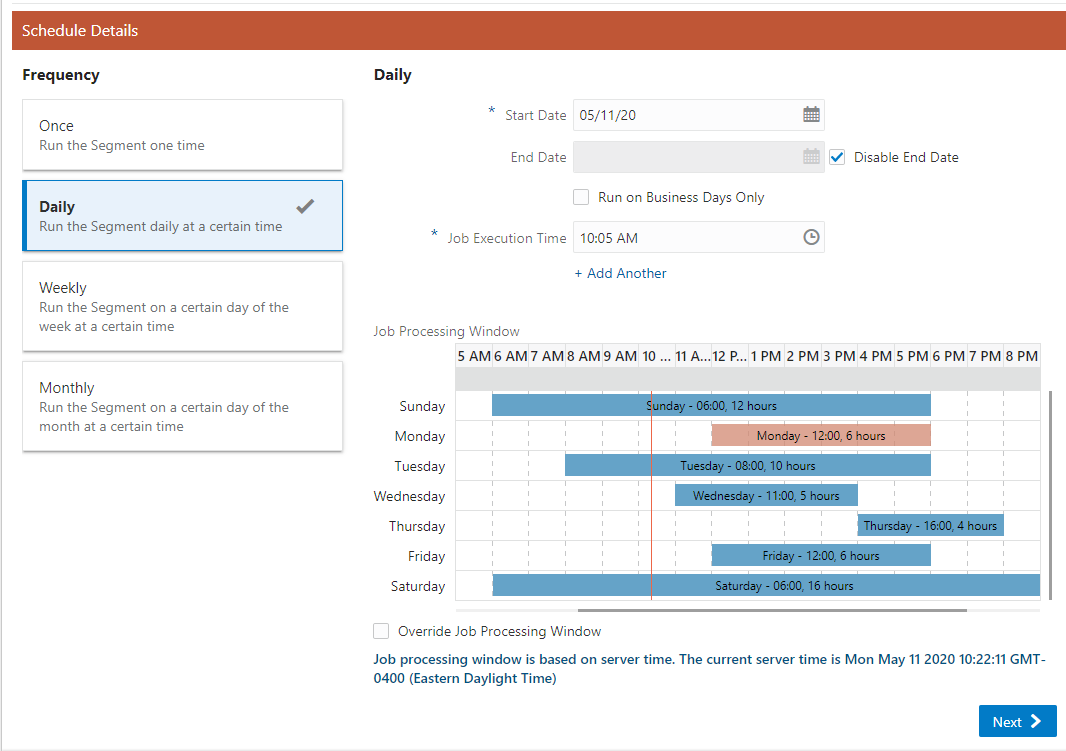
-
Daily - Run the Segment Query every day. Proceed to Step 22.a.
Either:
-
Daily, Business Days Only - To run the Segment Query only on business days (For example: Monday through Friday), select the Run on Business Days Only check box. Proceed to Step 22.a.
Figure 7-45 Frequency: Weekly
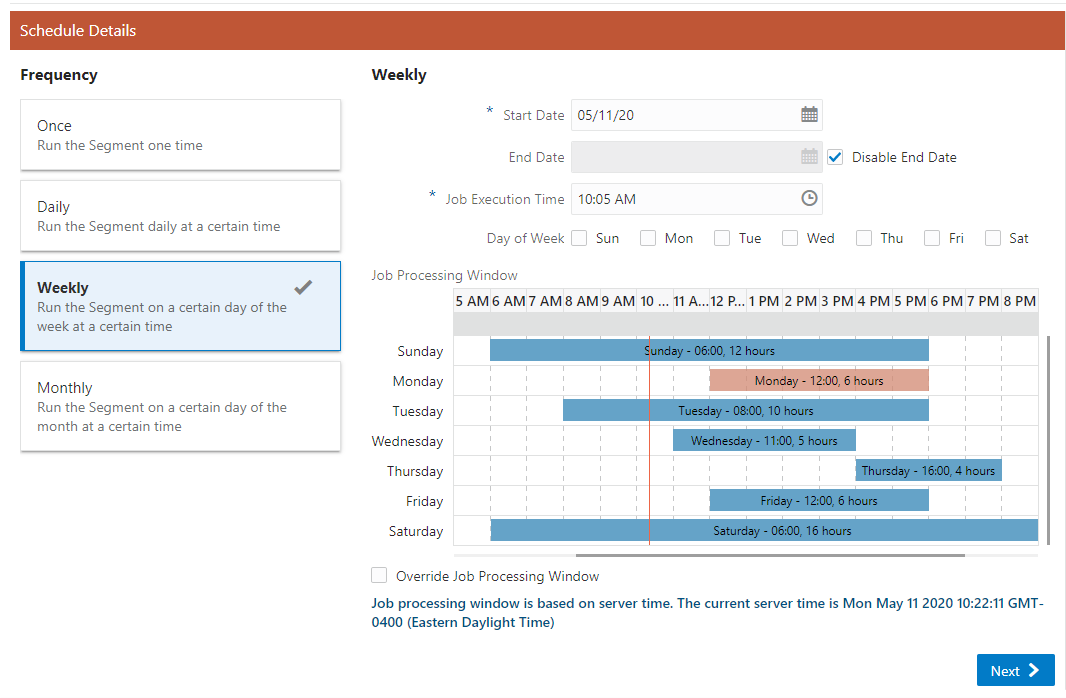
-
Weekly - Run the Segment Query once each week. Proceed to Step 22.a.
Figure 7-46 Frequency: Monthly
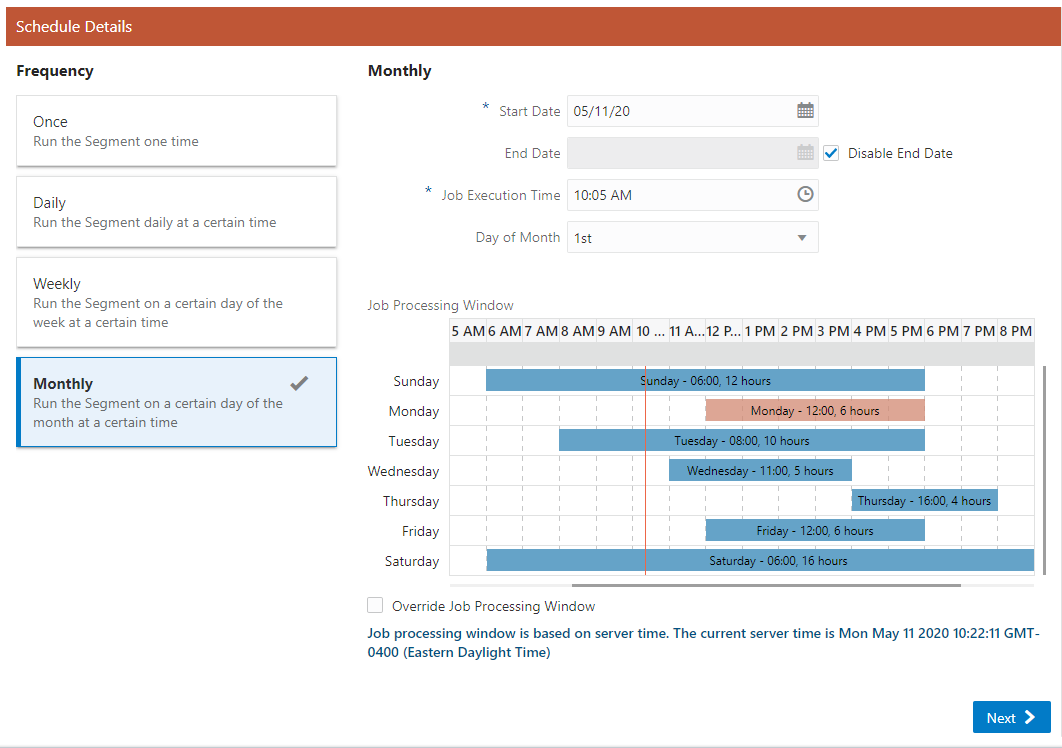
-
Monthly - Run the Segment Query once each month. Proceed to Step 22.a.
-
Use the Start Date Calendar Menu to select the start of the time range in which the job will run.
If you selected a Job Execution Frequency of Once, Later, proceed to Step 22.f.
-
Use the End Date Calendar Menu to select the end of the time range in which the job will run.
- If you selected a Job Execution Frequency of Daily, or Daily, Business Days Only, proceed to Step 22.e.
- If you selected a Job Execution Frequency of Weekly, proceed to Step 22.c.
- If you selected a Job Execution Frequency of Monthly, proceed to Step 22.d.
-
Use the Day of Week Selection Menu to select the day of the week on which the job will run. Proceed to Step 22.e.
-
Use the Day of Month Selection Menu to select the day of the month on which the job will run. Proceed to Step 22.e.
-
Use the Job Execution Time Time Menus to determine the time at which the job will run.
Note:
It is recommended that you select a time that is within the Job Processing Window. If you select a time outside the Job Processing Window, the Override Job Processing Window setting (see Step 22.f) must be checked for the job to run.
-
Use the Override Job Processing Window Check Box to indicate whether the job should run, even if it is scheduled outside the Job Processing Window.
-
-
When finished defining Schedule Details for the Segment, click Next and advance to the Review Tab.
-
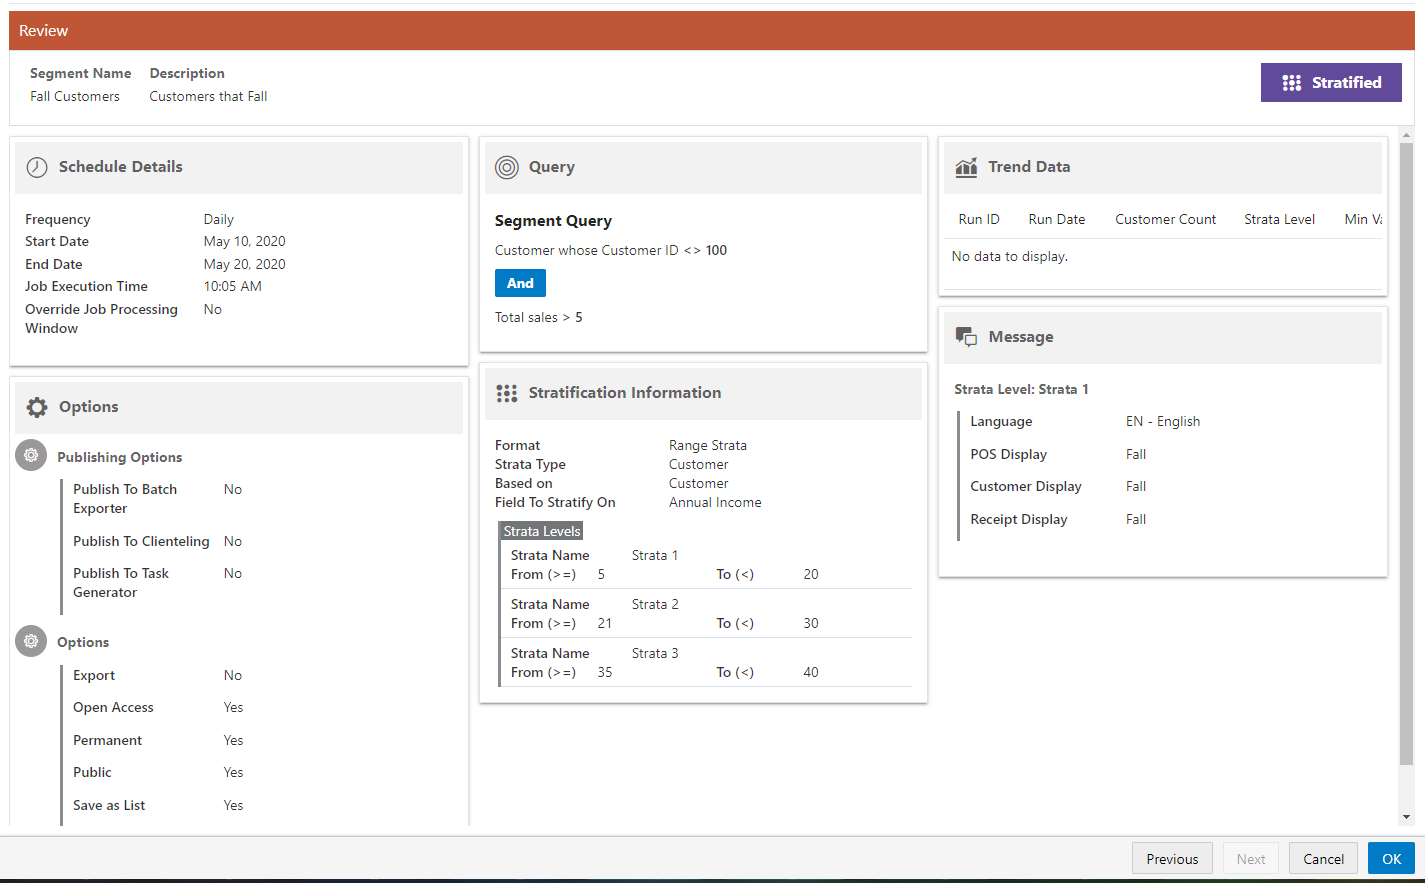
The Review tab displays key elements in the Create Segment Setup. Review the following for the Stratified Type.
Figure 7-47 Stratified Review Tab
-
Click OK to create the segment, or click Cancel to close without saving.
Figure 7-48 Segment Tabs Links

Note:
Before you save the Segment, you can use the tab links along with Previous and Next to go back to any point in the create segment process and make changes.
-
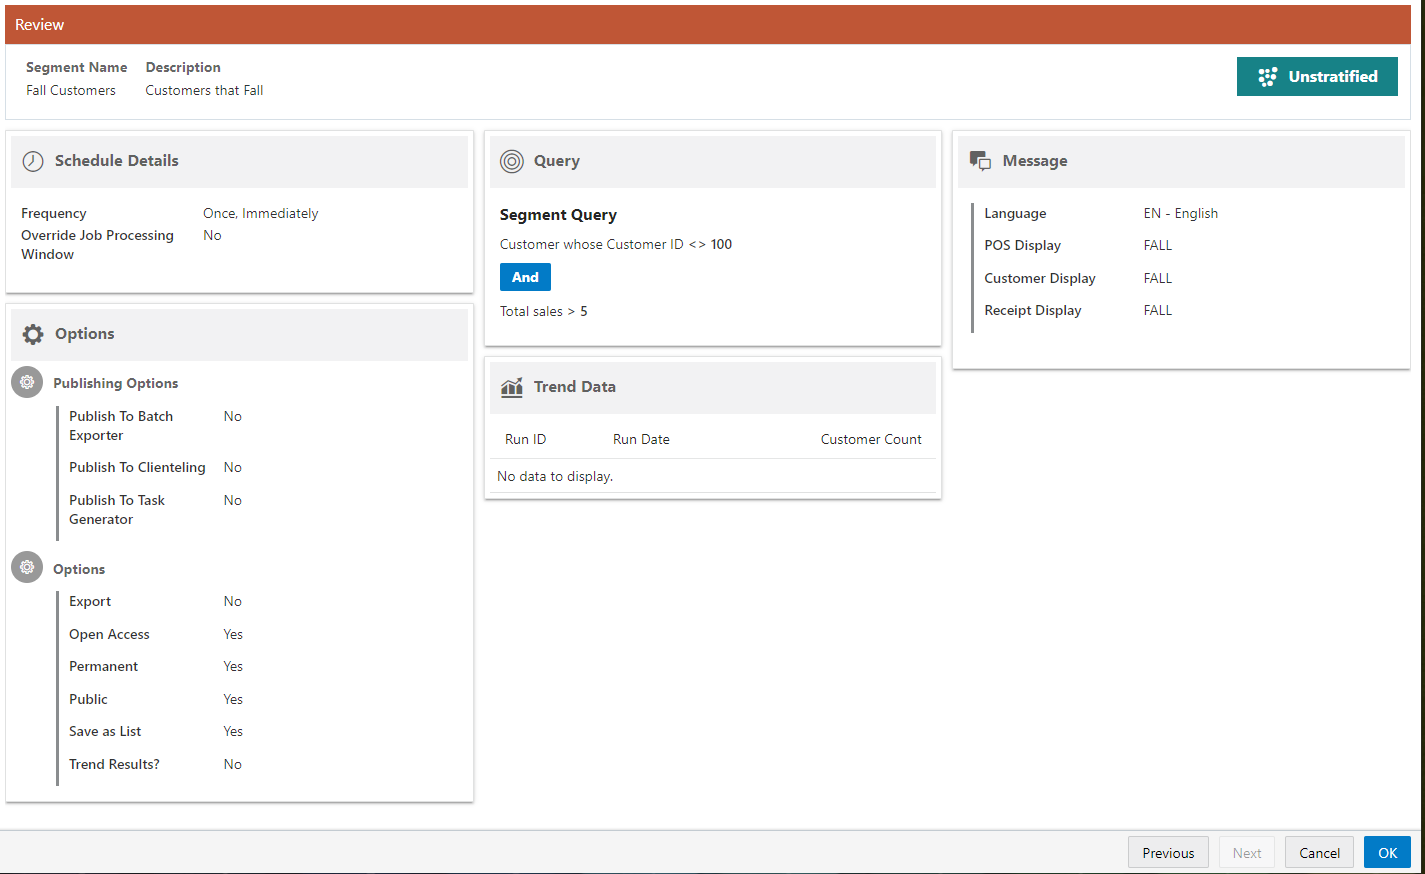
The Review tab displays key elements in the Segment Setup. Review the following for the Unstratified Type.
Figure 7-49 Unstratified Review Tab
-
Click OK to create the segment, or click Cancel to close without saving.
Figure 7-50 Segment Tabs Links

Note:
Before you save the Segment, you can use the tab links along with Previous and Next to go back to any point in the create segment process and make changes.
-
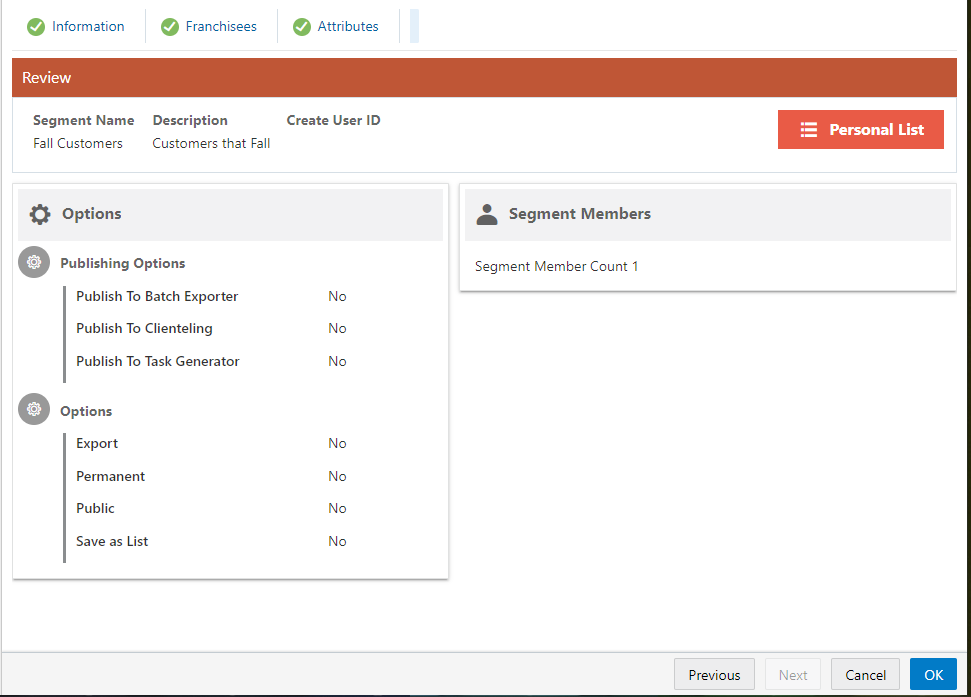
The Review tab displays key elements in the Create Segment Setup. Review the following for the Personal List Type.
Figure 7-51 Personal List Review Tab
-
Click OK to create the segment, or click Cancel to close without saving.
Figure 7-52 Segment Tab Links - Personal List

Note:
Before you save the Segment, you can use the tab links along with Previous and Next to go back to any point in the create segment process and make changes.
Editing Segments/Personal Lists
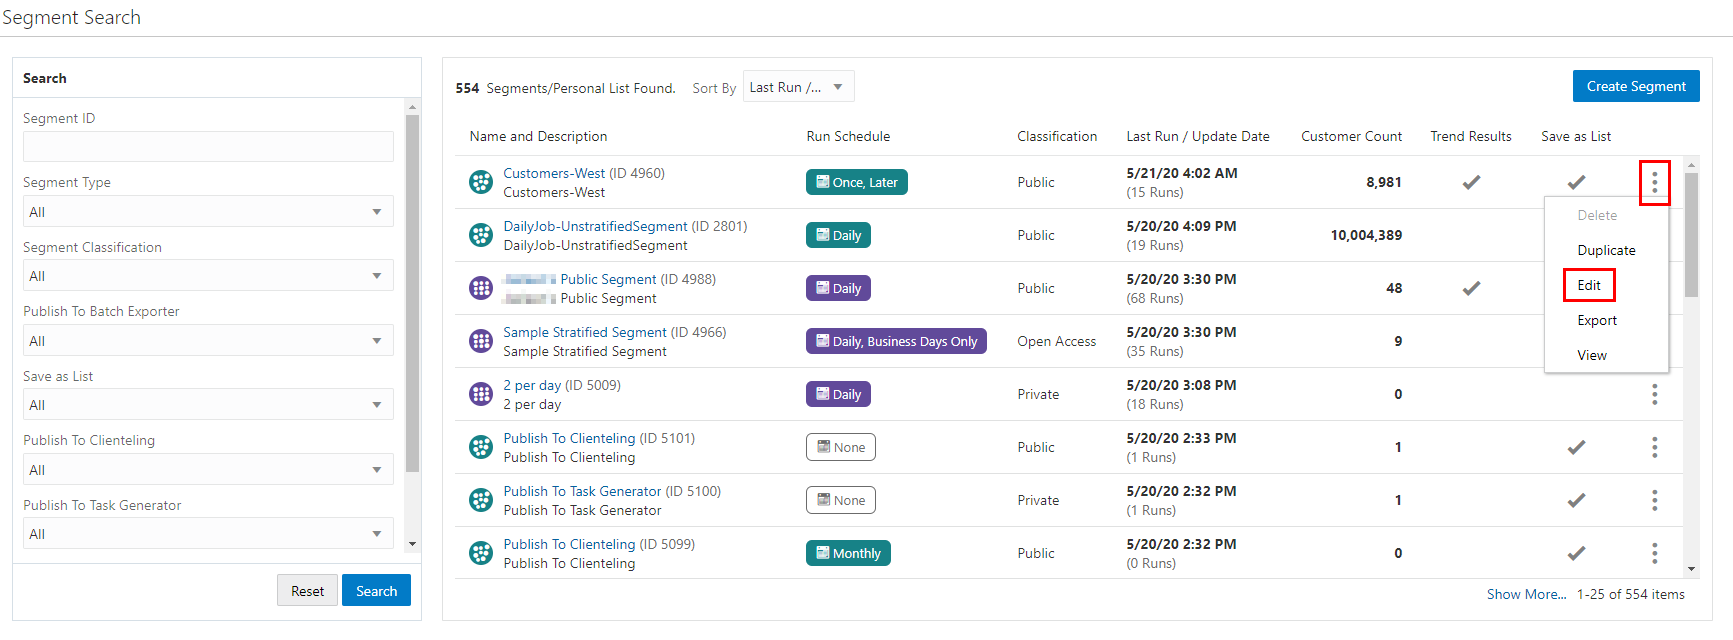
You can access a Segment/Personal List for editing using the following methods to display the Edit option:
-
Segment Search Results
-
Click the Overflow Menu icon on the far right in the data display section for an individual Segment/Personal List in the Segment Advanced Search window (Segment/Personal List Record Result Section).
-
Click Edit.
Figure 7-53 Overflow Menu Options (Segment Advanced Search)
-
-
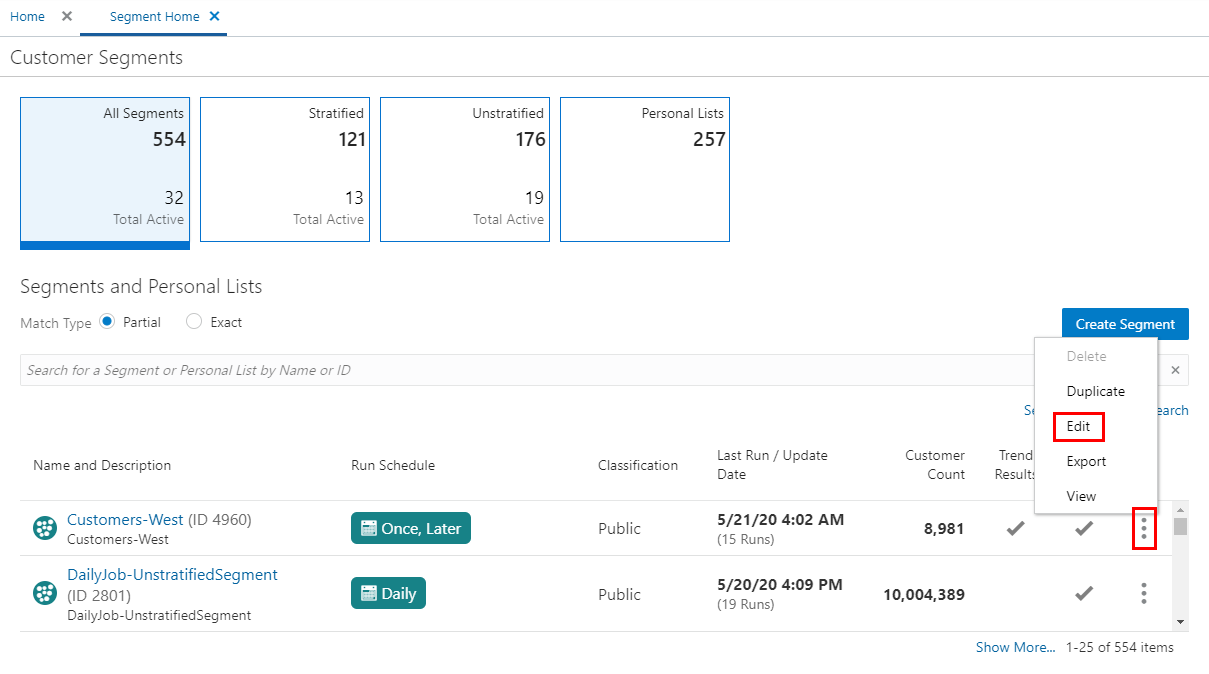
Segment Quick Search
-
Click the Overflow Menu icon on the far right in the data display section for each individual Segment/Personal List in the Segment Quick Search window.
-
Click Edit.
Figure 7-54 Overflow Menu Options (Segment Quick Search)
-
-
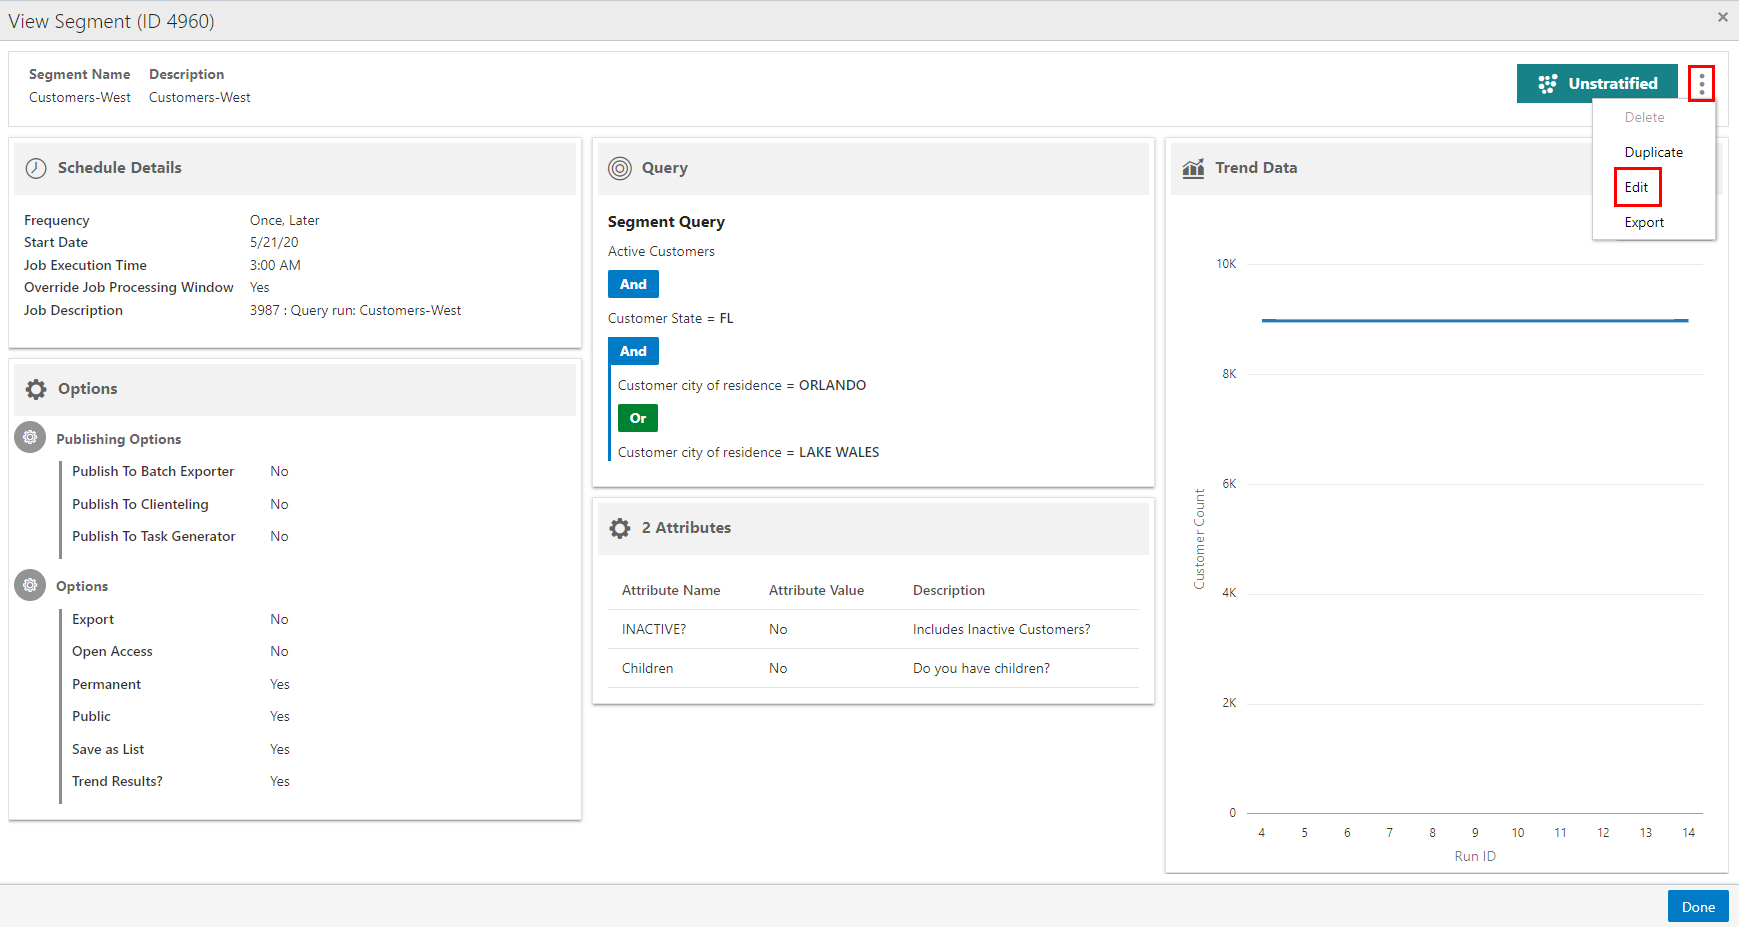
View Segment View
-
Click the Overflow Menu icon on the far right in the data display section for an individual Segment/Personal List.
-
Click Edit.
Figure 7-55 View Segment/Personal List (Edit)
-
For detailed information on each section while editing a Segment or Personal List see Creating a Segment or Personal List.
Duplicating Segments/Personal Lists
You can duplicate a Segment/Personal List using the following methods to display the Duplicate option:
-
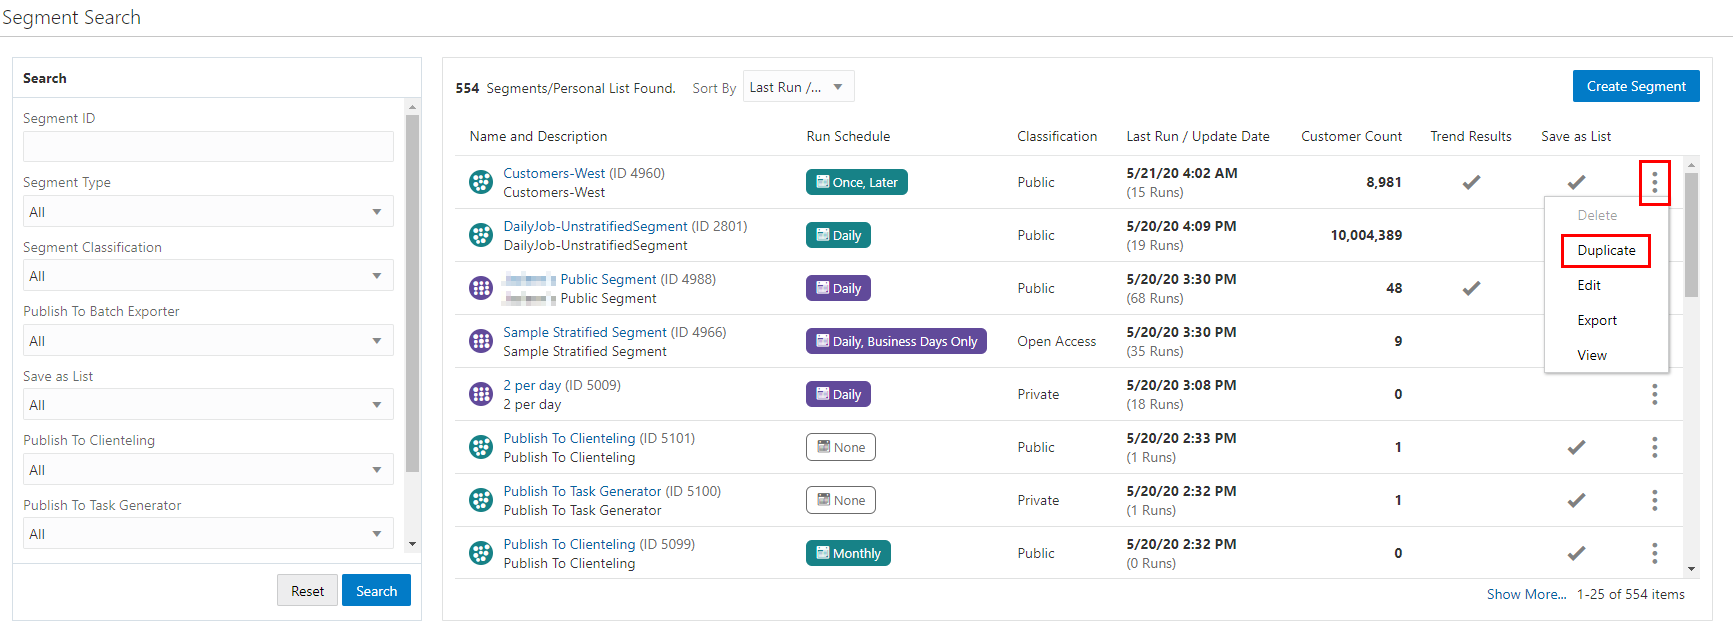
Segment Search Results
-
Click the Overflow Menu icon on the far right in the data display section for each individual Segment/Personal List in the Segments Advanced Search window.
-
Click Duplicate.
Figure 7-56 Overflow Menu Options (Segments Advanced Search)
-
-
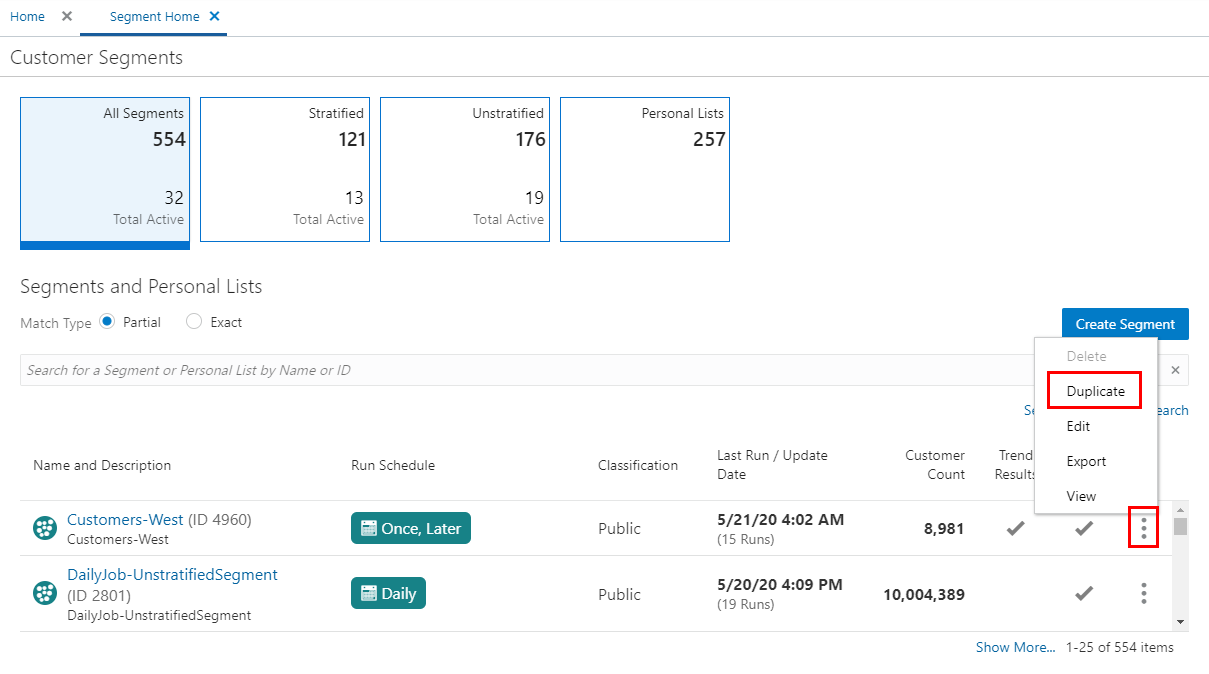
Segment Quick Search
-
Click the Overflow Menu icon on the far right in the data display section for an individual Segment/Personal List.
-
Click Duplicate.
Figure 7-57 Overflow Menu Options (Segment Quick Search)
-
-
View Segment View
-
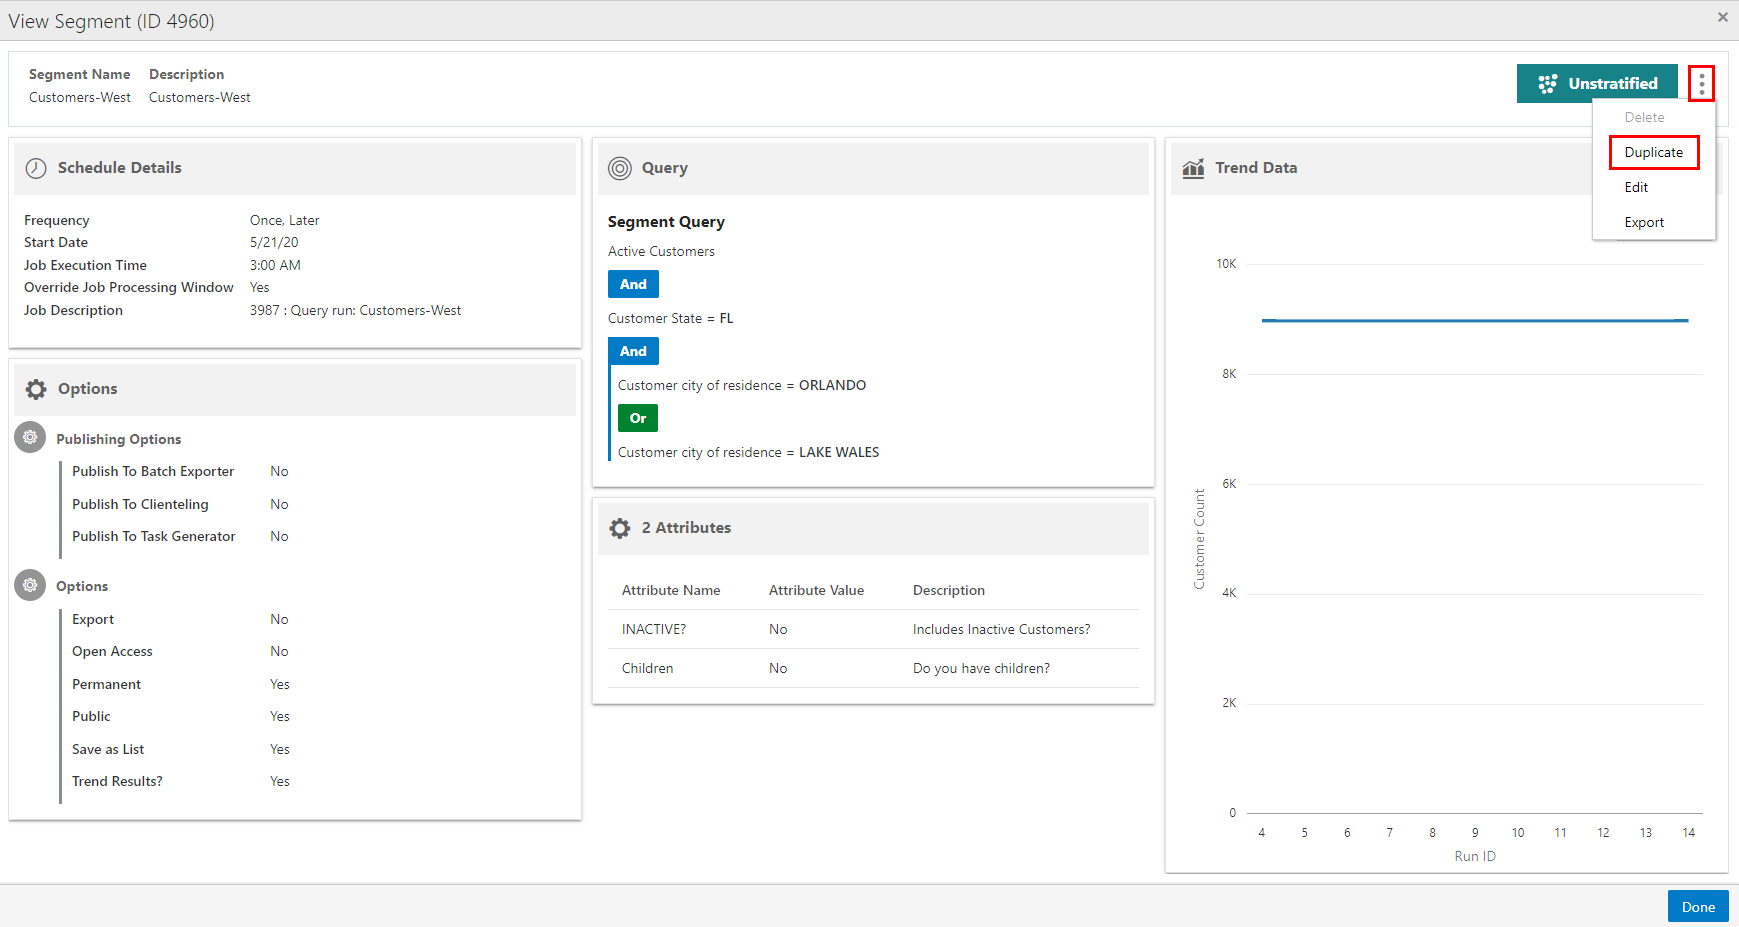
Click the Overflow Menu icon on the far right in the data display section for an individual Segment/Personal List.
-
Click Duplicate.
Figure 7-58 View Segment List (Duplicate)
-
For detailed information on each section after duplicating an offer see Creating a Segment or Personal List.
Viewing Segments/Personal Lists
You can access a Segment/Personal List for viewing using the following methods to display the View option:
-
Segment/Personal List Search Results
-
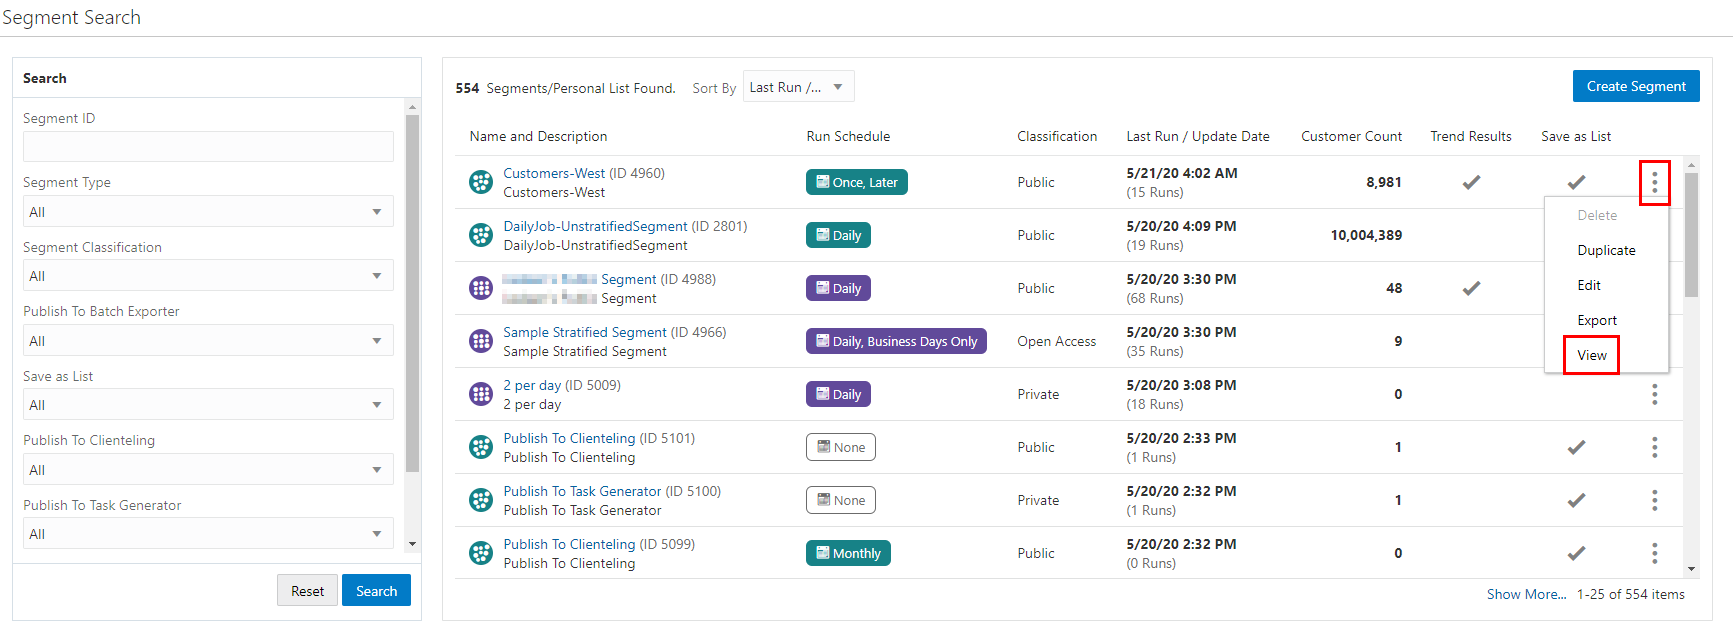
Click the Overflow Menu icon on the far right in the data display section for each individual Segment/Personal List in the Segment/Personal List Advanced Search window (Segment/Personal List Record Result Section).
-
Click View.
Figure 7-59 Overflow Menu Options (Segments Advanced Search)
-
-
Segment/Personal List Quick Search
-
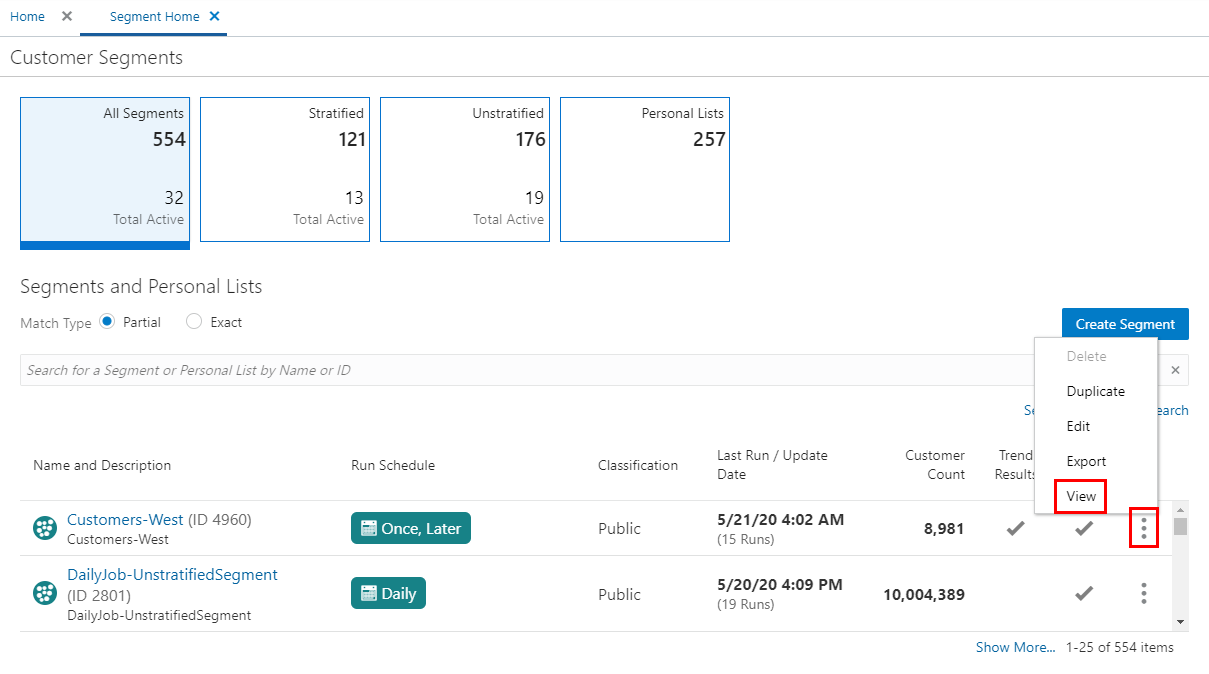
Click the Overflow Menu icon on the far right in the data display section for each individual Segment/Personal List in the Segment/Personal List Quick Search window.
-
Click View.
Figure 7-60 Overflow Menu Options (Segments Quick Search)
-
For detailed information on each section while Viewing an offer see Creating a Segment or Personal List.
Exporting Segments
You can export a Segment using the following methods to display the Export option:
-
Segment Search Results
-
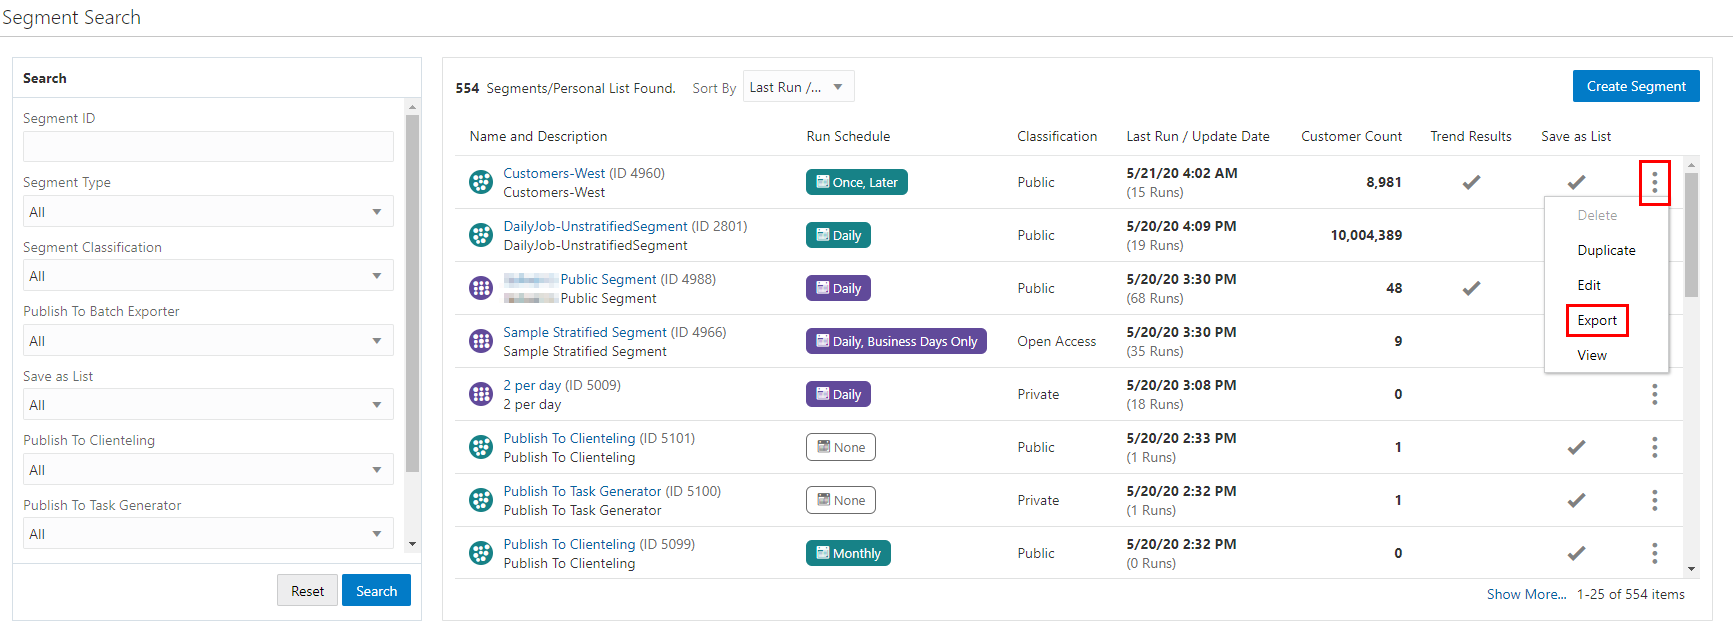
Click the Overflow Menu icon on the far right in the data display section for each individual Segment in the Segments Advanced Search window.
-
Click Export. A confirmation appears.
Figure 7-61 Export Confirmation

-
Click OK to export the Segment or Cancel to close the confirmation without saving.
Note:
A confirmation appears in the window.
Figure 7-62 Export Job Notification

Figure 7-63 Overflow Menu Options (Segments Advanced Search)
-
-
Segment Quick Search
-
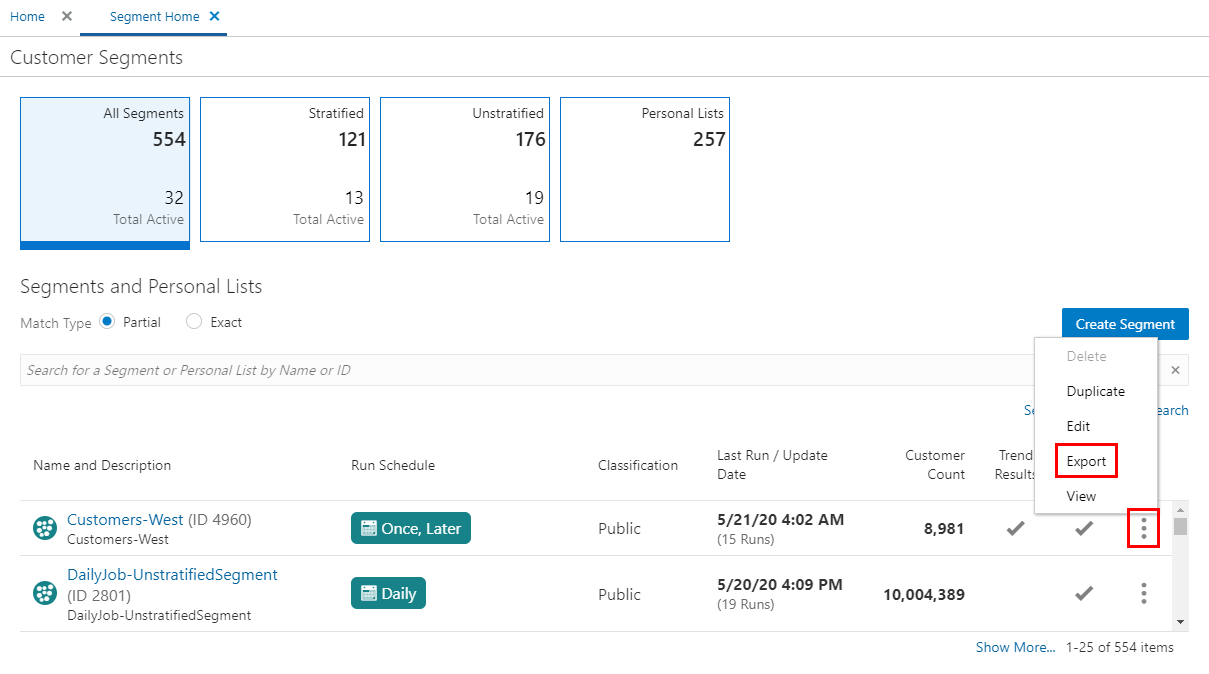
Click the Overflow Menu icon on the far right in the data display section for an individual Segment.
-
Click Export.
-
Click OK to export the Segment or Cancel to close the confirmation without saving.
Note:
A confirmation appears in the window.
Figure 7-64 Export Job Notification

Figure 7-65 Overflow Menu Options (Segment Quick Search)
-
-
View Segment View
-
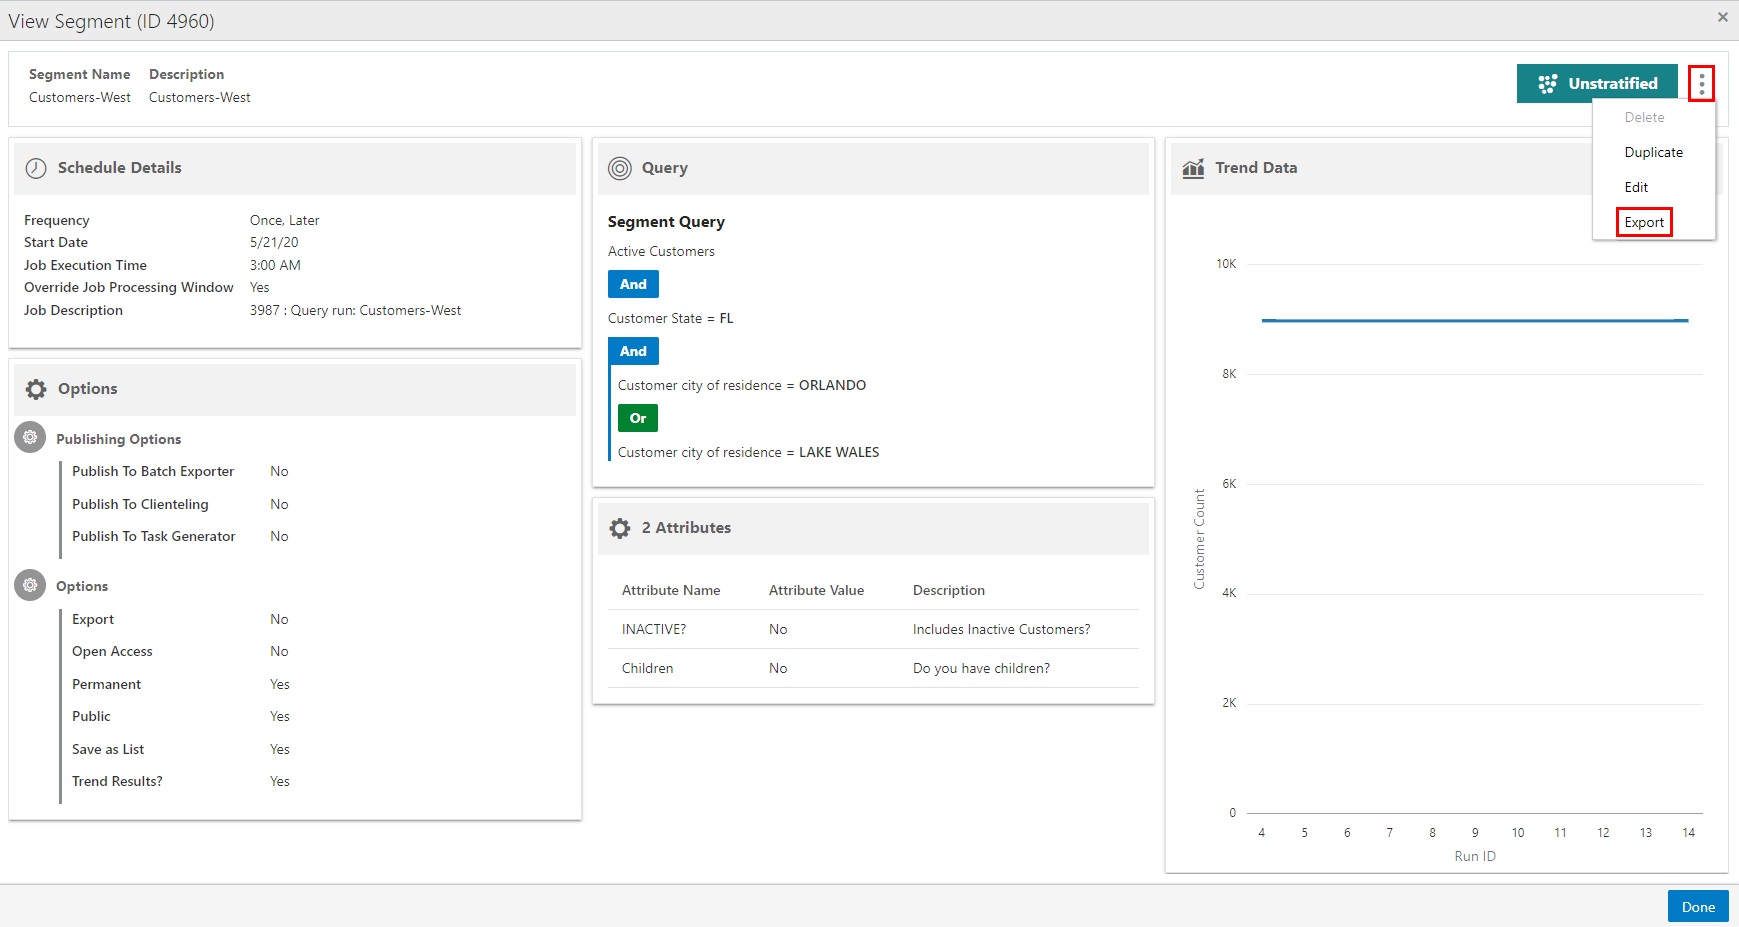
Click the Overflow Menu icon on the far right in the data display section for an individual Segment.
-
Click Export.
-
Click OK to export the Segment or Cancel to close the confirmation without saving.
Note:
A confirmation appears in the window.
Figure 7-66 Export Job Notification

Figure 7-67 View Segment (Export)
-
Deleting Segments/Personal Lists
You can delete a Segment/Personal List using the following methods to display the Delete option:
-
Segment Search Results
-
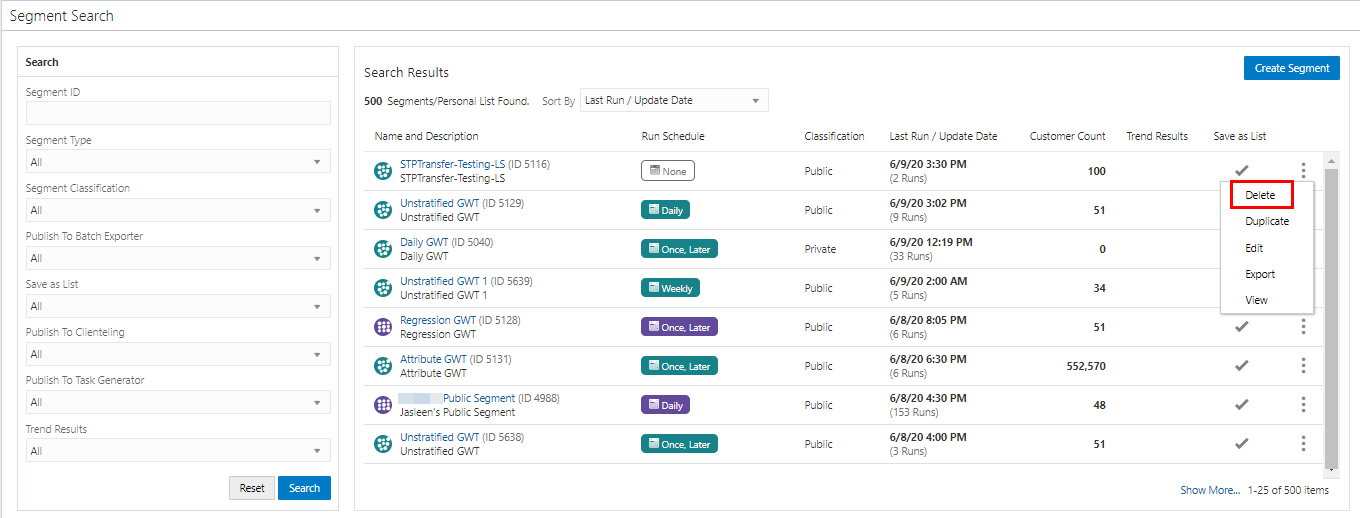
Click the Overflow Menu icon on the far right in the data display section for each individual Segment/Personal List in the Segments Advanced Search window.
-
Click Delete. A warning message appears.
Figure 7-68 Delete Warning

-
Click OK to delete the Segment/Personal List or Cancel to close the confirmation without saving.
Note:
A confirmation appears in the window.
Figure 7-69 Confirmation Message

Figure 7-70 Overflow Menu Options (Segments Advanced Search)
-
-
Segment Quick Search
-
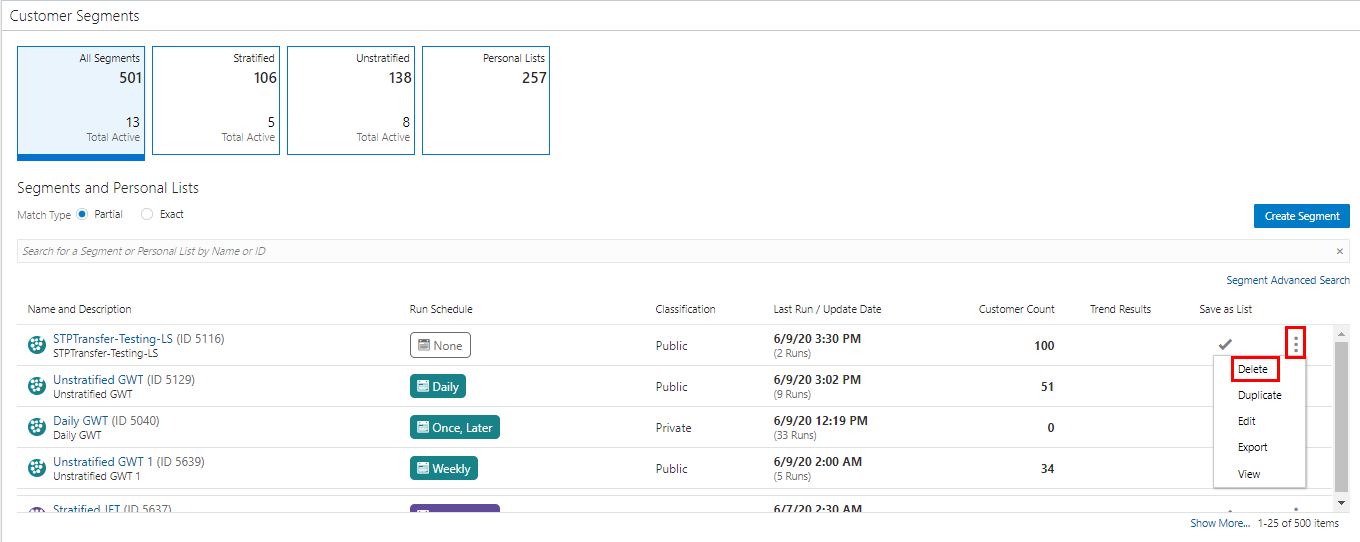
Click the Overflow Menu icon on the far right in the data display section for an individual Segment/Personal List.
-
Click Delete.
-
Click OK to delete the Segment/Personal List or Cancel to close the confirmation without saving.
Note:
A confirmation appears in the window.
Figure 7-71 Confirmation Message

Figure 7-72 Overflow Menu Options (Segment Quick Search)
-
-
View Segment View
-
Click the Overflow Menu icon on the far right in the data display section for an individual Segment/Personal List.
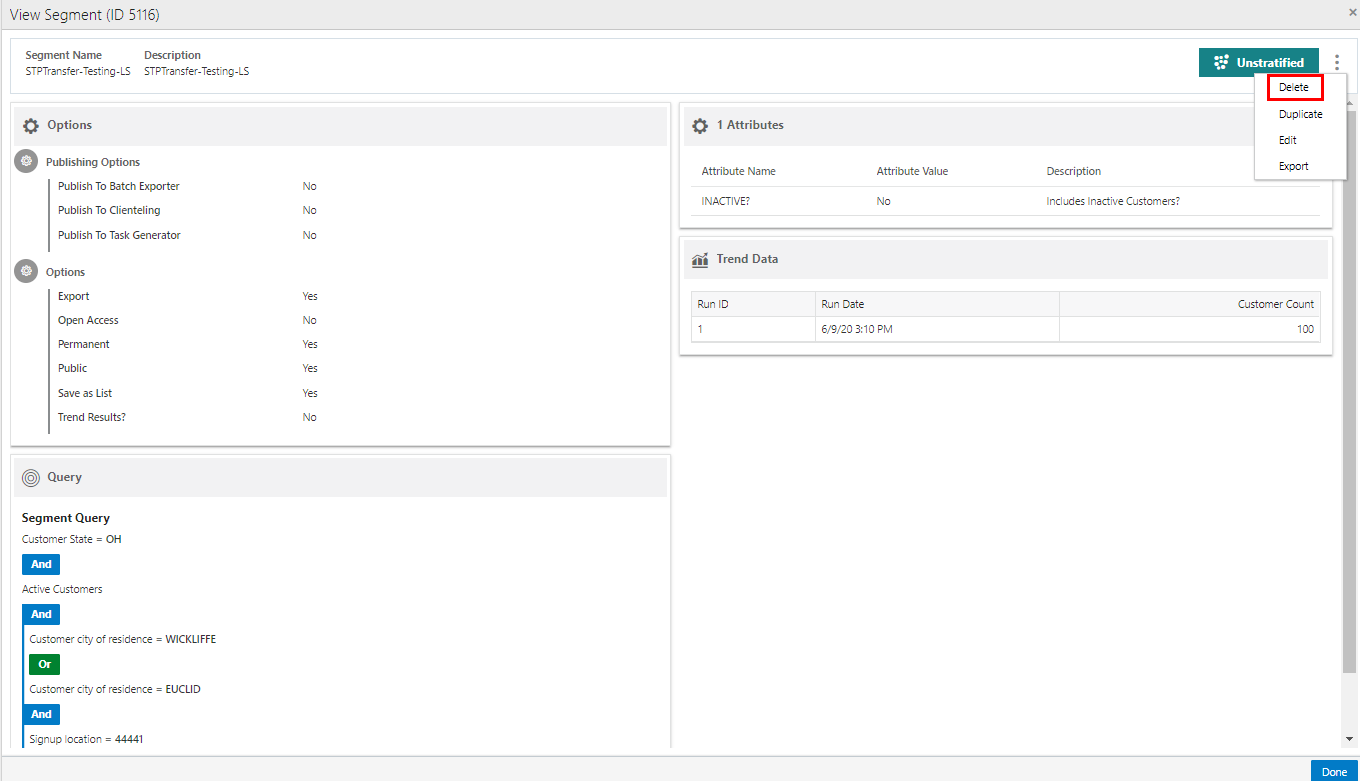
-
Click Delete.
-
Click OK to delete the Segment/Personal List or Cancel to close the confirmation without saving.
Note:
A confirmation appears in the window.
Figure 7-73 Confirmation Messages

Figure 7-74 View Segment/Personal List (Delete)
-
Segment Scorecards
The Segment Scorecard displays information about the Segment. You have the ability to periodically review the data on Segments. There are three types of Scorecards:
-
Stratified Scorecard
-
Unstratified Scorecard
-
Personal List Scorecard
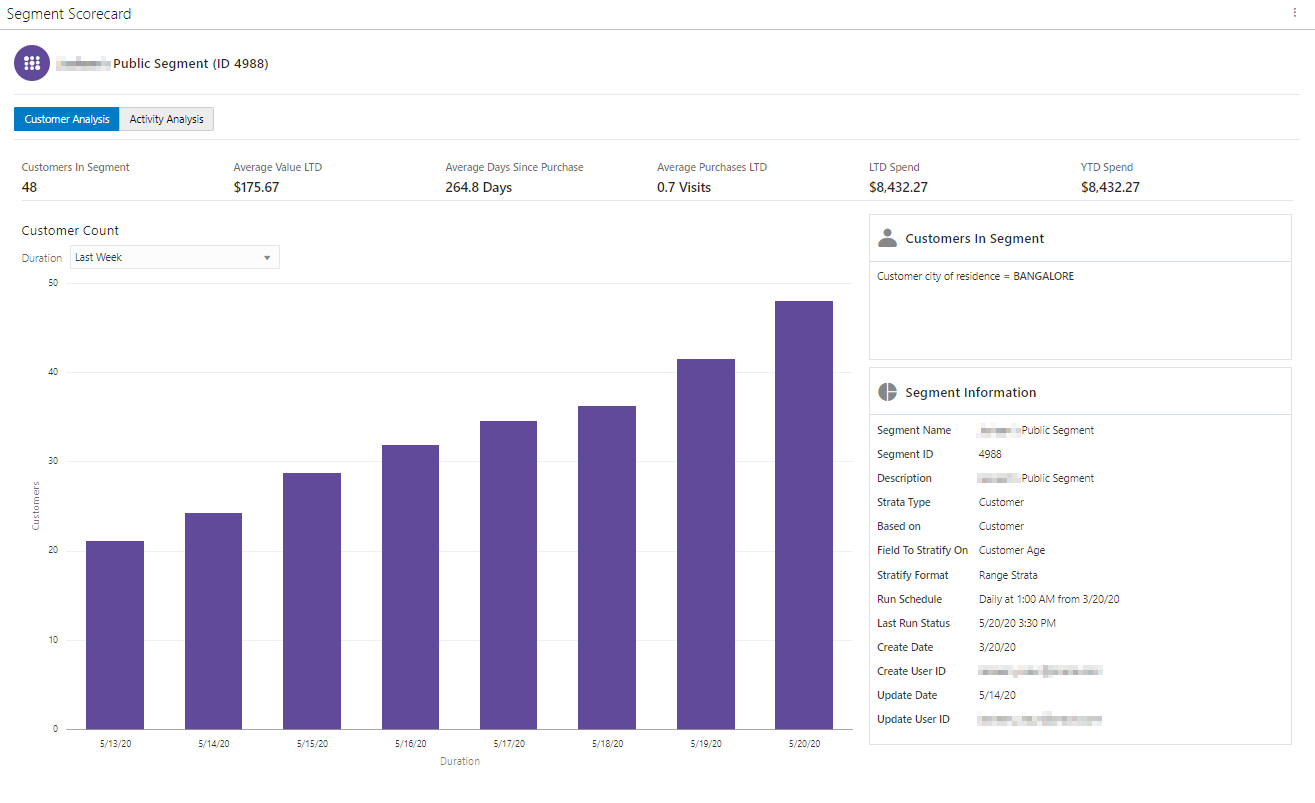
Figure 7-75 Stratified Segment Scorecard
Note:
When no data is available a message appears informing you this Segment/Personal List does not contain any data.
Segment Scorecard Feature Bar
The Segment Scorecard Feature Bar contains the following information:
-
Title of the window.
-
Action Menu with the ability to Edit, View, or Duplicate the Segment/Personal List.
Figure 7-76 Action Menu Options

-
The following information displays below the Feature Bar.
-
Segment Type Icon
-
Segment Name
-
Segment ID
-
Scorecard Analysis
Scorecards display high level metrics on customers within the segment, based on summary data.
Stratified Segment Scorecard
The Stratified Segment Scorecard provides summary data metrics on customers within the each strata of the segment. Click one of the following choices:
-
Customer Analysis- The analysis of each Customer within the Segment based on Recency, Frequency, and Monitory Value.
-
Activity Analysis - The analysis of each Customer on the basis of strata level within the Segment using Recency, Frequency, and Monitory Value metric.
Customer Analysis Metrics
Figure 7-77 Segment Scorecard (Stratified) - Customer Analysis

-
The following metrics and their values display above a graph.
-
Customers in Segment
-
Average Value LTD
-
Average Days Since Purchase
-
Average Purchases LTD
-
LTD Spend
-
YTD Spend
-
-
Duration:
-
Last Week - Customer Trend for Last Week (7 days (Current date (-1)) is displayed.
-
Last Month (Default) - Customer Trend for Last Month (Current date (-1)) is displayed.
-
Last 6 Months - Customer Trend for Last 6 Months converted into weeks (Current date (-1)) is displayed.
-
Last Year - Customer Trend for Last 12 months (Current date (-1)) is displayed.
-
Lifetime to Date - Customer Trend for the last 5 years (Current date (-1)) is displayed.
-
Customer Count Graph
-
The bar graph will dynamically update the Customer Trend based on the value selected for the Duration.
-
The graph will represent a plot between the Customers Count on Y-axis and duration on X-axis for the Segment.
Segment Details Side Panel
-
Customers in Segment
-
The selected templates along with their field values separated by AND/OR logic is displayed below the title.
-
-
Segment Information
-
Segment Name
-
Segment ID
-
Description
-
Strata Type
-
Based On
-
Field to Stratify On
-
Strata Format
-
Run Schedule
-
Last Run Status
-
Create Date
-
Create User ID
-
Update Date
-
Update User ID
-
Activity Analysis Metrics
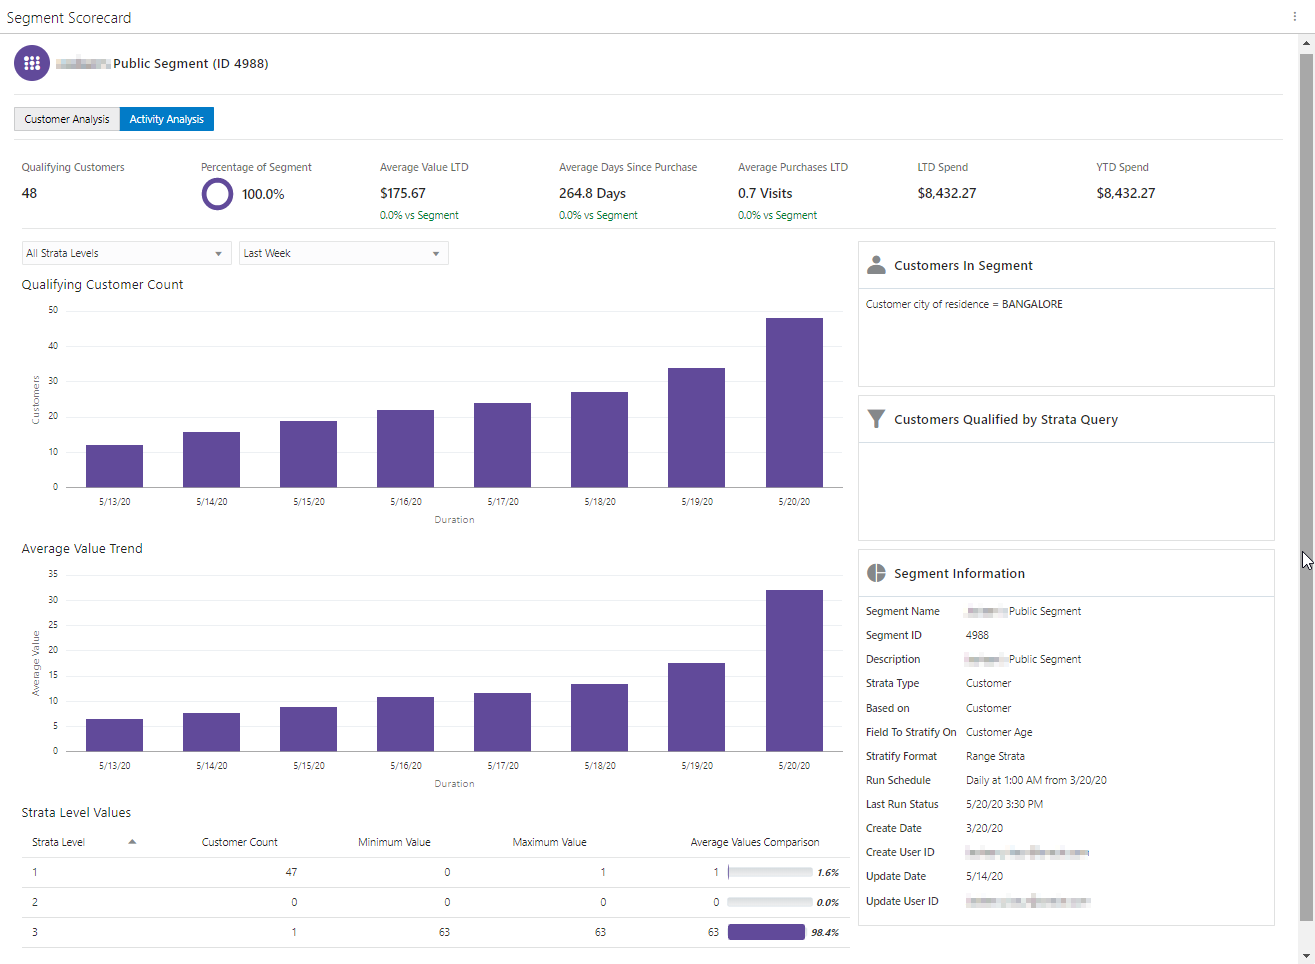
Figure 7-78 Segment Scorecard (Stratified) - Activity Analysis
-
The following metrics and their values display above a graph.
-
-
Qualifying Customers - The number of customers in the analysis.
-
Percentage of Segment - The Percentage of Customers in the Segment is represented by Doughnut chart.
-
Average Value LTD - The percentage increase will display in Green color and the percentage decrease will display in Red color.
-
Average Days Since Purchase -The percentage increase will display in Green color and the percentage decrease will display in Red color.
-
Average Purchases LTD - The percentage increase will display in Green color and the percentage decrease will display in Red color.
-
LTD Spend
-
YTD Spend
-
Qualifying Customer Count Graph
The Qualifying Customer Count graph dynamically updates based on the values selected for the number of Strata Levels and Duration. See Duration for duration details.
Average Value Trend Graph
The Average Value Trend graph dynamically updates based on the values selected for the number of Strata Levels and Duration. See Duration for duration details.
Strata Level Values
-
A list of all the Strata Levels defined for the segment display in the Strata Level selection menu. Once a selection is made (all strata levels or an individual strata) a table displays directly below the graph and includes the following values:
-
Strata Level - Number of the Strata Level
-
Customer Count - The number of Customers in the Strata.
-
Minimum Value - The smallest value for the field by a Customer in the Strata (will not display for Segment type = Unstratified Segment).
-
Maximum Value - The largest value for the field by a Customer in the Strata (will not display for Segment type = Unstratified Segment).
-
Average Value Comparison - The average value for the field among the Customers in the Strata.
-
-
Duration– Durations include:
-
Last Week - Customer Trend for Last Week (7 days (Current date (-1)) is displayed.
-
Last Month (Default) - Customer Trend for Last Month (Current date (-1)) is displayed.
-
Last 6 Months - Customer Trend for Last 6 Months converted into weeks (Current date (-1)) is displayed.
-
Last Year - Customer Trend for Last 12 months (Current date (-1)) is displayed.
-
Lifetime to Date - Customer Trend for the last 5 years (Current date (-1)) is displayed.
-
Segment Details Side Panel
-
Customers in Segment
-
The selected templates along with their field values separated by AND/OR logic is displayed below the title.
-
-
Customers Qualified by Strata Query - The Customers Qualified by Strata Query box reflects additional strata qualifiers selected when creating a stratified segment and the Strata Type is either Loyalty or Transaction.
-
Segment Information
-
Segment Name
-
Segment ID
-
Description
-
Strata Type
-
Based On
-
Field to Stratify On
-
Strata Format
-
Run Schedule
-
Last Run Status
-
Create Date
-
Create User ID
-
Update Date
-
Update User ID
-
Unstratified Segment Scorecard
The Unstratified Segment Scorecard provides summary data metrics on customers in the segment.
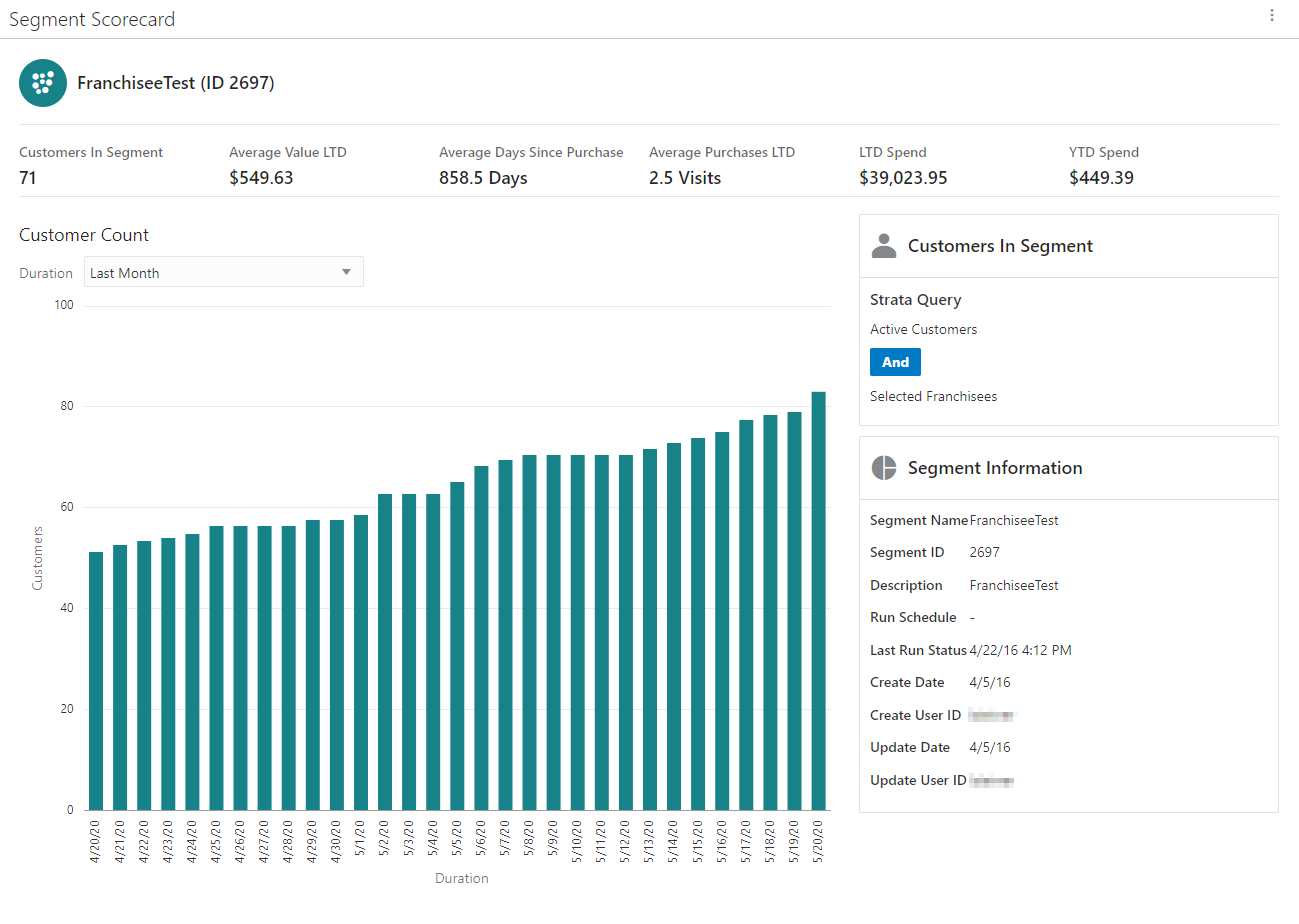
Figure 7-79 Segment Scorecard - Unstratified
-
The following metrics and their values display above a graph.
-
Customers in Segment
-
Average Value LTD
-
Average Days Since Purchase
-
Average Purchases LTD
-
LTD Spend
-
YTD Spend
-
-
Duration– Durations include:
-
Last Week - Customer Trend for Last Week (7 days (Current date (-1)) is displayed.
-
Last Month (Default) - Customer Trend for Last Month (Current date (-1)) is displayed.
-
Last 6 Months - Customer Trend for Last 6 Months converted into weeks (Current date (-1)) is displayed.
-
Last Year - Customer Trend for Last 12 months (Current date (-1)) is displayed.
-
Lifetime to Date - Customer Trend for the last 5 years (Current date (-1)) is displayed.
-
Customer Count Graph
-
The bar graph will dynamically update the Customer Trend based on the value selected for the Duration.
-
The graph represents a plot between the Customers Count on Y-axis and duration on X-axis for the Segment.
Segment Details Side Panel
-
Customers in Segment
-
The selected templates along with their field values separated by AND/OR logic is displayed below the title in View only mode.
-
-
Segment Information Panel
-
Segment Name
-
Segment ID
-
Description
-
Run Schedule
-
Last Run Status
-
Create Date
-
Create User ID
-
Update Date
-
Update User ID
-
Personal List Segment Scorecard
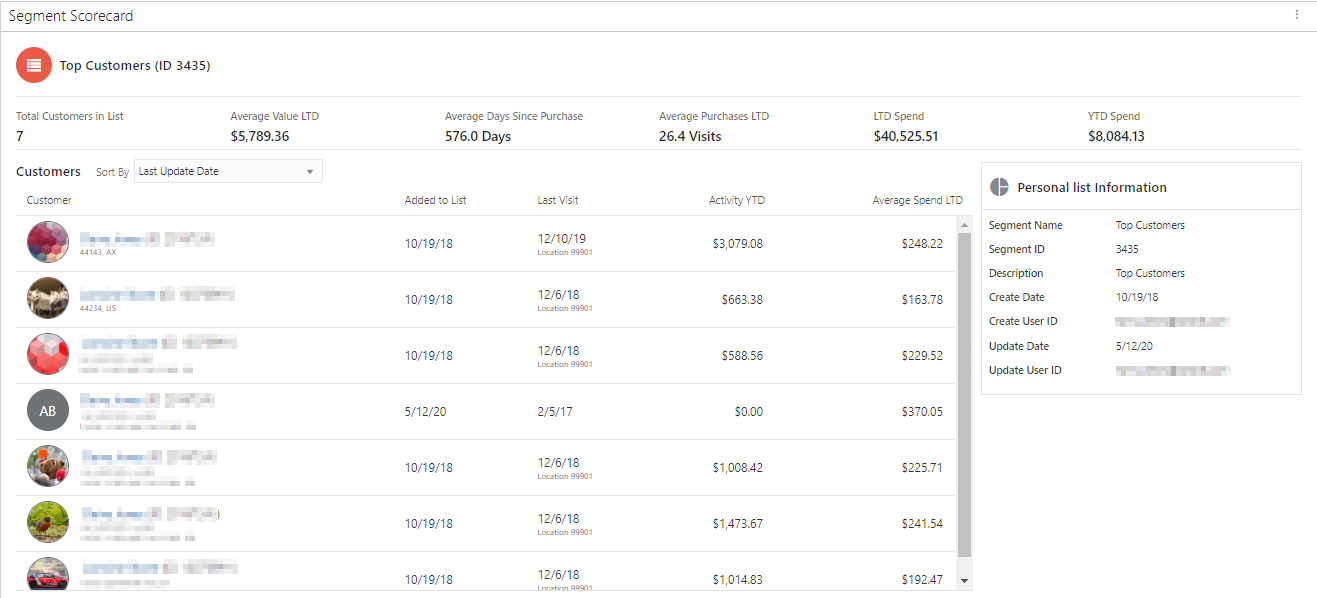
You have the ability to display the list of customers associated with the personal list, so that you can identify which customers are on the list and review their performance.
Figure 7-80 Personal List Scorecard
-
The following metrics and their values display above the list of results.
-
Total Customers in List
-
Average Value LTD
-
Average Days Since Purchase
-
Average Purchases LTD
-
LTD Spend
-
YTD Spend
-
-
Sort by - Options include:
-
Last Update Date (Customers are sorted by last updated date in descending order by default)
-
Average Spend LTD (Customers are sorted by Average Spend LTD in descending order)
-
Activity YTD (Customer are sorted by Activity YTD in descending order)
-
Last Visit (The Customer are sorted by last visit date in descending order)
-
Last Name (Customers are sorted by the Last Name in ascending order)
-
First Name (Customers are sorted by First Name in ascending order)
-
Address (Customers are sorted by Address in ascending order)
-
City (Customers are sorted by City in ascending order)
-
State (Customers are sorted by State in ascending order)
-
Added to List
-
Customer List
Note:
If more customers than can fit the window, a scroll bar displays. Select Show More... at the bottom of the page to retrieve more records.
-
The Customer List will dynamically update the results based on the value selected for the Sort by selection menu. The Customer List headers include:
-
Customer Name, ID, and Address
-
Added to List
-
Last Visit
-
Activity YTD
-
Average Spend LTD
-