11 Card Administration
The Card Administration page provides Users with access to Cards issued to Customers, and the Accounts associated with those Cards. Users can then view information about that Card or Account, or make any necessary changes to that Card or Account.You can use this page to work with Tender Accounts, Award Accounts, and Loyalty Accounts.
Card Search
The Card Search page uses Card-specific or Account-specific information to locate a Card to open in Card Administration.
To perform a Card search:
-
Either select Task>Program>Card Search or select the Card Search icon on the Menu Bar.
The Card Search page opens.
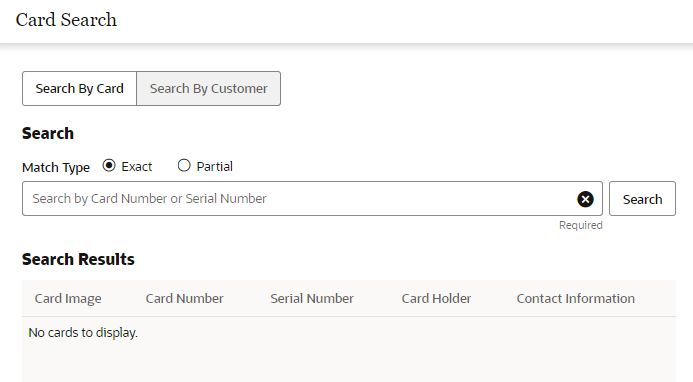
Figure 11-1 Card Search
-
In the Search for Card field, enter the Card Number or Serial Number of the Card you want to search for. Click Partial to search for Cards that partially match the search text, or click Exact, to search for an exact match.
-
Card Number - Card Number for the Card.
-
Serial Number - Serial Number for the Card.
-
Account Number - Account Number for an Account associated with a Card.
-
-
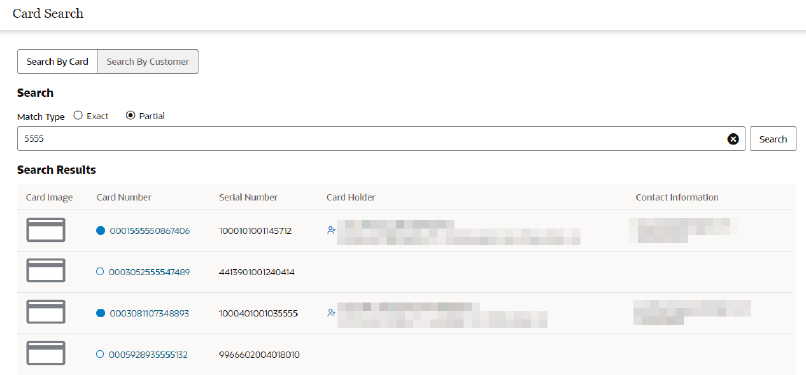
Click the Search button, or press Enter. The Search Results window appears,.
Figure 11-2 Search Results
-
The search results display the following fields:
-
Card Image
-
Card Number
-
Serial Number
-
Card Holder
-
Contact Information
-
If no Card is found matching the entered criteria, an error message displays.
-
-
Hover over any of the icons in the Card Number column (as shown in Figure 11-2) to see a tooltip listing the status of the Program.
-
Active - Filled
-
Inactive - Empty
-
-
Click the Card Number which appears as a link to view the details. The Card and Account Details window appears.
Note:
You can also arrive at this screen by clicking on the card number in the Customer Dashboard screen. See Cards and Programs for more information.
Figure 11-3 Card and Account Details
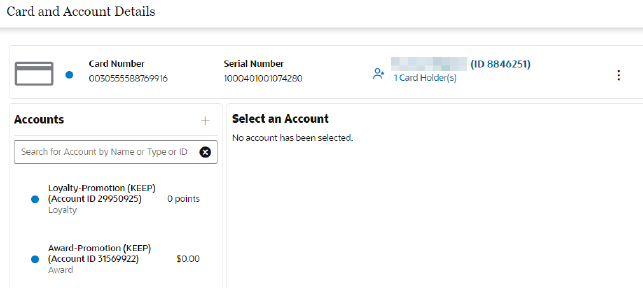
See Card and Account Details for more information.
Card and Account Details
The Card and Account Details page displays information about individual Cards and provides access to functions that can be performed on the Card and its associated Accounts, including:
-
Activate Card
-
Add Account
-
Card Attributes
-
Deactivate Card
-
Merge Card
-
Reset Card Expiration Date
-
Unblock Card
-
View Card Details
Basic Card Information
The upper portion of the Card Administration page displays basic information about the Card and the Accounts associated with the Card. This information is always displayed in Card Administration.
Figure 11-4 Basic Card Information

This area displays the following information:
-
Card Information - Basic information about the Card. This includes the following information:
-
Card Number - Card Number for the Card.
-
Serial Number - Serial Number for the Card.
-
Primary holder - Name of Customer designated as the primary holder of the Card. Click the name to open Customer Record of the primary holder in the Customer Dashboard.
-
Card Status - Current status of the Card.
-
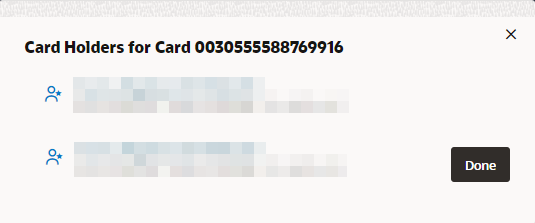
Card Holders - Total number of Customers assigned to this Card. This includes a link that will display all cardholders in a mini popup and will allow the user to click on a name which will open the customer dashboard for the selected customer.
-
-
Accounts Panel - Displays the Accounts associated with the Card.
-
Account Name - Name of the Account.
-
Account Number - Account Number for the Account.
-
Account Type - Type of Account (Tender, Award, or Loyalty).
-
Value
Tender - Current balance in the tender account.
Award - Current E-Award balance for Award Accounts.
Loyalty - Current Points balance for Loyalty Accounts
-
-
Select an Account Panel - This section lists the accounts associated with the Card. Select an Account listed in the Accounts Panel to populate the Account Details and Activity.
Figure 11-5 Account Details and Activity

The fields are based on the type of program selected.
-
Filter By - Options are based on the type of program selected.
-
Sort By - Options are based on the type of program selected.
-
Account Activity List
-
Activity ID - The ID of the Activity. Click the Activity ID to see the Activity Details. Click Done to close the Activity Details and return to the Activity List.
-
Voided - Indicates whether or not the activity was voided.
-
Activity Type - Type of activity performed.
-
Value
Tender - Displays the activity amount.
Award - Displays the e-award value or the entitlement offer name. A link will display for an entitlement offer that will open the View Offer screen.
Loyalty - Displays the points associated with the activity.
-
Date and Time - Date and Time of the activity.
-
Location - Location where the activity occurred. Click on the Location ID to view details.
-
Coupon ID - The ID of the Coupon (visible for Award Program only).
-
Actions Menu
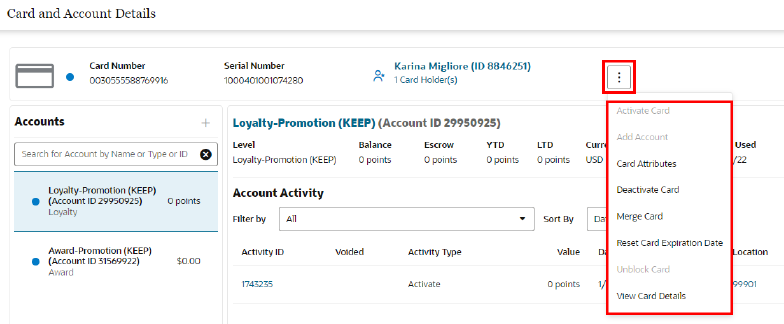
The Actions Menu for the Card Administration page (without selecting a specific Account, such as an Award Account) has the following options:
Figure 11-6 Card Actions Menu
-
Activate Card - Activate an inactive Card (only shown for inactive Cards). See Activate Card.
-
Add Account - Add a Loyalty Account to the Card. This option is available only if there is a Loyalty Account that has not been applied to the Card, when the Card was generated for a Program that has the Dynamically Create Accounts option selected. Also, the DynamicProgramAccountAdmin role controls access to this option. See Add Account.
-
Card Attributes - The details of the card attributes. See Card Attributes.
-
Deactivate Card - Deactivate an active Card (only shown for active Cards). See Deactivate Card.
-
Merge Card - Merge the Card with another Card. See Merge Card.
-
Reset Card Expiration Date - Set a new expiration date for the Card. See Reset Card Expiration Date.
-
Unblock Card - Enables you to unblock a card that has been blocked from deactivating or merging a card with a tender account. See Unblock Card.
-
View Card Details - Displays the details for the selected card. See View Card Details.
Open Customer Record
To open the Customer Record for the Customer associated with the Card, see Figure 11-4 and do one of the following:
-
Click the name of the Primary holder. The Customer Record of the primary holder opens in the Customer Dashboard.
-
Click the number of Card Holders to open a menu containing a menu of all of the Customers associated with the Card. Click the name in the menu to open the Customer Record in the Customer Dashboard.
Figure 11-7 Card Holders
Activate Card
To activate a card do the following:
-
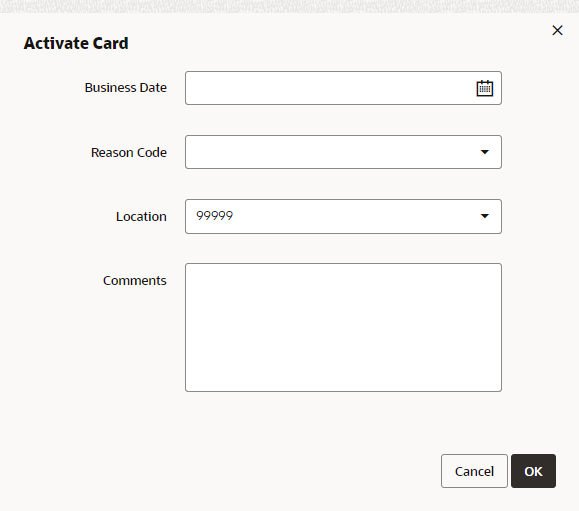
Click Activate Card in the Actions Menu. The Activate Card Window opens.
Figure 11-8 Activate Card Window
-
Select the Business Date.
-
Select the Reason Code.
-
Select the Location where the activation is being performed.
-
Enter Comments describing the reason for activating the Card.
-
Either click OK to close the Window and activate the Card or click Cancel to close the Window and keep the Card inactive.
Add Account
Use this window to add a Loyalty Account to an activated Card.
Note:
This option is available only if there is Loyalty Account that has not been applied to the Card, when the Card was generated for a Program that has the Dynamically Create Accounts option selected. Also, the DynamicProgramAccountAdmin role controls access to this option.
-
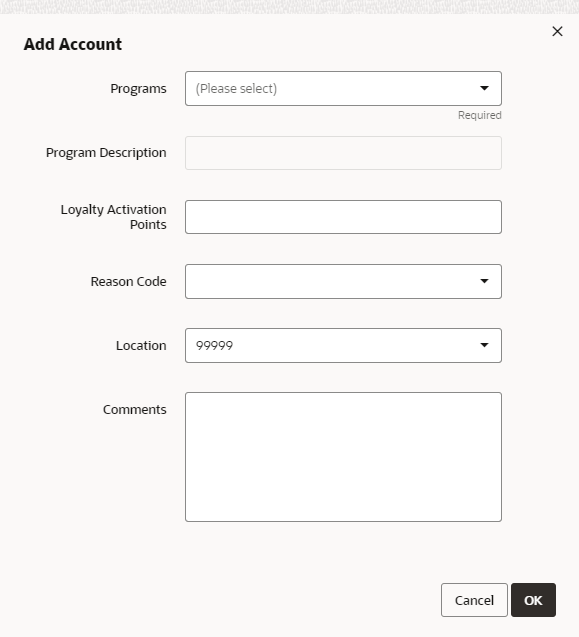
Click Add Account in the Actions Menu, or click the + (Plus) icon in the Accounts panel. The Add Account Window opens.
Figure 11-9 Add Account
-
Select the Loyalty Program to add an Account. Only Loyalty Programs that have the Dynamically Create Accounts option selected are available for selection. Also, if the Card is already associated with a Loyalty Account, it is not listed.
When you select a Loyalty Program, the associated Program Description is displayed.
-
Optionally, enter the Loyalty Activation Points to issue at Account activation.
-
Select the Reason Code that indicates why you are creating the Account.
-
Select the Location identifying the location associated with the Account creation.
-
Optionally, enter any Comments related to the Account creation.
-
Either click OK to create the Account or click Cancel to close without saving.
Note:
If the card is not already activated, the window is different. You can select the Program, but there is no option to enter or select Loyalty Activation Points, Reason Code, Location ID, or Comments.
Card Attributes
Click Card Attributes to display Attributes for the Card, its Series, and its Type, and optionally to add or modify Attributes for the Card.
Figure 11-10 Card Attributes

Card Type Attributes
Card Type Attributes include the following:
-
Attribute Name
-
Attribute Value
-
Description
Card Series Attributes
Card Series Attributes include the following:
-
Attribute Name
-
Attribute Value
-
Description
Card Attributes
Card Attributes - A List of Card Attributes currently assigned to the Card. Information displayed for each Card Attribute:
-
Group- The group associated with the attribute.
-
Name - The Name of the Card Attribute.
-
Description - The Description of the Card Attribute
-
Value - The current Value of the Card Attribute
-
Data Type - The Card Attribute Data Type. Possible Data Types are:
-
Character - A string of characters entered through a Text Field
-
Number - A number value entered through a Text Field
-
Currency - A currency amount entered through a Text Field.
-
Date - A date entered through a Calendar Menu
-
Logical - A true or false value entered through a Selection Menu
-
List - One of a number of defined values selected through a Selection Menu
-
-
Unique - Indicates whether the Attribute can be assigned more than once:
-
Yes - The Attribute can only be assigned to a Card once
-
No - The Attribute can be assigned to a Card multiple times.
-
-
Editable - Indicates the permissions required for a user to edit this attribute value in a customer record.
-
Yes - This attribute can edited by any user with permission to edit customer records.
-
No - This attribute can only be edited by a user with system administration permissions.
-
-
Open Access - Indicates whether there is Open Access to this attribute.
-
Yes - This Attribute has Open Access.
-
No - This Attribute does not have Open Access.
-
-
Publish to Batch Exporter - Indicates whether each Attribute value can be included in batch export to a Marketing system.
Add Card Attribute
To add a Card Attribute to a Card:
-
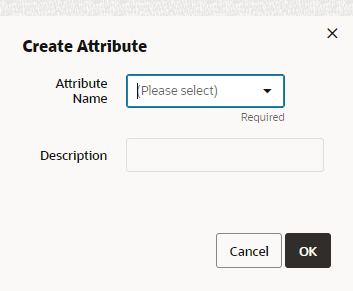
Click the Actions Menu, then, click Add, or click the Add (+) icon. This opens Create Attribute.
Figure 11-11 Create Attribute
-
Select the Attribute Name.
-
Enter or select the Value for the Attribute.
-
Either click OK to save the Attribute or Cancel to close without saving.
Figure 11-12 Confirmation Notification
Note:
A confirmation notification appears to confirm the Attribute has been successfully created.
Editing Card Attributes
To edit an existing Card Attribute for a Card:
-
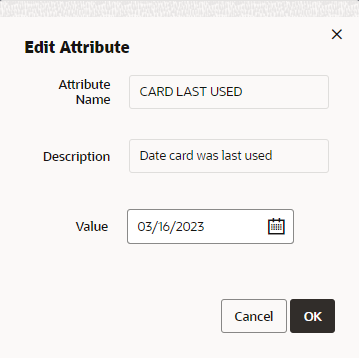
Click the Actions Menu, then, click Edit, or click the Pencil icon. This opens Edit Attribute.
Figure 11-13 Edit Attribute
-
To edit the Card Attribute value, select or enter the new values. Click OK to save the changes, or Cancel to close without saving.
Figure 11-14 Confirmation Notification
Note:
A confirmation notification appears to confirm the Attribute has been successfully updated.
Deleting a Card Attribute
To delete an existing Card Attribute for a Card:
-
Click the Actions Menu, then, click Delete, or click the X icon.
-
Click OK to delete the Attribute, or Cancel to close without saving.
Figure 11-15 Confirmation Notification
Note:
A confirmation notification appears to confirm the Attribute has been successfully deleted.
Deactivate Card
-
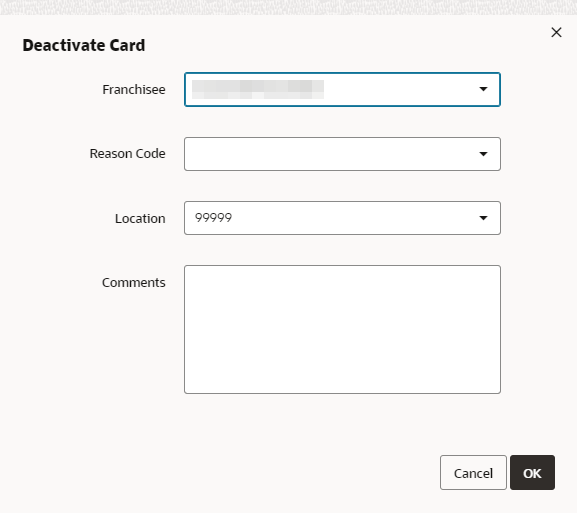
Click Deactivate Card in the Actions Menu. A Perform Action: Deactivate Card Window opens.
Figure 11-16 Deactivate Card Window
-
Select the Franchisee associated with the Card, if Franchises are enabled.
-
Select the Reason Code. Options include:
-
Client Request
-
Mgmt Decision
-
-
Select the Location where the deactivation is being performed.
-
Enter Comments describing the reason for deactivating the Card.
-
Either click OK to close the Window and deactivate the Card or click Cancel to close the Window and keep the Card active.
Merge Card
You can merge the Card with another Card as long as the Card Merge Permitted flag is not selected for a Program. To merge a Card with another Card:
-
Click the Actions Menu, then, click Merge Card. A Merge Card Window opens.
Figure 11-17 Merge Card

-
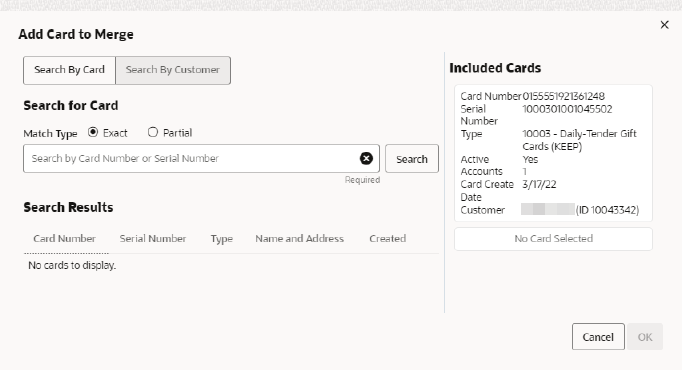
Click the Actions Menu, then, click Add Card to Merge, or click the + (Plus) icon. An Add Card to Merge Window opens.
Figure 11-18 Add Card to Merge
-
Use one of the following methods to search for a card to add to the merge.
To add a card using Search By Card
-
In the Search for Card field, enter the Card Number or Serial Number of the Card you want to search for. Click Partial to search for Cards that partially match the search text, or click Exact, to search for an exact match.
To add a card using Search By Customer
-
In the Search By Customer field, enter the Customer Name, ID, Email Address, or Serial Number of the Customer you want to search for. Click Partial to search for Customers that partially match the search text, or click Exact, to search for an exact match.
-
-
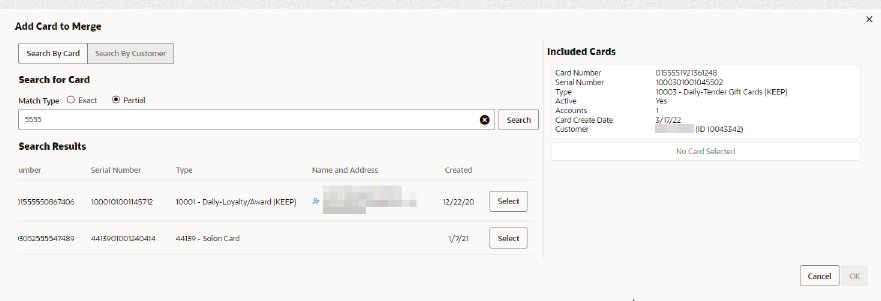
Click Search. The Search Results list displays the cards or customers matching the criteria.
Figure 11-19 Search Results: Add Card to Merge
-
Click Select to add the card to the merge.
-
Click OK. The Merge List appears.
Figure 11-20 Merge List

-
To complete the merge, select the Target card, then click Merge. The Cards are merged and the Window closes.
Note:
If you flag Loyalty Programs to Dynamically Create Accounts, it is possible that two Cards you are merging do not share the same Accounts. For example, Card A has Accounts for Programs 1 and 2, and Card B has Accounts for Programs 2 and 3. The merge will dynamically create the Accounts that do not already exist for Card A. After the merge, Card A has Accounts for Programs 1, 2, and 3, and Card B has deactivated Accounts for Programs 2 and 3.
To exit the Window without merging the Cards, click Cancel.
Reset Card Expiration Date
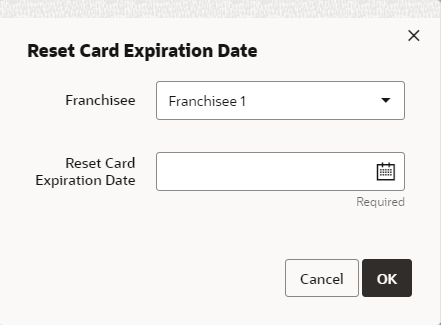
Expiration dates can be set on individual Cards in Customer Engagement. To set a new expiration date for an individual Card:
-
Click Reset Card Expiration Date in the Actions Menu. A Reset Card Expiration Date Window opens.
Figure 11-21 Reset Card Expiration Date Window
-
Select a Franchisee, if Franchisees are available.
-
Use the Reset Card Expiration Date Calendar Menu, select the new expiration date for the Card.
-
Either click OK to change the Card Expiration Date to the new value and close the Window or click Cancel to close the Window without saving.
Unblock Card
Typically a card will be blocked when the card has been deactivated and has a tender account on the card as shown inFigure 11-22. To unblock a card:
Figure 11-22 Blocked Card

-
Click Unblock Card in the Actions Menu.
-
Select a Reason Code.
-
Select a Location.
-
Enter Comments.
-
Click OK to unblock a card, or click Cancel to close without saving.
Figure 11-23 Confirmation Notification
Note:
A confirmation notification appears to confirm the card was unblocked successfully.
View Card Details
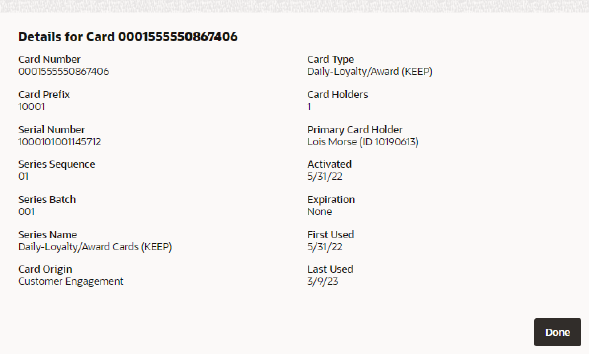
Click View Card Details to open the details for a card. Click Done to close the window.
Figure 11-24 Card Details
Account Information
Click the Account Number Link to view information about a specific Account. The information displayed for each Account depends upon its Account type: Tender Account, Award Account, or Loyalty Account.
Tender Account
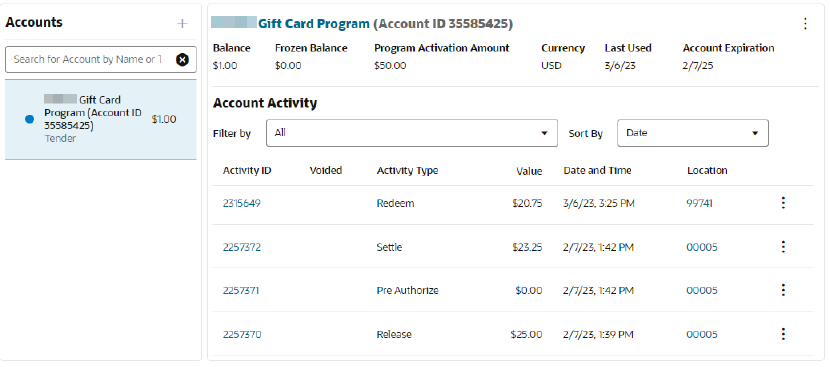
The following information is displayed for each Tender Account:
Figure 11-25 Tender Account Information
-
Tender Account Administration - Displays information about the Tender Account. This area includes the following information:
-
Program Name - Name of the Program to which the Account belongs.
-
Account ID - ID number for the Account.
-
Balance - Current tender balance of the Account.
-
Frozen Balance - Balance of the Account that is currently frozen.
-
Program Activation Amount - Amount the account will be activated for when there is no activation amount specified in the transaction. The original balance on the card could be different from this program activation amount.
-
Currency - Base currency for the Program.
-
Last Used Date - Date of the most recent activity on the Account.
-
Account Expiration - Date when the Account expires
Note:
Note that if the Tender Account was merged with another Account, Customer Engagement will display the message "Account has been merged" below the Tender Account Administration area.
-
-
Tender Account Activity - A List displaying each action performed on the Account.
The information in the List is determined by the Filter Activity Menu.
The following information is displayed for each Account action:
-
Activity ID - ID of the activity on the Account.
-
Voided - Indicates whether the activity was voided.
-
Activity Type - Type of activity performed.
-
Value - Value applied to the Account by the activity.
-
Date and Time - Date and time of the activity.
-
Location - ID of the location where the activity occurred.
-
Filter Activity Menu
The Filter Activity menu is a Filter for the Tender Account Activity List. This Selection Menu filters the Tender Account Activity List by Activity Type, such as Deactivate. The default setting is All.
Tender Account Actions Menu
Figure 11-26 Tender Account Actions Menu

The Actions Menu for Tender Accounts displays the following options:
-
Preauthorize - Preauthorize an amount on the Card. See Pre-Authorize an Amount.
-
Redeem - Redeem an existing amount from the balance on the Card. See Redeem an Amount.
-
Reload - Reload the Card with an additional amount. See Reload a Card.
Preauthorize an Amount
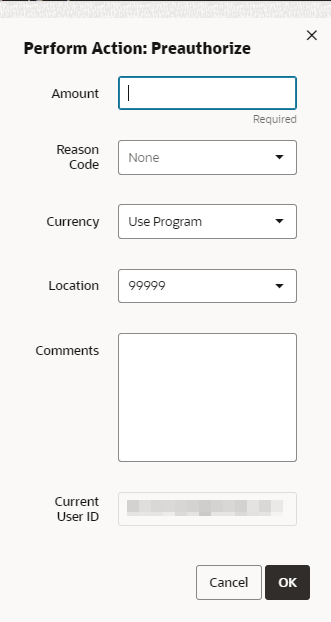
To preauthorize an amount on a Card:
-
Click Preauthorize in the Tender Account Actions Menu for a Tender Account. A Perform Action: Preauthorize Window opens.
Figure 11-27 Preauthorize Window
-
Enter the information for the pre-authorization:
-
Amount - The amount to be pre-authorized for the Card.
-
Reason Code - Use the Selection Menu to select the reason for the pre-authorization.
-
Currency - Use the Selection Menu to select the currency in which to pre-authorize the amount, or select Use Program [default] to use the base currency for the Program. This option is only available for Tender Programs that allow foreign currencies.
-
Location - Use the Selection Menu to select the location where the pre-authorization is being performed.
-
Comments - Enter any comments describing the pre-authorization.
-
-
Either click OK to perform the pre-authorization and close the Window or click Cancel to close the Window without pre-authorizing an amount.
Redeem an Amount
To redeem an amount from a Card:
-
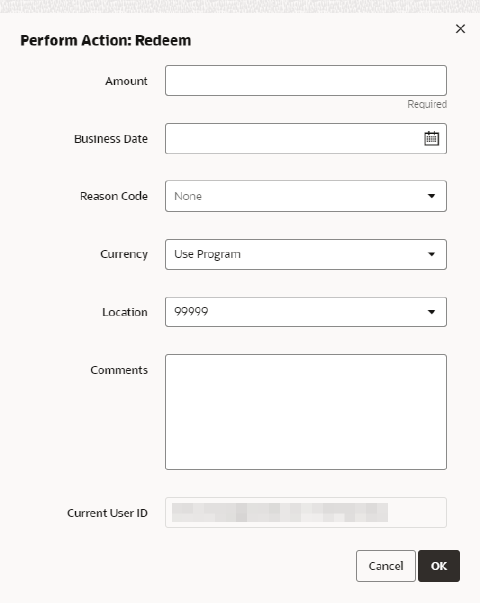
Click Redeem in the Tender Account Actions Menu for a Tender Account. A Perform Action: Redeem Window opens.
Figure 11-28 Perform Action: Redeem
-
Enter the information for the redemption:
-
Amount - The amount to be redeemed.
-
Reason Code - Use the Selection Menu to select the reason for the redemption.
-
Currency - Use the Selection Menu to select the currency in which to redeem the amount, or select Use Program [default] to use the base currency for the Program. This field can only be changed in Tender Programs that allow foreign currencies.
-
Location - Use the Selection Menu to select the location where the redemption is being performed.
-
Comments - Enter any comments describing the redemption.
-
-
Either click OK to perform the redemption and close the Window or click Cancel to close the Window without redeeming an amount.
Reload a Card
To reload a Card with an amount:
-
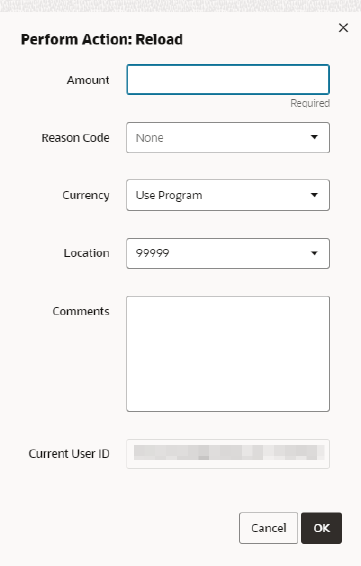
Click Reload in the Tender Account Actions Menu for a Tender Account. A Perform Action: Reload Window opens.
Figure 11-29 Perform Action: Reload
-
Enter the information for the reload:
-
Amount - The amount to be loaded onto the Card.
-
Reason Code - Use the Selection Menu to select the reason for the reload.
-
Currency - Use the Selection Menu to select the currency in which to reload the amount, or select Use Program [default] to use the base currency for the Program. This option can only be changed in Tender Programs that allow foreign currencies.
-
Location - Use the Selection Menu to select the location where the reload is being performed.
-
Comments - Enter any comments describing the reload.
-
-
Either click OK to perform the reload and close the Window or click Cancel to close the Window without reloading the Card.
Account Activity Actions Menu
The Actions Menu for Tender Accounts Account Activity List displays the following options:
-
Release Authorization - Releases the Authorization so that you can resolve an issue with the card.
-
Reverse Activity - Reverses the selected activity
-
Settle Authorization - Settles a preauthorization for a card, so that you can resolve an issue with the card.
-
View Activity Details - Views the details of the selected activity.
-
Void Activity - Voids the selected activity
Release Authorization
To Release Authorization:
-
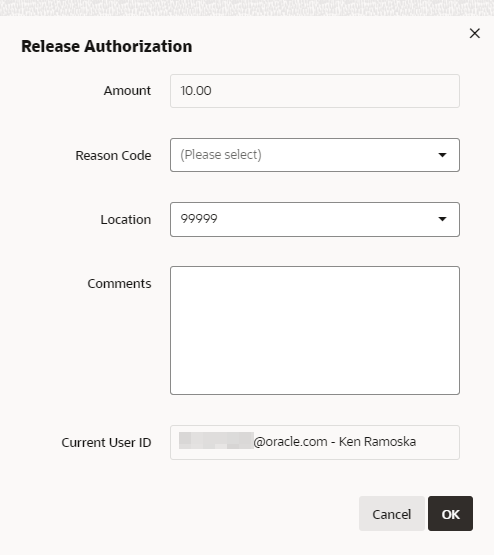
Select Release Authorization in the Actions Menu. A Release Authorization Window opens.
Figure 11-30 Release Authorization
-
Select the Reason Code.
-
Select the Location.
-
Enter Comments.
-
Either click the OK button to release the authorization and close the Window or click the Cancel button to close the window without saving.
Reverse Activity
To Reverse Activity:
-
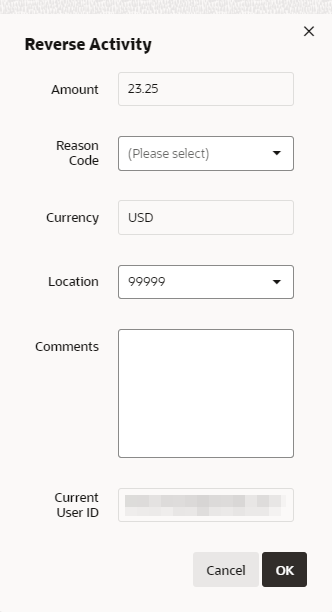
Select Reverse in the Actions Menu. A Reverse Activity Window opens.
Figure 11-31 Reverse Activity
-
Select the Reason Code for the Reverse in the Selection Menu.
-
Select the Location to be used for the Reverse in the Selection Menu.
-
Enter Comments describing the reasons for the Reverse.
-
Either click the OK button to reverse the activity and close the Window or click the Cancel button to close the Window without reversing the activity.
Settle Authorization
To Settle Authorization:
-
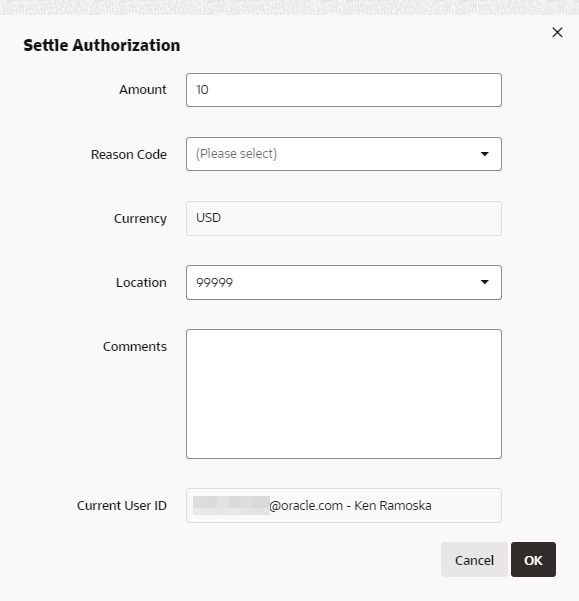
Select Settle Authorization in the Actions Menu. A Settle Authorization window opens.
Figure 11-32 Settle Authorization
-
Enter the Amount.
-
Select the Reason Code for the Reverse in the Selection Menu.
-
Select the Location.
-
Enter Comments.
-
Either click the OK button to settle the authorization and close the Window or click the Cancel button to close the window without saving.
View Activity Details
Click an activity to view detailed information about an activity in the List of activities displayed for a Tender Account. The activity displays in the Activity Detail Window.
Figure 11-33 Activity Details Window - Tender Account
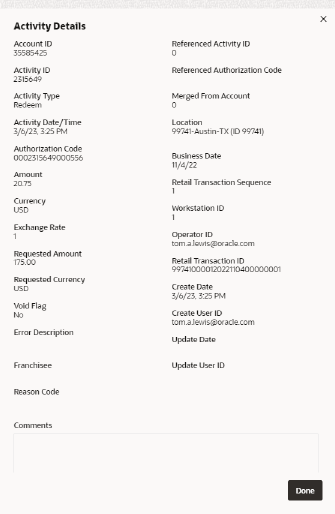
The Activity Detail Window displays the following information for the selected activity:
-
Account ID - ID number for the Account associated with the activity.
-
Activity ID - ID of the activity on the Account.
-
Activity Type - Type of activity performed.
-
Activity Date/Time - Date and time of the activity.
-
Authorization Code - Authorization Code used by the activity.
-
Amount - Amount applied to the Card by the activity.
-
Currency - Currency used for the amount, if different from the base currency.
-
Exchange Rate - If the transaction was performed in a foreign currency, the exchange rate between the foreign currency and the Account's base currency.
-
Requested Amount - Requested currency amount.
-
Requested Currency - Currency used for the requested amount, if different from the base currency.
-
Void Flag - Indicates whether the activity was voided.
-
Error Description - If an error occurred during the activity, a description of the error.
-
Franchisee - Franchisee associated with the activity.
-
Reason Code - Reason for the activity.
-
New Expiration Date - The date the card expires.
-
Referenced Activity ID - ID of an activity to which this activity refers.
-
Referenced Authorization Code - Authorization Code used by the Referenced Activity.
-
Merged From Account - If the Account was moved from another Account by a Card Merge, the ID number of the Account previously associated with the activity.
-
Location ID - ID of the Location where the activity was performed.
-
Location Name - Name of the Location where the activity was performed.
-
Business Date - Business date of the activity.
-
Retail Transaction ID - ID number of the activity within a retail transaction.
-
Workstation ID - ID of the workstation (within the Location) where the activity was performed.
-
Retail Tran ID - ID of the retail transaction of the activity. This field provides a Link to the Transaction in the Customer's Transaction History.
-
Create Date - Date when the activity was created.
-
Create User ID - ID of the user who created the activity.
-
Update Date - Date when the activity was most recently updated.
-
Update User ID - ID of the last user to update the activity.
-
Comments - Additional comments entered about the activity.
Void Activity
To void an activity on an Account:
-
Open the activity in the Activity Detail Window.
-
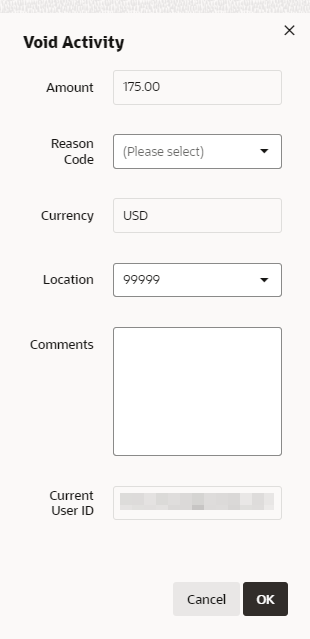
In the Activity Detail Window, select Void in the Actions Menu. A Perform Action: Void Window opens.
Figure 11-34 Void Activity
-
Select the Reason Code for the Void in the Selection Menu.
-
Select the Location to be used for the Void in the Selection Menu.
-
Enter Comments describing the reasons for the Void.
-
Either click OK to void the activity and close the Window or click Cancel to close the window without voiding the activity.
Award Account
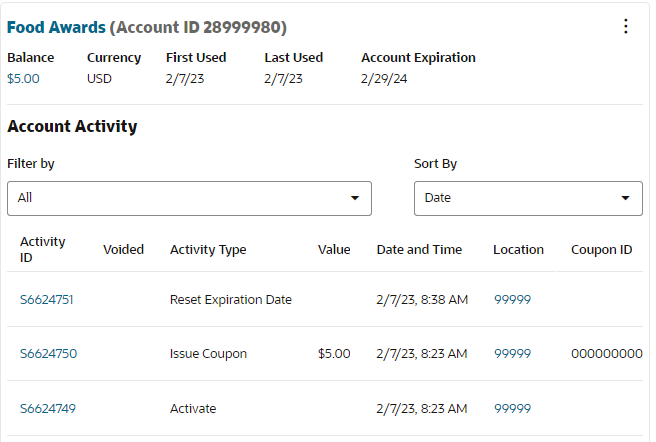
The following information is displayed for each Award Account.
Figure 11-35 Award Account Information
-
Award Account Administration - Displays information about the Award Account. This area includes the following information:
-
Program Name - Name of the Program to which the Account belongs. Click the Program Name to open the View Program window.
-
Account ID - ID number for the Account.
-
Balance - Current award balance of the Account.
-
First Used - Date of the first activity on the Account.
-
Last Used - Date of the most recent activity on the Account.
-
Account Expiration - Date when the Account expires.
Note:
If the Award Account was merged with another Account, Customer Engagement displays the message "Account has been merged" below the Award Account Administration area.
-
-
Award Account Activity - A List displaying each action performed on the Account.
The information in the List is determined by the Filter Activity Menu.
The following information is displayed for each Account action:
-
Activity ID - ID number of the activity within the transaction.
-
Voided - Indicates whether the activity was voided.
-
Activity Type - Type of activity performed.
-
Value - Displays the E-award value or the entitlement offer name. A link will display for an entitlement offer that will open the View Offer screen.
Tender - Displays the activity amount.
Award - Displays the e-award value or the entitlement offer name. A link will display for an entitlement offer that will open the View Offer screen.
Loyalty - Displays the points associated with the activity.
-
Date and Time - Date and time of the activity.
-
Location - Location where the activity took place. Click the Location to view the Location Details.
-
Coupon ID - ID number for the coupon (if any) created or redeemed by the activity.
-
Filter Activity Menu
The Filter Activity menu is a Filter for the Award Account Activity List. This Selection Menu filters the Award Account Activity List by Activity Type, such as Activate or Issue Coupon. The default setting is All.
Award Account Actions Menu
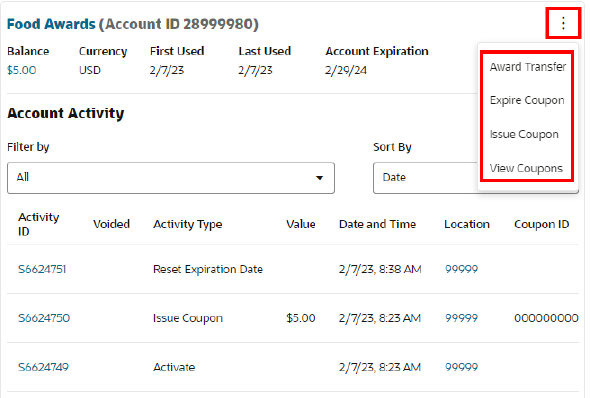
The Actions Menu for the Award Account will display the following options.
Figure 11-36 Award Account Actions Menu
-
Award Transfer - Transfer one or more E Awards or Award Certificate Coupons to another Award Account for the same Program. This option is available only if the Card is linked to an active Customer. See Transfer Award.
-
Expire Coupon - Expire an E-Award or Award Certificate Coupon so that it can no longer be redeemed. See Expire Coupon.
-
Issue Coupon - Issue a Coupon to the Customer. See Issue a Coupon.
-
View Coupons - View the Coupons that have been issued by the Award Account to the Customer. See View Coupons.
Award Transfer
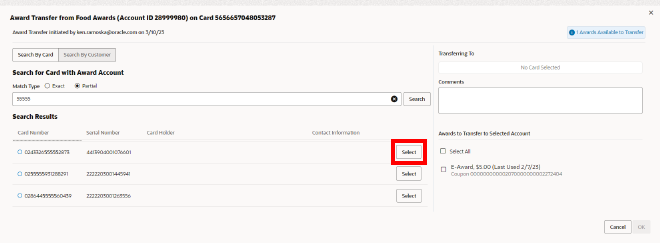
To transfer one or more E-Awards or Award Certificate Coupons to another Award Account for the same Program, select Award Transfer from the Award Account Actions Menu. The Award Transfer page opens.
Process
To add a card using Search By Card
-
In the Search for Card with Award Account, enter the Card Number or Serial Number of the Card you want to search for. Click Partial to search for Cards that partially match the search text, or click Exact, to search for an exact match.
To add a card using Search By Customer
-
In the Search By Customer field, enter the Customer Name, ID, Email Address, or Phone Number of the Customer you want to search for. Click Partial to search for Customers that partially match the search text, or click Exact, to search for an exact match.
Figure 11-37 Award Transfer - Search Results
-
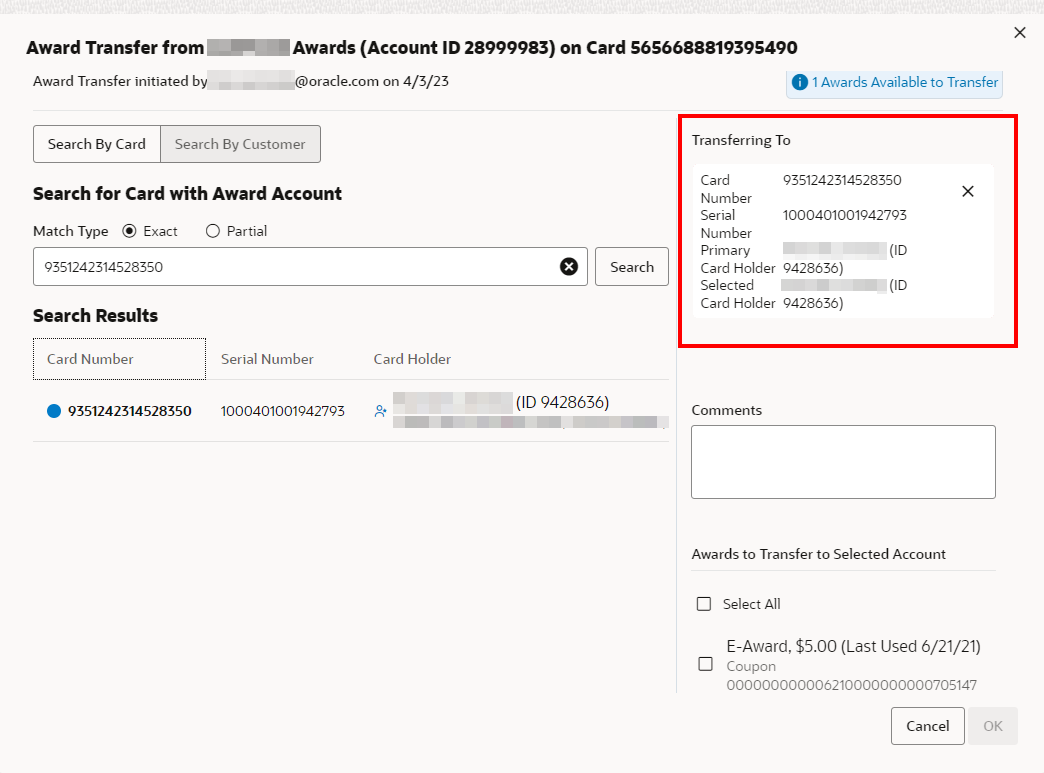
Click Select to populate the Transferring To area of the window.
Figure 11-38 Transferring To
-
Select the Awards to Transfer to Selected Account.
Figure 11-39 Awards to Transfer to Selected Account
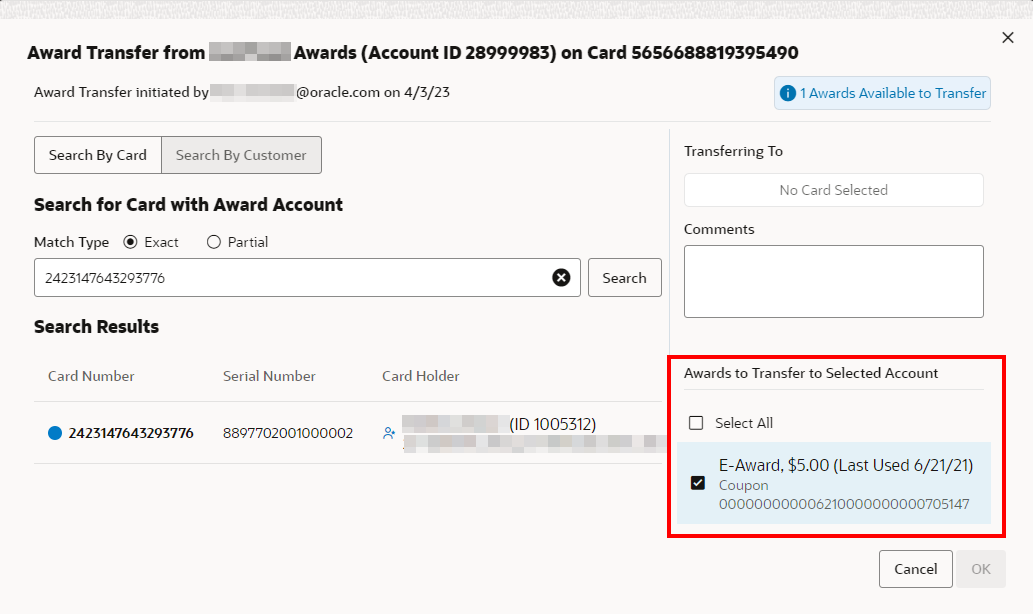
The Account must be within the same Program, and the Customer must be the primary card holder.
The Transferring To area includes the following information:
-
Program Name - Name of the Program
-
Card Number - Card Number for the Card selected for award transfer.
-
Serial Number - Serial Number for the Card selected for award transfer.
-
Primary Card Holder - Customer number and name of the primary account holder.
-
Selected Card Holder - Indicates the Customer associated with the Card.
-
Current Balance - Current award balance of the Account.
-
Comments
The Awards to Transfer to Selected Account includes the following information:
-
Coupon Type - E-Award or Award Certificate Coupon.
-
Balance - The value of the E-Award.
-
Last Used Date - The date and time of the most recent activity for the Coupon.
-
Coupon ID - Unique identifier for the Award Coupon.
-
-
Click OK to transfer the award, or click Cancel to close the window without saving.
The E-Award or Award Certificate Coupon is transferred to the Destination Account. A Transfer In Activity Detail record is created for the Destination Account, and a Transfer Out Activity Detail record is created for the Source Account.
Expire Coupon
To expire an E-Award or Award Certificate Coupon for a Customer that was issued through an Award Account:
-
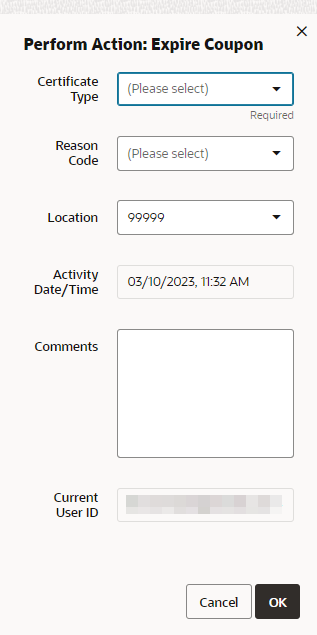
Click Expire Coupon in the Award Account Actions Menu. A Perform Action: Expire Coupon Window opens.
Figure 11-40 Perform Action: Expire Coupon
-
Enter the information for the Coupon:
-
Certificate Type - Use the Selection Menu to select either E-Award or Award Certificate Coupon.
-
Reason Code - Use the Selection Menu to select the reason for expiring the Coupon.
-
Location - Use the Selection Menu to select the location where the Coupon is being issued.
-
Comments - Enter any comments describing the Coupon expiration.
-
Either click OK to expire the Coupon and close the Window or click Cancel to close the Window without expiring the Coupon.
Issue a Coupon
To issue a Coupon to a Customer through an Award Account:
-
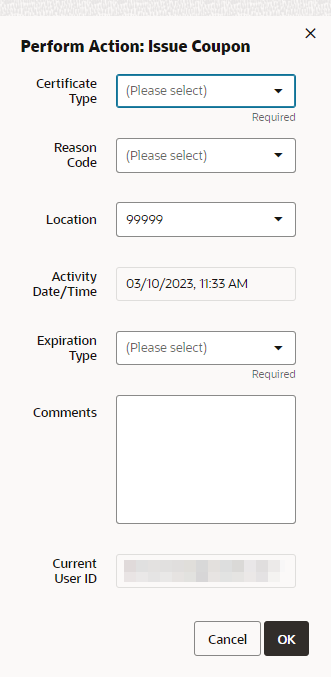
Click Issue Coupon in the Award Account Actions Menu. A Perform Action: Issue Coupon Window opens.
Figure 11-41 Perform Action: Issue Coupon
-
Enter the information for the Coupon:
-
Certificate Type - Use the Selection Menu to select either E-Award or Award Certificate Coupon.
-
Reason Code - Use the Selection Menu to select the reason for issuing the Coupon.
-
Location - Use the Selection Menu to select the location where the Coupon is being issued.
-
Expiration Type - Use the Selection Menu to select the type of expiration of the Coupon. This has the following options:
-
Use Program - Coupon expires when the Program expires.
-
Specify - Select a specific date when the Coupon expires.
-
None - No expiration date,.
-
-
Expiration Date - Use the Calendar Menu to select the date when the Coupon will expire (only visible if the Expiration Date is Specify).
-
Comments - Enter any comments describing the Coupon issue.
-
-
Either click OK to issue the Coupon and close the Window or click Cancel to close the Window without issuing a Coupon.
View Coupons
To view all of the Coupons issued to a Customer, select View Coupons in the Award Account Actions Menu to open a Coupons Window displaying a List of E-Award and Award Certificate Coupons issued through the Account.
Figure 11-42 View Coupon
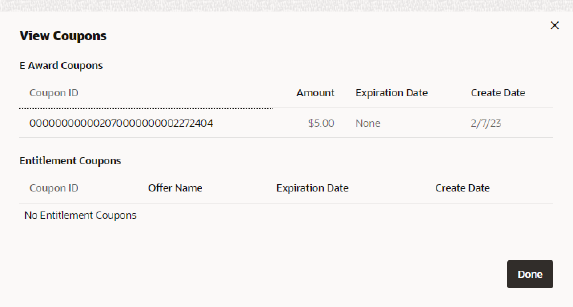
E-Award Coupons: The following information is displayed for each E-Award Coupon issued and not expired:
-
Coupon ID - The ID number for the Coupon.
-
Amount - The amount of the Coupon (in the base currency of the Program).
-
Expiration Date - The expiration date of the Coupon.
-
Create Date - Date the Coupon was created.
Award Certificate Coupons: The following information is displayed for each Award Certificate Coupon issued and not expired:
-
Coupon ID - The ID number for the Coupon.
-
Offer Name - The name of the Offer associated with the Coupon.
-
Expiration Date - The expiration date of the Coupon.
-
Create Date - Date the Coupon was created.
Account Activity Actions Menu
The Actions Menu in the Award Account Activity Detail Window for the issue of an e-award or entitlement coupon has the following options.
-
View Activity Details - Displays the Activity Details.
-
View Promotion Details - Views the details of the promotion associated to the activity. This menu option will only display when there is an associated promotion.
-
View Offer Details - Views the details of the offer associated to the activity. This menu option will only display when there is an associated offer.
-
Void Activity - Voids the open activity.
View Activity Details
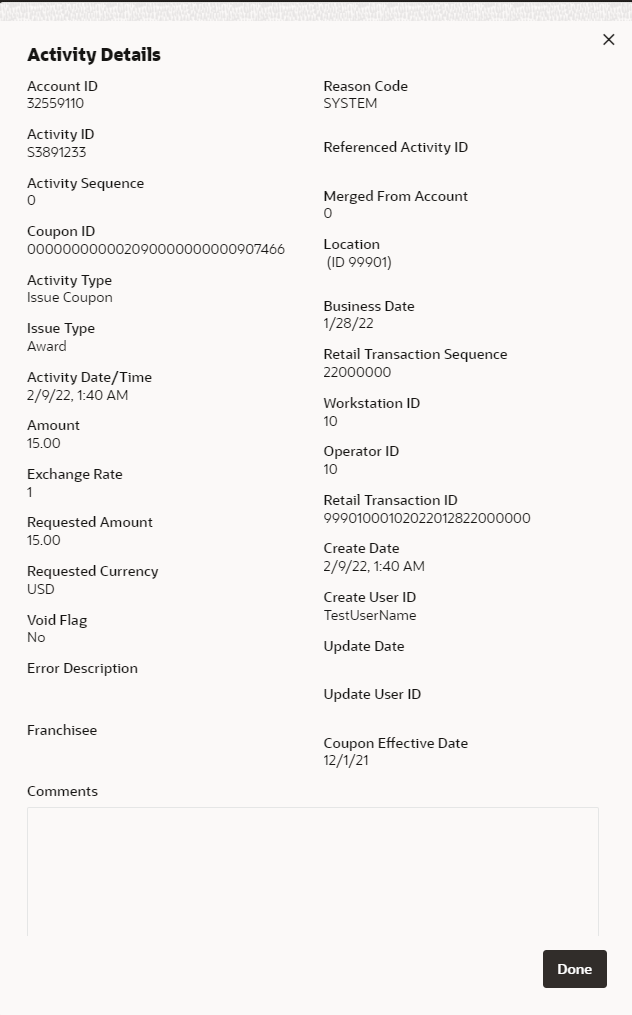
Click an activity to view detailed information about an activity in the List of activities displayed for an Award Account. The activity will be displayed in the Activity Detail Window.
-
Account ID - ID number for the Account associated with the activity.
-
Activity ID - ID of the activity on the Account.
-
Activity Sequence - Sequence number of the activity within a transaction.
-
Coupon ID - ID number for the coupon (if any) created or redeemed by the activity.
-
Activity Type - Type of activity performed.
-
Issue Type - Type of benefit issued.
-
Campaign - If the activity was associated to an award in a campaign, this field will be displayed and is the Name and ID of the campaign the award was from.
-
Promotion - If the activity was associated to an award in a promotion, this field will be displayed and is the Name and ID of the promotion the award was from.
-
Offer - If the activity was associated to an award in an offer, this field will be displayed and is the Name and ID of the offer the award was from.
-
Activity Date/Time - Date and time of the activity.
-
Amount - Amount applied to the Account by the activity, or removed from the Account in the case of a Transfer Out.
-
Exchange Rate - If the transaction was performed in a foreign currency, the exchange rate between the foreign currency and the Account's base currency.
-
Requested Amount - Requested currency amount.
-
Requested Currency - Currency used for the requested amount, if different from the base currency.
-
Void Flag - Indicates whether the activity was voided.
-
Error Description - If an error occurred during the activity, a description of the error.
-
Franchisee - Name of the Franchisee.
-
Reason Code - Reason for the activity.
-
Referenced Activity ID - ID of an activity to which this activity refers.
-
Merged From Account - If the Account was moved from another Account by a Card Merge, the ID number of the Account previously associated with the activity.
-
Location ID - ID of the Location where the activity was performed.
-
Location Name - Name of the Location.
-
Business Date - Business date of the activity.
-
Retail Transaction Sequence - Sequence number of the activity within a retail transaction.
-
Workstation ID - ID of the workstation (within the Location) where the activity was performed.
-
Retail Tran ID - ID of the retail transaction where the activity was performed.
-
Operator ID - ID of the employee who performed the transaction.
-
Create Date - Date and time when the activity took place.
-
Create User ID - ID of the user who created the activity.
-
Update Date - Date when the activity was most recently updated.
-
Update User ID - ID of the last user to update the activity.
-
Coupon Effective Date - The date when the coupon becomes effective.
-
Coupon Expiration Date - The date when the coupon expires.
-
Comments - Additional comments entered about the activity.
Figure 11-43 Activity Details - Award Account
Click Done to close the window.
Void Activity
To void an activity on an Account:
-
Open the activity in the Activity Detail Window.
-
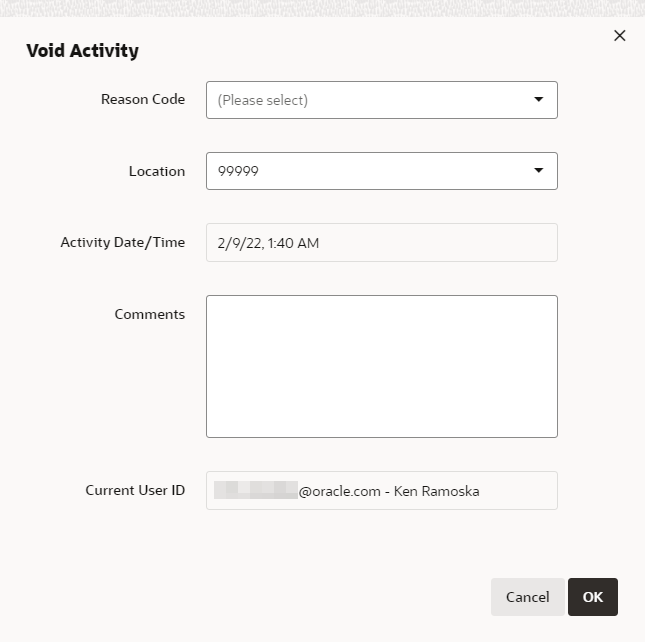
In the Activity Detail Window, select Void in the Actions Menu. A Perform Action: Void Window opens.
Figure 11-44 Void Activity
-
Select the Reason Code for the Void in the Selection Menu.
-
Select the Location to be used for the Void in the Selection Menu.
-
Enter Comments describing the reasons for the Void.
-
Either click OK to void the activity and close the Window or click Cancel to close the Window without voiding the activity.
Loyalty Account
The following information is displayed for each Loyalty Account:
Figure 11-45 Loyalty Account Card and Account Details

-
Loyalty Account Administration. Displays information about the Loyalty Account. This area includes the following information.
-
Program Name - Name of the Program to which the Account belongs. Click the Program Name to view the View Program window.
-
Account ID - ID number for the Account.
-
Level - Name of the Loyalty Level to which the Account currently belongs.
-
Balance - Current points balance of the Account.
-
Escrow - Number of points currently escrowed in the Account.
-
YTD - Number of points earned by the Account in the current year to date.
-
LTD - Number of points earned by the Account during the lifetime of the Account.
-
First Used - Date of the first activity on the Account.
-
Last Used - Date of the most recent activity on the Account.
-
Account Expiration - Date when the Account expires.
-
-
Loyalty Account Activity
A List displaying each action performed on the Account.
The information in the List is determined by the Filter Activity Menu.
This List uses Page Navigation to organize the actions.
The following information is displayed for each Account action:
-
Activity ID - ID of the activity on the Account.
-
Voided - Indicates whether the activity was voided.
-
Activity Type - Type of activity performed.
-
Value - Number of Points applied to the Account by the activity.
-
Date and Time - Date and time of the activity.
-
Location - Location of the activity. Click the Location ID to view the location details.
-
Filter Activity Menu
The Filter Activity menu is a Filter for the Loyalty Account Activity List. This Selection Menu filters the Loyalty Account Activity List by Activity Type, such as Change Level or Award. The default setting is All.
Loyalty Account Actions Menu
Figure 11-46 Loyalty Account Actions Menu

The Actions Menu for a Loyalty Account displays the following options.
-
Change Level - Change the Loyalty Level of the Loyalty Account. See Change Level.
-
Delete Account - Delete a Loyalty Account that has been added to the Card. This option is available only for a Loyalty Account that was applied to the Card, because the Card was generated for a Program that has the Dynamically Create Accounts option selected. Also, the DynamicProgramAccountAdmin role controls access to this option. See Delete Account.
-
Issue Award - Issue an award to a Customer. See Issue Award.
-
Issue Points - Issue points to a Loyalty Account. See Issue Points.
-
Point Recovery - Issue points that were not issued to a Customer in a previous transaction. See Recover Points.
-
Points Transfer - Transfer points to another Loyalty Account for the same Program. This option is available only if the Card is linked to an active Customer. See Points Transfer.
Change Level
To change the Loyalty Level for a Customer:
-
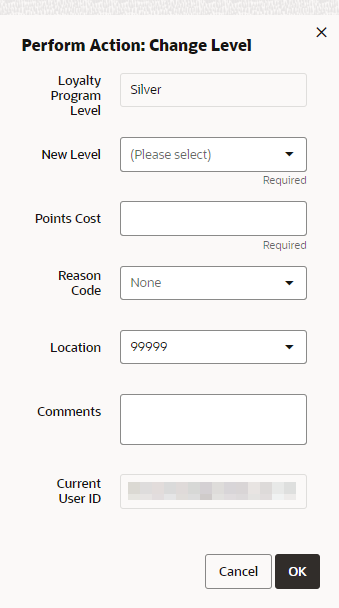
Click Change Level in the Loyalty Account Actions Menu for a Loyalty Account. A Perform Action: Change Level Window opens.
Figure 11-47 Perform Action: Change Level
-
Enter the information for changing the Loyalty Level.
-
New Level - Use the Selection Menu to select the new Loyalty Level for the Account. The menu includes the Levels in the Loyalty Program.
-
Points Cost - The number of points to remove from the Loyalty Account for changing the Loyalty Level.
-
Reason Code - Use the Selection Menu to select the reason for changing the level.
-
Location - Use the Selection Menu to select the location where the Loyalty Level change is being performed.
-
Comments - Enter any comments describing the change in Loyalty Level.
-
-
Click OK to change the Loyalty Level and close the Window, or click Cancel to close the Window without change the Loyalty Level of the Account.
Delete Account
Select this option to delete a Loyalty Account that has been added to the Card. This option is available only for a Loyalty Account that was applied to the Card, because the Card was generated for a Program that has the Dynamically Create Accounts option selected. Also, the DynamicProgramAccountAdmin role controls access to this option.
Click Delete Account in the Loyalty Account Actions Menu for a Loyalty Account. The Delete Account window opens.
Figure 11-48 Delete Account
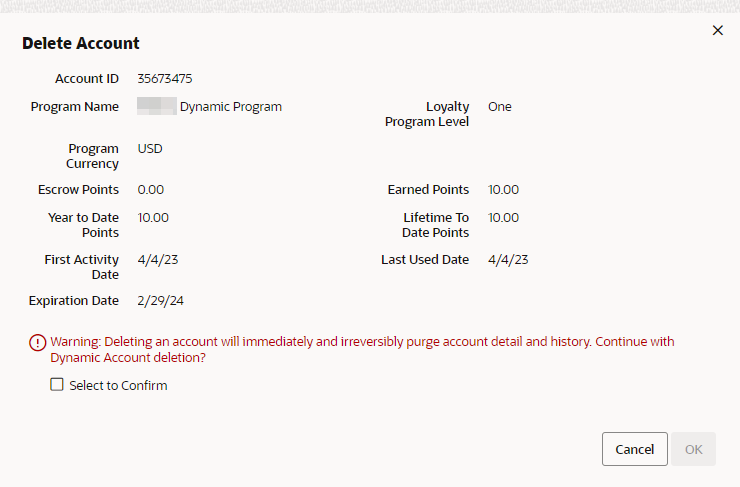
This window displays the following information about the Loyalty Account.
-
Account ID - ID number for the Account associated with the activity.
-
Program Name - Name of the Program to which the Account belongs.
-
Program Currency - ID of the currency used for the Loyalty Program.
-
Escrow Points - Number of points currently escrowed in the Account.
-
Year to Date Points - Number of points earned by the Account in the current year to date.
-
First Activity Date - Date of the first activity on the Account.
-
Expiration Date - Date when the Account expires.
-
Loyalty Program Level - Name of the Loyalty Level to which the Account currently belongs.
-
Earned Points - Current points balance of the Account.
-
Lifetime To Date Points - Number of points earned by the Account during the lifetime of the Account.
-
Last Used Date - Date of the most recent activity on the Account.
Click Select to Confirm and then click OK to delete the Loyalty Account.
Note that when you delete a Loyalty Account, this information is not included in the Batch Export.
Issue Award
To issue an Award to an Account:
-
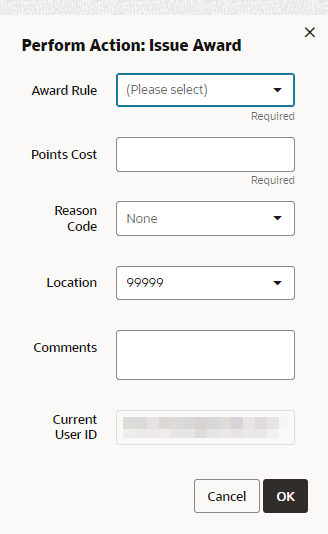
Click Award in the Loyalty Account Actions Menu for a Loyalty Account. A Perform Action: Issue Award Window opens.
Figure 11-49 Perform Action: Issue Award
-
Enter the information for issuing the award.
-
Award Rule - Use the Selection Menu to select the Award Rule to use for issuing the Coupon for the Loyalty Account. The menu includes those Award Rules that belong to the Loyalty Program and Level the account is currently assigned to.
Note:
Only the award rules for the 'paper' coupons will be listed. The rules created for e-awards and award certificates will not be displayed
-
Points Cost - The number of points to remove from the Loyalty Account as part of issuing the Coupon.
-
Reason Code - Use the Selection Menu to select the reason for awarding the points.
-
Location - Use the Selection Menu to select the location where the Award is being issued.
-
Comments - Enter any comments describing the issuance of the Award.
-
-
Click OK to issue the Award and close the Window, or click Cancel to close the Window without issuing an Award.
Issue Points
To issue points to a Loyalty Account:
-
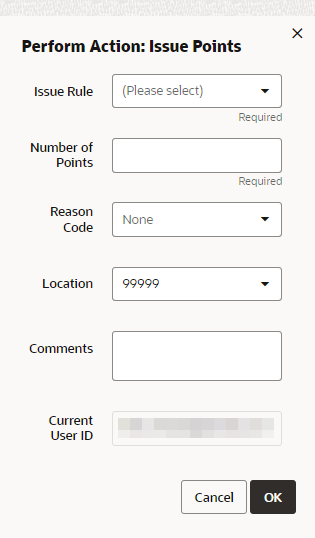
Click Issue in the Loyalty Account Actions Menu for a Loyalty Account. A Perform Action: Issue Window opens.
Figure 11-50 Perform Action: Issue Points
-
Enter the information for issuing points:
-
Issue Rule - Use the Selection Menu to select the Loyalty Level Issue Rule to use for issuing the points. The menu includes those rules that belong to the Loyalty Program and Level the account is assigned to.
-
Number of Points - The number of points to issue. For an Issue Rule whose Calculation Type is set to The number of marketing engagements, the Number of Points defaults from the Fixed Amount defined for the rule, but it can be overridden. See Issue Rule of the Programs chapter for background.
-
Reason Code - Use the Selection Menu to select the reason for issuing the points.
-
Location - Use the Selection Menu to select the location where the points are being issued.
-
Comments - Enter any comments describing the points issued.
-
-
Click OK to issue the points and close the Window, or click Cancel to close the Window without issuing points.
This window does not prevent you from issuing points more often than specified for the Issue Rule when the Calculation Type is set to The number of marketing engagements. See Issue Rule of the Programs chapter for background.
Recover Points
To issue loyalty points that were earned, but not issued to a Customer for a specific transaction:
-
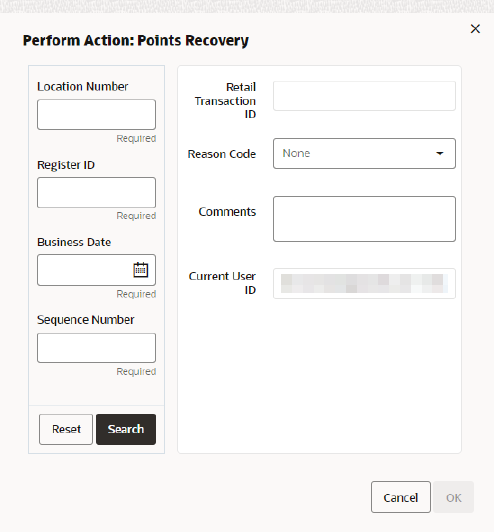
Click Point Recovery in the Loyalty Account Actions Menu for a Loyalty Account. A Perform Action: Search for Retail Transaction Window opens.
Figure 11-51 Perform Action: Points Recovery
-
Enter the transaction search information.
-
Location Number - ID number for the location where the transaction was performed.
-
Register ID - ID number for the register where the transaction was performed.
-
Business Date - Use the Calendar Menu to select business date when the transaction was performed.
-
Sequence Number - The purchase number for the transaction.
Note:
Refer to Figure 11-60 to see the 'Purchase' number that should be used for this field. In a future release, we will likely rename this field to match so there will be no confusion.
-
-
Click OK to search for the transaction and close the window, or click Cancel to close the window without searching for the transaction.
If the transaction is found and the loyalty points have not been processed for that line item, a Perform Action: Point Recovery Window opens.
Figure 11-52 Perform Action: Point Recovery Search Result
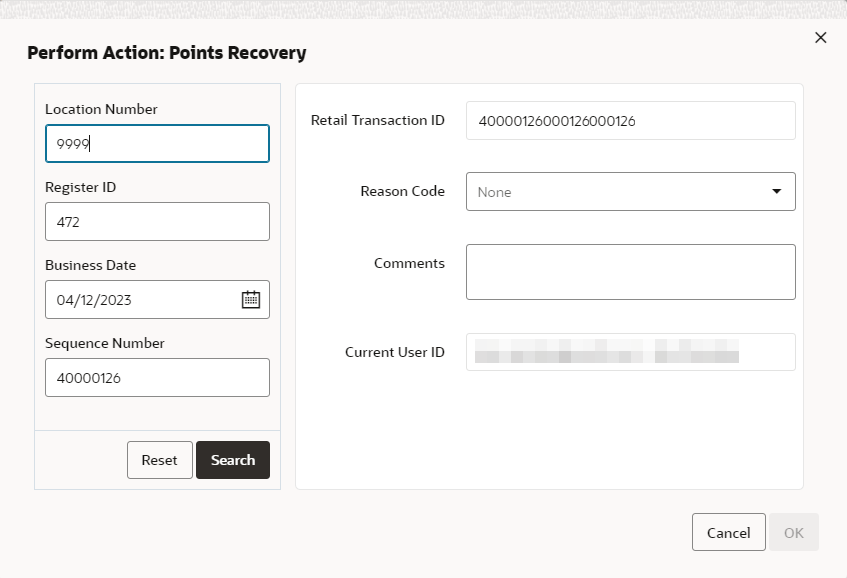
If the transaction is not found, or if the transaction was found, but the loyalty points have already been processed for the transaction, the window will close and an error message will be displayed.
-
Enter the Point Recovery information:
-
Reason Code - Use the Selection Menu to select the reason for performing the point recovery.
-
Comments - Enter any comments describing the point recovery.
-
-
Click OK to recover the points and close the Window, or click Cancel to close the Window without recovering the points.
Points Transfer
To transfer points to another Loyalty Account for the same Program, select Points Transfer from the Loyalty Account Actions Menu. The Points Transfer page opens.
Figure 11-53 Points Transfer
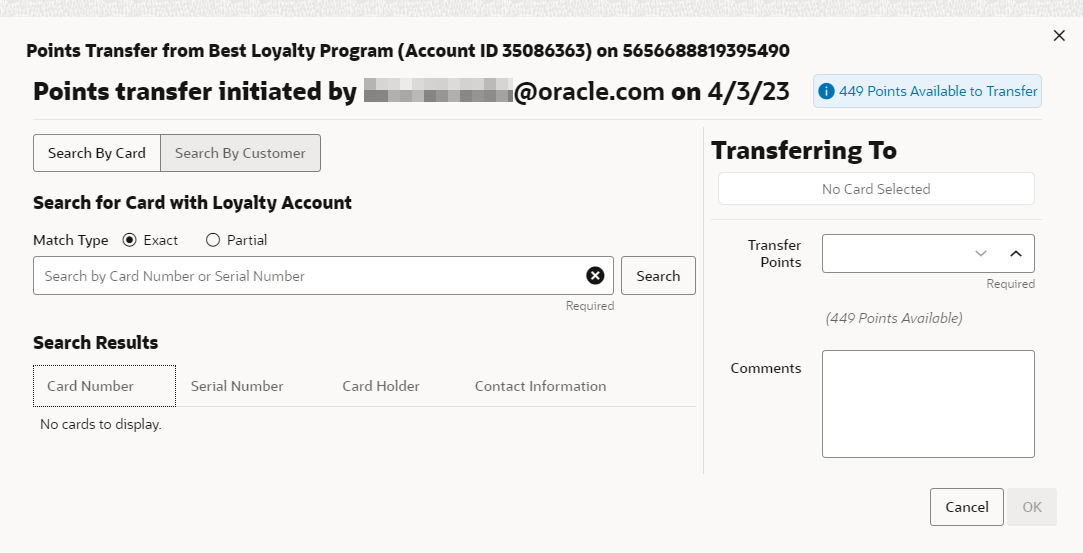
The information on the Points Transfer page includes.
-
Transfer Source Account:
-
Card Number - Card Number for the Card selected for points transfer.
-
Serial Number - Serial Number for the Card selected for points transfer.
-
Card Holder - Customer number and name of the a secondary card holder can also be displayed when searching by customer. If the primary cardholder is displayed, a primary cardholder icon will display next to the name. Click the name to open Customer Record of the card holder in the Customer Dashboard.
-
Card Status - Indicates whether the Card is currently active.
-
Card Holders - Indicates the number of Customers associated with the Card. Click the number of Card Holders to open a menu containing a menu of all of the Customers associated with the Card. Click the name in the menu to open the Customer Record in the Customer Dashboard.
-
-
Loyalty Account Administration
-
Account id - ID number for the Account.
-
Program Name - Name of the Program to which the Account belongs.
-
Loyalty Program Level - The current level of the Loyalty Account.
-
Escrow Points - Number of points currently escrowed in the Account.
-
Earned Points - Current points balance of the Account.
-
Program Currency - Base currency for the Program.
-
Year To Date Points - Number of points earned by the Account in the current year to date.
-
Lifetime Points - Number of points earned by the Account during the lifetime of the Account.
-
First Used Date - Date of the first activity for the Loyalty Account.
-
Last Activity Date - Date of the most recent activity for the Loyalty Account.
-
Expiration Date - Date, if any, when the Loyalty Account is scheduled to expire.
-
-
Customer Contact Permissions: The originating Customer can be notified of the transfer by an email or SMS message generated by an integrated marketing system, such as Responsys, if the Customer's contact permissions allow email or phone contact and if the marketing system supports it. See Points/Awards Transfer Notification Export for background.
-
Contact Preference - Indicates the preferred means for contact for the Customer, such as Email or Phone.
-
Email - The Customer's primary email address. Included if email is a preferred means of contact.
-
Phone - The Customer's primary phone number. Included if phone is a preferred means of contact.
-
The Email or Phone listed is None if the contact information is not available, indicating that no email or SMS message can be generated. Also, even when the Customer has provided the email address or phone number, the Email Address or Phone is listed as None if the Contact Permission is set to No.
-
Process
-
To add a card do the following:
-
Using Search by Card
-
In the Search for Card with Loyalty Account, enter the Card Number or Serial Number of the Card you want to search for. Click Partial to search for Cards that partially match the search text, or click Exact, to search for an exact match.
-
-
Using Search By Customer
-
In the Search By Customer field, enter the Customer Name, ID, Email Address, or Phone Number of the Customer you want to search for. Click Partial to search for Customers that partially match the search text, or click Exact, to search for an exact match.
-
-
-
Click Search. The Search Results appear.
Figure 11-54 Search Results
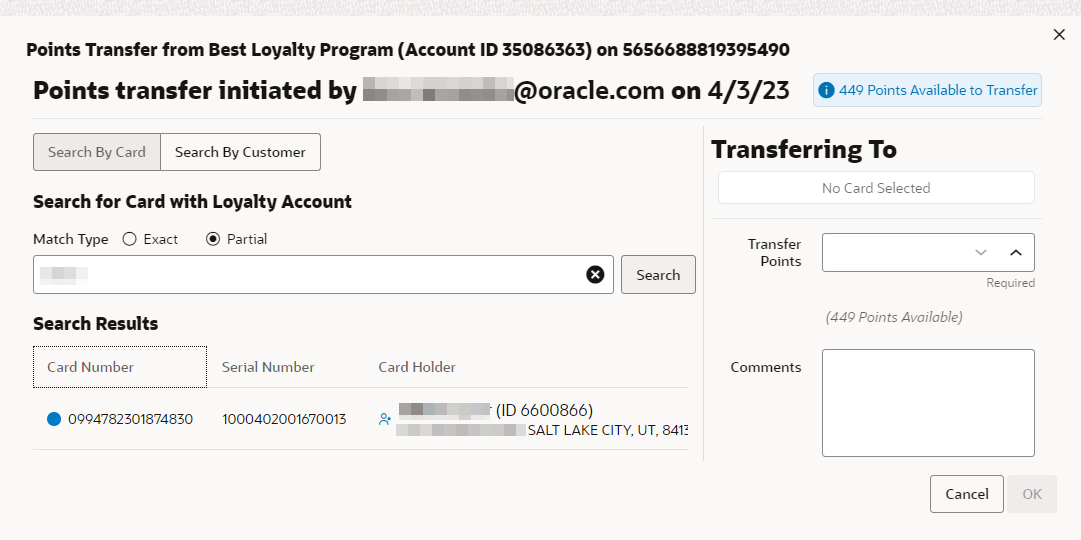
The Account must be within the same Program, and the Customer must be the primary card holder. Only active Cards can receive points.
-
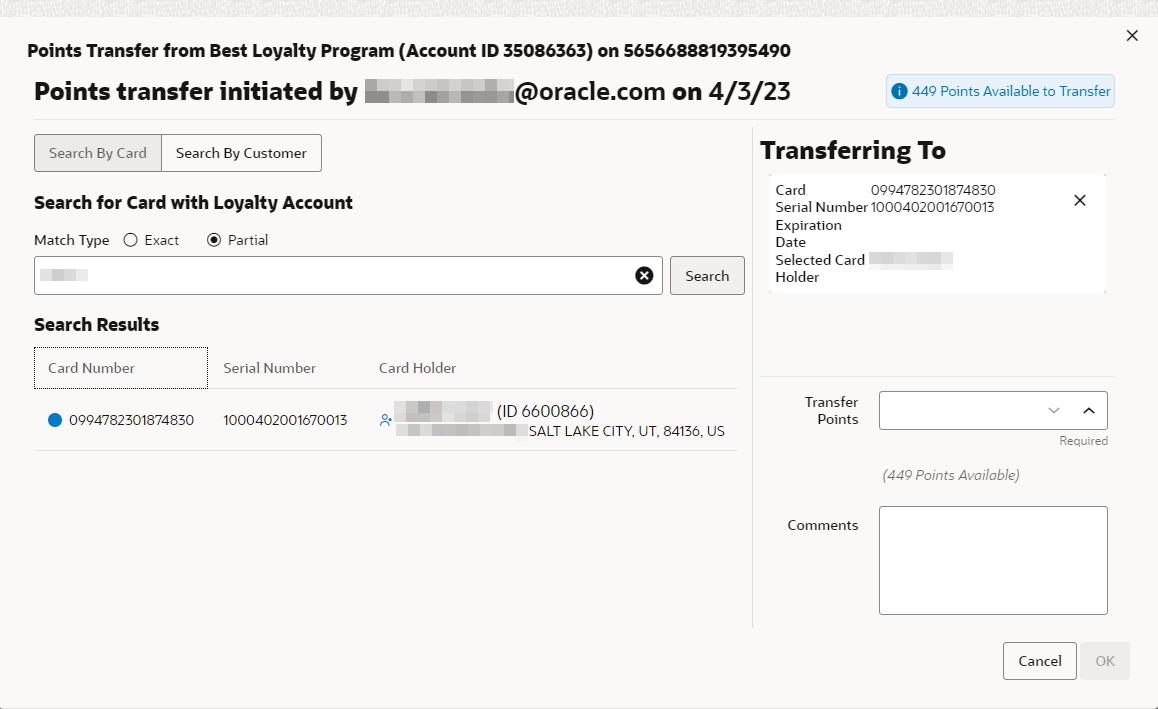
Click Select to populate the Transferring To section.
Figure 11-55 Transferring To
-
Card - Card Number for the Card. If the selected Customer has more than one Card in the Program, the most recently used Card is selected and displayed.
-
Serial Number - Serial Number for the Card.
-
Primary Card Holder - Customer name of the primary account holder.
-
Selected Card Holder - Customer name of the selected card holder.
-
Loyalty Level - The current loyalty level.
-
Current Balance - Current balance on the card.
-
-
Enter the Number of points to transfer. Your entry cannot exceed the Earned Points balance for the Transfer Source Account.
-
Enter any Comments.
-
Click OK to transfer the points, or click Cancel to close the window without saving.
The Points are transferred to the Destination Account. A Transfer In Activity Detail record is created for the Destination Account, and a Transfer Out Activity Detail record is created for the Source Account.
Loyalty Account Activity Actions Menu
Figure 11-56 Loyalty Account Activity Actions Menu
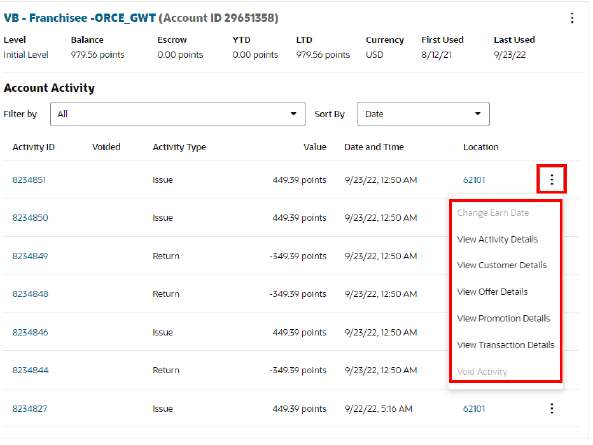
The Actions Menu for Loyalty Accounts Account Activity List displays the following options:
-
Change Earn Date - Changes the date the escrowed points will be moved to earned.
-
View Activity Details - Views the details of the selected activity.
-
View Customer Details - Views the details of the selected customer.
-
View Promotion Details - Views the details of the promotion associated to the activity. This menu option will only display when there is an associated promotion.
-
View Offer Details - Views the details of the offer associated to the activity. This menu option will only display when there is an associated offer.
-
View Transaction Details - Views the details of the selected transaction.
-
Void Activity - Voids the selected activity
Change Earn Date
Perform the following actions to change the date the escrowed points will be moved to earned.
-
In the Account Activity area, click the Action menu for the desired activity.
-
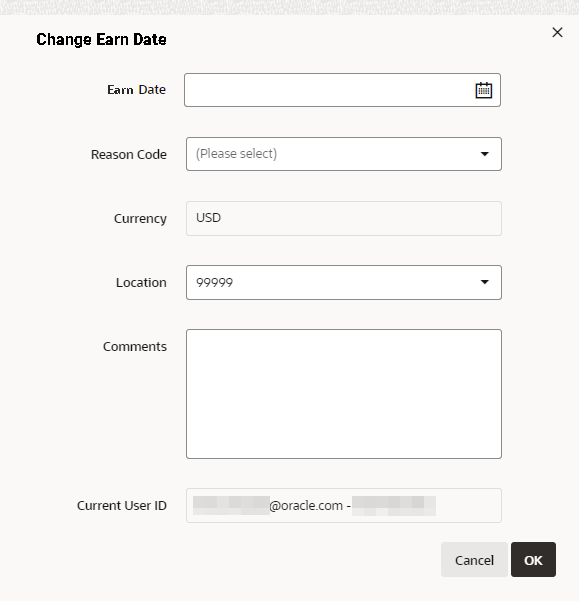
Click Change Earn Date. The Change Earn Date window displays.
Figure 11-57 Change Earn Date
-
Enter the following information:
-
Earn Date
-
Reason Code
-
Location
-
Comments
-
-
Click OK to change the earn date, or click Cancel to close the window without saving.
Note:
A notification appears indicating the request was a success.
View Activity Details
Do the following to view detailed information about an activity in the list of activities displayed for a Loyalty Account:
-
In the Account Activity area, click the Action menu for the desired activity.
-
Click View Activity Details. The Activity Details display.
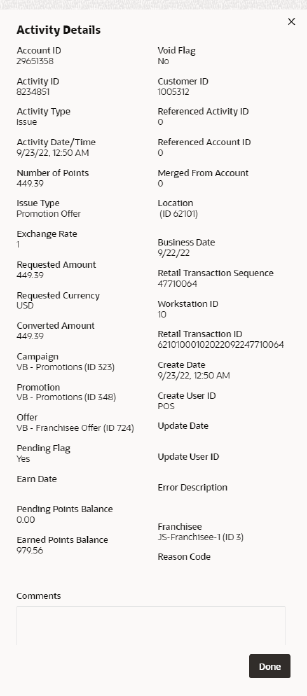
Figure 11-58 Activity Details - Loyalty Account
-
The Activity Detail Window displays the following information for the selected activity:
-
Account ID - ID number for the Account associated with the activity.
-
Activity ID - ID of the activity on the Account.
-
Activity Type - Type of activity performed.
-
Activity Date/Time - Date and time of the activity.
-
Number of Points - Number of points applied to the points balance, or subtracted in the case of an activity such as Change Level or Transfer Out.
-
Issue Type - The issue type of the tender.
-
Exchange Rate - If the transaction was performed in a foreign currency, the exchange rate between the foreign currency and the Account's base currency.
-
Requested Amount - Requested currency amount.
-
Requested Currency - Currency used for the requested amount, if different from the base currency.
-
Converted Amount - Amount of the request in the system's base currency
-
Campaign - If the activity was associated to points awarded in a campaign, this field will be displayed and is the Name and ID of the campaign the award was from.
-
Promotion - If the activity was associated to points awarded in a promotion, this field will be displayed and is the Name and ID of the promotion the award was from.
-
Offer - If the activity was associated to points awarded in an offer, this field will be displayed and is the Name and ID of the offer the award was from.
-
Earn Date - Date a pending activity will complete.
-
Pending Points Balance - Number of points pending at the time of the activity.
-
Earned Points Balance - Earned points balance at the time of the activity
-
Void Flag - Indicates whether the activity was voided.
-
Referenced Activity ID - ID of an activity to which this activity refers.
-
Referenced Account ID - ID of the Loyalty Account used by the Referenced Activity
-
Merge From Account - If two cards have been merged, the originating source account is displayed.
-
Location ID - ID of the Location where the activity was performed.
-
Location Name - Name of the Location where the activity was performed.
-
Business Date - Business date of the activity.
-
Retail Transaction Sequence - Sequence number of the activity on the retail transaction
-
Workstation ID - ID of the workstation (within the Location) where the activity was performed.
-
Retail Transaction ID - ID number of the activity within a retail transaction.
-
Create Date - Date when the activity was created.
-
Create User ID - ID of the user who created the activity.
-
Update Date - Date when the activity was most recently updated.
-
Update User ID - ID of the last user to update the activity.
-
Error Description - If an error occurred during the activity, a description of the error.
-
Franchisee - Franchisee associated with the activity.
-
Reason Code - Reason for the activity.
-
Comments - Additional comments entered about the activity.
-
-
Click Done to close the window.
View Customer Details
Do the following to view the customer details.
-
In the Account Activity area, click the Action menu for the desired activity.
-
Click View Customer Details. The Customer Dashboard displays in a new tab. See Customer Dashboard to see more information.
-
Click x to close the Customer Dashboard.
View Transaction Details
Do the following to view the transaction details.
-
In the Account Activity area, click the Action menu for the desired activity.
-
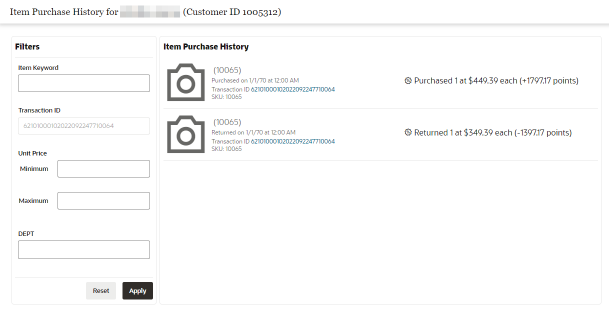
Click View Transaction Details. The Item Purchase History for the transaction displays.
Note:
This is in the Customer Feature as well and can be accessed from the Customer Dashboard. See Item Purchase History for more information.
Figure 11-59 Item Purchase History
-
The Item Purchase History can be filtered using the following options:
-
Item Keyword - Enter any part of the Item name.
-
Unit Price Min - Enter the Min Unit Price
-
Unit Price Max - Enter the Max Unit Price
-
Department - Enter any part of a department name. The list updates automatically with the matching departments.
-
-
Click the Item Name to view the Item Details.
-
Click Done to close the Item Details window.
-
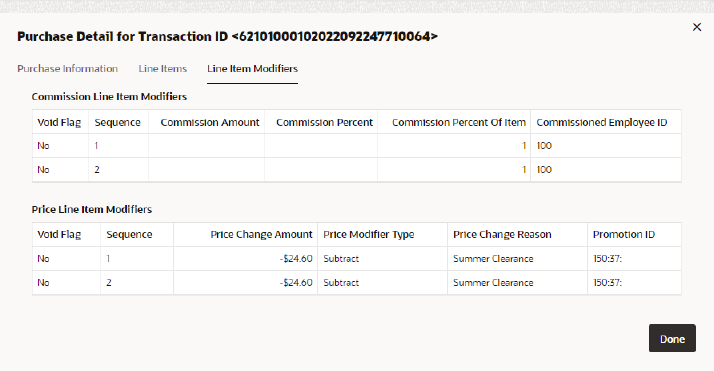
Click the Transaction ID to view the Purchase Details as shown in Figure 11-60, Figure 11-61, and Figure 11-62.
Figure 11-60 Purchase Information
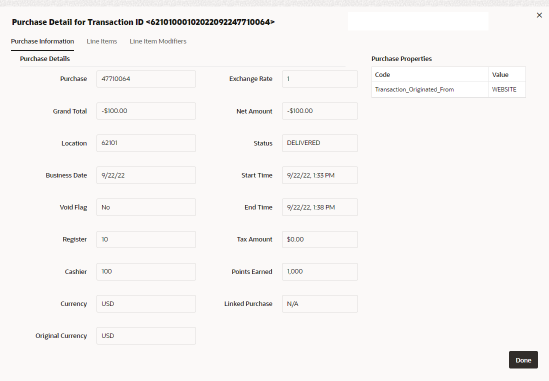
Figure 11-61 Line Items

Figure 11-62 Line Item Modifiers
-
Click Done to close the Transaction ID views.
-
Click x to close the Customer Dashboard.
Void Activity
To void an activity do the following:
-
In the Account Activity area, click the Action menu for the desired activity.
-
Click Void Activity. The Void Activity window displays.
Figure 11-63 Void Activity

-
Enter the following information:
-
Reason Code
-
Location
-
Comments
-
-
Click OK to void the activity, or click Cancel to close the window without saving.