4 Extension
RDS Architecture Basics
The defining feature of RDS is the data of each participating product resides in a single dedicated read-only schema, e.g., MFCS. Product data is made accessible to the customer in a dedicated companion, writeable schema using synonyms. All custom data objects are created in this companion, writeable schema. Management and retention of these objects is wholly the responsibility of the customer.
The product data in RDS is a replica of selected data residing in an operations system such as MFCS. The MFCS replica contains more than 700 views. Nonetheless, RDS is not part of MFCS (nor any other participating product), but a repository of MFCS data. Moreover, the data exchange is one way from MFCS to RDS. Any data movement, directly or indirectly, from RDS to MFCS is orchestrated by the customer.
Note:
Only views on replicated tables are accessible. Specifically, replicated tables are not accessible. Moreover, the data exchange is one way from any custom product schema (for example, MFCS_RDS_CUSTOM) to RDS. Any data movement, directly or indirectly, from RDS to a product (for example, MFCS) is orchestrated by the customer. RDS schema are accessible from services, Data Visualization, the APEX UI. There is no other access pathway.
Although data from multiple products reside in RDS, there is only an informal guarantee that if there are no updates to a given set of data items, then eventually all accesses will return temporally consistent results. What this statement means is that after sufficient time has passed, RDS accurately reflects the state of the enterprise at some point in time in the recent past (recent could be measured in seconds, minutes, or hours). What qualifies as sufficient time depends on the temporal consistency of the separate subsystems that make up the enterprise, which depends metaphorically speaking on when each system closes its book. Temporal consistency also depends on the replication lag, which varies depending on system loading. This lag, however, is expected to be minimal under normal operating conditions. Temporal consistency may prove decidedly less relevant than semantic and data model differences between the products that reflect the specific problems each product was devised to solve.
Refer to your product data model to determine what data is available in RDS. Bear in mind, the data is a replica of inserts and updates as well as deletes. The point is, the data retention policy in RDS is effectively replicated from the operations system. Selected audit/delete tables are also retained. The retention period of audit/delete data is one year. Retention of audit/delete data beyond one year is the responsibility of the customer. The retention period is not configurable.
Environment Considerations
When embarking on the customization of a product, it is important to understand how the RDS implementation environment, which is a SaaS offering, differs from PaaS and on-premises. First of all, some or all product customization will be accomplished by making modifications to RDS (the product implementation guide will provide details on product customization). Those modifications are achieved using APEX.
APEX is a low code development environment. As a result it does not anticipate the need for (and does not provide) development life cycle tools. Application user interfaces are composed in an application builder. RESTful services are built in a similar fashion. In fact, one constructs most database objects using a UI rather than by executing code. One can, however, use the SQL Workshop to compose small amounts of PL/SQL (e.g., 100s to 1000s of lines of code). There is no access to SQL*Developer or SQL*Loader. In fact, most consoles are unavailable. It is an ideal environment for most business savvy users, but may be foreign to the skilled PL/SQL, front end, or back end developer. It is important to note that customizations that require coding will use SQL and PL/SQL. Moreover, most data interchange will rely on JSON formatted messages. All the examples in this document will employ JSON.
When using APEX, SQL command line type activities are performed in the SQL Commands tool within the SQL Workshop. For SQL script development (for blocks of code where reuse is anticipated), however, one uses the SQL Scripts tool.
When using APEX, one logs into a workspace and that workspace provides access to a single schema. Specifically, one can have access to the data for a single product within a workspace. In other words, it is not possible to execute a mutli-schema or cross-schema query from within a workspace. If one needs to combine information from multiple products, then one constructs schema specific integrations and then joins that information externally.
Lastly, it is important to remember that since RDS is a SaaS offering, some tools and features may not be available or availability may be provided with some limitations. It is important that one understand the dependencies inherent in customizations that one wishes to migrate. Expect to review these dependencies with an Oracle Representative.
Prerequisites
In order to implement any meaningful customizations, you will need to meet the prerequisites listed below. Furthermore, the examples in this chapter can be replicated in your RDS environment. Replicating the examples will both help you understand the development context and provide assurance that the prerequisites have been met prior to starting implementation.
-
A Retail Home instance. Contact your RDS System Administrator for details – Oracle Support does not provide this information.
-
An IDCS Authorization Server host. Contact your RDS System Administrator for details – Oracle Support does not provide this information.
-
An Oracle Cloud account. Contact your RDS System Administrator for details on setting up your Oracle Cloud account.
-
A working knowledge of Oracle Retail Home.
-
A working knowledge of the Oracle Cloud Console (on the web search for Using the Oracle Cloud Console for the latest documentation).
-
Access to an APEX workspace within an RDS tenant (see user management above).
-
Access to a suitable Object Storage service.
-
Access to a suitable object storage bucket. RDS does not automatically come with a customer accessible object storage bucket. Provisioning an object storage bucket for use with RDS is a customer responsibility. Bear in mind, FTS, when available, will not be able to produce usable writable PARs for DBMS_CLOUD.EXPORT_DATA (EXPORT_DATA is expecting a prefix or bucket URI, not an object URI). Readable PARs generated by FTS for importing data into RDS, however, are usable with DBMS_CLOUD.COPY_DATA.
Accessing the APEX UI
You will need a Retail Home endpoint URL to perform the steps described below.
APEX is a browser-based application. You access APEX by navigating to the Retail Home Application Navigator and tapping RDS APEX/ORDS (RDS APEX/ORDS is included in the Application Navigator by default).
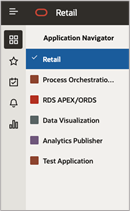
It is the responsibility of RDS workspace admin to create development user accounts for each user requiring access to one or more APEX workspaces. for you so that you will be . See the APEX User Management section above for additional details.
Before proceeding:
-
Verify access to Retail Home
-
Verify access to the relevant APEX workspaces.
Obtaining ORDS Service Credentials
ORDS services use OAUTH 2 for authentication. All services are authenticated. What this means in practice is that a short-lived token is used for authentication. That token is generated using a well-known service, which authenticates using basic auth. The basic auth credentials (i.e., client id and client secret) are obtained from Retail Home.
-
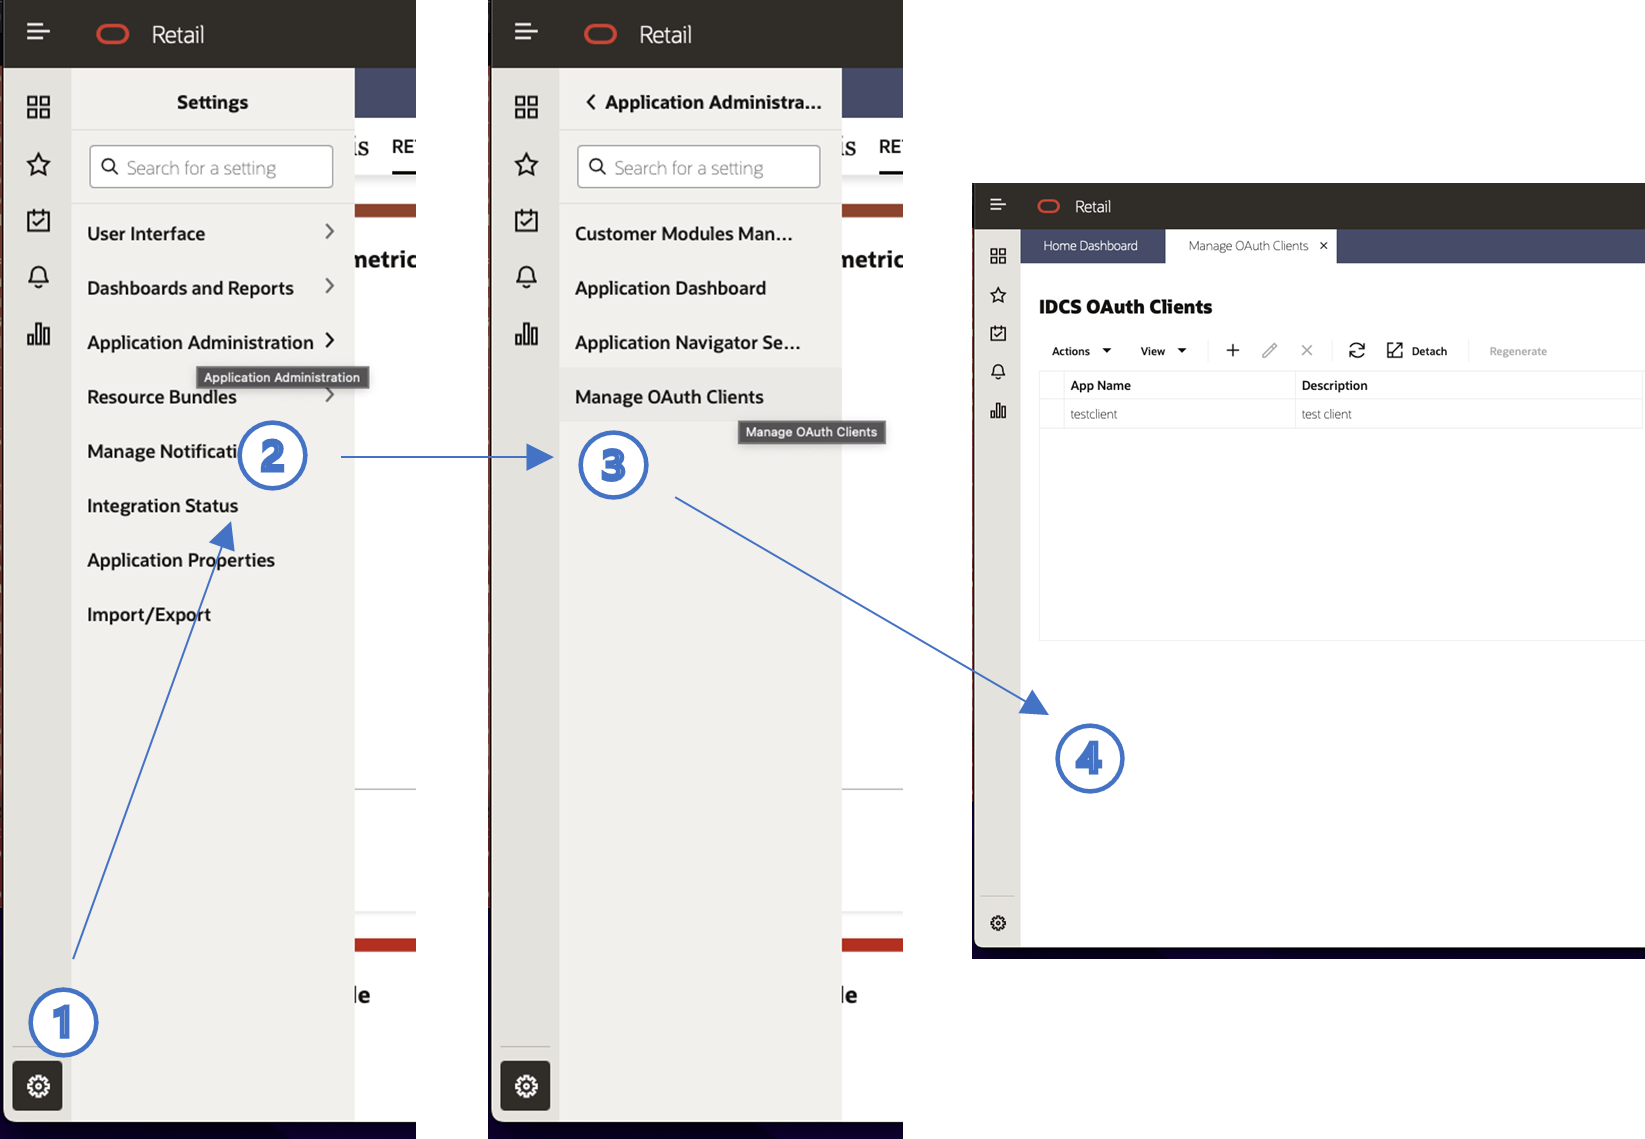
In Retail Home, navigate to Manage OAUTH Clients page by tapping settings (1), then tapping the Application Administration menu item (2), and lastly tapping the Manage OAUTH Clients menu item to arrive at the Manage OAUTH Clients page (4).
-
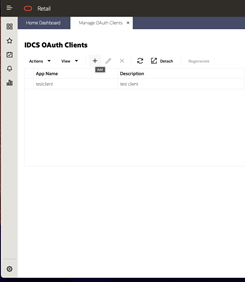
Tap the + button.
-
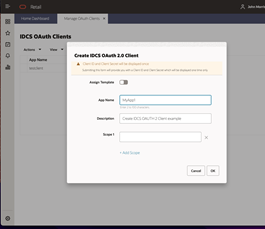
A popup dialog will appear. Provide an App Name and Description. Leave Scope blank. Tap OK.
-
A new dialog window will appear with a Display Name, Client ID, and Client Secret. Retain this information. It will not be displayed again. Tap Done when the information has been copied. Note that new credentials can be created at any time and that production, stage, and development will have different credentials.
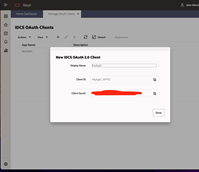
Consult Retail Home Application Administration Guide for additional details on managing OAUTH clients.
Before proceeding:
-
Verify that a client id and secret can be created in Retail Home.
-
Retain the client id and secret for future use.
Generating an ORDS Access Token
You will need an IDCS Authorization Server endpoint URL and ORDS service credentials to perform the steps described below.
One uses an IDCS Authorization Server to generate an ORDS access token. Two access token generation techniques will be described, curl and POSTMAN. One is likely to use both techniques during the development process.
Generating an Access Token Using cURL
The cURL command for generating an access token has five components:
-
The IDCS Authorization Server endpoint URL
-
A content type
-
An authorization
-
A grant type
-
A scope
Only the IDCS Authorization Server endpoint URL and authorization are customer-specific. Content type, grant type, and scope are the same for all customers.
The endpoint URL has the following form:
https://<idcs authorization server host>/oauth2/v1/tokenThe authorization uses Basic Auth. You will need to base64 encode your Basic Auth credentials using the following format:
clientId:clientSecret
Replace Client ID and Client Secret with credentials obtained using the method described in the 4.3.2 Obtaining ORDS Service Credentials section above. Then use a base64 encoding tool to encode the string.
The cURL command to generate a token is as follows:
curl --location --request \
POST 'https://<idcs authorization server host>/oauth2/v1/token' \
--header 'Content-Type: application/x-www-form-urlencoded' \
--header 'Authorization: Basic <base64 clientId:clientSecret>’ \
--data-urlencode 'grant_type=client_credentials' \
--data-urlencode 'scope=urn:opc:idm:__myscopes__'
Generating an Access Token Using POSTMAN
Generating is access token in POSTMAN is typically an integral part of calling other services. In this section, we will illustrate the process of generating a token directly and generating it as part of another service invocation. Use the following steps to generate a token directly:
-
Open POSTMAN and create a new request by clicking on the New button in the top left corner of the screen.
-
Select HTTP.
-
In the new request tab, select the POST method from the drop-down menu.
-
Enter the IDCS Authorization Server endpoint URL in the "Enter request URL" field.
-
Click the Authorization tab to configure authorization.
-
In the Type drop-down menu, select Basic Auth.
-
Enter your username (client id) and password (client secret) in the fields provided.
-
Next click the Body tab to add the grant type and scope parameters.
-
In the menu, select x-www-form-urlencoded.
-
Next enter two key-value pairs:
Key Value grant_type
client_credentials
scope
urn:opc:idm:__myscopes__
-
Once you have configured your request, click on the "Send" button to execute it.
-
The response from the service will be displayed in the "Response" section below the request configuration. You can view the response headers and body, as well as any errors or status codes. The response is JSON formatted and should have the following form:
{ "access_token": "<token>", "token_type": "Bearer", "expires_in": 3600 } -
You can also save the request for future use by clicking on the "Save" button in the top right corner of the screen and giving it a name.
To use OAuth2 in Postman to invoke a ORDS service, you can follow these steps.
-
Open POSTMAN and create a new request.
-
Select the Authorization tab from the top of the request builder.
-
Select the OAuth 2.0 type from the drop-down menu.
-
Scroll down to Configure New Token.
-
Choose a name for the token configuration.
-
Select client credentials as the grant type.
-
Enter your IDCS Authoization server endpoint URL, client id, client secret, and scope as you did above.
-
Set client authentication to Send as Basic Auth Header.
-
Scroll down to get new access token.
-
POSTMAN will then display the token details, such as the access token, refresh token, and token expiration time.
-
Finally, click the Use Token to apply the token to your service.
Before proceeding verify your understanding and validate your ORDS service credentials:
-
Unless you do not expect to use cURL, verify your that you can generate a token using cURL.
-
Unless you do not plan to use POSTMAN, then verify your understanding by generating a token using POSTMAN.
-
More than likely, you do not have an ORDS service with which to test authentication at this point. If you do and you expect to use POSTMAN, then verify your understanding by invoking an ORDS service.
Obtaining a Pre-Authenticated Request (PAR) URL
If you do not anticipate using Object Storage for integration, you can skip this section. You will need to use the Oracle Cloud Console to perform the steps below.
A pre-authenticated request, or PAR, provide a way to let users access a bucket or object without having their own credentials. Users continue to have access to the bucket or object for as long as the creator of the request has permissions to access those resources.
When you create a pre-authenticated request, a unique URL is generated. Anyone you provide with this URL can access the Object Storage resources identified by the pre-authenticated request. See Using Pre-Authenticated Requests in the Oracle Cloud Infrastructure Documentation for additional details.
The steps to create a writable PAR for specific object are as follows:
-
Login to you Oracle Cloud account
-
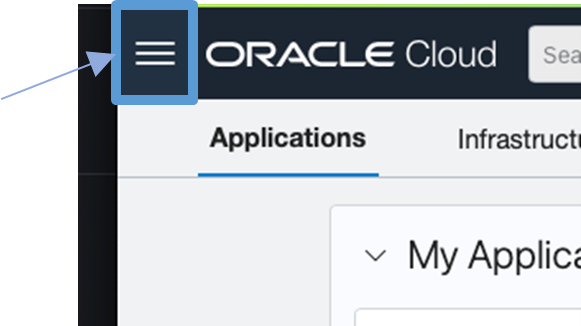
Open the navigation menu in the upper left to work with services and resources. Services and resources are organized by functional group.
-
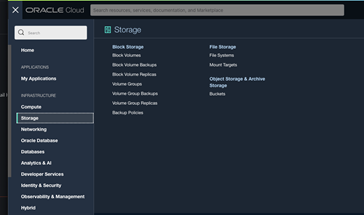
Open the navigation menu and click Storage.
-
Then click Buckets.
-
Select the appropriate compartment in the compartment select box. The object storage buckets in the compartment will be listed.
-
Select the appropriate bucket from the list.
-
In the Resources section, click Pre-Authenticated Request.
-
Specify the Name, select a Pre-Authenticated Request Target, select the Access Type, and the Expiration date.
-
Click Create Pre-Authenticated Request.
-
Copy the pre-authenticated request URL for your records.
Alternatively, one can create a PAR using from a shell using OCI os. Before proceeding verify your understanding and verify that you can create PAR.
Constructing an Object Storage Object URL
If you do not anticipate using Object Storage for integration, you can skip this section. You will need to use the Oracle Cloud Console to perform the steps below.
Unlike a PAR, an Object Storage object URL requires the schema user to have their own credentials. Like a PAR, the URL will provide a way for users to identify and access a bucket with a known name. In order to construct a URL, you will need to know:
-
the region identifier for your object storage instance
-
the namespace in which your object storage is located
-
the name of the bucket that you will be using
To obtain the region identifier:
-
Login to the Oracle Cloud Console
-
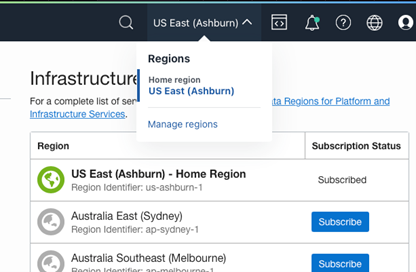
In the middle right portion of the tool bar at the top of the console page, you will find the name of the region in which your Object Storage instance is located (you can change regions from here as well, if need be), e.g., US East (Ashburn). Tap the region to reveal the region menu.
-
In the region menu, there is a Manage regions menu item. Tap it.
-
A list of regions will be displayed. For each region displayed there is a region identifier. Note the region identifier for your region. See the figure below:
Once you have the region identifier, you can construct a base URI for your object store instance, which has the following form:
https://objectstorage.<region-identifier>.oraclecloud.comFor example, the host for a URI for US East (Ashburn) region is:
https://objectstorage.us-ashburn-1.oraclecloud.comNext find the namespace for your bucket at the top of the General section in the Bucket Information. Lastly, find the name of the bucket at the top of the bucket page.
The complete URL is:
https://<host>/n/<namespace>/b/<bucket>/o/<object-prefix>Note that the object prefix is a base name when exporting from ADW. The final object name will have a multi-part identifier (e.g., which is "1", if it is not a multipart export), timestamp suffix, a format extension (e.g., ".json") and, if compression was used, a compression extension (e.g., ".gz"). For example, an object name as listed in the bucket might look like the following:
ie_export_test_1_20221108T225927023493Z.json.gzBefore proceeding verify your understanding and verify that you can create ab object storage object UIL.
Obtaining Object Storage Credentials
You will need to use the Oracle Cloud Console to perform the steps below.
In order to read from or write to object storage one will need the necessary credentials. Refer to Required Keys and OCIDs for details on obtaining credential information for object storage. The easiest way to obtain the needed credentials is as follows:
-
Navigate to one’s My Profile page in the Oracle Cloud (i.e., tap the profile button/image in the upper right corner and select My Profile from the drop down).
-
Next tap the API Keys link in the Resources section on the lower left of the screen.
-
Finally tap the Add API Key button and follow the instructions. Part of the process is downloading one’s private key. The downloaded key is in PEM format. The key will need to be reformatted as a single long string without the leading and trailing dashes when using the credential in create credential script. There should be no new lines in the key.
These instructions will make more sense once one goes through the Add API Key process.
ORDS RESTful Services
The point of this section is not to say everything that needs to be said about RESTful Services. Rather it will describe some patterns one is likely to encounter and how they might be implemented. Those patterns are as follows:
-
Data producing services or outbound integrations are one of the most likely patterns one will implement. Such services are typically pull producers that generate a chunk of data in response to an explicit request. A less common producer is one which continues to generate data without external prompting by invoking an external data consuming service. In this case, the service is either governed by the DBMS_SCHEDULER or by and external scheduling system.
-
Data consuming services or inbound integrations insert data into RDS. The inbound data originates in an external system. There is no need to insert data found in the participating products or subscribe to RICS data originating in these products because it is already being replicated.
-
Bulk import and export services represent another inbound and outbound integration pattern. In this case, however, data is transferred through object storage rather than through the service itself. The role of the service is to initiate the transfer.
-
The last services pattern concerns process orchestration and monitoring. These service patterns start, stop, and monitor jobs. In most cases, these services will run asynchronously. For example, they will submit a job for future execution and return immediately.
Oracle RESTful Data Services play a role in every integration. Services either directly transfer the data or initiate that transfer through object storage. For a pull pattern, the service queries ADW and then returns the query result as its response. For a push pattern, the service is invoked with a payload that is inserted in a ADW table. In the case of a bulk export integration, the service initiates the export and then returns a response indicating whether the export was successfully initiated or not. Lastly, a bulk import integration service initiates the import and then returns a response indicating whether the import was successful or not. Additional services are required to monitor the progress of import and export jobs.
In most cases, the pattern chooses itself for a given task. Synchronous data services that push or pull data in response to an explicit request are simple to implement. The problem is that simple producers do not tend to scale to large volumes of data. First, there is a non-negotiable hard limit of 300 seconds on query duration. If the query exceeds this limit, the caller will return a socket hang up error. Moreover, it is also worth remembering that the database is not infinitely scalable. Specifically, there are only so many connections available (a max of 100) and there is only so much CPU capacity. One can't split a huge bulk data task into a multitude of smaller subtasks and expect them to require fewer CPU seconds. In the worst case, a backlog of REST invocations builds, and invocations start timing out.
Implementing a RESTful Service in APEX
In order to implement the examples below, you will need:
-
Access to the APEX UI and Workspace so that you can create a service
The following paragraphs will only provide an overview of how one creates a RESTful service. Consult Chapter 7 of the SQL Workshop Guide, Enabling Data Exchange with RESTful Services. The chapter describes in detail how one creates a RESTful service in APEX. Bear in mind, documentation is version specific. Although documentation across versions tends to be quite similar, it is generally best to consult the documentation for the version of APEX one is using.
To begin, navigate to the APEX UI and select a workspace, such as MFCS, then follow the steps below:
-
From the APEX UI navigate to the RESTful Services page (i.e., from the APEX Navigation Bar SQL Workshop > RESTful Services).
-
Click Modules
-
Click Create Module
-
Name your module "imp_guide" and set the Base Path to "/imp_guide/"
-
Click Create Module
A module represents a collection of related services. Begin creating the first service by creating a template. The steps are as follows:
-
Click Create Template
-
Set the URI Template to "hello_world/:name"
-
Click Create Template
The ":name" path component allows us to introduce and demonstrate a bind variable.
The last step is to create a handler for the service. Create the handler by following steps below:
-
Click Create Handler
-
Set the Method to GET
-
Set Source Type to Collection Query
-
Set the Source to "select 'Hello World! ' || :name as response from dual"
-
Click Create Handler
The full URL is displayed on the ORDS Handler Definition page. The URL has the following form:
https://<host>/<tenant-name>/ords/<workspace>/imp_guide/hello_world/<your-name>Note that the URL for service handler is displayed on the handler definition page.
Since this is a GET service, it can be tested from a browser. The response for this service, if your_name was john would be:
{
  "items": [
    {
      "response": "Hello World! john"
    }
  ],
  "hasMore": false,
  "limit": 25,
  "offset": 0,
  "count": 1,
  "links": [
    {
      "rel": "self",
      "href": "https://<host>/<tenant-name>/ords/mfcs/imp_guide/hello_world/john"
    },
    {
      "rel": "describedby",
      "href": "https://<host>/<tenant-name>/ords/mfcs/metadata-catalog/imp_guide/hello_world/item"
    },
    {
      "rel": "first",
      "href": "https://<host>/<tenant-name>/ords/mfcs/imp_guide/hello_world/john"
    }
  ]
}
Query parameters become bind variables. For example:
-
Edit the Source of your hello_world service to be "select 'Hello World! ' || :name || ' ' || nvl(:last_name, 'Smith') as response from dual"
-
Apply Changes.
The response for this service, if your_name was john?last_name=jones would be:
{
  "items": [
    {
      "response": "Hello World! john jones"
    }
  ],
  "hasMore": false,
  "limit": 25,
  "offset": 0,
  "count": 1,
  "links": [
    {
      "rel": "self",
      "href": "https://<host>/<tenant-name>/ords/mfcs/imp_guide/hello_world/john?last_name=jones"
    },
    {
      "rel": "describedby",
      "href": "https://<host>/<tenant-name>/ords/mfcs/metadata-catalog/imp_guide/hello_world/item"
    },
    {
      "rel": "first",
      "href": "https://<host>/<tenant-name>/ords/mfcs/imp_guide/hello_world/john?last_name=jones"
    }
  ]
}
Before proceeding:
-
Create the hello_world service in the APEX UI.
-
Test the service from a browser. You should be challenged (if you have not already been authenticated) when invoking the service. Use your IDCS login credentials to authenticate.
Invoking a RESTful Service from POSTMAN
In order to implement the example below, you will need:
-
The hello_world service described above.
-
Access to POSTMAN. The discussion below assumes familiarity POSTMAN.
-
The ORDS OAUTH credentials created in Obtaining ORDS Service Credentials.
Invoking a RESTful service from POSTMAN combines access token generation with endpoint access. Using POSTMAN allows you to test your services as well as simulate the fundamental tasks performed in service-based integration. To invoke your hello_world service using POSTMAN, follow these steps:
-
Open Postman and create a new request by clicking on the "New" button in the top left corner of the application. Select HTTP Request.
-
In the "Enter URL or paste text" field, enter the endpoint of the hello_world service.
-
The default HTTP method is GET. Examine the other methods, but leaving the setting as GET.
-
Click the Params tab and add the last_name parameter (i.e., key is last_name, value is Smith for example).
-
Click the Authorization tab.
-
Select the OAuth 2.0 type from the drop-down menu.
-
Click on the "Get New Access Token" button.
-
In the "Get New Access Token" popup window, fill in your access token URL (IDCS Authorization Server endpoint URL), client ID, client secret, grant type, and scopes.
-
Once you have filled in the required fields, click on the Get New Access Token button.
-
POSTMAN will then display the token details, such as the access token, refresh token, and token expiration time.
-
Finally, click the Use Token to apply the token to your service.
-
-
Once you have configured the request, click on the "Send" button to send the request to the RESTful service.
-
You will see the response from the RESTful service in the "Response" section of the request window. You can view the response headers, body, and status code to verify that the request was successful.
Before proceeding invoke your hello_world service from POSTMAN.
ORDS PRE-HOOK
Oracle REST Data Services (ORDS) provides the ability to use PL/SQL based pre-hook functions that are invoked prior to an ORDS based REST call. These functions can be used for a variety of purposes including auditing, custom authentication and authorization, and metrics gathering.
Each provided RDS workspace comes pre-configured with a simple
pre-hook function named ORDS_PREHOOK, and it has
a default implementation that simply returns true. As such, it has no effect on the REST calls made into custom applications.
It is provided as a starting point for extension to teams that required
additional processing on each REST call. For those teams, replacing
the implementation of the ORDS_PREHOOK function will
enable the additional capabilities they require. For more information
on pre-hook functions, please refer to Oracle REST Data Services Installation, Configuration,
and Development Guide: Overview of Pre-hook Functions.
Be aware that some extensions, such as those provided by the Oracle Retail Cloud Value team, use ORDS PRE_HOOK to enhance security. Incomplete configuration of these extensions as well as failure to communicate their presence to the broader customer implementation team can result in unexpected authentication failures.
Using RDS to Build a Data Producing Service
A data producing service can be used to deliver data to a UI or fulfill some data need in an automated business process. The limiting factor is time. The data producing service must be able to produce a response in less than 300 seconds. If the service exceeds that limit, the caller will hang up and respond with a socket hang up error. The consumer may be able to wait longer than 300 seconds, but ORDS will not. The 300 seconds limit is not configurable.
Most data producing services are parameterized to one degree or another. The hello_world service demonstrated the use of a parameter in the URL template as well as the use of a query parameter. When considering how best to communicate parameters to a service, the developer should be aware that a URL has a maximum size (Oracle will not guarantee support of any maximum). If the parameters are complex or lengthy, then parameters should be passed to the service in the body of the request. The format of the request body is up to the developer; however, the body should be easy to parse in PL/SQL, e.g., JSON formatted requests are easy to parse. If the request includes a body, then the request method must be POST or PUT. GET methods ignore the request body.
GET Services
In order to implement the example below, you will need:
-
Access to the APEX UI.
-
The hello_world service described above.
-
Access to POSTMAN. The discussion below assumes familiarity POSTMAN.
-
The ORDS OAUTH credentials created in Obtaining ORDS Service Credentials.
GET services are particularly easy to implement in the APEX UI. The service source is the query. Complicated queries should be implemented, when possible, as views to keep the service source simple. Views are more easily tested. Bear in mind, the service source is not compiled until the service is invoked. In other words, the first indication of a compilation error is the error message in the service response.
The hello_world service was configured as a collection query that anticipates returning multiple rows. The result is also paged, meaning links to next and previous pages are supplied in the response. The response is also formatted as a JSON object. For additional details refer to the ORDS Developers Guide.
Before proceeding:
-
Review the response to the invocation of the hello_world and make sure that you understand each element of the response.
-
Change the result type to a collection query item and invoke the service. Make sure you understand each element of the collection query item response.
-
Lastly, navigate in your browser to the ORDS Developers Guide. Take the time to review familiarize yourself with its contents.
POST Services
In order to implement the example below, you will need:
-
Access to the APEX UI.
-
Access to POSTMAN. The discussion below assumes familiarity POSTMAN.
-
The ORDS OAUTH credentials created in Obtaining ORDS Service Credentials.
Sometimes it is necessary to use a POST service in a GET-like setting because the query string would be too complicated (bin64 encoding is an option, but will not be discussed here). POST services, however, are more complicated to implement. In this case, the method is POST and the source type is PL/SQL. The service source is a PL/SQL block. There is no paging. There is no automatic rendering of the response in JSON format. The body or payload is retrieved using the implicit bind variable :body_text. The format of the body is up to you. Bear in mind, whatever format you choose, you will have to parse or unpack it.
For example, the following service source:
declare
    payload varchar2(128) := :body_text;
    response varchar2(64);
    first_name varchar2(64);
    last_name varchar2(64);
begin
    first_name := json_value(payload, '$.first_name');
    last_name := json_value(payload, '$.last_name');
    select json_object('response' value '"hello '||
first_name || ' ' || last_name || '"' format json)
        into response
    from dual;
    htp.prn(response);
end;
Illustrates four important tasks:
-
Obtaining the service body or payload using :body_text. Note, :body_text can only be read once.
-
Unpacking the payload using json_value.
-
Building a JSON response.
-
Returning a response using htp.prn.
The service when given a payload of:
{"last_name":"smith", "first_name":"john"}Returns with a response of:
{"response":"hello john smith"}Before proceeding, create and test the POST service above using POSTMAN.
Long Responses
In some cases, the response from your service exceeds the capacity of varchar2. When this happens, replace the varchar2 response with a clob. The procedure, HTP.PRN procedure used above will not, however, work with a clob. For http printing clobs, I created the HTP_PRN_CLOB procedure below.
create or replace PROCEDURE HTP_PRN_CLOB(PCLOB IN OUT NOCOPY CLOB)
IS
    V_TEMP VARCHAR2(4000);
    V_CLOB CLOB := PCLOB;
    V_AMOUNT NUMBER := 3999;
    V_OFFSET NUMBER := 1;
    V_LENGTH NUMBER := DBMS_LOB.GETLENGTH(PCLOB);
    V_RESULT CLOB;
BEGIN

    WHILE V_LENGTH >= V_OFFSET LOOP
        V_TEMP:= DBMS_LOB.SUBSTR(V_CLOB, V_AMOUNT, V_OFFSET);
        HTP.PRN(V_TEMP);
        V_OFFSET := V_OFFSET + LENGTH(V_TEMP);
    END LOOP;
END;
Using RDS to Build a Data Consuming Service
In order to implement the example below, you will need:
-
Access to the APEX UI.
-
Access to POSTMAN. The discussion below assumes familiarity POSTMAN.
-
The ORDS OAUTH credentials created in Obtaining ORDS Service Credentials.
A data consuming service updates an existing a custom RDS table, emphasis on custom. All the replicated views and tables in RDS are read-only. If you want to add data to RDS, you will need to create a table for it. The semantics of http methods strongly encourages you to use the POST, PUT, and DELETE methods modification, specifically, it discourages creating GET handlers that have side effects. From the service implementation perspective, a data consuming service is no different than the POST service described in POST Services. The difference is that the service source unpacks the payload (or query string parameters) and then inserts a new record or updates an existing record based on the results of that unpacking.
For example, the following service source inserts a row into a table name hello_world_names. This table has two columns, last_name and first_name. The first name is part of the URL and the last name is found in the body of the post method.
declare
    payload varchar2(128) := :body_text;
    response varchar2(64);
    first_name varchar2(64) := :name;
    last_name varchar2(64);
begin
    last_name := nvl(json_value(payload, '$.last_name'),
                   'no_last_name_given');
    insert into hello_world_names (last_name, first_name)
      values (last_name, first_name);
    htp.prn('{"status":"success"}');
end;
Before proceeding:
-
Create hello_world_names table in your RDS.
-
Add (create) a POST handler for your hello_world service described in POST Servicesto insert a row in the hello_world_names. Use the example source above.
-
Test your new POST handler using POSTMAN.
Exporting Data to Object Storage
In order to implement the example below, you will need:
-
Access to Oracle Cloud Console.
-
Access to the Object Storage Service.
-
Ability to list buckets and their objects.
-
Ability to create a PAR.
-
Access to the APEX UI.
-
Access to POSTMAN. The discussion below assumes familiarity POSTMAN.
-
The ORDS OAUTH credentials created in Obtaining ORDS Service Credentials.
There are two approaches to exporting data to object storage. The approaches only differ in the type for file URI used. The first approach uses a pre-authenticated request (PAR). The second uses a URI that requires authentication.
Exporting Data Using a PAR
Create a bucket level or prefix PAR using the process described in Section 4.3.4. An object level PAR will not work. The example code below demonstrates how a PAR can be used to export data from RDS.
Begin
   dbms_cloud.export_data(
     file_uri_list=> '<your-PAR-goes-here>',
     query => 'select 1 from dual',
     format => json_object('type' value 'csv')
   );
   htp.prn('{"status":"success"}');
end;
Before proceeding:
-
Create a bucket level PAR for an export test.
-
Execute the above code in APEX > SQL Commands
-
Verify an export was created by listing the objects in your bucket.
-
-
Implement an export POST service using the example code above and your PAR.
-
Test the service using POSTMAN.
-
Verify an export was created by listing the objects in your bucket.
-
Exporting Data with a Credential
In Obtaining Object Storage Credentials, you created credentials that can be used to import data from and export data to object storage. You will need those credentials to run the example described here. The first step to exporting data using an unauthenticated file URI is configure a credential for use in ADW. An example follows.
begin
  DBMS_CLOUD.CREATE_CREDENTIAL (
    credential_name =>'OCI_KEY_CRED',
    user_ocid => '<your-user-ocid>',
    tenancy_ocid=> '<your-tenancy-ocid>',
    private_key=> '<your-private-key>',
    fingerprint=> '<your-fingerprint>'
  );
end;
The export code for an unauthenticated file URI adds this credential to the calling parameters.
begin
   dbms_cloud.export_data(
    credential_name => '<your-credential>',
    file_uri_list=> '<your-URI-goes-here>',
    query => 'select 1 from dual',
    format => json_object('type' value 'csv')
   );
   htp.prn('{"status":"success"}');
end;
Before proceeding:
-
Configure your credential using the information you obtained in Obtaining Object Storage Credentials.
-
Execute the above code in APEX > SQL Commands.
-
Verify an export was created by listing the objects in your bucket.
-
-
Implement an export POST service using the example code above and your file URI. The format of the URI is described in Constructing an Object Storage Object URL.
-
Test the service using POSTMAN.
-
Verify an export was created by listing the objects in your bucket.
-
Importing Data from Object Storage
In order to implement the example below, you will need:
-
Access to Oracle Cloud Console.
-
Access to the Object Storage Service.
-
Ability to list buckets and their objects.
-
Ability to create a PAR.
-
Access to the APEX UI.
-
Access to POSTMAN. The discussion below assumes familiarity POSTMAN.
-
The ORDS OAUTH credentials created in section 4.3.2.
-
A table in which to import data.
As with exporting, there are two approaches to importing data from object storage. The approaches only differ in the type for file URI used. The first approach uses a pre-authenticated request (PAR). The second uses a URI that requires authentication.
Importing Data Using a PAR
Create a readable PAR (bucket level, prefix, or object level) using the process described in Obtaining a Pre-Authenticated Request (PAR) URL. The example code below demonstrates how a PAR can be used to export data from RDS. Note that you will need a table into which your data will be imported and the source file and the destination table will need to be compatible.
begin
dbms_cloud.copy_data(
        file_uri_list=> '<your-URI-goes-here>',
        table_name => <your-table-name>,
        format => json_object('type' value 'csv'));
end;
Before proceeding:
-
Create a PAR for an import test.
-
Execute the above code in APEX > SQL Commands
-
Verify an import was successful examining the data in your destination table.
-
-
Implement an import POST service using the example code above and your PAR.
-
Test the service using POSTMAN.
-
Verify an import was successful examining the data in your destination table.
-
Importing Data Using a Credential
In Obtaining Object Storage Credentials, you created credentials that can be used to import data from and export data to object storage. You will need those credentials to run the example described here. The first step to exporting data using an unauthenticated file URI is configure a credential for use in ADW. You should have done this in Exporting Data with a Credential. You can reuse that credential here. The import code for an unauthenticated file URI adds this credential to the calling parameters.
begin
  dbms_cloud.copy_data(    credential_name => '<your-credential>',
    file_uri_list=> '<your-URI-goes-here>',    table_name => <your-table-name>,    format => json_object('type' value 'csv'));
end;
Before proceeding:
-
Configure your credential using the information you obtained in Section 4.3.6
-
Execute the above code in APEX > SQL Commands
-
Verify an import was successful examining the data in your destination table.
-
-
Implement an import POST service using the example code above and your file URI. The format of the URI is described in Section 4.3.5.
-
Test the service using POSTMAN.
-
Verify an import was successful examining the data in your destination table.
-
Incremental Export
In order to implement the example below, you will need:
-
Access to the APEX UI.
A common use case is one where you want to incrementally export data from RDS. The challenge, of course, is keeping track of what you have exported and what is new. RDS makes keeping track of changes relatively simple. All replicated views include a CSN_NBR. A CSN is a monotonically increasing identifier generated by Oracle GoldenGate that uniquely identifies a point in time when a transaction commits to the database. Its purpose is to ensure transactional consistency and data integrity as transactions are replicated from source to target. Bear in mind, the CSN_NBR for seeded data, i.e., data loaded using data pump, will be null. For example, the following will yield item and csn_nbr for RDS_WV_ITEM_MASTER:
select item, csn_nbr from rds_wv_item_masterWhen incrementally exporting data, there are two cases, the first export and subsequent exports. In the first export, you will obtain the current max CSN_NBR from your fastest changing table:
select max(csn_nbr) from <your-fastest-changing-table>Call this current CSN max X1. Next you export all rows from the tables of interest using the where clause:
csn_nbr is NULL or csn_nbr <= X1This where clause will include all seeded data and any data that was present prior to the start of the export operation. Specifically, it will exclude any replicated data that arrives after the export starts. You remember X1 and use it in the next export operation. X1 becomes the last seen max CSN.
In subsequent exports, I compute a new CSN that becomes X2. I then export data from all the tables of interest using a where clause like:
csn_nbr > X1 and csn_nbr <= X2.Use the upper and lower bounds so you do not have to export the same data twice and new data might be arriving while you export.
Before proceeding:
-
Query the CSN_NBR field for a table of interest.
-
Build an export script use various CSN based where clauses and DBMS_CLOUD.export_data.
Jobs
An asynchronous approach is generally called for when the likely wait time for process completion is high. A data export to object storage is generally a good candidate for an asynchronous start. In the simplest case, one needs to implement three data services: job start, job stop, and job status. The DBMS_SCHEDULER package provides the functionality one would need for these services. There is, of course, the option to schedule an export job to repeat and obviate the need to create a job start service. One could still use a job start service to invoke an unscheduled export.
One uses the DBMS_SCHEDULER.create_job procedure to create a job that can be started asynchronously. A typical approach would be to use create job to wrap a procedure. The create job invokes the procedure immediately (by setting the start_date to SYSTIMESTAMP) upon creation and is dropped automatically upon completion. The service would return a unique job name or execution id to be used to stop and monitor the job.
Another service is used to monitor the job status using the returned execution id. The monitoring service would be used to poll the status of the job. The job status is obtained by executing a query on the DBMS_SCHEDULER.user_scheduler_job_run_details. A complete reference implementation of an asynchronous job start and monitoring framework is available on My Oracle Support. To view the reference implementation:
-
Login to my oracle support.
-
Search for Oracle Retail Data Store Documentation Library
-
Navigate to Sample Code
-
Click on the link Sample Code
Retail Home Integrations
A Retail Home integration is an example of outbound integration with a user interface or portal. Retail Home Metric tiles without charts are quite simple to implement. For example, the following data service source (with a source type of collection query) will populate the 2 Metric Tile below:
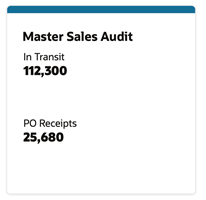
select
   'PO Receipts' as NAME, 25680 as VALUE,
   'N' as   "VALUE_FORMAT" from dual
union
select
   'In Transit' as name, 112300 as value,
   'N' as "VALUE_FORMAT" from dual
This data service response is:
{"items":[
      {"name":"In Transit","value":112300,"value_format":"N"},
      {"name":"PO Receipts","value":25680,"value_format":"N"}
   ],
   "hasMore":false,
   "limit":25,
   "offset":0
   "count":2,
   "links":[...]
}
Producing a 4 Metric Summary, however, is more complicated and requires one use a source type of PL/SQL (the following code only provide values for two of four metrics).

declare
    response varchar2(4000);
begin
    SELECT json_object (
        'items' value
            json_array(
                json_object ('name' value 'Metric 1',
                   'value' value 0.5,
                   'valueFormat' value 'PC'),
                json_object ('name' value 'Metric 2',
                   'value' value 0.25,
                   'valueFormat' value 'PC')
            ),
        'chart' value
            json_object ('type' value 'bar',
                'items' value
                   json_array(json_object('name' value 'FEB',
                                          'value' value 2300),
                              json_object('name' value 'MAR',
                                          'value' value 3100),
                              json_object('name' value 'APR',
                                               'value' value 2900)
                            ),
                         'valueFormat' value 'S',
                         'seriesName' value 'Sales',
                         'valueLabel' value 'Amount'
                        )
        )
    into response FROM DUAL;
    htp.print(response);
end;
Filters, if used, become query string parameters and values in the URL. The query string parameters manifest in the source as bind variables.
Monitoring Resource Consumption in RDS
Although ADW is self-tuning, it cannot ensure that one's business priorities and resource consumption are well aligned. For example, the resource consumption of a new, as yet to be tuned, report may adversely impact higher priority tasks. By monitoring the consumption and performance of RDS, one is able to pinpoint which tasks could benefit from additional attention. In some cases, however, even well tuned tasks are long running and resource intensive. If these tasks are of lower priority, the user would like to run them at a lower priority. Ultimately, monitoring allows the user to both effectively employ compute services and determine if resource consumption matches business priorities. Control, on the other hand, gives the user a means to align resource consumption with priorities. Exerting control will be the subject of another chapter whereas this chapter will focus on monitoring using AWR reports.
AWR reports are used to monitor activity in ADW. This section will discuss how to obtain AWR reports, but it will not discuss how to interpret those reports. Given that each customer's monitoring needs differ, there is no ready to use AWR report access built into RDS. In other words, an AWR report is obtained via a customer implemented data service.
There are two steps to creating an AWR report, obtaining snap ids and generating the report using the appropriate pair of snap ids. Sample code for obtaining snap ids is shown in Listing 1. The code is used as the source for a ORDS GET handler. It illustrates the use of two bind variables. The first is part of the URI template, the begin_interval_time. The second optional query string parameter is the end interval time. The times are given as dates for simplicity, but snap ids are based on timestamps. If the query parameter is not given, the value is null.
Note that a procedure, HTP_PRN_CLOB, is used to output the response. HTP.print, which is ultimately used to output the response, only handles varchar2 args. Varchar2 strings have a maximum size of 4000 characters, which is often insufficient. Hence, the output of the query is put into a CLOB. The CLOB is then output using HTP_PRN_CLOB, which is shown in Listing 2.
The second step is generating the report. I hard code the snap ids for simplicity. Using the code in Listing 3 as the source of a GET handler and the URL of the data service, a browser will render the report. It would not be difficult to add additional bind variables to allow one to create a narrower snap id interval and combine the snap id query and the report generation.
LISTING 1: OBTAINING SNAP IDS
DECLARE
    from_begin_interval_time date := to_date(:from, 'YY-MM-DD');
    to_end_interval_time date := null;
    db_id NUMBER;
    inst_id NUMBER;
    response clob;
BEGIN
   dbms_output.enable(1000000);
   if :to is not null then to_end_interval_time := to_date(:to, 'YY-MM-DD') + 1;
   end if;
   SELECT dbid INTO db_id FROM v$database;
   SELECT instance_number INTO inst_id FROM v$instance;

   SELECT json_arrayagg(
                json_object(
                    'snap_id' value snap_id,
                    'begin_interval_time' value begin_interval_time,
                    'end_interval_time' value end_interval_time
                    returning clob format json)
                returning clob) into response
              FROM   dba_hist_snapshot
              WHERE  dbid = db_id
              AND    instance_number = inst_id
              and    begin_interval_time >= from_begin_interval_time
              and    (to_end_interval_time is null or
                      to_end_interval_time >= end_interval_time)
              ORDER BY snap_id DESC;
    HTP PRN CLOB(response);
END;
LISTING 3: GENERATING THE AWR REPORT
DECLARE
    db_id NUMBER;
    inst_id NUMBER;
    start_id NUMBER;
    end_id NUMBER;
    response clob := null;
BEGIN
   dbms_output.enable(1000000);
   SELECT dbid INTO db_id FROM v$database;
   SELECT instance_number INTO inst_id FROM v$instance;
   start_id := 12133;
   end_id := 12134;

   FOR v_awr IN
     (SELECT output FROM
TABLE(DBMS_WORKLOAD_REPOSITORY.AWR_REPORT_HTML(db_id,inst_id,start_id,end_id)))
     LOOP
     response := response || v_awr.output;
   END LOOP;
   HTP PRN CLOB(response);
END;
Invoking External Services
External services can be invoked using the APEX_WEB_SERVICE package. The UTL_HTTP is not supported. Specifically, the use of the UTL_HTTP requires white listing using the access control list (ACL). The privileges to modify the ACL are not available in any of the product schema.
Notification-Based Monitoring
POM can be used in combination with the data in RDS to establish automated process monitoring. A POM batch job can be setup to call a RDS data service to generate and send the Alert to the associated application such as Merchandising.
This document describes the steps needed to setup such an automated process. These steps are:
-
Setup a notification type in Retail Home
-
Implement a RESTful service in RDS
-
Setup a job in POM to invoke that service
RDS-POM integration will be illustrated for an alert that returns the counts of stock counts that are open for more than seven days.
Setting up the Notification Type
Typically, an alert/notification results from the monitoring activity. As a first step, a notification type associated with this monitoring activity needs to exist or be setup in Retail Home. Refer to Retail Home documentation for details on how to create a notification type. For the example at hand the notification type is MerchStockCountAlert and is setup for the MFCS application.
Implementing a RESTful Service in RDS
The first step is to create the data service boiler plate, which consists of the following:
-
creating a module
-
creating a URI template, and lastly
-
creating a POST handler
The steps below describe the implementation of an open stock count RESTful service suitable for integration with POM.
The alert service must conform to the POM specification. There are two relevant specifications. The first concerns the format of the JSON body in the POST, which is shown in the following table. The alert service need not use any of the details in the body of the POST message.
|
Endpoint to start a job. Method: POST Body: |
| Attribute | Description |
|---|---|
|
cycleName |
Name of the Cycle - Nightly, Hourly_1, Adhoc etc. |
|
flowName |
Name of the Flow. |
|
processName |
POM process name |
|
jobName |
POM job name |
|
agentExecutionId |
A unique ID assigned by POM for every job run (Re-run of a failed job would have a different id compared to the initial run) |
|
parameters |
Job Parameters (Pipe delimited key-value pairs -- hey1=value1||key2=value2) |
The second specification concerns the response returned. If the notification object is not null, the content will be sent as a notification by POM.
| Attribute | Description |
|---|---|
|
executionId |
Unique Id returned by the target app to POM for status tracking |
|
executionInfo |
Any additional info the target app would like to share with POM |
|
notification |
This is an optional entry that can contain the following attributes. The url, type, and severity fields are optional. "notification": { "info": "<message>", "url": null, "type": "ErrorNotification", “severity":1 } |
|
status |
Submitted/ Running/Error/Completed |
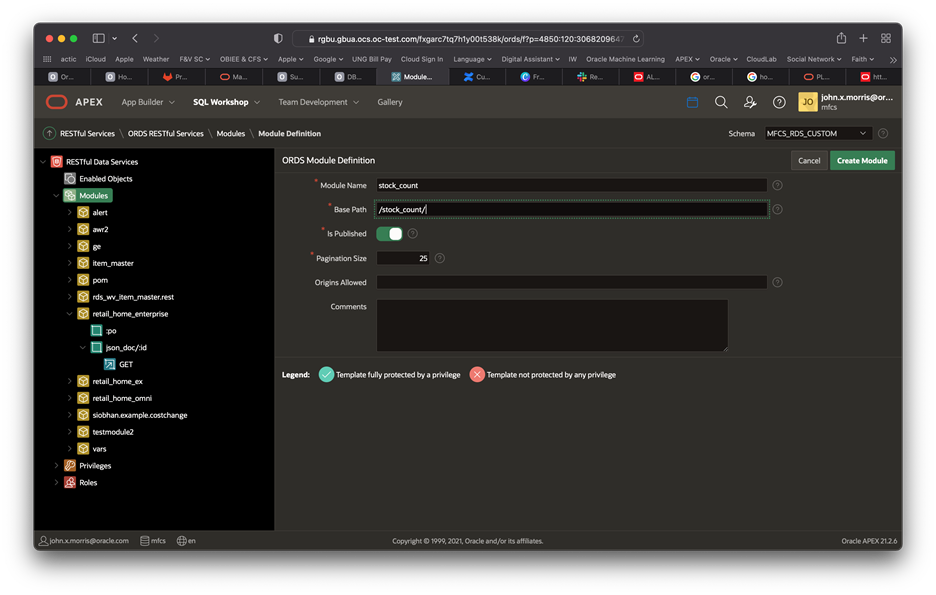
Create a Stock Count Module
The first step is to create a module. Module is a hierarchical organizing construct. The user may have multiple services associated with it or just one. The following screen shot illustrates what the create module screen looks like prior to creating the module. Note the module name is stock_count and the base path is /stock_count/.
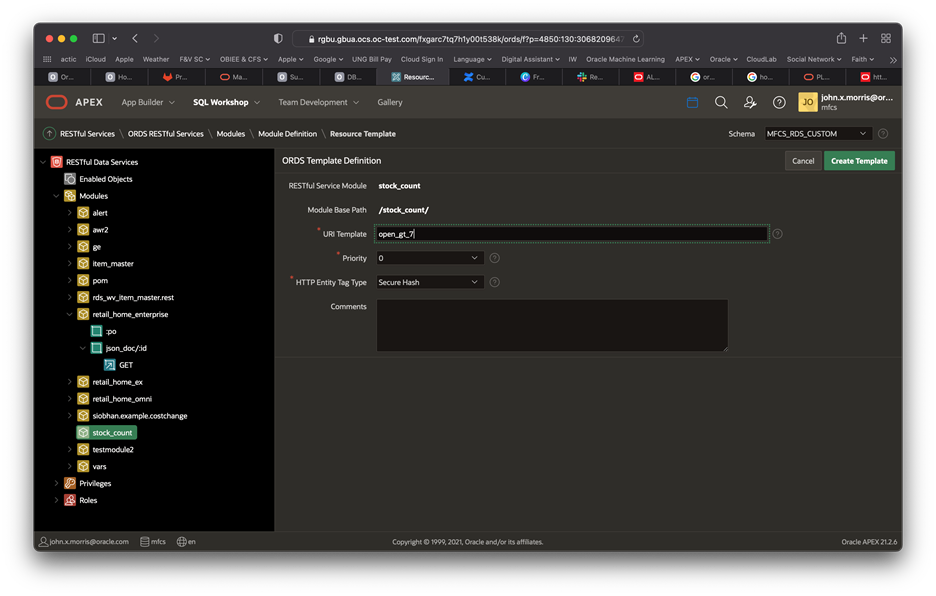
Create a URI Template
Once the module is created, create the URI template. Note the URI template is set to open_gt_7, i.e., stock counts open for more than seven days.
Create a POST Handler
The last step is to create a POST handler. Note the method is POST and the source type is PL/SQL.
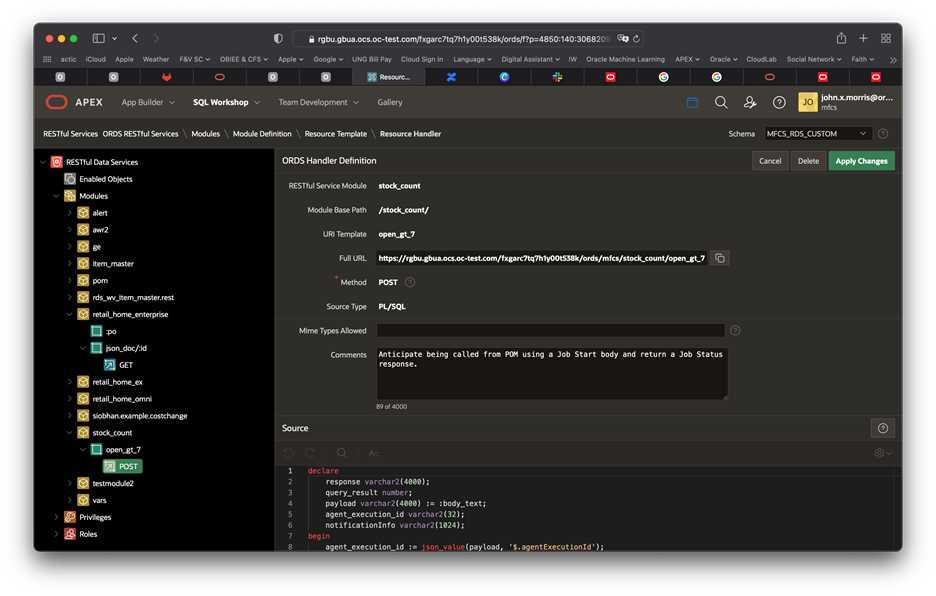
The source of the example alert service is in Listing 1. The body, a sample of which is shown in Listing 2, of the alert service invocation is accessed using the :body_text implicit parameter -- a bind variable. This variable can only be read once; so, retrieve it and store it in a variable. Unpacking the payload and crafting a response will be common tasks for most RESTful services. The example below illustrates some but not all that one might encounter. Bear in mind, the example below does not show any error handling. Experimentation and experience will determine what level of error handling is warranted. Listing 3 shows a response.
declare
    -- The :body_text bind variable is an implicit parameter.
    -- It can only be read once, so it is captured in a variable
    -- called payload.
    payload varchar2(4000) := :body_text;
    -- The result of the stock count query
    query_result number;
    -- Note that varchar2 is set to the maximum. If the response
    -- could exceed 4000 characters, a CLOB would be needed and
    -- one could not use htp.print directly.
    response varchar2(4000);
    -- The response will return the agentExecutionId in
    -- response as the executionId.
    agent_execution_id varchar2(32);
    -- The notification info destination.
    notificationInfo varchar2(1024);
begin
    -- Get the agent execution id from the payload (i.e., body text).
    agent_execution_id := json_value(payload, '$.agentExecutionId');
    -- Get a count of stock counts that have been open for more than
    -- 7 days and put it in query result.
    SELECT count(1)
        into query_result
        FROM rds_wv_stake_prod_loc spl,
            rds_wv_stake_head s
        WHERE s.stocktake_date BETWEEN sysdate - 7 AND sysdate
        AND s.delete_ind = 'N'
        AND spl.cycle_count = s.cycle_count
        AND s.stocktake_type = 'B'
        AND spl.processed != 'S'
        AND spl.cycle_count = s.cycle_count;
    -- Craft notificationInfo as a human readable string.
    notificationInfo := 'Number of stock counts that have been ' ||
        'open for more than 7 days is ' || to_char(query_result) || '.';
    -- Craft the required JSON response. There is no executionInfo.
    select json_object('status' value 'success',
            'executionInfo' value '',
            'executionId' value agent_execution_id,
            'notificationInfo' value notificationInfo) into response from dual;
    -- Output the response - note htp.print is used here. htp.print
    -- only supports varchar2 so another approach would be needed
    -- if the response is likely to exceed 4000 characters. This could
    -- if error handling (not shown) were to return a stack trace.
    htp.print(response);
end;
Listing 1: An Alert service conforming to POM Requirements
A sample payload for the above job is:
{
   "cycleName": "cycle1",
   "flowName": "flow1",
   "processName": "process1",
   "jobName": "job1",
   "agentExecutionId": "agentExecutionId1234",
   "parameters": ""
}
Listing 2: A Sample Payload
The response of the above service, given the payload in Listing 2 is:
{
   "status":"success",
   "executionInfo":null,
   "executionId":"agentExecutionId1234",
   "notificationInfo":"Number of stock counts that have been open for more than 7 days is 0."
}
Listing 3: A Sample Response
Setting up the POM Job
The user now needs to setup an Adhoc batch job in POM which calls the RESTful service described above. Adding such a job is done through the spreadsheet as described in the next section. The user then uploads the spreadsheet to POM then schedules to run at the desired time.
When the job executes, it will invoke the RESTful service which will return a response with notification content. POM will then send a notification to the associated application based on the designated notification type. The notification will contain the notification content returned from the RESTful service.
Adding the Adhoc Job in Batch Schedule Spreadsheet
Entries as shown below as an example need to be added in the specified tabs of the batch schedule spreadsheet for every Adhoc job created for an alert.
Figure 4-1 Process Tab
-
ProcessName – Add a unique process name in upper case with no spaces. Use an underscore if needed. It should end with XXX_PROCESS.
-
Description – Short description of the process without any special characters.
-
Application Name – Mention the application name where the batch process belongs to. E.g., MFCS
-
DependencyType – This needs to be set to ‘Time’.
-
AdhocInd – It will be ‘Y’ as we are creating an adhoc job here.
Figure 4-2 Job Tab
-
JobName – Unique job name for each alert in upper case only with no spaces. Use an underscore if needed. It should end with XXX_JOB.
-
Description – Short description of the job without any special characters.
-
RmsBatch, ScriptFolder and RmsWrapper – Irrelevant for alerts and can be left empty.
-
ParameterValue – This holds the two parameters needed to identify the notification type and the RDS endpoint. For the example at hand, these are:
-
notificationType: This is the notification type setup in Retail Home as described in the Setting Up a Notification Type section at the top of this document: MerchStockCountAlert.
-
restPath : This points to the endpoint defined above: mfcs/stock_count/open_gt_7.
-
-
These need to be separated by a double pipe as depicted in the Job tab screen shot above.
-
ApplicationName – Mention the same application name entered in Process tab. Here, it’s RMS.
-
Modules – Job can be associated with a module of the application.
-
JobType – The job type associated with RDS alerts is RDSAlert.
Figure 4-3 ProcessJobMapping
-
To map the new process and jobs (it’s one-to-one for adhoc jobs), enter the created ProcessName, JobName and the day(s) of the week on which the specific Process/Job needs to be run. If the Job will run on daily basis, leave ‘DaysOfTheWeek’ column blank.
Figure 4-4 Schedule
Ensure that the ‘Version’ is updated to a version greater than the ‘Current Version’ in POM Application. In this example, the version should be changed on the spreadsheet to 22.1.302.2.1 or 22.1.302.3.
Uploading the Batch Schedule Spreadsheet in POM
-
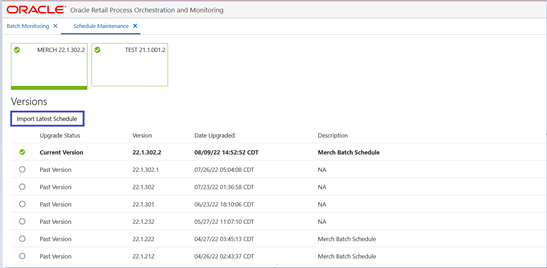
Login to POM UI and navigate to Tasks -> Schedule Maintenance.
-
Select the Application Scheduler tile and click ‘Import Latest Schedule’ button.
-
Upload the spreadsheet containing the new Adhoc job for alert.
Figure 4-5 Upload Batch Schedule
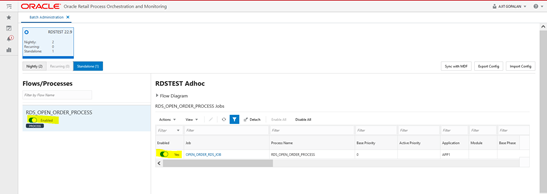
Enable the Newly Added Process/Job
Note that any new job introduced through the spreadsheet will be added in the disabled state. Enable it using the Batch Administration screen.
Figure 4-6 Batch Administration Screen
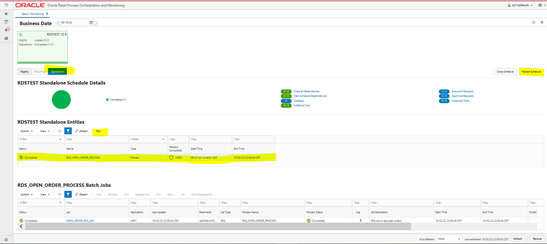
Starting/Restarting the Scheduler Day
You will need to start a new scheduler day or restart the existing scheduler day on the Batch Monitoring screen for the new changes to take effect in the next batch run. See the Batch Monitoring screen shot below.
You can now run the Alert job in POM in one of two ways:
-
Direct run through the Batch Monitoring screen or
-
Schedule it to run using the POM Scheduler Administration screen.
Direct Run
On the Batch Monitoring screen, select the Standalone tab below the tile area. Then select the previously added RDS Alert process in the Standalone Entities table and click on the run action button above the table.
Figure 4-7 Batch Monitoring
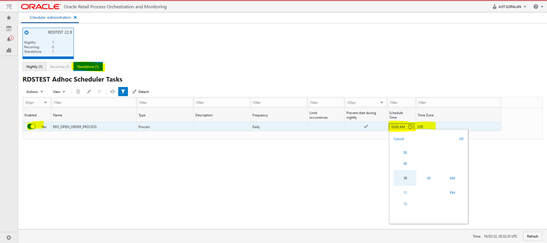
Schedule through the Scheduler Administration Screen
You can use the POM Scheduler Administration screen to schedule the newly added job to run as frequently as needed.
Figure 4-8 Scheduler Administration
In Context Launch of an APEX App
In context launch of an APEX App entails navigating to an APEX App from within a product application using a URL. Once you have deployed your application, loaded the data, and created users, you can publish your production URL. You can determine the production URL for your application by either:
-
Selecting the application on the Application home page and right clicking the Run button. Then, select Copy link address or Copy link location depending on your browser.
-
Running the application and then copying the URL.
Invoking an APEX app with one or more query parameters requires that the APEX App Session State Protection and Application Items be appropriately configured.
-
In your APEX App navigate to Shared Components > Security > Session State Protection. Navigate to the Set Page and Item Protection page of your published launch page, for example, your App Home page. Next, set page access restriction to Unrestricted. Always treat query parameter input as untrusted and sanitize it.
-
Next navigate to Shared Components > Application Logic > Application Items. Create an application item of the same name as your query parameter.
See Oracle APEX for additional details on URL syntax and managing session state.
Launching APEX Apps from Retail Home
It is quite simple to configure Retail Home to facilitate the launch of an APEX application.
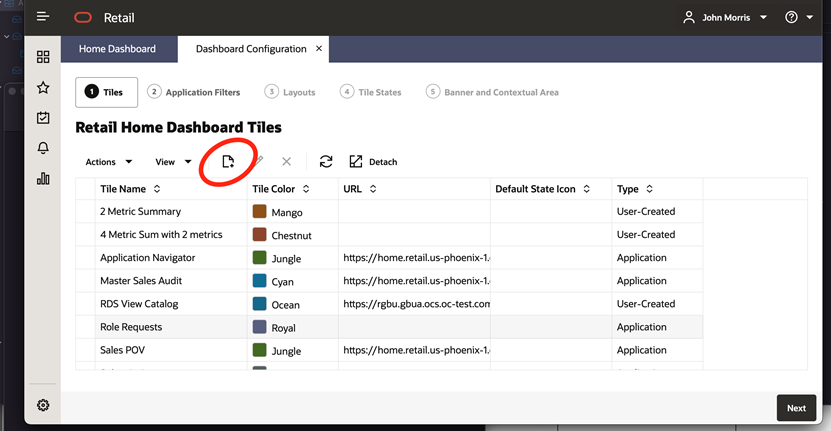
-
Navigate to the Dashboard Configuration tab and tap the Create button.
Figure 4-9 Dashboard Configuration Tab
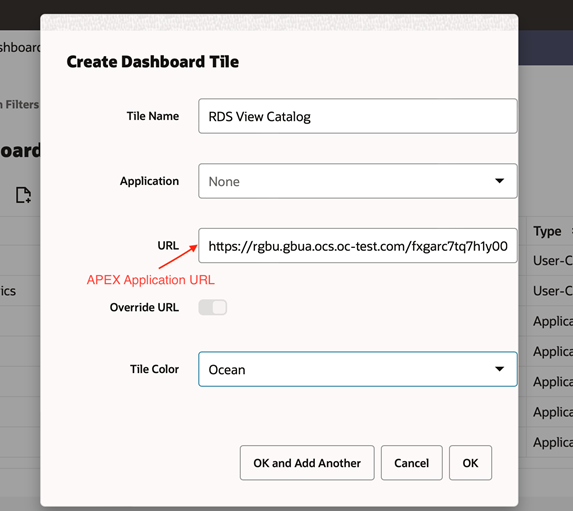
-
Fill in the Create Dashboard Tile Dialog. Note there is a field for specifying a URL for you new dashboard tile.
Figure 4-10 Create Dashboard Tile
Retail DB Ops Console
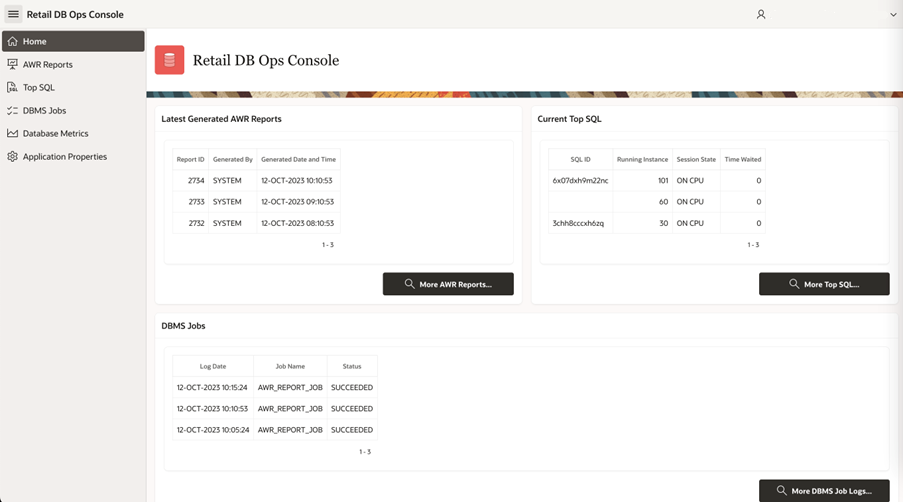
The Retail DB Ops Console provides customers access to tools such as AWR Reports, Top SQL, etc that helps in database performance troubleshooting.
Home
The Retail DB Ops Console can be accessed from Retail Home’s Application Navigator. The home page can be accessed by a ‘Viewer’ having RDS_MANAGEMENT_VIEWER or RDS_MANAGEMENT_VIEWER_PREPROD roles.
The Home page gives a quick view of recent data for the following:
-
Latest Generated AWR Reports.
-
Current Top SQL
-
DBMS Jobs
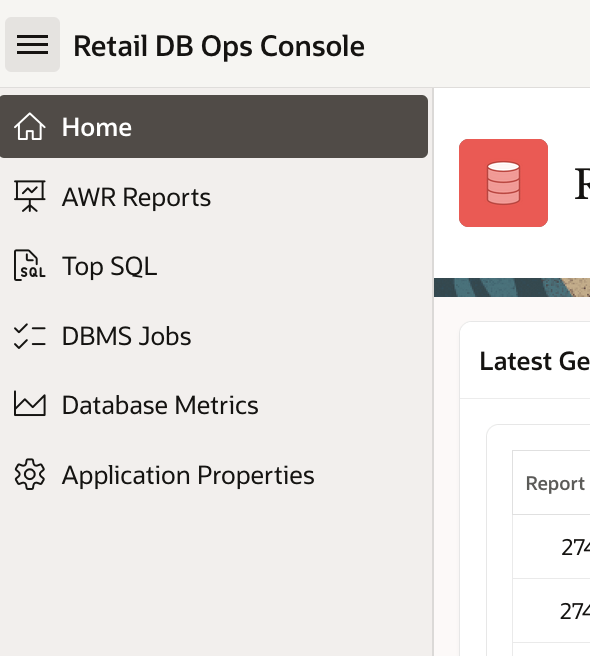
Figure 4-11 DB Ops Console
All features can be accessed from the left panel.
Figure 4-12 DB Ops Console Menu
AWR Reports
The AWR stands for Automated Workload Repository Report and provides a set of tables into which snapshots of system statistics are stored. Generally, these snapshots are taken on an hourly basis and include wait interface statistics, top SQL, memory, and I/O information that is cumulative in nature up to the time of the capture.
The AWR report process takes the cumulative data from two snapshots and subtracts the earlier snapshot’s cumulative data from the later snapshot and then generates a delta report showing the statistics and information relevant for the time period requested.
Search Generated AWR Reports
Search Generated AWR Reports screen can be accessed by a ‘Viewer’ having RDS_MANAGEMENT_VIEWER or RDS_MANAGEMENT_VIEWER_PREPROD roles and shows a list of generated reports and also allows the user to filter the reports based on the following:
-
Snap ID – The unique key of a snapshot
-
Generated By – System or User
-
Interval by Date and Hour
Figure 4-13 AWR Reports
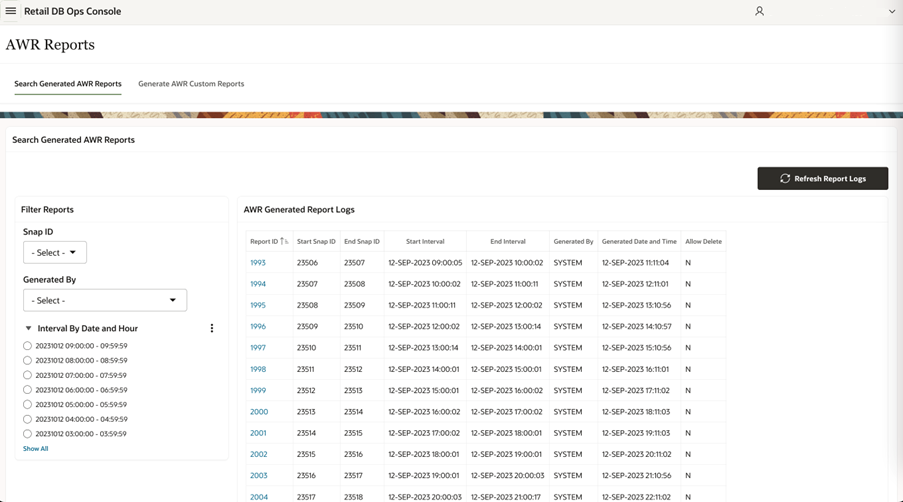
The list of generated report logs are listed in the “AWR Generated Report Logs” table that contains the following information for every Report ID. The ‘Refresh Report Logs’ button can be used to refresh the table to display the newly generated reports.
-
Report ID: Unique ID of the generated report.
-
Start Snap ID: Snap ID of the start snapshot in that time interval.
-
End Snap ID: Snap ID of the end snapshot in that time interval.
-
Start Interval: Start timestamp of the snapshot interval.
-
End Interval: End timestamp of the snapshot interval.
-
Generated By: If generated automatically by the system, then SYSTEM is populated. If generated manually by any user, then that user’s ID is populated.
-
Generated Date and Time: Timestamp of the report generation.
-
Allow Delete: Indicator that mentions if the report can be deleted or not.
AWR Report Viewer
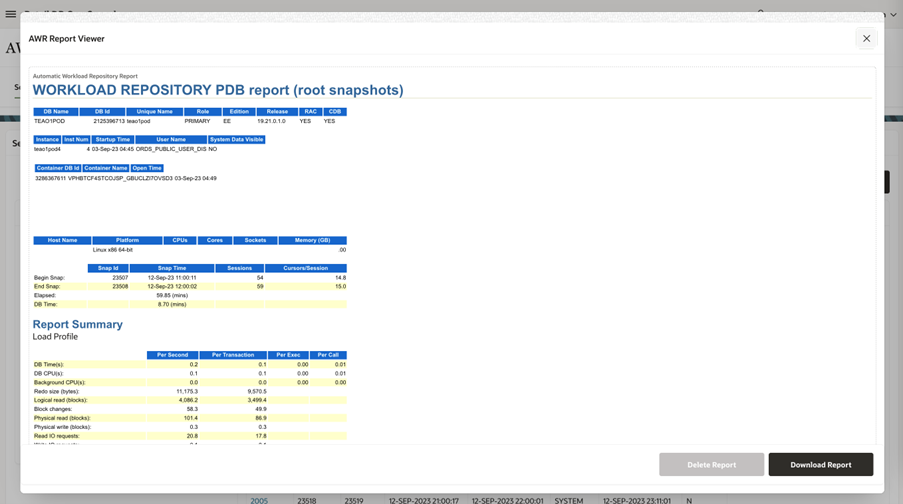
When clicking on the Report ID, a detailed AWR Report is displayed. The report can be downloaded or deleted from this window.
Figure 4-14 AWR Report Viewer
Top SQL
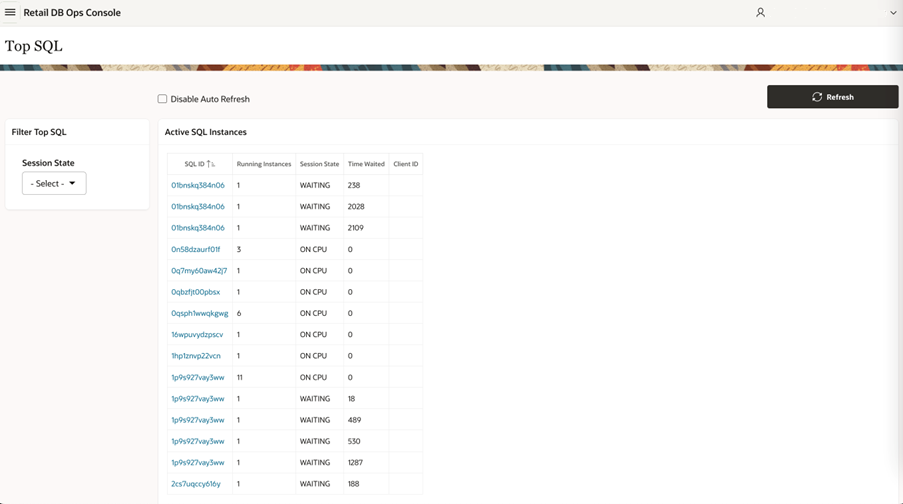
Top SQL screen displays a list of active SQL instances and their details that the snap process collects from SQL statements. The instances also can be filtered based on the Session States – ON CPU and WAITING. This page can be accessed by a ‘Viewer’ having RDS_MANAGEMENT_VIEWER or RDS_MANAGEMENT_VIEWER_PREPROD roles.
Figure 4-16 Top SQL
Clicking on the SQL ID link opens up a window with more details on the SQL Instance.
Figure 4-17 SQL Instance Viewer
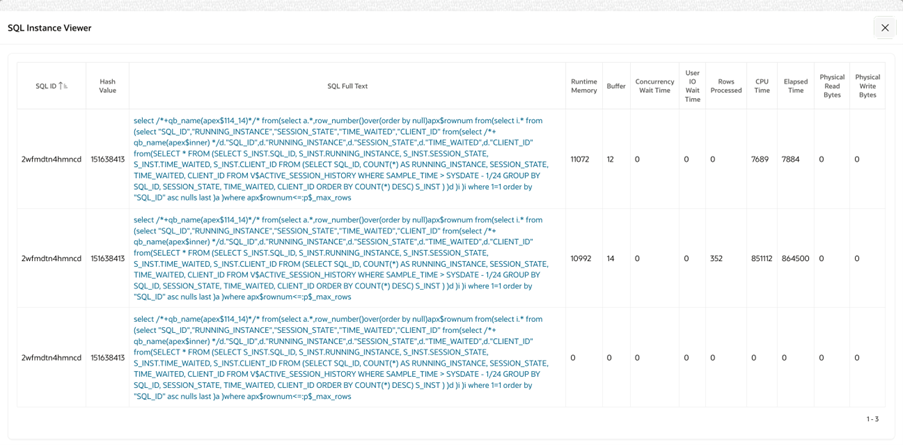
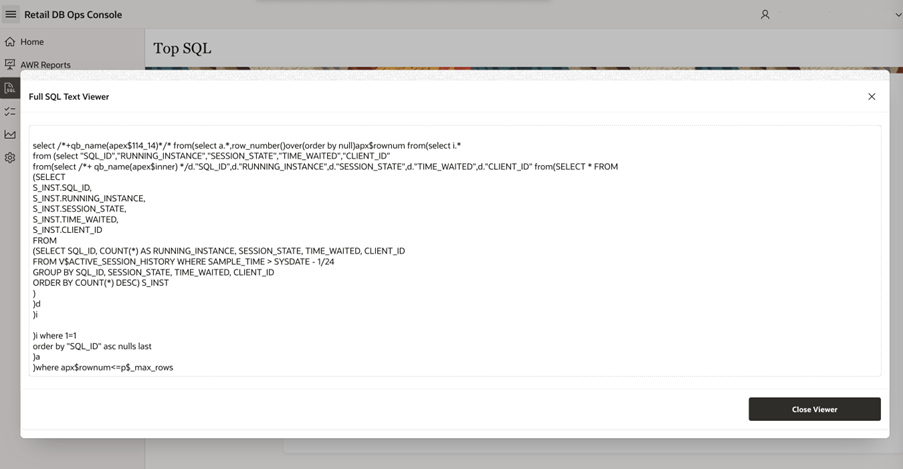
Clicking on the SQL Full Text link shows the complete SQL statement.
Figure 4-18 SQL Text Viewer
DBMS Jobs
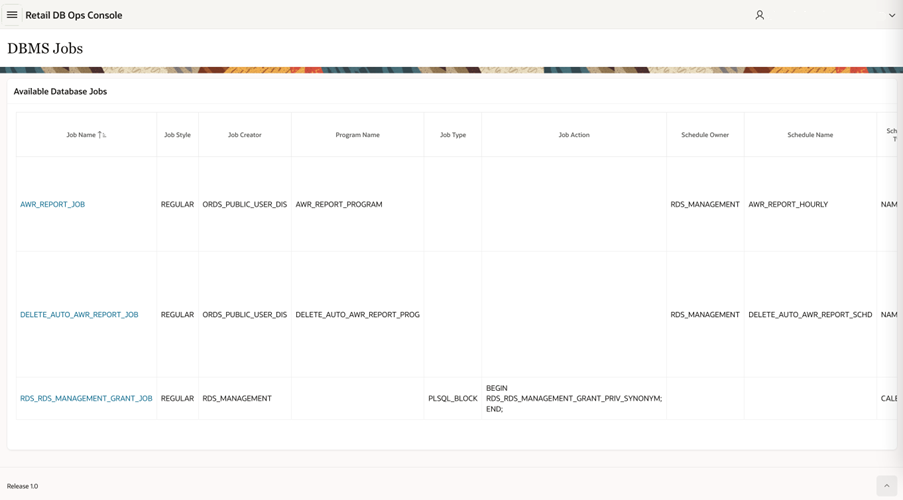
The DBMS Jobs table lists the available DB jobs and their details. This page can be accessed by a ‘Viewer’ having RDS_MANAGEMENT_VIEWER or RDS_MANAGEMENT_VIEWER_PREPROD roles.
Figure 4-19 DBMS Jobs
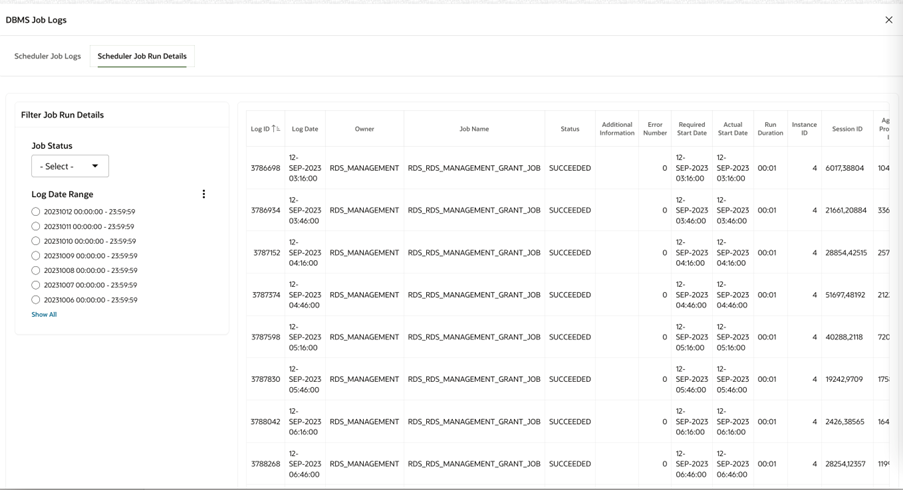
Clicking on the Job Name opens a window with detailed job log and job run details. For example, the job log and job run details for ‘RDS_RDS_MANAGEMENT_GRANT_JOB’ is as shown below.
Figure 4-20 DBMS Scheduler Job Logs
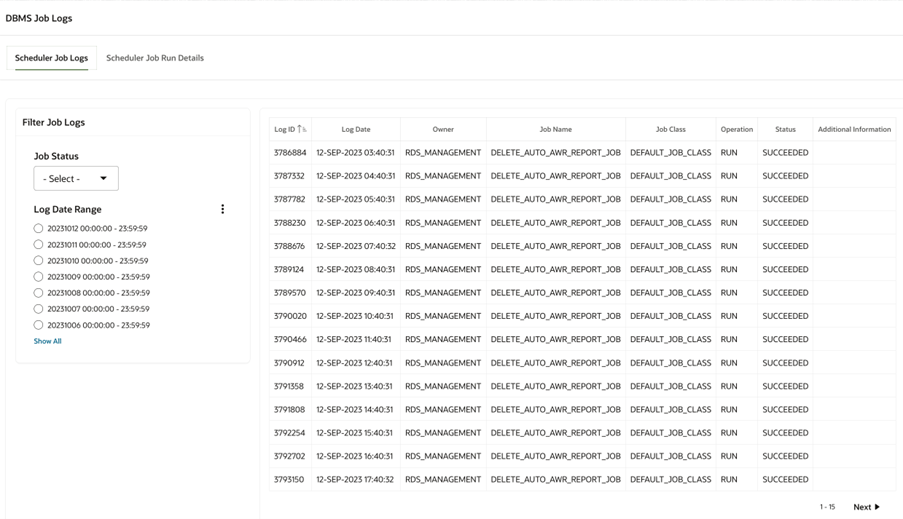
Figure 4-21 DBMS Scheduler Job Run Details
Database Metrics
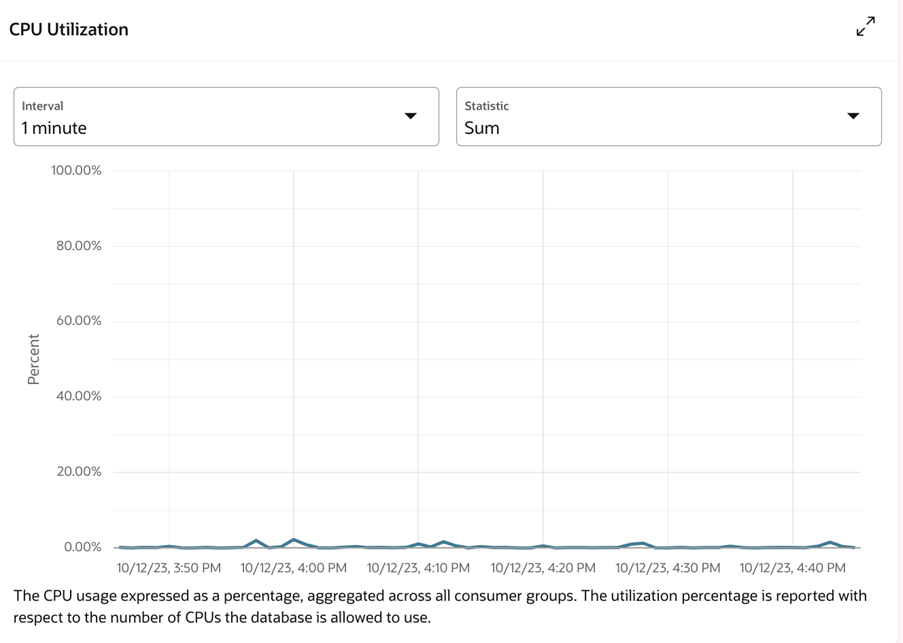
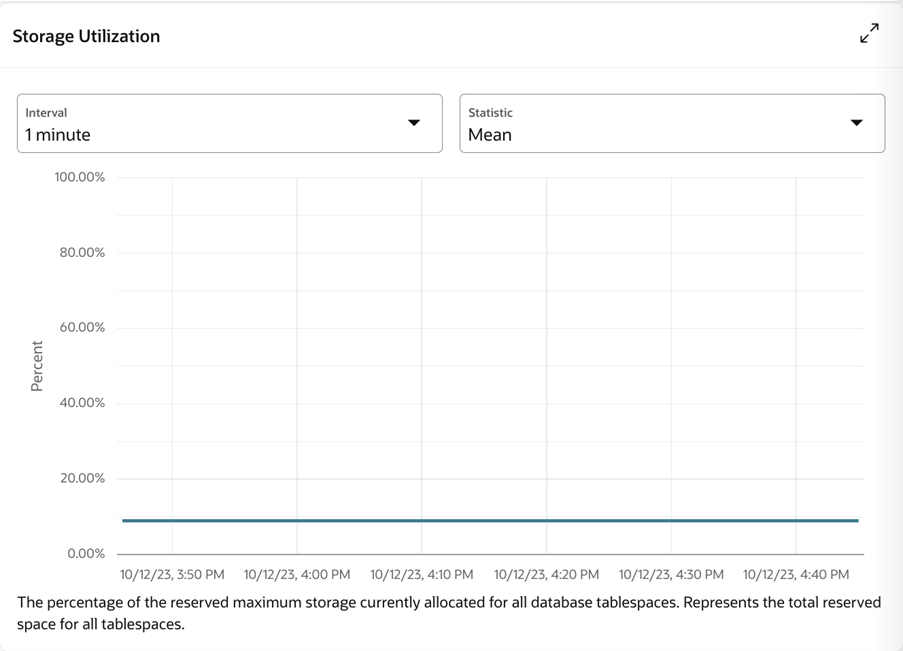
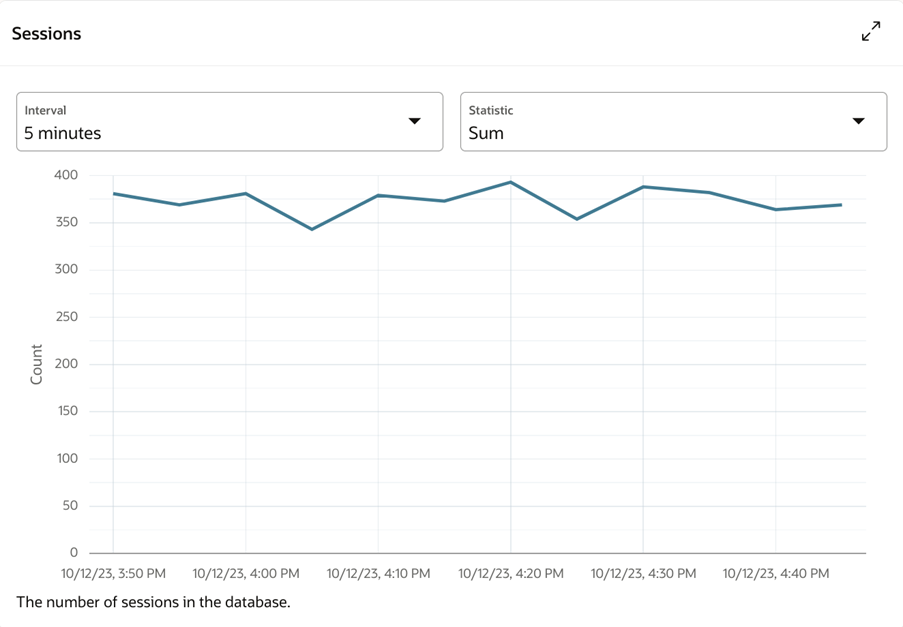
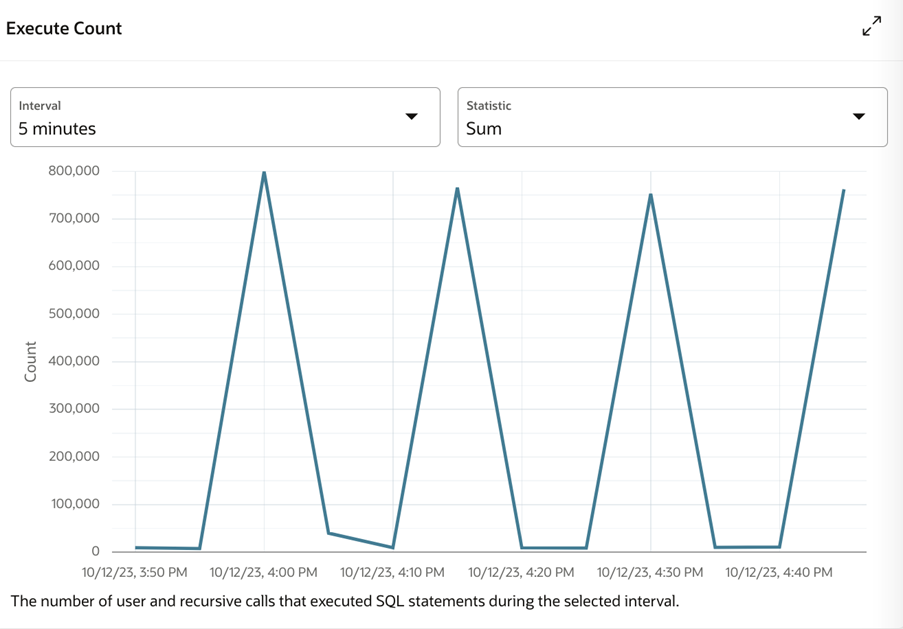
Database Metrics shows the following graphical metrics for this environment’s Oracle APEX and database performance. This page can be accessed by an ‘Administrator’ having RDS_MANAGEMENT_ADMINISTRATOR or RDS_MANAGEMENT_ADMINISTRATOR_PREPROD roles.
CPU Utilization
Figure 4-22 CPU Utilization
Storage Utilization
Figure 4-23 Storage Utilization
Sessions
Figure 4-24 Sessions
Execute Count
Figure 4-25 Execute Count
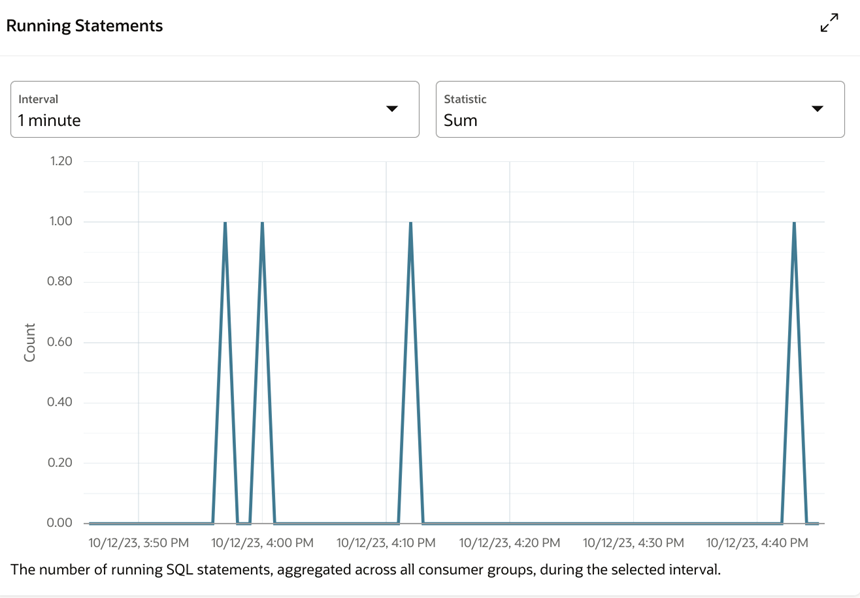
Running Statements
Figure 4-26 Running Statements
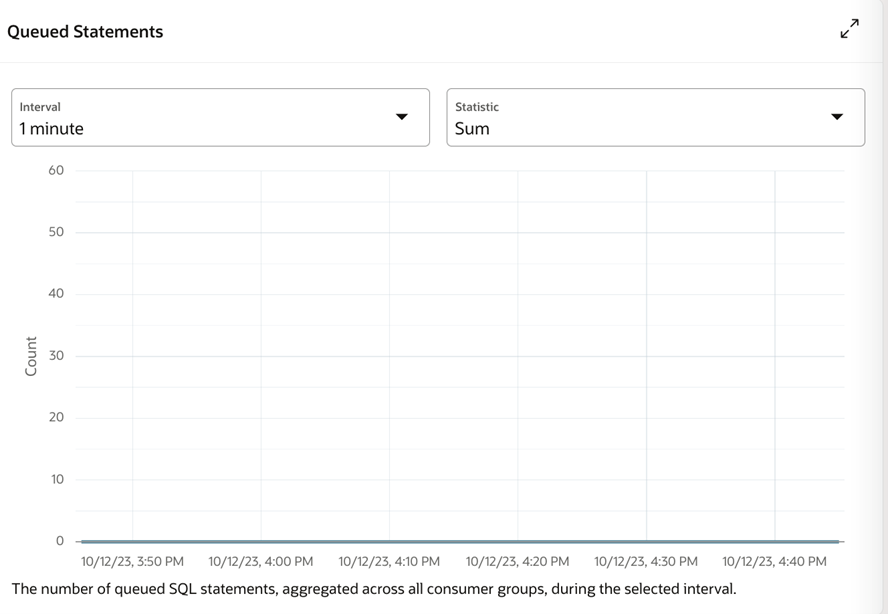
Queued Statements
Figure 4-27 Queued Statements
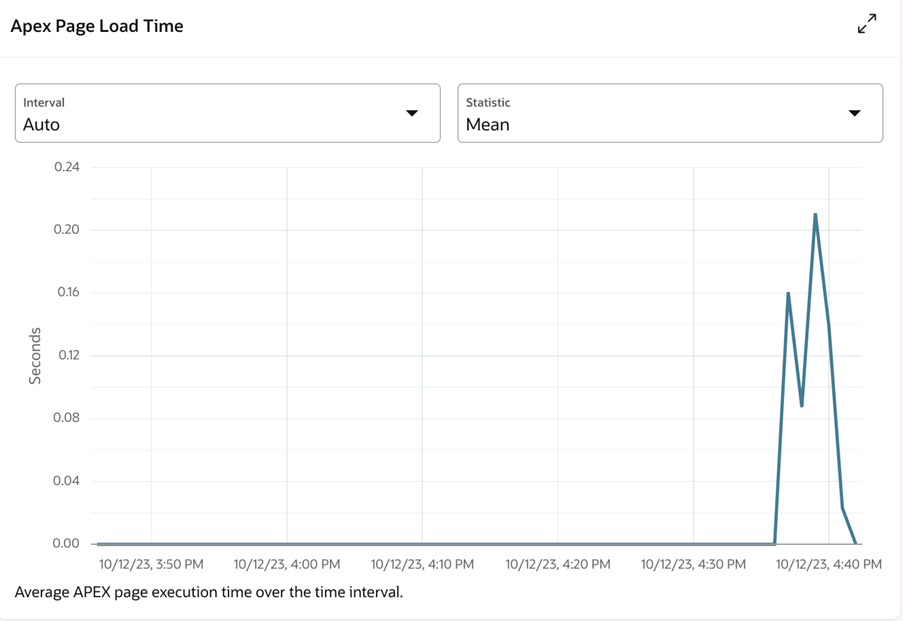
APEX Page Load Time
Figure 4-28 APEX Page Load Time
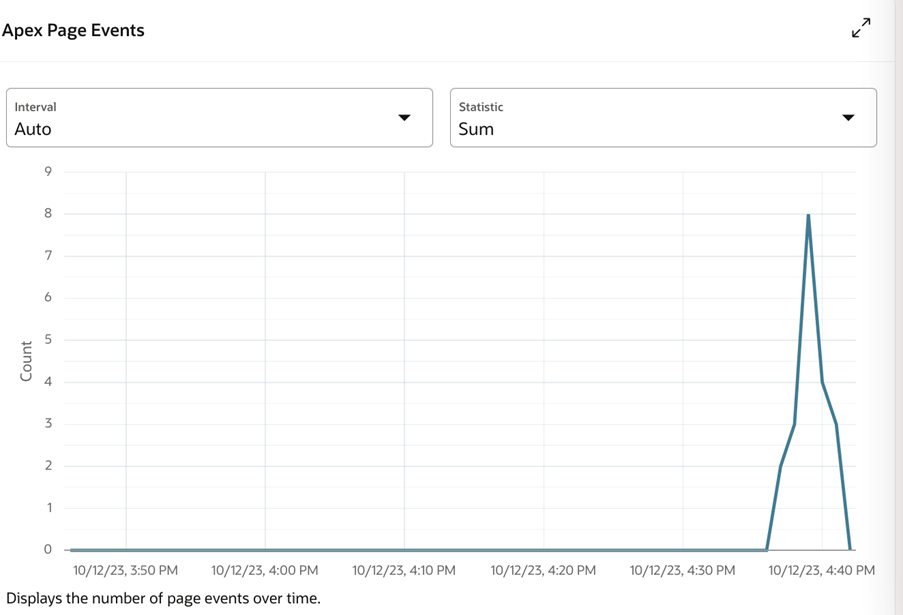
APEX Page Events
Figure 4-29 APEX Page Events
Application Properties
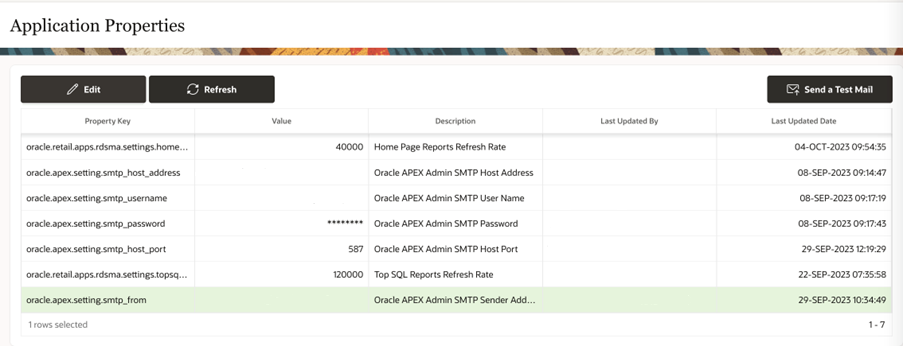
The Application Properties page lists the available application properties including Oracle APEX SMTP settings. The Application Properties are stored as key-value pair, e.g., oracle.apex.setting.smtp_from: me@email.com. This page can be accessed by an ‘Administrator’ having RDS_MANAGEMENT_ADMINISTRATOR or RDS_MANAGEMENT_ADMINISTRATOR_PREPROD roles.
Figure 4-30 Application Properties
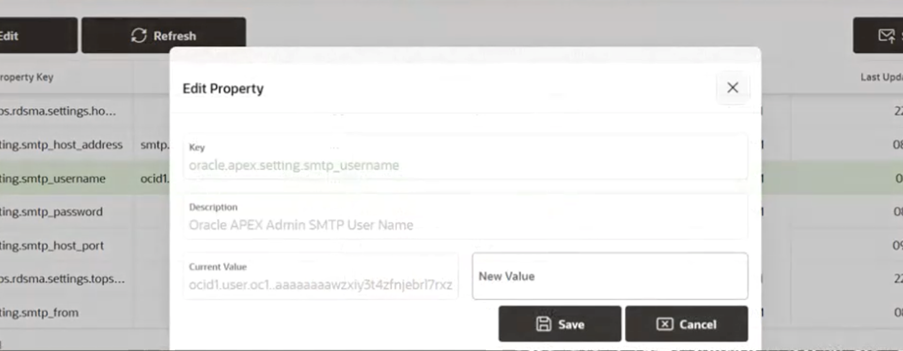
The value for the key can be updated using the Edit window.
Figure 4-31 Edit Property
Sending Email from APEX
To enable sending email from APEX, you must have access to an SMTP server. Provide values for the following Application Properties:
-
oracle.apex.setting.smtp_host_address
-
oracle.apex.setting.smtp_username
-
oracle.apex.setting.smtp_password
-
oracle.apex.setting.smtp_host_port
-
oracle.apex.setting.smtp_from
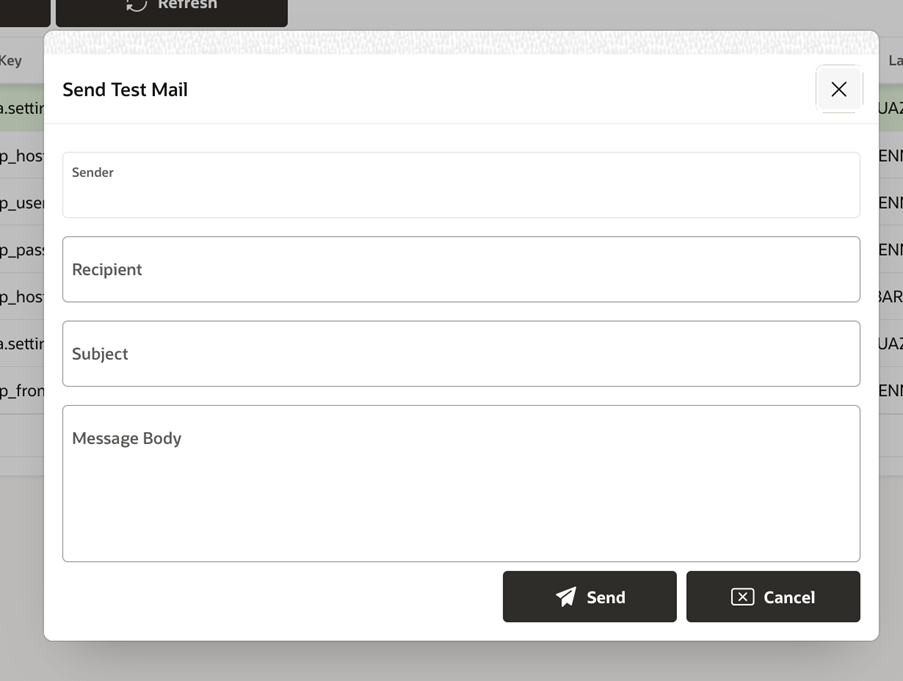
Your settings can be verified by attempting to send a test email by clicking on the ‘Send a Test Mail’ button. Once you have verified your settings, you can use the APEX_MAIL package to send emails from Oracle APEX applications.
Figure 4-32 Send Test Email
Known Limitations
Please review the known limitations below. In general, a known limitation describes a case where a documented capability is not available or does not work as expected in the RDS SaaS environment.
APEX Roles and Privileges
APEX roles and privileges are not available for RDS services. Any attempt to attach privileges to a service will result in that service becoming inaccessible. When invoking the service the ORDS services container will respond with a 401, authorization required.
Importing Services
Importing a service using the APEX UI does not work. However, if the exported service is a SQL script, as a workaround, construct a SQL Script using the APEX SQL Workshop from the contents of the exported file, then run the script. Bear in mind, the script may contain schema names. If you are exporting the service from one workspace for use in another workspace, you will need to modify the schema names. More modifications may be necessary to make the schema functional in another workspace. Remember there is no cross-schema access.
