4 Getting Started
Step 1: Setting Up the Workspace Administrators
Before you can log in to any of the above APEX Workspaces, you must set up the login details for the administrator of each workspace.
Prerequisites
-
Access to the OCI Console
-
You have the Retail Home URL for each environment you wish to set up (for example,
PRODandSTG) -
Access to Retail Home
-
The ability to create new users in OCI IAM
Steps
-
Log in to the OCI Console.
-
Create a default workspace administrator account from your OCI Console in OCI IAM for each subscribed cloud service using the primary schema names in Table 1-1.
-
The Default Workspace Administrator account passwords and their lifecycle will then be managed by the customer in OCI IAM going forward.
-
There is no need to synchronize this user with APEX. The only requirement is that the usernames match.
-
For example, create a Workspace Administrator account in OCI IAM with the username
MFCS_RDS_CUSTOM. Once you have created this account you can log in to the APEX MFCS Workspace using theMFCS_RDS_CUSTOMuser ID. -
These logins will work for all your environments (for example, the
MFCS_RDS_CUSTOMlogin will grant you access to the MFCS workspace in bothSTAGEandPRODUCTION). -
The default administrator logins are secure by default. They are, however, only intended to provide the initial access necessary to establish access for each workspace administrator.
-
-
Log in to the Default Workspace Administrator account on your OCI Console. You will have to logout first.
-
Verify the reachability of the workspace launch page for your environment using the Retail Home Application Navigator and selecting RDS APEX/ORDS (RDS APEX/ORDS is included in the Application Navigator by default).
-
Note that the default workspace administrator will only be able to reach one workspace.
-
-
Create one or more workspace administrators for this workspace (see APEX User Management below). One of those workspace administrators should be yourself.
-
Once you have created your user administrators, logout of the APEX UI.
-
Login as yourself.
-
Disable the default administrator accounts in OCI IAM. You can always recreate the accounts in the future, if necessary.
-
-
Verify the reachability of the workspace launch page for your environment using the Retail Home Application Navigator and selecting
RDS APEX/ORDS. -
Repeat steps 2-5 for each cloud service to which you have subscribed.
-
Using your workspace administrator account set up workspace developer accounts, see APEX User Management below.
Step 2: Setup RDS Database Operations Console Access
Prerequisites
-
Access to the OCI Console
-
You have the Retail Home URL for each environment you wish to set up (for example,
PRODandSTG) -
Access to Retail Home
-
The ability to assign users to groups in OCI IAM
Steps
-
Log in to the OCI Console.
-
Assign each workspace administrator with access to pre-production environments to the
RDS_MANAGEMENT_ADMINISTRATOR_PREPRODgroup.-
Verify reachability of the RDS DB Ops Console for your pre-production environment using the Retail Home Application Navigator and selecting RDS DB Ops Console (RDS DB Ops Console is available in the Retail Home Application Navigator by default).
-
Assign developers to the appropriate
RDS_MANAGEMENTpre-production groups based on the level of access required. See the Retail Data Store Security Guide for additional details.
-
-
Assign each workspace administrator with access to production environments to the
RDS_MANAGEMENT_ADMINISTRATORgroup.-
Verify reachability of the RDS DB Ops Console for your production environment using the Retail Home Application Navigator and selecting RDS DB Ops Console.
-
Assign developers to the appropriate
RDS_MANAGEMENTproduction groups based on the level of access required. See the Retails Data Store Security Guide for additional details.
-
APEX User Management
For the purposes of this documentation, there are two types of APEX users, end users and development users. End users are users with access to the applications built with APEX. They will log into and use those applications but not be involved in their development or management. Development users, on the other hand, can create and manage the APEX applications the end users use. Within this set of users, there are Developer and Workspace Administrator roles. From the Oracle APEX UI, developers can quickly create web apps including custom database objects, reports, forms, and RESTful services using a low code interface.
Note:
You will typically grant additional users workspace administrator permissions rather than continuing to use the default workspace administrator account.This document will focus on managing Development users. End user authentication is managed by the Workspace Administrator, who can choose any supported form of authentication for the APEX applications developed. For details on supported models, please reference the APEX App Builder User’s Guide, section 21.4 “Establishing User Identity Through Authentication.”
Development user authentication is provided through integration with Oracle Cloud Infrastructure Identity and Access Management (OCI IAM). The APEX Workspaces provisioned for RDS are configured to use HTTP Header Variable authentication. For full details on this model, please refer to the APEX App Builder User’s Guide, section 21.4.2.4 “HTTP Header Variable.”
In most cases, teams will need to create additional development users to facilitate the development of APEX applications and REST endpoints. The Workspace Administrator account has the permissions to create additional Developer and Workspace Administrator users through the APEX UI. Any additional users created will need to follow the same pattern as the default user accounts. Create the users in APEX and create matching usernames in OCI IAM. Like the default Workspace Administrator accounts, these new accounts will have their passwords live in OCI IAM.
-
Log in to APEX using your workspace administrator account, such as MFCS_RDS_CUSTOM, which you previously created in OCI IAM.
-
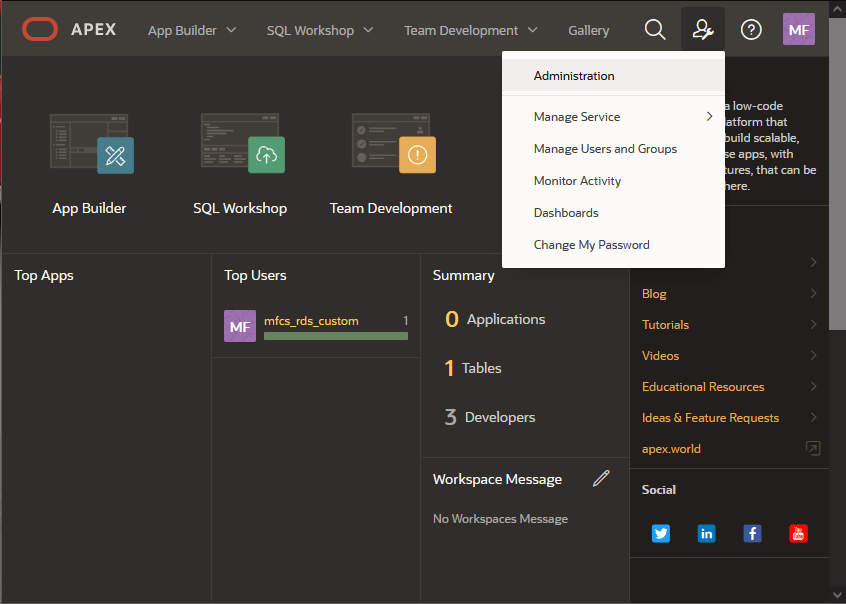
From the APEX start page, access the Administration menu in the upper right corner and select the Manage Users and Groups option.

-
Click the Create User button within the User Management screen.
-
On the create user form, enter the Username and Email, which are identical to the OCI IAM user account you wish to add.
-
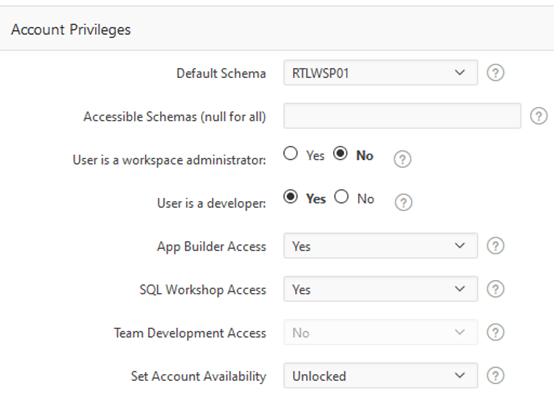
Under Account Privileges, select whether the User is a workspace administrator or the User is a developer.
If neither option is selected, then the user will not have the ability to create anything in APEX but may be able to access applications that are already created.

-
For the Password, you may enter any value you wish. The APEX password is not used when authentication is managed by OCI IAM.
-
Ensure the option Require Change of Password on First Use is set to No, as we do not want APEX to manage the authentication.
-
Under Group Assignments, add one or more privileges to the user if they are a Developer or Administrator. When you are finished, click Create User at the top of the screen to add them to APEX.
For details on other user management activities in APEX, refer to the APEX Administration Guide chapter “Understanding Workspace Administration”.