3 Manage Reason Codes
Reason codes are used to resolve discrepancies between receipts and invoices. A discrepancy originates when the price or quantity variance exceeds acceptable tolerance levels.
Using the Reason Code Maintenance window, you can set up and maintain reason codes. Reason codes are used to resolve discrepancies between receipts and invoices. A discrepancy originates when the price or quantity variance exceeds acceptable tolerance levels. After you create the reason code, you must associate it with an action that helps you resolve the discrepancies.
This section includes the following reason code instructions:
Search for a Reason Code
The Reason Code window provides a way in which to search for already defined Reason Codes.
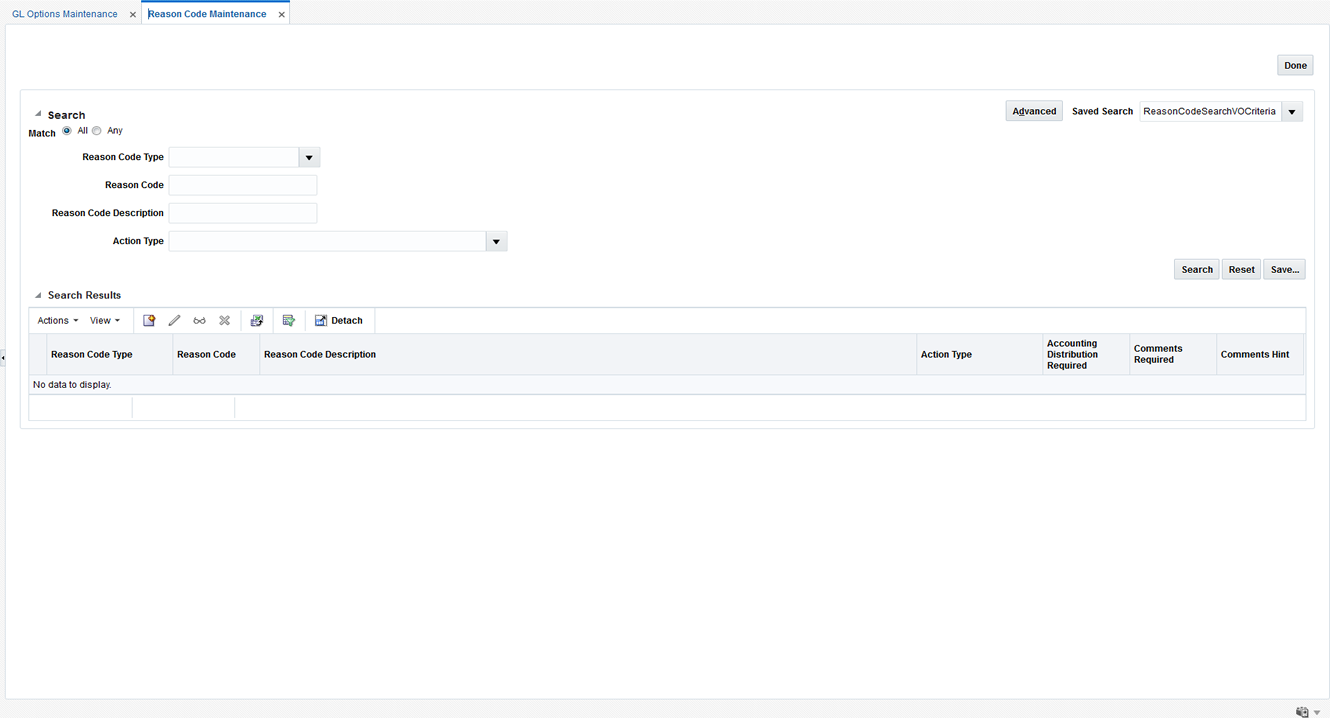
Navigate: From the Tasks menu, select Foundation > Reason Code Maintenance. The Reason Code Maintenance window opens.
Figure 3-1 Reason Code Maintenance Window

-
From the Reason Code Maintenance window, use the following criteria to search for existing reason codes:
Table 3-1 Supplier Options Search Fields
Field Description Reason Code Type
The type of reason code for which you are searching. Valid values include:
-
Cost Discrepancy
-
Quantity Discrepancy
-
Tax Discrepancy (only in a Tax On environment)
-
Credit Note Tax Discrepancy (only in a Tax On environment)
-
RTV Chargeback
-
Allowance Discrepancy
Reason Code
This field allows for query by reason code ID which is a unique identifier of the reason code being referenced.
Reason Code Description
This field allows for query by reason code description as a search/filter.
Action Type
This field allows filtering of Reason Codes based on the Action Type.
The Action type drop-down has a dependence on the Reason Code type specified.
-
-
After you have entered the desired search criteria, click Search.
Note:
If you would like to save your search criteria to use at a later date, click Save.
Your search results are displayed in the Search Results pane of the Reason Code Maintenance window.
Create a Reason Code
Navigate: From the Tasks menu, select Foundation > Reason Code Maintenance. The Reason Code Maintenance window opens.
Figure 3-2 Reason Code Maintenance Window

-
From the Search Results pane of the Reason Code Maintenance window, select Create from the Action menu. The Reason Code window opens.
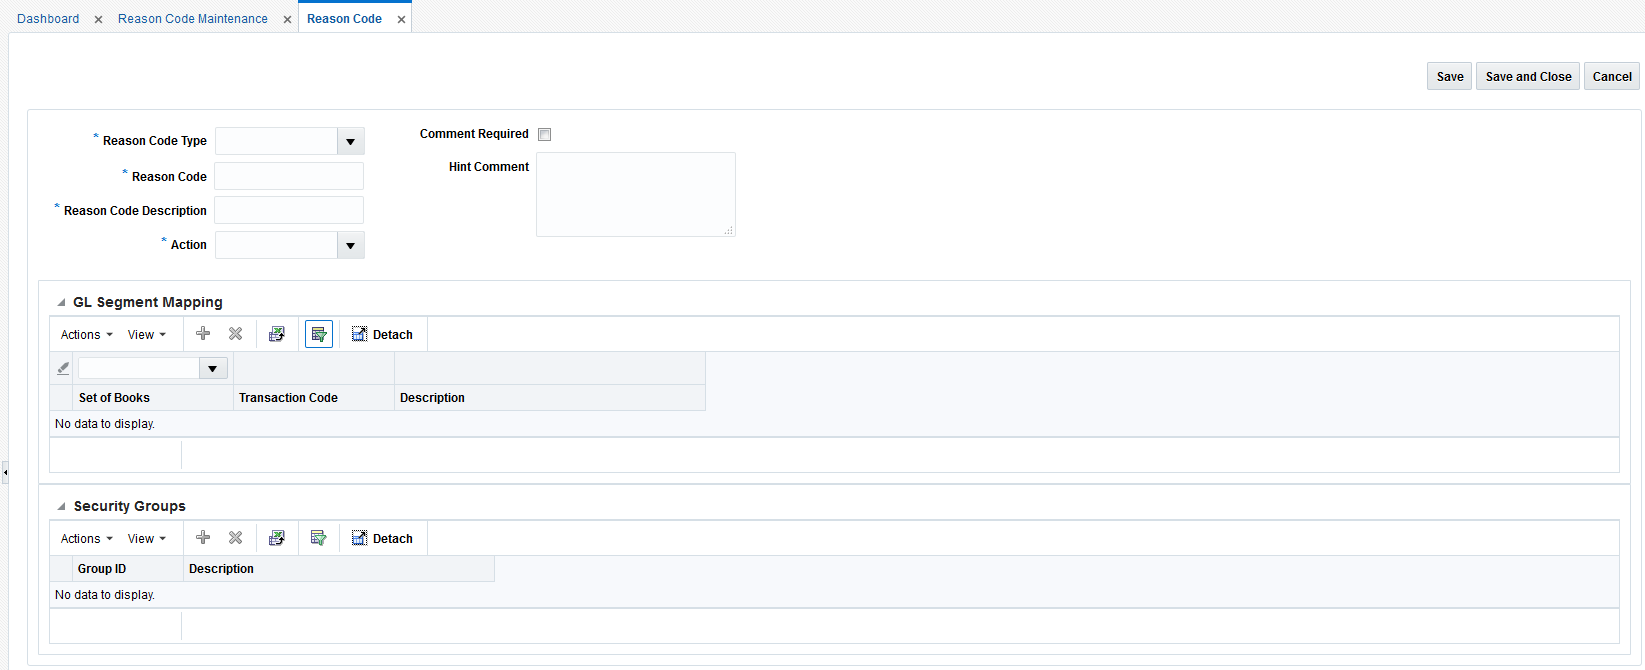
Figure 3-3 Create Reason Code Window

-
In the Reason Code Type field, select the reason code type to associate with the reason code. Valid values are:
-
Cost Discrepancy
-
Quantity Discrepancy
-
Tax Discrepancy (only in a Tax On environment)
-
Credit Note Tax Discrepancy (only in a Tax On environment)
-
RTV Chargeback
-
Allowance Discrepancy
-
-
In the Reason Code field, enter an ID for the reason code.
-
In the Reason Code Description field, enter the description of the reason code.
-
In the Action field, select the action to resolve the discrepancy.
-
In the Comments Hint field, enter additional information that may be needed to resolve the discrepancy.
-
If a comment is required when a reviewer is resolving the discrepancy, select the Comments Required check box.
-
Click Save to save your changes and continue editing. Alternatively, from the drop down menu, select Save and Close to save your changes and close the window.
Associate General Ledger Segment Mapping with a Reason Code
The GL Segments Mapping pane is only enabled if the reason code type is one which requires accounting. For Reason Codes that require accounting, the GL cross-reference pane allows the user to specify the set of books and the GL cross reference transaction code to be used to post the accounting entries when this reason code is used in discrepancy resolution. For reason codes that do not require accounting, the GL Segments mapping container is disabled.
-
In the Set of Books field, click the LOV button to select the Set of Books. The selected set of books GL options are displayed.
-
In the Transaction Code field, click the LOV button to select a GL Transaction Code. This will be the Transaction Code used to send accounting entries to GL when this reason code is used.
When the Transaction Code is selected, the screen will display the GL Cross reference segments assigned to this Transaction Code.
-
Click Save to save your changes and continue editing. Alternatively, from the drop down menu, select Save and Close to save your changes and close the window.
Associate Security Groups with a Reason Code
Reason Code usage is controlled using the Merchandising security groups structure. The Security Groups pane maps user groups to a reason code. During discrepancy resolution, a user will only be able to see and use reason codes to which they have security access. Security access means that the user is in a security group which is mapped to the reason code.
Use the following procedure to associate a security group with a reason code:
-
In the Security Groups pane, select Add from the Actions menu.
-
In the Security Groups table, select the Security Group by ID or by Description.
-
Click Save to save your changes and continue editing. Alternatively, from the drop down menu, select Save and Close to save your changes and close the window.
Maintain Reason Codes
Navigate: From the Tasks menu, select Foundation > Reason Code Maintenance. The Reason Code Maintenance window opens.
-
Perform a search for the reason code you wish to edit. See Search for a Reason Code for additional information.
-
In the search results pane, select the reason code you want to edit and select Edit from the Action menu. The Reason Code window opens.
-
From the Reason Code window, update the enabled fields as necessary.
-
Click Save to save the updated reason code.
Click Save and Close to save the reason code and return to the Reason Code Maintenance window.