6 Manage Supplier Options
In the Supplier Options window, you can indicate how invoices from each supplier should be matched. You can associate a specific accounts payable reviewer to a supplier, and you can create Supplier Groups.
Create Supplier Options
The Create supplier action is available in the Search Results pane at all times regardless of whether a supplier search has been performed.
Navigate: From the Tasks menu, select Foundation > Supplier Options. The Supplier Options window opens.
-
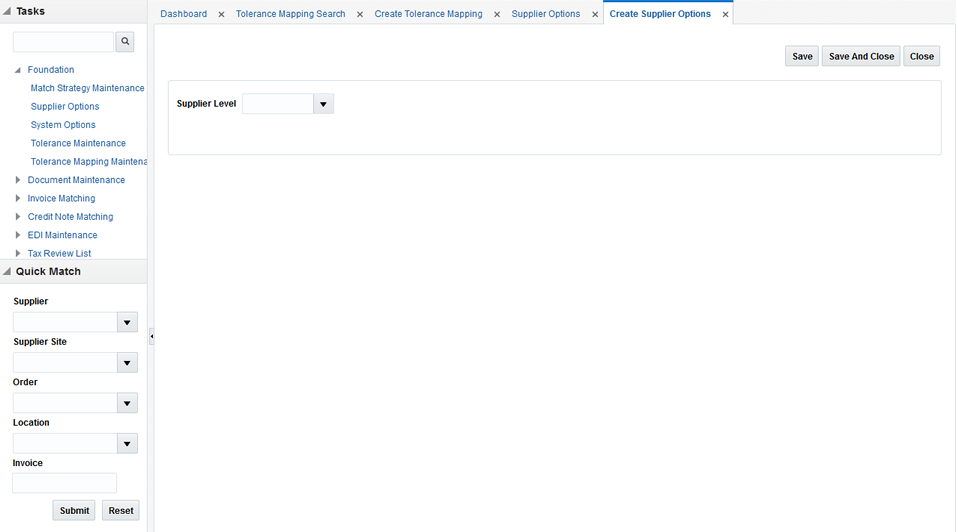
From the Search Results pane of the Supplier Options window, select Create from the Action menu. The Create Supplier Options window is displayed.
Figure 6-1 Create Supplier Options Window
-
From the Create Supplier Options window, you can perform the following actions:
Create Supplier
-
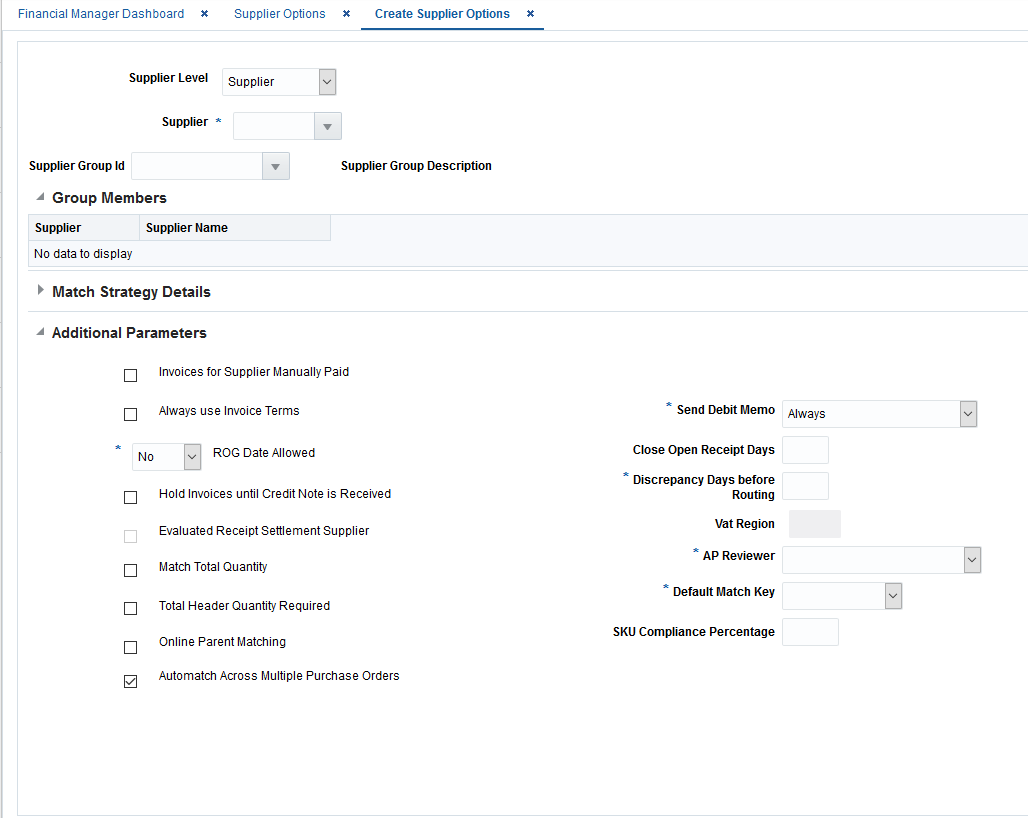
From the Create Supplier Options window, select Supplier in the Supplier Level field.
Figure 6-2 Create Supplier
-
In the Supplier field, select the supplier against which the new Supplier Options record is to be created. The supplier must be a valid supplier already setup in Merchandising.
-
If this supplier will be matching invoices to other suppliers with a supplier group, then enter the supplier group ID.
-
If the supplier is not part of a supplier group, and they do not want to use the system default match strategy, then enter the match strategy.
-
Enter values in the enabled fields as necessary:
-
Invoices for Supplier Manually Paid: Select the check box to indicate that invoices from this supplier should be paid manually.
-
Always Use Invoice Terms: Select the check box to indicate that the invoice terms should always be used as the best terms.
-
ROG Date Allowed: Select an option to determine whether the receipt of goods date is used when determining the basis date for best terms. The options are:
-
No – the invoice date becomes the basis date
-
Yes – the invoice date and ROG date are compared and the later one becomes the basis date
-
Always – the ROG date becomes the basis date
-
-
Hold invoices until Credit Note is Received: If checked, matched invoices will not post to the Financial System until all Credit Note Requests associated with the invoice are matched to Credit Notes.
-
Match Total Quantity: Determines if Matching of Total Quantity is required for Invoices at this Supplier Level.
-
Total Header Quantity Required: Determines if Total Header Quantity is required to be specified for Invoices at this Supplier Level.
-
Online Parent Matching: Indicates whether parent level matching is allowed in the online matching process for this supplier.
-
Automatch Across Multiple Purchase Orders: Indicates whether the supplier is sending one invoice for multiple purchase orders.
-
Send Debit Memo: Select the frequency to indicate when to send a debit memo.
Possible values are:
Always - Indicates Debit Memo will be sent.
Never - Indicates a Credit Note Request will be sent.
Only when Credit Note is late - Indicates a Credit Note Request will be sent, but later if the Credit Note does not come in on time, a Debit Memo is then generated and the Credit Note Request is voided.
Only when Credit Note is late, No void - Indicates a Credit Note Request will be sent, but later if the Credit Note does not come in on time, a Debit Memo is then generated, but the Credit Note Request is not voided. Later, if the Credit Note comes in and is matched to the Credit Note Request, the Debit Memo is reversed.
When this setting is:
-
Never
-
Only when the Credit Note is Late
-
Only when the Credit Note is Late, No Void
An additional option called ‘Hold Invoice until Credit Note is Received’ is allowed. You can check or uncheck it.
-
-
Close Open Receipt Days: Enter the number of days that a receipt remains in the system without an invoice. After the number of days has passed, the receipt is posted for payment.
-
Discrepancy Days Before Routing: Enter the number of days that quantity discrepancies should be held before routing for resolution.
-
AP Reviewer: This field specifies which accounts payable employee will be the default reviewer for invoice at this Supplier Levels.
-
Default Match Key: Indicates the Default Match key applicable for the Supplier Group for the Auto match process.
-
SKU Compliance Percentage: Enter the percent of items on the invoice which also need to be on the receipt for a header level match to be accepted.
-
-
Click Save to save your changes or Save and Close to save your changes and close the window.
Create Supplier Site
-
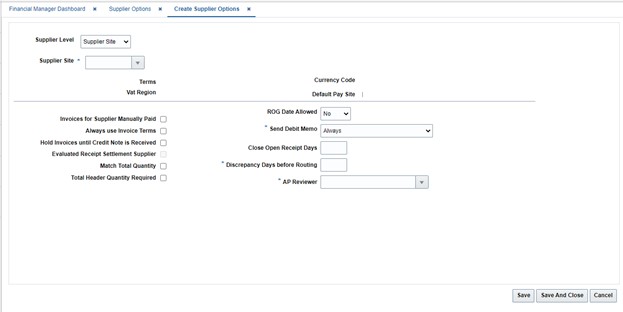
From the Create Supplier Options window, select Supplier Site in the Supplier Level field.
Figure 6-3 Create Supplier Site
-
In the Supplier Site field, select the supplier site against which the new Supplier Options record is to be created.
-
Enter values in the enabled fields as necessary:
-
Invoices for Supplier Manually Paid: Select the check box to indicate that invoices from this supplier should be paid manually.
-
Always Use Invoice Terms: Select the check box to indicate that the invoice terms should always be used as the best terms.
-
Hold invoices until Credit Note is Received: If checked, matched invoices will not post to the Financial System until all Credit Note Requests associated with the invoice are matched to Credit Notes.
-
Match Total Quantity: Determines if Matching of Total Quantity is required for Invoices at this Supplier Level.
-
Total Header Quantity Required: Determines if Total Header Quantity is required to be specified for Invoices at this Supplier Level.
-
ROG Date Allowed: Select an option to determine whether the receipt of goods date is used when determining the basis date for best terms. The options are:
-
No – the invoice date becomes the basis date
-
Yes – the invoice date and ROG date are compared and the later one becomes the basis date
-
Always – the ROG date becomes the basis date
-
-
Send Debit Memo: Select the frequency to indicate when to send a debit memo.
Possible values are:
Always - Indicates Debit Memo will be sent.
Never - Indicates a Credit Note Request will be sent.
Only when Credit Note is late - Indicates a Credit Note Request will be sent, but later if the Credit Note does not come in on time, a Debit Memo is then generated and the Credit Note Request is voided.
Only when Credit Note is late, No void - Indicates a Credit Note Request will be sent, but later if the Credit Note does not come in on time, a Debit Memo is then generated, but the Credit Note Request is not voided. Later, if the Credit Note comes in and is matched to the Credit Note Request, the Debit Memo is reversed.
When this setting is:
-
Never
-
Only when the Credit Note is Late
-
Only when the Credit Note is Late, No Void
An additional option called ‘Hold Invoice until Credit Note is Received’ is allowed. You can check or uncheck it.
-
-
Close Open Receipt Days: Enter the number of days that a receipt remains in the system without an invoice. After the number of days has passed, the receipt is posted for payment.
-
Discrepancy Days Before Routing: Enter the number of days that quantity discrepancies should be held before routing for resolution.
-
AP Reviewer: This field specifies which accounts payable employee will be the default reviewer for invoices at this Supplier Levels.
-
-
Click Save to save your changes or Save and Close to save your changes and close the window.
Note:
The Default Pay Site is displayed for Supplier Sites. It is optionally assigned to a purchasing supplier site in MFCS and acts as an override of the standard logic for assigning a pay site to documents sent to the financial system.
Create a Supplier Group
-
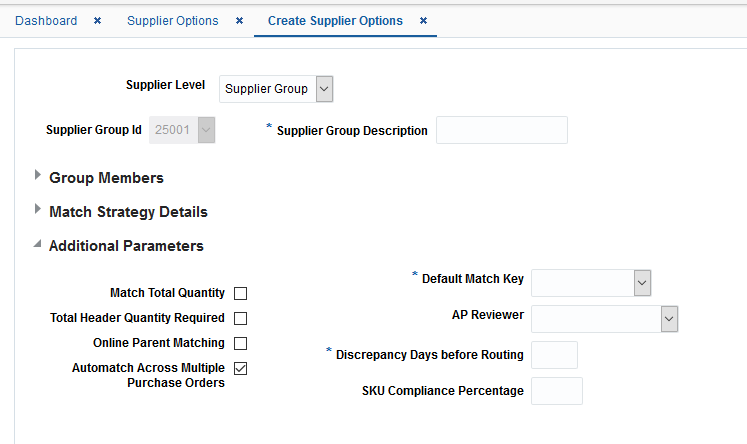
From the Create Supplier Options window, select Supplier Group in the Supplier Level field.
Figure 6-4 Create Supplier Group
-
In the Group Description field, enter a description for the group being created.
-
If you do not want to use the system default match strategy, then enter the match strategy.
-
Enter values in the enabled fields as necessary:
-
Match Total Quantity: Determines if Matching of Total Quantity is required for Invoices at this Supplier Level.
-
Total Header Quantity Required: Determines if Total Header Quantity is required to be specified for Invoices at this Supplier Level.
-
Online Parent Matching: Indicates whether parent level matching is allowed in the online matching process for this supplier.
-
Automatch Across Multiple Purchase Orders: Indicates whether the supplier is sending one invoice for multiple purchase orders.
-
Default Match Key: Indicates the Default Match key applicable for the Supplier Group for the Auto match process.
-
AP Reviewer: This field specifies which accounts payable employee will be the default reviewer for invoice at this Supplier Levels.
-
Discrepancy Days Before Routing: Enter the number of days that quantity discrepancies should be held before routing for resolution.
-
SKU Compliance Percentage: Enter the percent of items on the invoice which also need to be on the receipt for a header level match to be accepted.
-
-
Click Save to save your changes or Save and Close to save your changes and close the window.
Search for a Supplier, Supplier Site, or Supplier Group
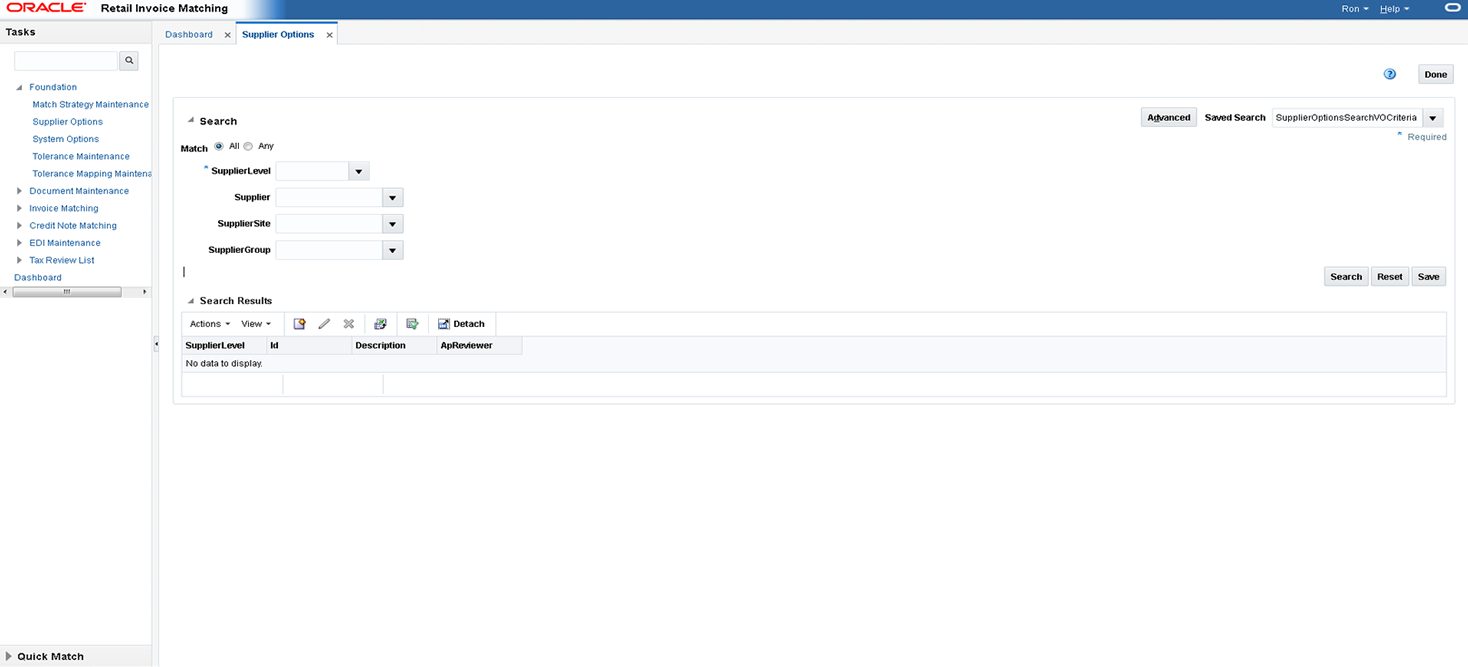
The Supplier Options window provides a way in which to search for already defined suppliers, supplier sites, or supplier groups.
Navigate: From the Tasks menu, select Foundation > Supplier Options. The Supplier Options window opens.
Figure 6-5 Supplier Options Window
-
From the Supplier Options window, use the following criteria to search for existing suppliers, supplier sites, or supplier groups:
Table 6-1 Supplier Options Search Fields
Field Description Supplier Level
This field allows selection of a Supplier Level as a filter criterion to filter the Supplier Options records. Available options are:
-
Supplier Group
-
Supplier
-
Supplier Site
Supplier
This field allows selection of a Supplier as a filter criterion to filter the Supplier Options records.
Supplier Site
This field allows filtering of Supplier Options records based on the Supplier site ID specified.
Supplier Group
This field allows filtering of Supplier Options records based on the Supplier Group ID specified.
-
-
After you have entered the desired search criteria, click Search.
Note:
If you would like to save your search criteria to use at a later date, click Save.
Your search results are displayed in the Search Results pane of the Supplier Options window.
Maintain Suppliers, Supplier Sites, and Supplier Groups
Navigate: From the Tasks menu, select Foundation > Supplier Options. The Supplier Options window opens.
Figure 6-6 Supplier Options Window

-
In the Supplier Level field, select Supplier, Supplier Site, or Supplier Group or click the LOV buttons to select a specific Supplier, Supplier Site, or Supplier Group.
Note:
Differences exist between editing a supplier group, a supplier, and a supplier site. For example, when editing a Supplier Group the UI displays Suppliers associated with the Group. In addition, supplier groups have fewer possible fields. Default Match Key is not allowed on the supplier site level.
-
Click Search. The supplier details are displayed.
-
In the AP Reviewer field, enter the ID of an accounts payable reviewer, or click the LOV button to select the reviewer that you want to associate with the supplier, supplier site, or supplier group.
-
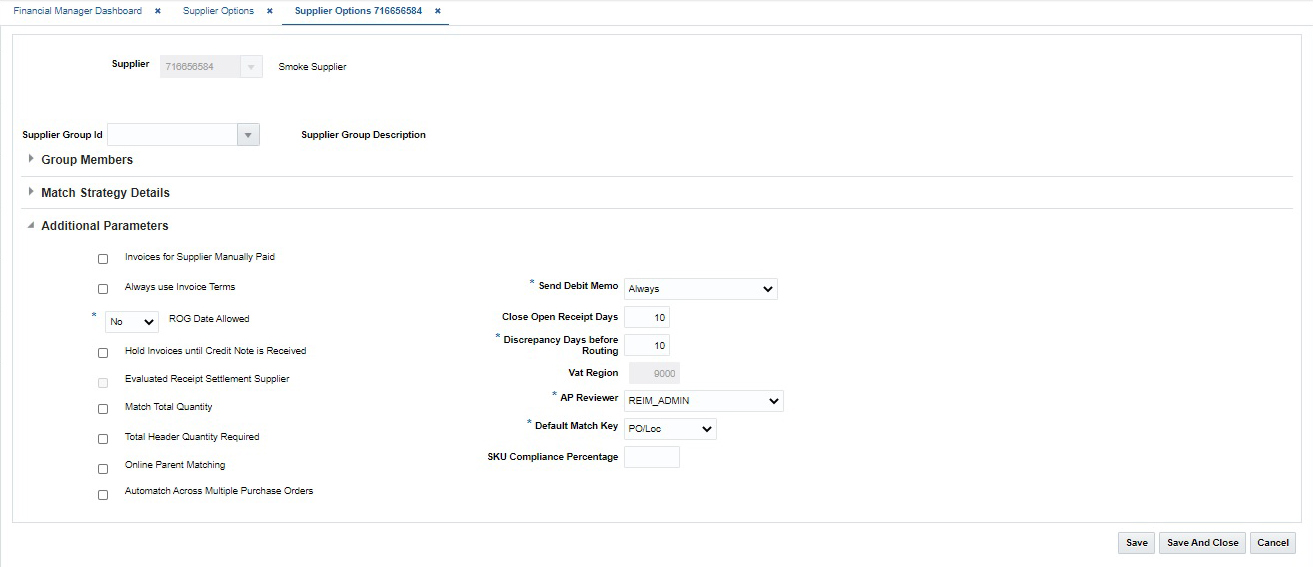
Edit the enabled fields as necessary:
-
Invoices for Supplier Manually Paid: Select the check box to indicate that invoices from this supplier should be paid manually.
-
Always Use Invoice Terms: Select the check box to indicate that the terms date on the invoice is always used to pay an invoice.
-
ROG Date Allowed: Select an option to determine whether the receipt of goods date is used when determining the basis date for best terms. The options are:
-
No – the invoice date becomes the basis date
-
Yes – the invoice date and ROG date are compared and the later one becomes the basis date
-
Always – the ROG date becomes the basis date
-
-
Send Debit Memo: Select the frequency to indicate when to send a debit memo.
Possible values are:
Always - Indicates Debit Memo will be sent.
Never - Indicates a Credit Note Request will be sent.
Only when Credit Note is late - Indicates a Credit Note Request will be sent, but later if the Credit Note does not come in on time, a Debit Memo is then generated and the Credit Note Request is voided.
Only when Credit Note is late, No void - Indicates a Credit Note Request will be sent, but later if the Credit Note does not come in on time, a Debit Memo is then generated, but the Credit Note Request is not voided. Later, if the Credit Note comes in and is matched to the Credit Note Request, the Debit Memo is reversed.
When this setting is either Never or Only when the Credit Note is Late, an additional option called Hold Invoice is allowed. You can check or uncheck it.
Note:
If Hold Invoice is checked, matched invoices will not post to the Financial System until all Credit Note Requests associated with the invoice are matched to Credit Notes.
Figure 6-7 Supplier Options Window
-
Close Open Receipt Days: Enter the number of days that a receipt remains in the system without an invoice. After the number of days has passed, the receipt is posted for payment.
-
Discrepancy Days Before Routing: Enter the number of days that quantity discrepancies should be held before routing for resolution.
-
-
Click Save to save your changes or Save and Close to save your changes and close the window.
Maintain Master Supplier for Supplier Level Supplier Options
This section will describe how to maintain the master supplier options.
Note:
Check the Implementation Guide for how to create the Master Supplier for Supplier Level Supplier options.The Master Supplier is only maintained at the Supplier Level of Supplier Options. When a Master Supplier is maintained in Invoice Matching, it is used to build default Supplier Options when a parent supplier is added in Merchandising via the UI or ReST service.
To maintain the Master Supplier Options, proceed as follows:
Navigate: From the Tasks menu, select Foundation > Supplier Options. The Supplier Options window opens.
Figure 6-8 Supplier Options Window

-
In the Supplier Level field, select Supplier.
-
Select the Master Supplier check box.
-
Click Search to bring the Master Supplier to the search Results.
-
Select the Edit Action to bring up the Master Supplier Options.
-
Edit the enabled fields as necessary. (See Create Master Supplier section in the Implementation Guide for more details on specific fields on the screen). Select Save and Close when all adjustments have been made.