3 Create Specialty Purchase Orders
Apart from automatically generated purchase orders and manually created basic purchase orders, Merchandising provides a few special workflows to create orders. These purchase orders are usually created for a specific purpose. The following specialty purchase orders can be created in Merchandising:
Contract Orders
This workflow provides the option of creating orders for the items that are part of Plan/Availability type contracts. When a retailer enters into such contracts with a supplier, suppliers communicate availability to retailers as the production progresses. Based on the supplier availability, periodic purchase orders are created. In this workflow, the contract is selected as first step and only items attached to that contract are available to be added to the order.
Contract purchase orders are different from regular orders in a few ways. Since contract POs are supposed to have lowest negotiated cost, they cannot further have bracket costing or deals applied on them. They cannot have scaling or truck splitting either. These orders cannot be sent to Buyer Worksheet and they don't have pre-mark ability. Non-sellable packs and non-contracted items cannot be added to contract orders.
Order for Contracted Items
This workflow provides option of creating orders for items that are associated with one of more contracts. Here the user can choose the items, choose which contract to use for ordering the item, select ordering locations and quantity, and finally create the purchase order. Except Plan/No Availability type of contracts, orders for items attached with all other contract types can be created here. All the characteristics of contract orders mentioned above will be applicable to these orders as well.
DSD Orders
Merchandising can be configured to create a purchase order for items that are received directly at the store without a prior purchase order issued to the supplier. Usually such orders are created after the supplier has delivered items in the store along with invoices. However, they can be prepared before receipt as well, depending on the business process. Such orders can be created only for selected suppliers who are configured as DSD suppliers in Merchandising. Merchandising provides the option to attach invoices and non-merchandise expenses to such orders. When Merchandising is configured to not allow creation of DSD orders, such orders are created by store inventory management system and interfaced to Merchandising, where they can't be edited.
Pre-issued Orders
Sometimes, to expedite the ordering process when meeting with suppliers, there is a desire for orders to be placed immediately, even before they are entered into Merchandising. Merchandising provides the ability to pre-issue order numbers such that suppliers can be issued a valid purchase order number along with quantity and expiration date to support this business requirement. Later these numbers can be used to create a valid purchase order, capturing all required details. For example: A buyer can travel to a trade show with a number of pre-issues order numbers and issue them to suppliers depending on the negotiations. Then when the buyer returns to office, a formal purchase order will be created with the pre-issued number.
Customer Orders
As the name suggests, customer order purchase orders are another special type of purchase order that is created for the fulfillment of a customer order by supplier, sometimes referred to as "drop ship" orders. Customer details such as billing information, delivery information etc. is mandatory to be captured on such orders. These orders are usually generated automatically as part of customer order fulfillment process and sent to Merchandising from an order management solution but can also be created manually in Merchandising by selecting order type as Customer Order. The ability to manually create these in Merchandising is supported only when the system option for integrating with an OMS is set to No.
Create a Contract Order
To create a contract order follow the steps below.
-
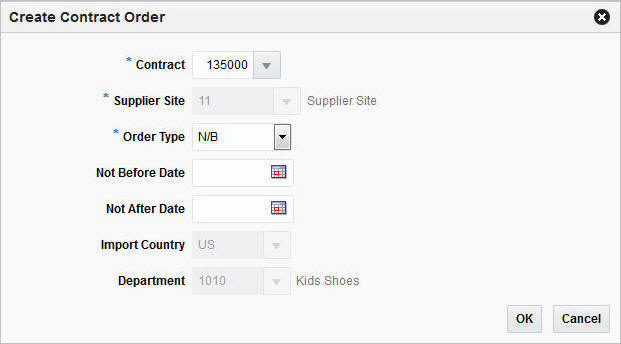
From the Tasks menu, select Orders > Create Contract Order. The Create Contract Order page opens.
Figure 3-1 Create Contract Order Page
-
In the Contract field, enter, select or search for the contract number. This field is required to create a contract order.
-
The Supplier Site field is populated with the contract's supplier site, once you select a contract number. This field is required to create a contract order.
-
In the Order Type field, select an Order Type from the drop down list. This field is required to create a contract order. Possible order types are:
-
ARB - Automatic replenishment of basic goods
-
BRB - Buyer replenishment of basic goods
-
N/B - Order of non-basic goods
-
-
In the Not Before Date field enter or use the Calendar to select the date before which the order deliveries are not expected.
-
In the Not After Date field enter or use the Calendar to select the date after which the order deliveries are not accepted.
-
The Import Country field is populated with the contract's import country, once you select a contract number.
-
The Department field is populated with the contract's department, once you select a contract number.
-
After you have entered all the information for the contract order, you have the following options.
-
Click OK to create the contract order and close Order page. The Order page opens automatically in a new tab.
Enter the necessary order information. For more details about the Order page, see the Define/Enter a Purchase Order section.
-
Click Cancel to reject the contract order and close the Create Contract Order page.
-
Create an Order for Contracted Items
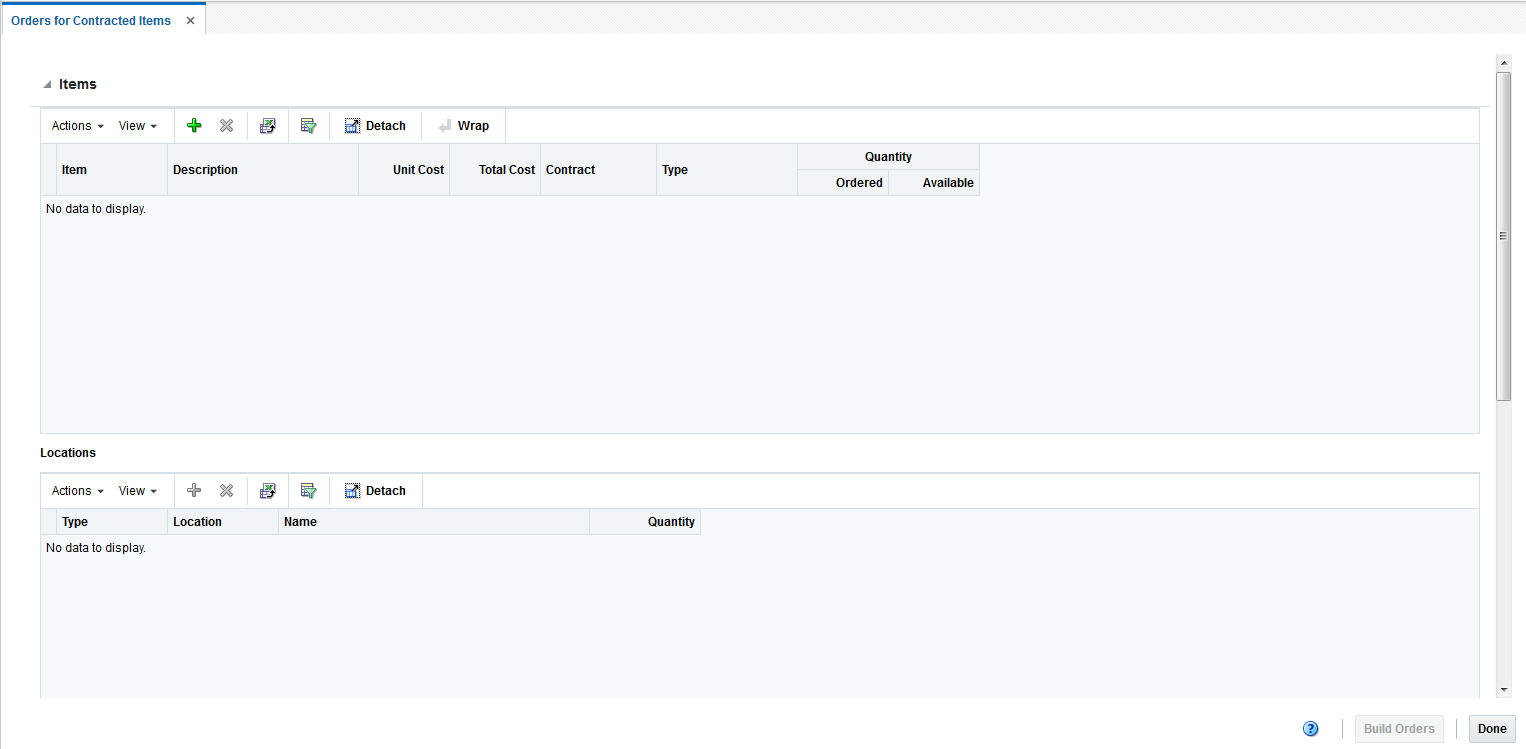
In the Orders for Contracted Items page you can manually create orders with a contract. You can choose the items, associate them with a contract, select order locations, and quantities as well as create orders for the items.
The Orders for Contracted Items page consists of the following three sections:
-
Items
-
Locations
-
Orders
Figure 3-2 Orders for Contracted Items Page
To create orders for contracted items follow the steps below.
-
From the Tasks menu, select Orders > Create Orders for Contracted Items. The Orders for Contracted Items page opens.
-
In the Items section select Actions > Add or use the Add Item
 icon to add an
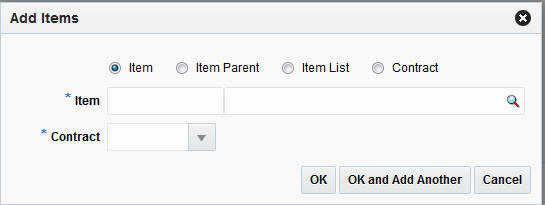
item. The Add Items page opens.
Figure 3-3 Add Items Page
-
You can add contracted items by selecting:
-
a transaction level item
-
an item parent
-
an item list
-
a contract
-
-
Check the corresponding radio button.
Note:
If the Item/Item Parent/Item List radio button is selected, the corresponding fields are displayed. If the Contract radio button is selected, then only the Contract field is shown.
-
In the Item/Item Parent/Item List field, enter, select or search for the item/item parent or item list.
Table 3-1 Add Items Page
Field Description Item
Enter or search for the item.
If you select the contract before you enter any items, only items from this particular contract are available.
Item Parent
Enter or search for the item parent.
All contracted item parents are available for selection.
After you have entered the item parent, all diffs associated with the item are displayed.
All diff IDs will be available for selection. If there is no valid item for a particular diff ID, then nothing is shown in the Items section.
If no diffs are selected, all transaction level items are shown in the Items section.
If all parent diffs are not selected, all items fitting the criteria are added.
If you enter the contract before you enter the item parent, all contracted item parents are available for selection. If the combination of item parent and contract is not valid, then nothing is populated in the table.
If all the child items are not part of the selected contract, you receive a warning message that one or more child items are not part of the contract.
Item List
Enter or search for the item list.
All item lists, which have at least one contracted item, are available for selection.
If you enter the contract before you enter the item list, all item lists having at least one contracted item are available. As long as at least one valid combination of item-contract is possible, all the contracted items of the item list are populated in the items table.
If all the items in the item list are not part of the selected contract, you receive a warning message that one or more items are not part of the contract.
Contract
Enter the contract number.
All the items of the selected contract are populated in the Items table.
-
In the Contract field, enter, select or search for the contract.
Note:
If you enter the item parent first, only contracts containing the item/item parent are available for selection. For item lists, all contracts associated with at least one item of the item list are available for selection.
-
After you have entered all the item information, choose one of the following options.
-
Click OK to add the selected item to the Items section and exit the Add Item page.
-
Click OK and Add Another to add further entries.
-
Click Cancel to reject all entries and exit the Add Item page.
Figure 3-4 Orders for Contracted Items Page - Items Added
Note:
To delete an item, mark the corresponding record in the Items section. Then select Actions > Delete or use the Delete Icon
 .
.
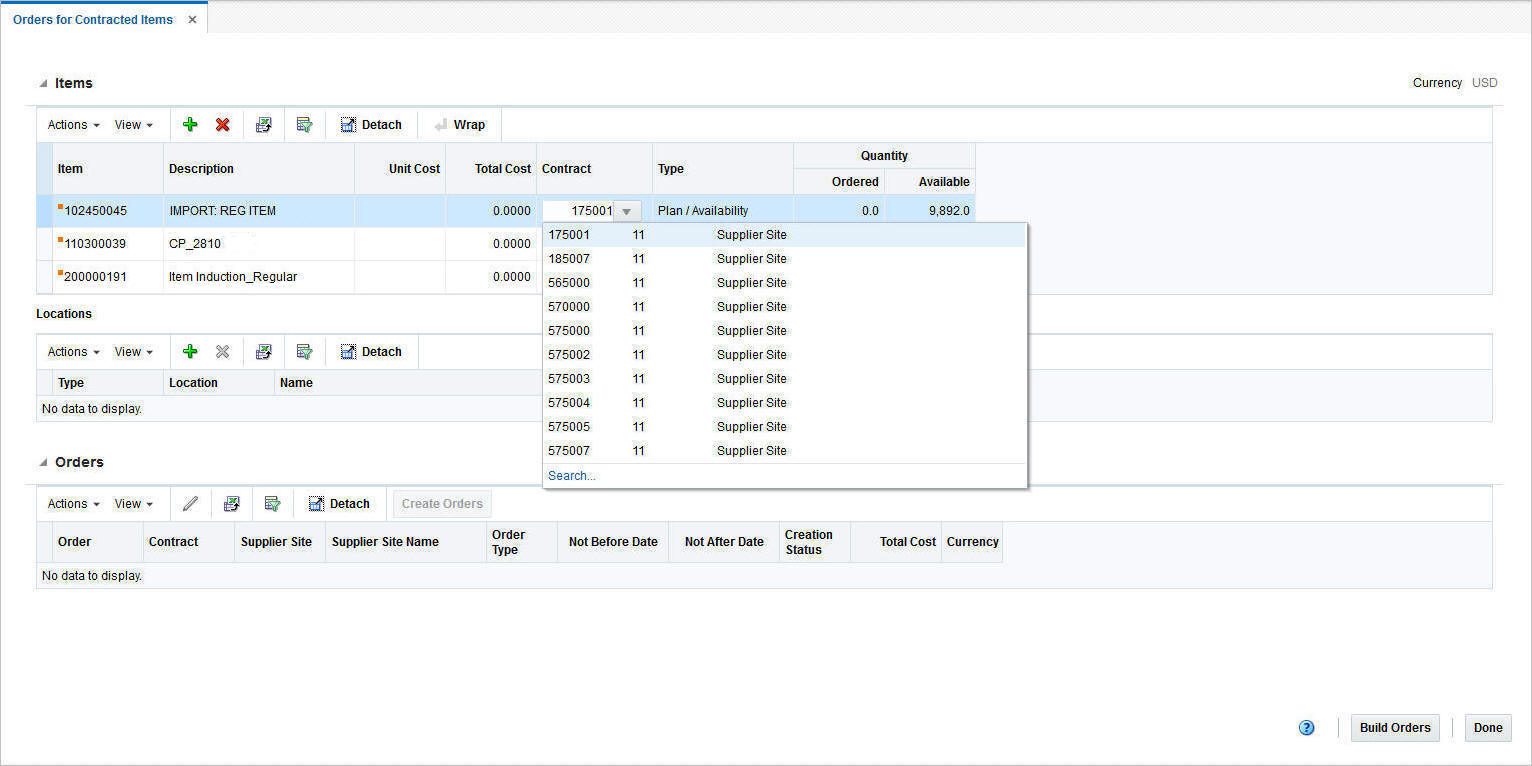
If an item is associated with multiple contracts or in the case of a parent item or item list, the selected contract combination is not valid. You can select the contract number in the Contract column from the drop down list.
-
-
-
After you have added items, assign a location or more locations to each item. Locations can only be assigned to one item at a time. Select an item on the table to assign locations to it.
-
In the Locations section select Actions > Add or use the Add icon
 to add a location.
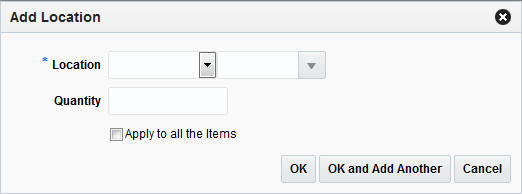
The Add Location page opens.
Figure 3-5 Add Location Page
-
In the Location field, select a location type and enter, select or search for a location.
-
In the Quantity field, enter the corresponding quantity to be ordered.
Note:
If you want to apply the location and the corresponding quantity to all items, check the Apply to all the items check box.
-
After you have entered all the location information, choose one of the following options.
-
Click OK to confirm the location and close the Add Location page.
-
Click OK and Add Another to add additional locations.
-
Click Cancel to reject all entries and close the Add Location page.
Note:
To delete a location, mark the corresponding row in the Locations section. Then select Actions > Delete or use the Delete icon
 .
.
If you want to edit the quantity for a location, enter the new quantity in the Quantity column.
-
-
-
After you have selected the location, you need to generate purchase orders for the selected contracted items.
In the Toolbar, click Build Orders to populate the Order section with pending orders.
Note:
The Build Orders button is only enabled, after you have associated each item with a location and a quantity.
-
Click the Create Order button or select Actions > Create Orders to create orders for the contracted items. The status of the order changes to Created.
Note:
The Order Type field is set to N/B by default.
The Not Before and Not After Date fields contain the dates specified in the contract.
You can edit the Order Type, Not Before and Not After Date fields in the Orders section.
-
To edit the created purchase order, select the corresponding order. Then use one of the following options.
-
Select Actions > Edit or use the Edit icon
 . The Order page opens. For more details about editing
orders, see the Define/Enter a
Purchase Order section.
-
In the Order column, click the order number. The Order page opens. For more details about editing orders, see the Define/Enter a Purchase Order section.
-
-
Click Done, to exit the Orders for Contracted Items page.
Create a DSD Order
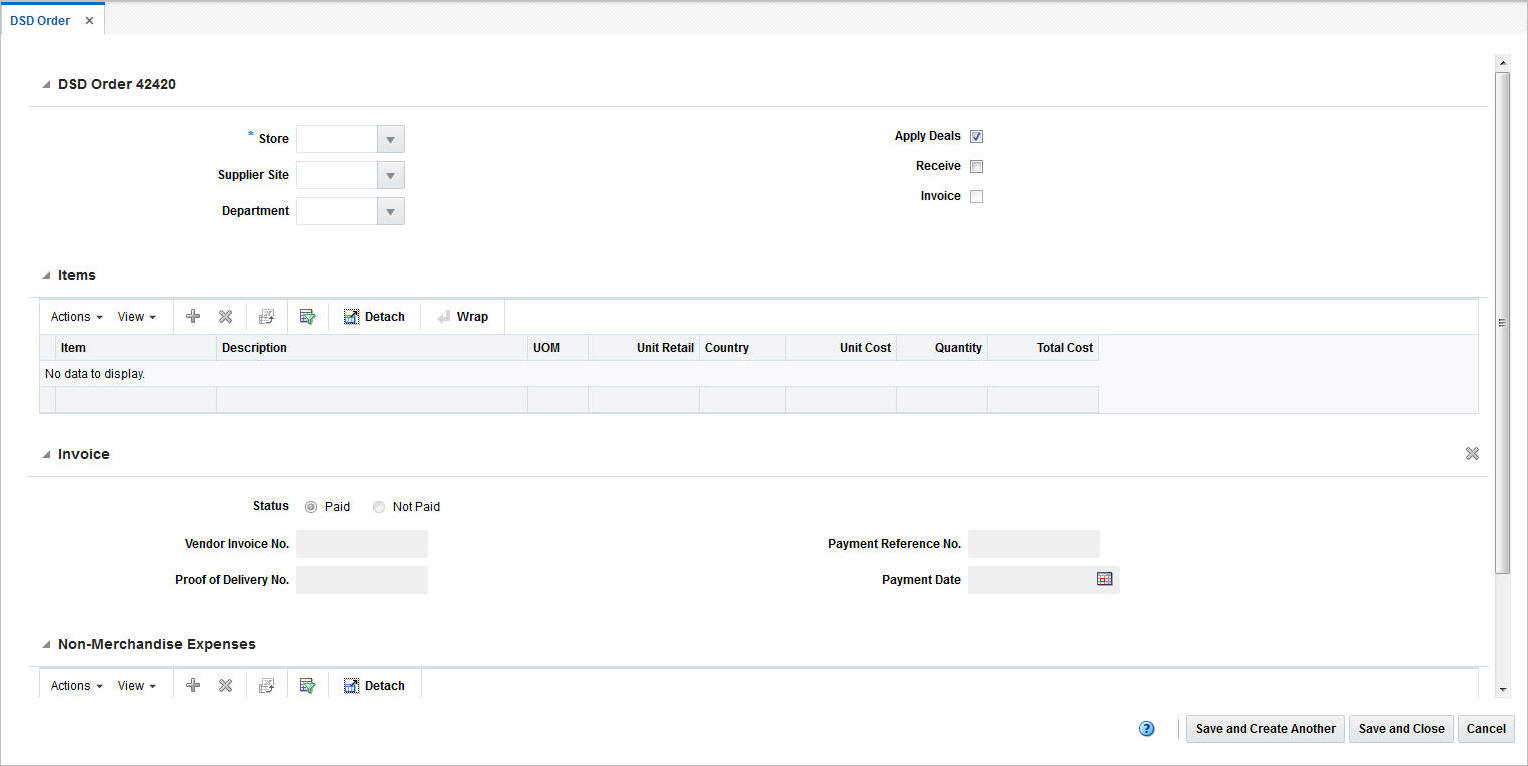
The Direct Store Delivery (DSD) is the delivery of merchandise and/or services directly to a store. In the DSD Order page you can create direct store deliveries.
The DSD Order page consists of the following sections:
-
DSD Order
-
Items
-
Invoice
-
Non-Merchandise Expenses
Figure 3-6 DSD Order Page
To create a DSD order follow the steps below.
-
From the Tasks menu, select Orders > Create DSD Order. The DSD Order page opens.
-
In the DSD Order section the title contains the order number as well as the order currency. In this section enter or select the following DSD order information.
-
Store - This field is required to create a DSD order.
-
Supplier Site
-
Department
Furthermore, select the following check boxes, if necessary.
-
Apply Deals
-
Receive
-
Invoice
-
-
In the Items section, you can associate the item with the DSD order. To add an item select Actions > Add, or use the Add icon
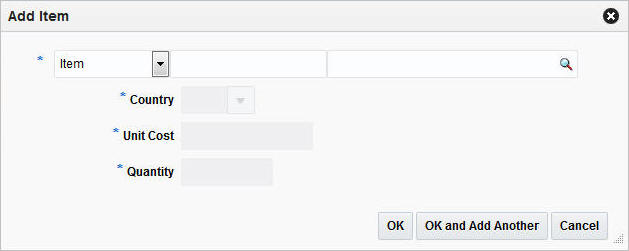
 . The Add Item page
opens.
Figure 3-7 Add Item Page
-
Select the item level. Then enter or search for the item/reference item number.
-
In the Country field, enter, select or search for the country information for the item.
-
In the Unit Cost field, enter the unit cost for the item.
-
In the Quantity field, enter the quantity for the item.
-
After you have entered all necessary information, choose one of the following options.
-
Click OK to add the entered item to the Item section and close the Add Item page.
-
Click OK and Add Another to add the entered item to the Item section and stay in the Add Item page to add additional items.
-
Click Cancel to reject all entries and close the Add Item page.
Note:
To delete the item from the DSD order, select Actions > Delete or use the Delete icon
 .
.
-
-
-
The Invoice section displays invoice related information for the DSD order.
-
In the Status field, select the valid status, paid or not paid, for the invoice.
-
In the Vendor Invoice No. field, enter the vendor invoice number.
-
In the Proof of Delivery field, enter the proof of delivery number.
-
In the Payment Reference No. field, enter the payment reference number.
-
In the Payment Date field, enter the payment date or click the Calendar button to select the date.
Note:
To delete an entered invoice, use the Delete Invoice icon in the top right corner of the Invoice section.
-
-
In the Non-Merchandise Expenses section, select Actions > Add or use the Add icon. The Add Non-Merchandise Expense page opens.
-
In the Code field, enter or search for the expense code of the non-merchandise expense, for example, select M (Miscellaneous).
-
In the Amount field, enter the expense amount.
-
In the VAT section, in the Code field, enter, select or search for the VAT code, for example, select Standard.
-
In the Rate field, the VAT rate is populated once you enter the VAT code.
-
In the Amount field, the VAT amount is populated once you enter the VAT code.
-
After you have entered all necessary information, choose one of the following options.
-
Click OK to add the entered expense information to the Non-Merchandise Expense section and close the page.
-
Click OK and Add Another to add the entered expense information to the Non-Merchandise Expense section and stay in the page to add additional non-merchandise expenses.
-
Click Cancel to reject all changes and close the page.
Note:
To delete non-merchandise expenses from the DSD order, select Actions > Delete or use the Delete icon
 .
.
-
-
-
After you have entered all necessary information for the DSD order, choose one of the following options.
-
Click Save and Close to create the DSD order and close the DSD order page.
-
Click Save and Create Another to create the DSD order and stay in the DSD Order page to create additional DSD orders.
-
Click Cancel to reject all entries and close the DSD order page.
-
Create a Pre-Issued Order
In Merchandising you can create a purchase order using a pre-issued order number. For more details about how to generate pre-issue order numbers, see the Pre-Issued Order Numbers section.
To create a pre-issue order follow the steps below.
-
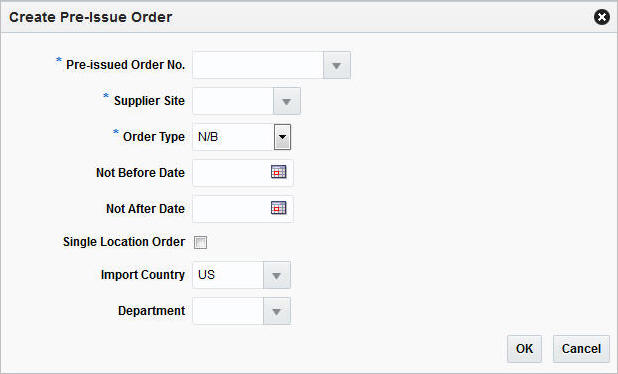
From the Tasks menu, select Orders > Create Pre-Issue Order. The Create Pre-Order page opens.
Figure 3-8 Create Pre-Issue Order Page
-
In the Pre-Issued Order No. field, enter, select or search for the previously created pre-issued order number.
-
In the Supplier Site field, enter, select or search for the supplier site.
-
In the Order Type field, select an order type form the list. Possible order types are:
-
ARB - Automatic replenishment of basic goods
-
BRB - Buyer replenishment of basic goods
-
Customer Order - For more information about how to create a customer order, see the Create a Customer Order section.
-
N/B - Order of non-basic goods
-
-
In the Not Before Date field, enter the date before which the order deliveries are not expected, or use the Calendar icon to select a date.
-
In the Not After Date field, enter the date after which the order deliveries are not accepted, or use the Calendar icon to select a date.
-
Select the Single Location Order check box if the items of the purchase order are shipped to only one location.
-
In the Location field, select the Location Type, for example, select Warehouse. Once you select the Location Type, enter, select or search for the location. After you have selected the location, the Location Name is displayed.
Note:
The Location fields are shown only if you have selected the Single Location Order check box.
-
In the Import Country field, enter, select or search for the import country.
Note:
The Import Country field is enabled when you create pre-issue orders.
-
In the Department field, enter, select or search for the department.
-
After you have entered all information for the pre-issue order, you have the following options.
-
Click OK to create the pre-issue order and close the Create Order page. The Order page opens in a new tab. Enter the necessary order information. For more details about creating orders, see the Create a Purchase Order section.
-
Click Cancel to reject all entries and close the Create Order page.
-
Pre-Issued Order Numbers
Pre-issued order numbers are used to provide a supplier with a valid purchase order number. The items may be delivered to a warehouse or store against this pre-issued order number. In the Pre-Issue Order Numbers page you can create purchase order numbers immediately or create a schedule to generate purchase order numbers, through a batch process.
Figure 3-9 Pre-Issue Order Numbers Page
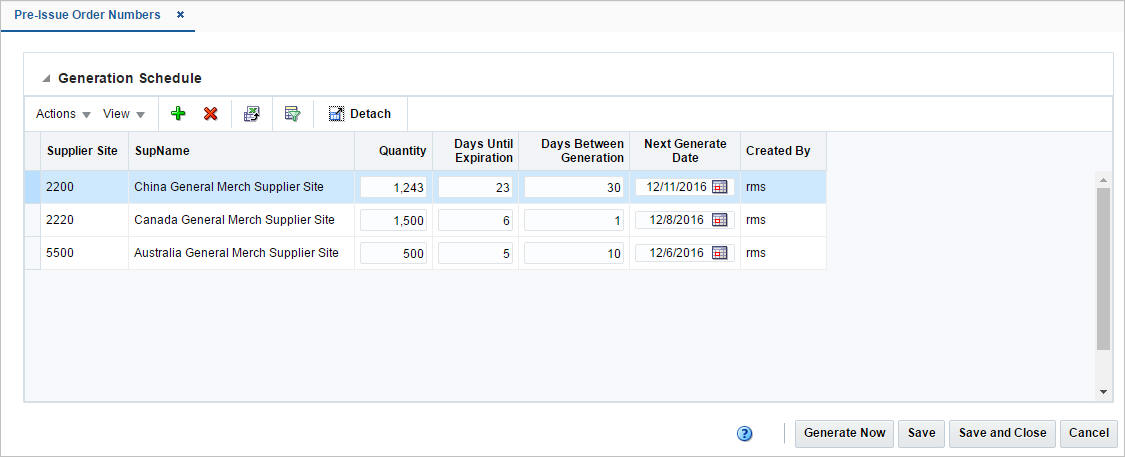
Generation Schedule Table
In the Generation Schedule table you can create or delete a schedule, to generate PO numbers by a batch program.
Creating a Schedule for Pre-Issue Order Numbers
To create a schedule to generate pre-issue order numbers, follow the steps below.
-
From the Tasks menu, select Orders > Pre-Issue Order Numbers. The Pre-Issue Order Numbers page opens.
-
To create a schedule to generate pre-issue order numbers, select Actions > Add or use the Add icon
 . The Add Generation Schedule page opens.
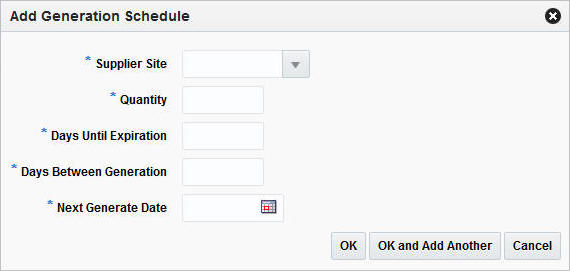
Figure 3-10 Add Generation Schedule Page
-
In the Supplier Site field, enter, select or search for the supplier site for which you want to create pre-issue order numbers.
-
In the Quantity field, enter the quantity of pre-issue order numbers you want to create.
-
In the Days Until Expiration field, enter the number of days that should elapse between the date each set of pre-issue order numbers is created and the date when the pre-issue order numbers expire.
-
In the Days Between Generation field, enter the days between one generation to the next.
-
In the Next Generate Date, enter the date when this set of pre-issue order numbers should be generated.
-
Click OK, to add the current schedule to the Generation Schedule section and exit the Add Generation Schedule page.
Click OK and Add Another to add the current schedule to the Generation Schedule section and create another schedule.
Click Cancel to reject all changes and exit the Add Generation Schedule page.
-
-
After you have entered the information for the pre-issue order numbers, you have the following options.
-
Click Save, to save the pre-issue order number schedule and/or pre-issue order number.
-
Click Save and Close, to save the pre-issue order number schedule and/or pre-issue order number and exit the Pre-Issue Order Numbers page.
-
Click Cancel, to reject all changes and exit the Pre-Issue Order Numbers page.
-
Generating Order Numbers
To generate a pre-issue order number immediately, follow the steps below.
-
From the Tasks menu, select Orders > Pre-Issue Order Numbers. The Pre-Issue Order Numbers page opens.
-
In the toolbar, click Generate Now. The Generate Order Numbers Now page opens.
-
In the Supplier Site field, enter, select or search for the supplier site you want to generate a pre-issue order number for.
-
In the Quantity field, enter the quantity of pre-issue order numbers you want to generate.
-
In the Days Until Expiration field, enter the number of days that should elapse between the date, the pre-issue order number is created and the date when the pre-issue order number expires.
-
After you have entered the required information, choose one of the following options.
-
Click OK, to add the pre-issue order number to the Generation Schedule section and exit the Generate Order Numbers Now page.
-
Click OK and Add Another, to add the pre-issue order number to the Generation Schedule section and create another pre-issue order number.
-
Click Cancel, to reject all changes and exit the Generate Order Numbers Now page.
-
-
-
After you have entered the information for the pre-issue order numbers, you have the following options.
-
Click Save, to save the pre-issue order number schedule and/or pre-issue order number.
-
Click Save and Close, to save the pre-issue order number schedule and/or pre-issue order number and exit the Pre-Issue Order Numbers page.
-
Click Cancel, to reject all changes and exit the Pre-Issue Order Numbers page.
-
Create a Customer Order
Note:
Customer Orders may only be created in Merchandising when the application is not configured to integrate with an external order management system.
To create an order for a customer, follow the steps below.
-
From the Tasks menu, select Orders > Create Order. The Create Order page opens.
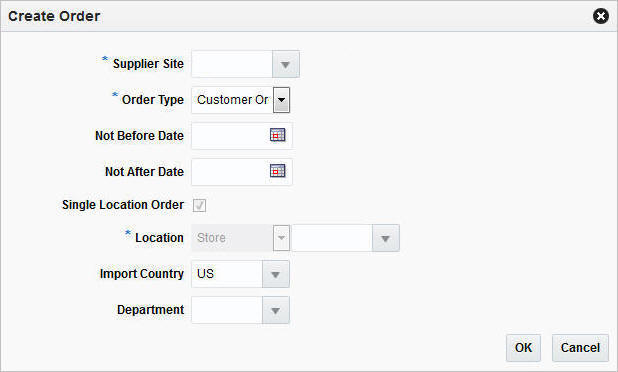
Figure 3-11 Create Order Page
-
In the Supplier Site field, enter, select or search for the supplier site. This field is required to create a purchase order.
-
In the Order Type field, select Customer Order.
-
In the Not Before Date field, enter the date before which the order deliveries are not expected, or use the Calendar icon to select a date.
-
In the Not After Date field, enter the date after which the order deliveries are not accepted, or use the Calendar icon to select a date.
-
The Single Location Order check box is checked by default, when you create a customer order. You cannot change this entry.
-
In the Location type field, the Location Type is set to Store by default, when you create a Customer Order. You cannot change the Location Type. Enter, select or search for the corresponding store location.
-
In the Import Country field, enter or select the import country.
Note:
The Import Country field is only available for import orders.
-
In the Department field, enter, select or search for the department.
-
After you have entered all information for the customer order, choose one of the following options.
-
Click OK to create the customer order and close the Create Order page. The Order page opens in a new tab. Enter the necessary order information. For more details about creating orders, see the Define/Enter a Purchase Order section. To add Customer Details, see the Customer Details section.
-
Click Cancel to reject all entries and close the Create Order page.
-
Customer Details
In the Customer Details page you can view, add or edit customer details for the created customer purchase order.
Customer Header
The Customer header section contains the following fields.
Table 3-2 Customer Header Section
| Field | Description |
|---|---|
|
Customer |
Enter the customer in this field. |
|
Customer Order |
This field contains the created Customer Order Number. The Customer Order will be the same as the Order Number of the Customer Order in Merchandising. |
|
Fulfillment |
This field contains the Fulfillment Number. The Fulfillment will be the same as the Order Number of the Customer Order in Merchandising. |
Billing Information
The Billing Information section contains the following fields. Enter the details for the billing information in this section.
Table 3-3 Billing Information Section
| Field/Button | Description |
|---|---|
|
Address |
Enter the billing address. This field is a required field. |
|
City |
Enter the city. This field is a required field. |
|
State |
Enter, select or search for the state. |
|
Postal Code |
Enter the postal code of the city. |
|
Country |
Enter, select or search for the country. This field is a required field. |
|
Jurisdiction |
Enter, select or search for the jurisdiction information. This further breaks down the tax rate if the location is different from the transaction location. |
|
First Name |
Enter the first name of the customer. |
|
Phonetic First Name |
Enter the customer's phonetic first name. |
|
Last Name |
Enter the last name of the customer. |
|
Phonetic Last Name |
Enter the customer's phonetic last name. |
|
Company |
Enter the company name. |
|
Preferred Name |
Enter the preferred name of the billing address. |
|
Phone |
Enter the phone number of the billing location. |
|
Copy from Billing Address |
The Copy from Billing Address button copies the Billing Address details to the Delivery Information section. |
Delivery Information
The Delivery Information section contains the following fields. Enter the details for the delivery information in this section.
Table 3-4 Delivery Information Section
| Field/Button | Description |
|---|---|
|
Address |
Enter the delivery address. This field is a required field. |
|
City |
Enter the city. This field is a required field. |
|
State |
Enter, select or search for the state. |
|
Postal Code |
Enter the postal code of the city. |
|
Country |
Enter, select or search for the country. This field is a required field. |
|
Jurisdiction |
Enter, select or search for the jurisdiction information. This further breaks down the tax rate if the location is different from the transaction location. |
|
First Name |
Enter the first name of the customer. |
|
Phonetic First Name |
Enter the customer's phonetic first name. |
|
Last Name |
Enter the last name of the customer. |
|
Phonetic Last Name |
Enter the customer's phonetic last name. |
|
Company |
Enter the company name. |
|
Preferred Name |
Enter the preferred name of the delivery address. |
|
Phone |
Enter the phone number of the delivery location. |
Other Information
The Other Information section contains the following fields. Enter additional delivery information in this section.
Table 3-5 Other Information Section
| Field | Description |
|---|---|
|
Partial Delivery |
This check box is unchecked by default. Note: You cannot change the value of the Partial Delivery field. This field is only enabled when the page is accessed from the Transfer page. |
|
Delivery Date |
Enter the delivery date or use the Calendar button to select a date. |
|
Delivery Time |
Enter or select the delivery time. |
|
Delivery Charge |
This field contains the sum of all charges associated with the delivery of the order. |
|
Currency |
Indicates the currency of the order. |
|
Delivery Type |
Indicates the delivery type of the order. |
|
Carrier Code |
Indicates the carrier the order is shipped with, if specified on the order. |
|
Carrier Service Code |
Indicates the method selected for shipping by the customer placing the order. For example, Standard Shipping, Overnight and so on. |
|
Comments |
Enter any comments or special instructions that you might want to capture against the customer order. For example, services. |
Maintaining Customer Details
To view, add or edit customer details follow the steps below.
-
From the More Actions menu of the Order page, select Customer. The Customer Details page opens.
-
Add, edit or view the customer details information.
For more information about how to maintain the customer details, see the Customer Details section.
-
After you have entered all necessary information, choose one of the following options from the Toolbar.
-
Click Save to save the entered customer details.
-
Click Save and Close to save the entered customer details and close the Customer Details page and return to the Order page.
-
Click Cancel to reject all entries and close the Customer Details page and return to the Order page.
-